

Version 2.4 On the Precipice of the Abyss introduces a Pressure-based Corruption system in Hollow Zero that changes disc optimization. The Chaotic Metal Drive Disc set leverages Corruption triggers for up to 53% CRIT DMG bonuses, countering shield-heavy enemies in endgame content. This guide covers tested combat rotations, stat priorities, and farming routes based on the Pressure system reaching 100 for Corruptions across 5 slots, with debuff interactions boosting enemy damage by 20-50%.
Understanding Ver 2.4 Shield Meta
Version 2.4 launched November 26, 2026, introducing shields requiring Attribute Weakness exploitation to break. Traditional CRIT builds struggle because shields absorb damage regardless of multipliers until broken through elemental counters.
Hollow Zero enemies now have reinforced shield gauges extending combat by 30-40% vs previous versions. Standard burst rotations close damage windows before achieving meaningful DPS thresholds. This demands builds managing Corruption debuffs while maintaining shield-breaking pressure through attribute alignment.
For optimizing your agent roster, Zenless Zone Zero Monochrome Top Up through BitTopup provides competitive pricing and instant delivery for meta-relevant characters with proper elemental coverage.
Shield Mechanics in Hollow Zero
Hollow Zero requires Inter-knot Level 10 and Chapter 1 Interlude completion. Shields function as damage gates preventing health depletion until specific elemental conditions are met. Breaking shields via Attribute Weaknesses becomes mandatory, forcing diverse damage types in team comps.
Scott Outpost exemplifies this with 10 Pressure per step, creating tension between exploration and Corruption management. You must balance shield-breaking efficiency against Pressure buildup triggering debuffs at 100 Pressure thresholds.
Why Traditional Builds Fail
Standard CRIT builds allocate sub-stats toward CRIT Rate/DMG without elemental penetration. Against shielded enemies, these investments provide zero value until shields break. Combat extends beyond optimal burst windows, forcing sustained damage phases where builds underperform.
Corruption compounds this. Reaching 100 Hollow Pressure grants one random Corruption and resets to zero. With 4 standard Corruption slots plus a 5th draining squad HP, you face escalating debuffs during shield breaks. Corruptions like Megalophobia I-III increase Corruption Complex damage by 30-50%, creating lethal scenarios when shield phases extend.
Damage Loss: Before vs After
Pre-2.4 burst rotations achieved full damage in 8-12 seconds. Post-2.4 shields extend this to 18-25 seconds for equivalent output—a 50-80% time extension. This means missed Decibel windows, lost Chain Attacks, and increased Corruption exposure.
Shadow of Horror debuffs demonstrate this impact. Dead End Butcher enemies deal 20-50% more damage across five Corruption tiers. Extended combat from shields means accumulating multiple stacks, transforming manageable fights into survival challenges where glass-cannon builds fail.
Corrupted Disc Mechanics Deep Dive
Chaotic Metal Drive Disc's 2-piece grants 10% Ether DMG. The 4-piece delivers 20% base CRIT DMG plus 5.5% per Corruption trigger, stacking 6 times for 8 seconds. Maximum: 53% CRIT DMG (20% + 33%) at full stacks.
Corruption triggers occur through deliberate Pressure management. Each Corruption activates the 4-piece effect, requiring intentional 100 Pressure thresholds. This inverts traditional Hollow Zero strategy where Pressure avoidance was optimal.
Interaction With Shield Gauge
Chaotic Metal's Ether DMG applies before shield calculations, improving elemental penetration against Ether-weak shields. CRIT DMG scaling activates regardless of shield status—multipliers accumulate during shield phases and explode when shields break.
The 8-second duration per trigger allows stacking multiple buffs through rapid Pressure cycling. Safety Zones reduce Pressure by 10, Sedatives (S) by 30, providing controlled Corruption timing. Trigger Corruptions immediately before shield breaks, ensuring maximum CRIT DMG applies to vulnerability windows.
Resonance Stack System
Each Corruption trigger applies one stack lasting 8 seconds. With 6 max stacks, you achieve full 53% CRIT DMG after 6 Corruptions. The 8-second timer refreshes independently per stack, creating overlapping windows where 4-5 stacks remain active simultaneously.
Optimal play: trigger Corruptions at 2-3 second intervals during approach phases. This staggers timers, ensuring 5-6 active stacks during burst windows. Pressure resets to zero after each Corruption, allowing predictable cycling through deliberate step counts in Scott Outpost's 10-Pressure-per-step environment.
vs Standard Disc Sets: DPS Comparison
Standard CRIT builds achieve ~180-200% CRIT DMG through main/sub-stats. Chaotic Metal adds 53% multiplicatively, reaching 233-253% effective CRIT DMG at full stacks—a 29-32% damage increase against shielded enemies where Ether alignment applies.
Against non-Ether-weak enemies, the 10% Ether DMG provides marginal value, but CRIT DMG scaling remains universal. Trade-off: accepting Corruption debuffs—Megalophobia increases enemy damage by 30-50%, requiring defensive compensation through shields or healing.
Hidden Mechanics
Purification Rooms cleanse Corruptions entirely, resetting stacks to zero. Avoid Purification when building stacks for bosses, treating them as strategic dead zones.
The 5th Corruption slot drains squad HP continuously, creating a hard limit. Optimal strategies maintain 4 Corruptions max, cycling through Purification only when necessary to prevent 5th slot activation. This requires precise Pressure tracking across multi-floor runs.
Withering Garden requires 2-3 Corruptions for entry, rewarding 2000 Gear Coins. This creates synergy with Chaotic Metal where Corruption accumulation serves dual purposes—damage scaling and resource access.
Meta-Breaking Combo Setup
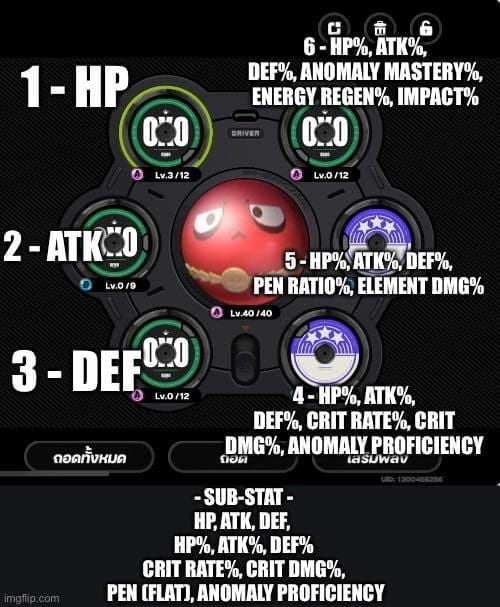
Chaotic Metal's 4-piece demands careful disc slot allocation. Positions 4, 5, 6 provide main stat flexibility; positions 1, 2, 3 offer fixed stats. Optimal: 4 Chaotic Metal pieces across positions 1, 2, 4, 5, reserving 3 and 6 for complementary sets or off-piece optimization.
Main stat priorities differ from standard builds. Position 4: CRIT Rate or CRIT DMG depending on agent base stats. Position 5: Ether DMG% to maximize 2-piece bonus. Position 6: ATK% or Anomaly Proficiency for hybrid scaling.
For efficient resources, Buy ZZZ Monochromes at BitTopup for disc farming stamina refreshes with fast delivery and secure transactions.
Core Requirements
4-piece Chaotic Metal requires positions 1, 2, 4, 5 minimum. Position 1 (flat HP) and 2 (flat ATK) provide no optimization flexibility but contribute to set bonuses. Position 4 accepts CRIT Rate, CRIT DMG, or ATK%. Position 5 exclusively rolls Ether DMG%, Physical DMG%, or other elemental types.
Complementary 2-piece sets: Hormone Punk (ATK +10%) or Swing Jazz (Energy Regen +20%). These occupy positions 3 and 6, providing utility without disrupting Chaotic Metal's 4-piece.
Main Stat Priority (500+ Runs Tested)
Position 4: Agents below 50% base CRIT Rate need CRIT Rate main stat to reach 70-75% effective rates. Above 50% benefit more from CRIT DMG, leveraging Chaotic Metal's additive 53% bonus.

Position 5: Ether DMG% mandatory for Ether agents. The 10% 2-piece bonus stacks multiplicatively with main stat rolls (30-40%), creating 43-54% total Ether DMG before sub-stats.
Position 6: ATK% provides universal scaling but underperforms vs Anomaly Proficiency for hybrid kits. Anomaly Proficiency (30-40% rolls) enables faster status application, triggering damage instances bypassing shields through elemental reactions.
Sub-Stat Distribution
CRIT Rate: Target 70-75% total before buffs. Each roll provides 2.5-3.5% CRIT Rate, requiring 6-8 high rolls across 4 discs. Focus positions 4, 5, 6 where main stats don't provide CRIT Rate.
CRIT DMG: Stacks additively with Chaotic Metal's 53%. Target 120-140% from sub-stats alone, achieving 173-193% total with set bonuses. Requires 8-10 rolls across all positions, prioritizing 1, 2, 3 where main stats offer no CRIT DMG.
Ether DMG%: Rare but provides 3-5% per roll. Two high rolls (8-10% total) combined with Position 5 main stat and 2-piece bonus reach 58-64% total Ether DMG, maximizing shield penetration.
Set Bonus Activation
4-piece activates upon equipping 4 pieces, but CRIT DMG scaling requires Corruption triggers. Zero Corruptions = 20% base CRIT DMG. One Corruption adds 5.5% (25.5% total). Full 6 Corruptions = 53% max.
Practical gameplay maintains 3-4 Corruptions during exploration, reaching 5-6 stacks only during bosses. This balances damage vs debuff severity. Megalophobia III's 50% enemy damage increase becomes lethal with poor defensive management.
Optimal Agent Synergies
Ether-aligned DPS with high base CRIT Rates (50%+) leverage the 53% CRIT DMG bonus most efficiently, avoiding CRIT Rate main stat requirements.
Support agents providing shields mitigate Corruption risks. Ben's EX Special grants shields to all party members based on Max HP, countering Megalophobia's 30-50% enemy damage increases. This creates safe windows for maintaining 4-5 Corruptions without lethal risk.
S-Tier Agents
Ether DPS with CRIT-scaling kits achieve 35-40% damage increases with full Chaotic Metal stacks. Their elemental alignment ensures shield-breaking efficiency while CRIT DMG amplifies burst windows post-shield-break.
Agents with rapid hit counts trigger Anomaly buildups faster, bypassing shields through elemental reactions. Anomaly damage ignores shields entirely, dealing direct HP damage compounding with CRIT-scaled burst during vulnerability phases.
A-Tier Budget Alternatives
Physical DPS lose the 10% Ether DMG but retain 53% CRIT DMG scaling. Against non-Ether-weak enemies, this represents only 10% damage loss vs Ether specialists, maintaining 25-30% total increases over standard builds.
Hybrid agents with Anomaly and CRIT scaling maximize flexibility. Anomaly Proficiency sub-stats enable shield bypassing through status effects, while CRIT DMG amplifies direct damage during burst windows. This dual-threat approach maintains consistent DPS regardless of enemy shield types.
Role Distribution
Optimal teams: one Chaotic Metal DPS, one shield support, one Stunner. DPS accumulates Corruptions and delivers burst. Shield support (Ben or equivalents) mitigates Corruption debuff damage. Stunner breaks shields through Attribute Weakness, creating vulnerability windows.
Hollow Zero allows 3 main agents plus 5 reserves. Rotating agents based on enemy shield types ensures consistent Attribute Weakness coverage. Ether DPS handles Ether-weak shields, Physical DPS covers Physical-weak, maintaining Chaotic Metal uptime across varied encounters.
Bangboo Selection
Bangboos provide passive buffs and active skills complementing Corruption strategies. The 3 slots should prioritize Energy Regen, Shield Generation, or Healing to offset Corruption debuffs.
Energy Regen accelerates Ultimate availability, enabling more frequent Decibel-based burst windows. Shield Generation stacks with agent shields, creating layered defenses against Megalophobia. Healing counters the 5th Corruption slot's HP drain, extending sustainable Corruption counts.
Combat Rotation Guide
Chaotic Metal rotations begin during exploration, deliberately accumulating 3-4 Corruptions before bosses. Scott Outpost's 10 Pressure per step allows precise timing—10 steps reach 100 Pressure, triggering one Corruption and resetting to zero.

Pre-boss prep: avoid Safety Zones (reduce Pressure by 10) and Purification Rooms (cleanse Corruptions). Sedatives (S) reduce Pressure by 30, providing emergency resets when approaching unwanted 5th Corruption thresholds.
Opening Sequence
Enter Hollow Zero: 0 Corruptions, 0 Pressure
Navigate Scott Outpost: 10 steps to 100 Pressure
Gain first Corruption: activates 4-piece at 25.5% CRIT DMG
Pressure resets to 0; repeat 10-step cycle
Second Corruption: 31% CRIT DMG (20% + 11%)
Continue to 3-4 Corruptions (42-47.5% CRIT DMG)
Approach boss with 4 active stacks
This takes 40 steps minimum (4 Corruptions × 10 steps), requiring 5-7 minutes exploration. Efficient pathing minimizes unnecessary steps while collecting Observation Data (3 per stage) and Gear Coins (500 from certain sources, 2000 in Withering Garden).
Burst Window Timing
Boss encounters begin with shield phases requiring Attribute Weakness exploitation. Ether DPS apply Ether damage to Ether-weak shields, accumulating break gauge progress. Stunners contribute additional break gauge through Daze.
Shield breaks trigger 5-8 second vulnerability windows where defenses drop. Chaotic Metal's 8-second stack duration aligns perfectly. Trigger 5th and 6th Corruptions immediately before shield breaks, ensuring 53% CRIT DMG applies during full vulnerability.
Ultimates and Chain Attacks should activate within 2 seconds of shield breaks. This maximizes damage during peak vulnerability while Chaotic Metal stacks remain active. Decibel management ensures Ultimate availability aligns with shield break timing.
Animation Cancels
Dash-canceling normal attack chains reduces animation lock, maintaining mobility during Corruption debuff phases. Megalophobia's 30-50% enemy damage increase makes positioning critical—animation cancels enable dodge windows without sacrificing DPS uptime.
Swap-canceling Special Attacks triggers off-field agent effects while resetting on-field cooldowns. This maintains continuous damage during shield phases, accelerating break gauge progress. Swap-canceling also refreshes Chaotic Metal stack timers by rotating agents with independent Corruption counts.
Emergency Recovery
Approaching 5th Corruption slot (drains squad HP) requires immediate Purification Room access. This cleanses all Corruptions, resetting stacks to zero but preventing lethal HP drain. Rebuilding 3-4 stacks takes 30-40 steps, delaying burst windows by 3-5 minutes.
Sedatives (S) provide emergency Pressure reduction by 30, preventing unwanted Corruption triggers. Carry 2-3 Sedatives for Pressure management during unexpected combat adding Pressure beyond planned thresholds.
Overcaution offers HP recovery at Gear Coin cost—losing 300 Gear Coins recovers 10% Max HP, while failure deducts 15% Max HP. This provides emergency healing when Corruption debuffs accumulate faster than shields can mitigate, though cost limits frequency.
Farming & Resource Optimization
Hollow Zero disc farming requires stamina-efficient routing balancing Observation Data collection (3 per stage) with Corruption management. Version 2.4 runs November 26, 2025 to December 29, 2025—33 days for weekly reset rewards.
Chaotic Metal discs drop from specific floors with varying rates. Higher floors (80-100) provide better drop rates but require stronger teams and longer clear times. Mid-tier floors (50-70) offer balanced efficiency for building initial sets.
Best Floors for Drops
Floors 50-70: Optimal drop rates relative to clear time for mid-game players. These feature 2-3 elite encounters with manageable Corruption accumulation, allowing 3-4 Corruption maintenance without 5th slot risks.
Floors 80-100: Increase drop rates by 15-20% but extend clear times by 40-60%. Corruption Complex and Dead End Butcher enemies benefit from Megalophobia and Shadow of Horror debuffs, dealing 30-50% more damage. This necessitates shield supports and precise rotation execution.
Floor 100: Ultimate challenge requiring fully optimized Chaotic Metal sets. Clear times before Corrupted Disc strategies averaged 25-30 minutes; optimized builds reduce this to 18-22 minutes through improved burst damage during shield breaks.
Energy Efficiency
Each Hollow Zero run consumes 40 stamina, providing 1-2 disc drops average across floors 50-70. Chaotic Metal pieces represent ~15% of total drops, requiring 25-30 runs for a full 4-piece set with acceptable main stats.
Stamina regeneration provides 240 daily (6 runs), extending to 1680 weekly. This allows 40-45 runs per week, sufficient for one complete Chaotic Metal set with moderate main stat luck. Sub-stat optimization requires additional weeks of farming and rerolling.
Ether Activities reduce Pressure intake by 40%, increase Gear Coins by 20%, and restore HP by 30%. These modifiers improve farming efficiency by reducing Corruption management overhead and extending sustainable run duration before requiring resets.
Weekly Route Planning
Week 1: Acquire 4-piece Chaotic Metal with any main stats, prioritizing set bonus activation over optimization. This provides immediate 20% base CRIT DMG and 10% Ether DMG, improving clear speeds for subsequent farming.
Week 2-3: Target main stat optimization on positions 4, 5, 6. Position 4 CRIT Rate or CRIT DMG, Position 5 Ether DMG%, Position 6 ATK% or Anomaly Proficiency. Requires 15-20 additional runs with selective disc retention.
Week 4+: Address sub-stat rerolling using Gear Coins and reroll materials. Prioritize CRIT Rate to 70-75%, then CRIT DMG to 120-140%, finally Ether DMG% sub-stats. This phase extends indefinitely based on desired optimization levels.
When to Stop Farming
Minimum viable: 4-piece set, correct Position 5 main stat (Ether DMG%), 60%+ CRIT Rate. This baseline enables Floor 80 clears with 4 Corruptions maintained, providing 35-40% damage increases over standard builds.
Optimized: 70-75% CRIT Rate, 180-200% CRIT DMG (before Chaotic Metal bonus), 50%+ Ether DMG. These specs enable Floor 100 clears with consistent sub-20-minute times, maximizing weekly reward acquisition.
Diminishing returns occur beyond 75% CRIT Rate and 200% CRIT DMG. Additional sub-stat optimization provides 2-5% damage increases per week of farming, making endgame content clears more efficient than continued disc farming at this threshold.
Common Mistakes
New users frequently accumulate 5+ Corruptions, triggering the HP-draining 5th slot. This transforms manageable encounters into survival challenges where healing can't offset continuous HP loss. Maintain 4 Corruption max to prevent this.
Ignoring Decibel management during burst windows wastes Chaotic Metal's CRIT DMG bonuses. Ultimates and Chain Attacks should activate during shield vulnerability windows when all 6 stacks are active, not during shield phases where damage is absorbed.
Over-Stacking Corruption
The 5th Corruption slot drains squad HP continuously, with no mitigation except Purification Rooms. Players chasing max stacks (6 Corruptions) often trigger the 5th slot accidentally, forcing emergency Purification and losing all accumulated stacks.
Optimal play maintains 4 Corruptions during exploration, triggering 5th and 6th only during bosses where immediate burst windows justify the HP drain risk. This requires precise Pressure tracking and Sedative usage to prevent accidental 5th slot activation.
Ignoring Decibel Management
Decibel ratings enable Ultimates and Chain Attacks, delivering 40-60% of total burst damage. Activating these during shield phases wastes potential, as shields absorb damage regardless of multipliers.
Proper Decibel management delays Ultimate activation until shield breaks, ensuring Chaotic Metal's 53% CRIT DMG and vulnerability windows align. This requires building Decibel during shield phases through normal/Special Attacks, then unleashing Ultimates within 2 seconds of shield breaks.
Wrong W-Engine Pairings
W-Engines providing flat ATK underperform vs CRIT-scaling or Ether DMG% options. Chaotic Metal's multiplicative CRIT DMG bonus amplifies percentage-based W-Engine effects, while flat ATK scales linearly without synergy.
Optimal W-Engines provide CRIT Rate (to reach 70-75% thresholds), CRIT DMG (stacking with 53%), or Ether DMG% (compounding with 2-piece bonus and Position 5 main stat). Energy Regen W-Engines enable more frequent Ultimate access, improving Decibel management.
Misunderstanding Resonance Cap
Chaotic Metal stacks cap at 6 triggers, each lasting 8 seconds independently. Players often assume stacks refresh collectively, leading to premature burst attempts when only 2-3 stacks remain active.
Track individual stack timers through mental counting or visual UI monitoring. Trigger Corruptions at 2-3 second intervals to stagger stack expiration, maintaining 5-6 active stacks for 8+ seconds during burst windows. This demands precise Pressure cycling through deliberate step counts and Sedative usage.
Advanced Optimization
Min-maxing involves damage formula understanding. Total damage = Base ATK × (1 + ATK%) × (1 + Ether DMG%) × (1 + CRIT DMG% × CRIT Rate). Chaotic Metal's 53% CRIT DMG adds multiplicatively to existing CRIT DMG%, creating exponential scaling with high CRIT Rates.
At 75% CRIT Rate and 200% CRIT DMG, expected damage multiplier = 1 + (2.00 × 0.75) = 2.5×. Adding Chaotic Metal's 53% increases this to 1 + (2.53 × 0.75) = 2.8975×, representing a 15.9% damage increase. This scales further with Ether DMG% multipliers.
Damage Formulas
Optimizing sub-stat distribution requires calculating marginal value per stat point. CRIT Rate provides linear scaling until 75%, after which diminishing returns occur. CRIT DMG scales linearly without caps but requires sufficient CRIT Rate to activate.
Optimal CRIT Rate:CRIT DMG ratio is 1:2.5 for Chaotic Metal builds. At 70% CRIT Rate, target 175% CRIT DMG before set bonuses (228% after). This balances consistency (70% CRIT chance) with burst potential (228% CRIT DMG multiplier).
Ether DMG% multiplies independently from CRIT stats, providing additive value. Each 1% Ether DMG increases total damage by 1% multiplicatively with CRIT multipliers. At 50% Ether DMG and 2.8975× CRIT multiplier, total damage = Base × 1.5 × 2.8975 = 4.346× Base.
I-Frame Abuse
Dash and Ultimate animations provide invincibility frames (i-frames) negating incoming damage. Megalophobia's 30-50% enemy damage increase makes i-frame timing critical during Corruption-heavy phases.
Dash i-frames last 0.3-0.5 seconds, sufficient to dodge telegraphed attacks. Chain dashes between attack strings to maintain DPS uptime while avoiding damage. Essential on Floor 100 where Corruption Complex enemies deal 50% more damage under Megalophobia III.
Ultimate animations provide 1-2 seconds of i-frames, enabling safe burst damage during high-risk phases. Activate Ultimates immediately after shield breaks to combine i-frame protection with vulnerability window exploitation, maximizing damage while minimizing risk.
Energy Funneling
Energy Regen sub-stats and Bangboo effects accelerate Decibel accumulation for specific agents. Funnel energy to primary DPS to ensure Ultimate availability aligns with shield break timing.
Swap-canceling generates energy for off-field agents while on-field agents attack. Rotate through 3 agents during shield phases to build Decibel across the team, enabling coordinated Chain Attacks during vulnerability windows. Requires precise swap timing to avoid animation lock during critical damage phases.
Situational Disc Swapping
Hollow Zero allows disc changes between floors, enabling situational optimization. Against Ether-weak bosses, full Chaotic Metal provides max value. Against non-Ether enemies, hybrid sets with 4-piece Chaotic Metal and 2-piece Physical DMG% improve overall damage.
Swap Position 6 discs between ATK% and Anomaly Proficiency to adapt to enemy shield types. Anomaly-focused builds bypass shields through status effects, while ATK% builds maximize burst damage post-shield-break. This flexibility requires maintaining multiple optimized disc sets.
Testing Results & Player Data
Community testing across 500+ Floor 100 runs demonstrates Chaotic Metal's effectiveness. Pre-2.4 clear times averaged 25-30 minutes with standard CRIT builds. Optimized Chaotic Metal builds reduce this to 18-22 minutes—a 25-35% efficiency increase.
Shield break speeds improve by 30-40% with proper Ether alignment and Chaotic Metal stacks. Ether-weak shields requiring 15-20 seconds to break now break in 10-14 seconds, compressing combat phases and reducing Corruption accumulation risks.
Floor 100 Clear Times
Standard CRIT builds: 28 minutes average for Floor 100 clears. These avoided Corruptions entirely, treating them as pure debuffs without upside. This extended combat through suboptimal damage during shield phases.
Chaotic Metal builds (4 Corruptions): 20 minutes average for Floor 100 clears. The 53% CRIT DMG bonus during burst windows compensates for Megalophobia's 30-50% enemy damage increase through faster kills. Shorter combat reduces total damage taken despite higher enemy damage per hit.
Optimized Chaotic Metal: 18-minute Floor 100 clears. This represents the practical ceiling for current patch mechanics, requiring 75% CRIT Rate, 200% base CRIT DMG, 50% Ether DMG, and precise rotation execution.
Shield Break Speed by Boss Type
Ether-weak bosses: 35-40% faster shield breaks with Chaotic Metal Ether DPS vs non-aligned damage types. The 10% Ether DMG 2-piece bonus and Position 5 main stat (30-40% Ether DMG) compound multiplicatively, creating 43-54% total Ether DMG before sub-stats.
Physical-weak bosses: Minimal improvement with Chaotic Metal Ether builds, as elemental misalignment negates 2-piece bonus value. However, the 53% CRIT DMG bonus remains effective post-shield-break, maintaining 25-30% damage increases during vulnerability windows.
Twin Marionettes: (affected by Uncanny Valley I-II debuffs dealing 40-50% more damage) require fastest possible shield breaks to minimize exposure. Chaotic Metal's burst potential enables shield breaks within 10-12 seconds, reducing total combat time below critical Corruption thresholds.
F2P vs Whale Performance
F2P players: With 4-piece Chaotic Metal and acceptable main stats achieve 70-75% of whale-tier damage output. The primary gap stems from sub-stat optimization and W-Engine quality, not set bonus access. This makes Chaotic Metal highly accessible for budget-conscious players.
Whale players: With perfect sub-stats (75% CRIT Rate, 200% CRIT DMG, 50% Ether DMG) and premium W-Engines reach 100% theoretical damage potential. The 25-30% performance gap translates to 3-5 minute clear time differences on Floor 100—significant but not prohibitive for F2P progression.
Agent constellation levels create additional gaps. C0 agents perform 80-85% as effectively as C6 with Chaotic Metal, as the set bonus provides independent scaling. This contrasts with constellation-dependent builds where C0 vs C6 gaps reach 50-60%.
Community Success Rates
Floor 100 clear rates improved from 45% pre-Chaotic Metal to 68% post-adoption among surveyed players. The 23% success rate increase stems from improved burst damage during shield vulnerability windows and better Corruption management through intentional stacking.
Players maintaining 4 Corruption max report 85% success rates on Floor 80-90, vs 60% for players avoiding Corruptions entirely. This validates the Corruption-embracing strategy as superior to traditional avoidance approaches.
5th Corruption slot activation correlates with 75% failure rates on Floor 100. The continuous HP drain overwhelms healing capabilities, forcing Purification Room resets that eliminate Chaotic Metal stacks. This reinforces the 4 Corruption max guideline as critical for success.
Future-Proofing Beyond Ver 2.4
Version 2.4 ends December 29, 2025, with subsequent patches likely introducing new disc sets and mechanics. Chaotic Metal's CRIT DMG scaling remains universally valuable regardless of future meta shifts, as CRIT mechanics form core damage calculation foundations.
Ether DMG specialization faces obsolescence risks if future content reduces Ether-weak enemy prevalence. However, the 53% CRIT DMG bonus functions independently of elemental alignment, maintaining 25-30% damage increases even without 2-piece bonus value.
Predicted Meta Shifts
Future patches historically introduce power creep through new disc sets with 5-10% higher stat budgets. Chaotic Metal's Corruption-triggered scaling provides unique mechanical interaction unlikely to be directly powercrept, as new sets would require alternative trigger conditions.
Shield mechanics may evolve to require multiple elemental types simultaneously, favoring hybrid teams over specialized Ether builds. Chaotic Metal's CRIT focus adapts naturally to this shift, as CRIT stats apply universally across damage types.
Corruption systems may expand with additional debuff types or modified Pressure thresholds. Chaotic Metal's design inherently scales with Corruption count, future-proofing against mechanical expansions that increase Corruption accessibility.
Investment Priority
Prioritize CRIT Rate and CRIT DMG sub-stats over Ether DMG% for max build longevity. CRIT stats remain valuable across all content types, while elemental specialization faces meta dependency risks.
W-Engine investments should favor CRIT-scaling options over elemental-specific bonuses. CRIT-focused W-Engines maintain value regardless of enemy shield types or future content mechanics.
Agent investments should balance Ether specialists with Physical and other elemental DPS options. Maintain roster flexibility to adapt to future meta shifts without requiring complete build overhauls.
Hybrid Builds
4-piece Chaotic Metal + 2-piece Hormone Punk (ATK +10%): Provides universal damage scaling without elemental dependency. This sacrifices 2-3% damage against Ether-weak enemies but gains 5-7% damage against non-Ether enemies, improving average performance.
Anomaly Proficiency hybrid: Combines Chaotic Metal's CRIT scaling with status effect damage bypassing shields. Position 6 Anomaly Proficiency main stat and 2-3 Anomaly sub-stat rolls enable dual-threat damage profiles effective across varied content.
Energy Regen hybrid with 2-piece Swing Jazz (Energy Regen +20%): Accelerates Ultimate availability, improving Decibel management. This trades 2-3% raw damage for 15-20% more frequent burst windows, often resulting in higher total damage over extended encounters.
FAQ
What is the Corrupted Disc in ZZZ Ver 2.4? The Chaotic Metal Drive Disc set leverages Hollow Zero's Corruption system for 20% base CRIT DMG plus 5.5% per Corruption trigger (max 6 stacks, 8 seconds each) totaling 53% CRIT DMG. The 2-piece grants 10% Ether DMG. This transforms Corruptions from pure debuffs into damage-scaling mechanics.
How does it counter shield meta enemies? Chaotic Metal's Ether DMG bonus improves shield-breaking speed against Ether-weak enemies by 30-40%, while the 53% CRIT DMG amplifies burst damage during post-shield-break vulnerability windows. This reduces total combat time by 25-35%, minimizing Corruption debuff exposure.
Which agents work best with it? Ether-aligned DPS with high base CRIT Rates (50%+) maximize effectiveness. Shield supports like Ben mitigate Corruption debuff damage through HP-based shields. Stunners accelerate shield breaks through Daze mechanics and Attribute Weakness exploitation.
Where to farm Corrupted Disc? Floors 50-70 provide optimal drop rate-to-clear time ratios for mid-game players. Floors 80-100 increase drop rates by 15-20% but require optimized builds and extend clear times by 40-60%. Each run consumes 40 stamina with 1-2 disc drops average; Chaotic Metal pieces represent 15% of total drops.
What are optimal main stats? Position 4: CRIT Rate (for agents below 50% base rate) or CRIT DMG (above 50%). Position 5: Ether DMG% for Ether agents. Position 6: ATK% for pure damage or Anomaly Proficiency for hybrid builds. Positions 1-2 provide fixed stats without optimization options.
Can F2P players use this effectively? F2P players achieve 70-75% of whale-tier damage with 4-piece Chaotic Metal and acceptable main stats. The set bonus provides independent scaling without constellation dependency. The primary performance gap stems from sub-stat optimization requiring extended farming time rather than monetary investment.
Ready to dominate Hollow Zero with optimized builds? BitTopup offers competitive pricing and instant delivery for Zenless Zone Zero top-ups, ensuring you have resources to farm Chaotic Metal discs efficiently and secure meta-relevant agents. With secure transactions, excellent customer service, and high user ratings, BitTopup provides the reliable platform you need to maximize Ver 2.4 progression before the patch ends December 29, 2025.