

The Viridescent Venerer 4-piece set provides 60% Swirl DMG increase and 40% Elemental RES shred for 10 seconds, making it essential for Anemo supports like Kazuha, Sucrose, and Venti who maximize team damage through resistance reduction.
Look, I've been covering Genshin builds for years now, and if there's one artifact set that consistently separates good players from great ones, it's Viridescent Venerer. This isn't just another nice to have set bonus—it's the difference between tickling enemies and absolutely melting them.
Understanding Viridescent Venerer 4-Piece Set Effect
Set Bonus Breakdown
Here's what you're getting with the full 4-piece: +15% Anemo DMG from the 2-piece, then the real magic happens. That 4-piece bonus delivers 60% Swirl DMG increase and—this is the big one—40% Elemental RES reduction for 10 seconds.

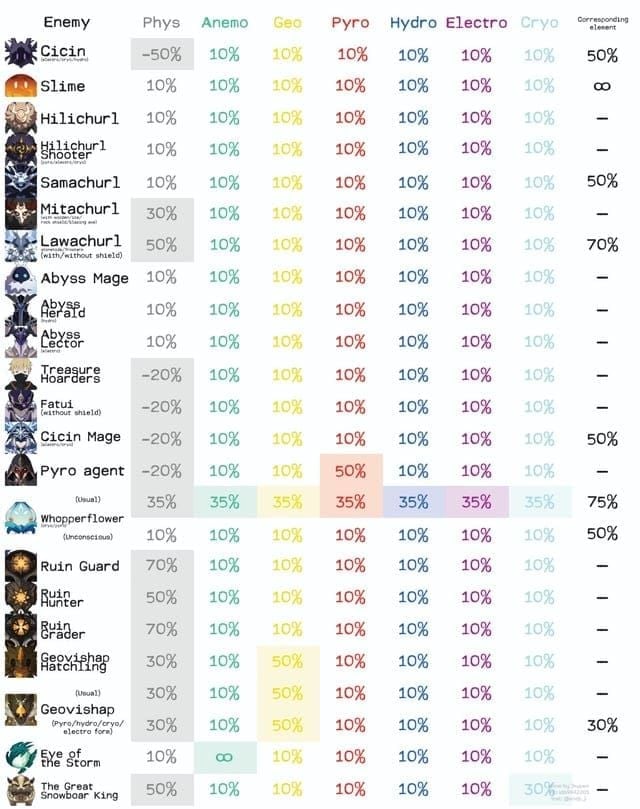
The resistance shred works on Pyro, Hydro, Electro, and Cryo elements that get swirled. Pretty versatile, right? Against your typical enemy with 10% base resistance, you're looking at -30% final resistance. That translates to roughly 30% more damage for your entire team. Not bad for switching characters and pressing one button.
For Genesis Crystals best price options, BitTopup provides excellent value for artifact farming refreshes with competitive pricing and instant delivery.
Resistance Shred Mechanics
Here's where things get technical (and where a lot of players mess up). The character wearing 4-piece VV absolutely must be on-field when that Swirl reaction triggers. I can't tell you how many times I've seen players wonder why their resistance shred isn't working—they're swirling off-field.
The math gets weird when enemies drop below 0% resistance. Once you hit negative territory, the shred effectiveness gets halved for that portion. So if an enemy has 10% resistance and you apply 40% shred, you end up with -15% final resistance (10% - 10% - 30%÷2). It's not intuitive, but that's HoYoverse for you.
Good news though—that 40% resistance shred lasts a full 10 seconds and refreshes with each application. Multiple VV users can't stack shred for the same element (that would be broken), but they can absolutely shred different elements at once.
How Resistance Shred Works in Genshin Impact
Damage Calculation Impact
This is where VV really shines. Resistance shred operates as a multiplicative damage modifier in the final calculation stage, which means it affects everything your team does to that enemy.
The damage increases vary wildly by enemy type:
Standard enemies (10% base resistance): ~30% damage boost
Tanky enemies (50% base resistance): ~90% damage increase
Those annoying immune enemies (100% base resistance): You can actually hurt them now
One thing that trips up newer players—elemental absorption has a strict priority system: Pyro > Hydro > Electro > Cryo. But here's the thing: understanding this priority lets you pull off Double Swirl techniques. You can manipulate which elements get applied when to shred multiple resistances in one rotation. It's advanced stuff, but incredibly satisfying when you nail it.
Best Characters for Viridescent Venerer 4-Piece
S-Tier VV Users
Kazuha is honestly in a league of his own here. Guy's got crowd control, his A4 passive gives teammates elemental damage bonuses based on his EM, and he makes Swirl application look effortless.

There's a reason he's been meta since his release.
Sucrose remains the best 4-star option, no contest. Her crowd control is solid, she shares EM through her passives, and she can trigger multiple Swirls in quick succession. Plus, she's way more accessible than Kazuha for most players.
Venti used to be the undisputed king of VV users. His crowd control is still unmatched—that vortex groups enemies like nothing else while maintaining constant Swirl reactions. The catch? He struggles against heavier enemies that can't be pulled. Still incredible in the right situations though.
For cheap Genesis Crystal bundles, BitTopup offers cost-effective solutions for character acquisition featuring secure transactions and 24/7 customer support.
Characters to Avoid
Xiao and Wanderer are the obvious ones to skip. They're hypercarries who want to deal personal Anemo damage, not support the team through Swirl reactions. Sure, they can use the 2-piece for +15% Anemo DMG, but slapping a 4-piece VV on them is like using a Ferrari as a grocery cart—technically possible, but you're missing the point entirely.
Optimal Artifact Stats and Substats
Main Stat Priorities
For support Anemo characters, go full EM. EM on Sands, EM on Goblet, EM on Circlet. This maximizes your Swirl damage and any EM-scaling abilities your character might have.
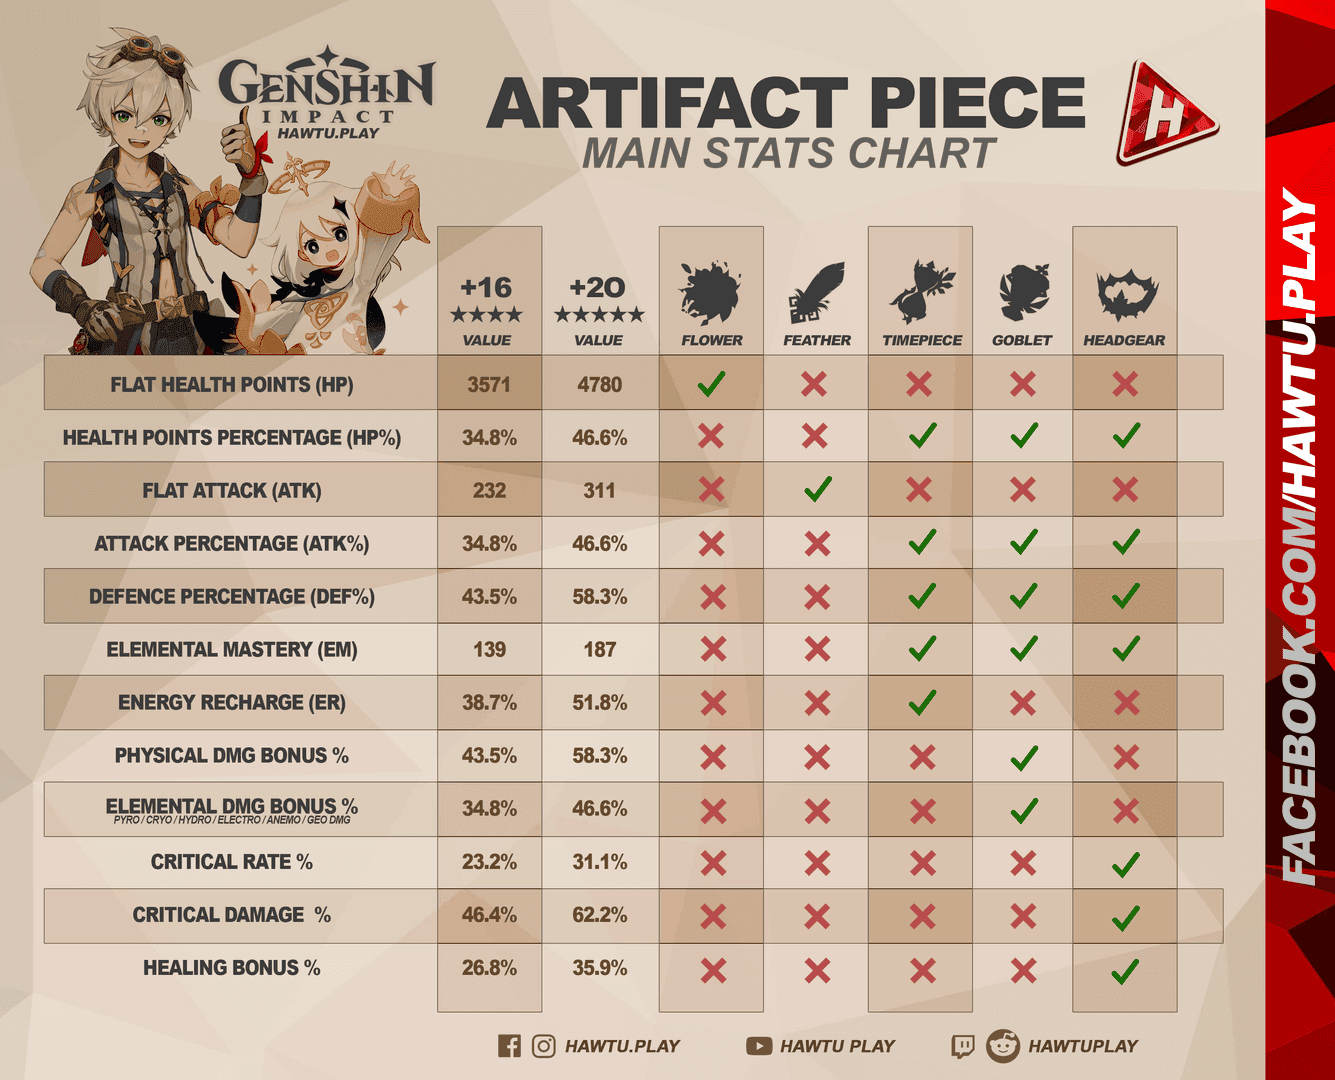
Fair warning though—EM main stats have brutal drop rates. We're talking 10% on Sands, 2.5% on Goblets, 4% on Circlets. I've seen players farm for months just to get the right main stats. It's painful, but worth it.
If you want to run a hybrid build for some personal damage, you can go ATK%/ER Sands, Anemo DMG Goblet, CRIT Rate/DMG Circlet. You'll still get the resistance shred utility while dealing respectable talent damage.
Substat Optimization
Energy Recharge is your lifeline. Without consistent burst uptime, you're not providing consistent resistance shred. Target at least 180% ER as a baseline, then adjust based on your team.
Character-specific ER needs (from my testing):
Kazuha: 160-180% ER, can drop to 140-160% with Favonius weapons
Sucrose: 180-200% ER, Sacrificial Fragments helps a ton here
Venti: 120-140% ER (his energy generation is just that good)
Anemo Traveler: 200-220% ER if you're brave enough to use them
Character-Specific VV Build Guides
Kazuha VV Build
Shoot for EM/EM/EM main stats with 800+ total EM and 160-180% ER. Iron Sting is solid for the EM stats, Favonius Sword helps with energy issues while supporting the team. Freedom-Sworn is his best weapon if you've got it—EM and team buffs in one package.
Talent priorities: Burst > Skill > Normal Attack. His burst is where the magic happens.
Venti Support Build
You've got options here. Full EM support (EM/EM/EM, 120-140% ER) for maximum utility, or hybrid damage (ATK%/Anemo DMG/CRIT) if you want him to contribute personal damage. His energy generation is so good that you can get away with lower ER requirements.
Stringless scales beautifully with his kit, Elegy provides team buffing if you prefer support over personal damage.
Sucrose EM Build
Stack EM like your life depends on it. Her A1 and A4 passives share EM with the team, so more EM on her means more damage for everyone. Sacrificial Fragments is her best 4-star weapon—EM and skill resets are exactly what she needs. Thrilling Tales works as a budget option for team buffing.
Talent priorities: Skill > Burst > Normal Attack.
Team Composition Strategies
National Team Variants
Anemo National swaps out Chongyun for a VV user, and honestly? It's often better than the original. Kazuha or Sucrose can shred both Pyro and Hydro resistance through Double Swirl techniques, which amplifies both Xiangling's Pyronado and Xingqiu's Rain Swords.
The rotation involves applying Hydro and Pyro auras, then swirling both simultaneously. Takes practice, but the damage increase is noticeable.
Freeze Team Compositions
VV users bring crowd control and Cryo resistance shred to freeze teams. Venti excels at grouping smaller enemies, while Kazuha provides more consistent shred against bosses that can't be grouped.
Some popular combinations I've tested:
Ayaka/Mona/Diona/Venti (classic)
Ganyu/Kokomi/Shenhe/Kazuha (expensive but effective)
Chongyun/Xingqiu/Bennett/Sucrose (budget-friendly)
Advanced VV Mechanics and Rotations
Double Swirl Execution
This is advanced territory, but incredibly powerful when executed correctly. Apply the lower-priority element first, then the higher-priority element, then swirl the higher-priority one while the lower-priority element is still on nearby enemies.
Example: Apply Electro to enemies, then Pyro, then swirl Pyro. The Anemo ability will absorb Pyro (higher priority) but can still swirl Electro off nearby enemies, giving you resistance shred for both elements.
Standard rotation structure: Apply elemental auras → Switch to VV user and Swirl → Execute DPS during the resistance shred window → Refresh applications before the debuff expires.
Farming Guide and Artifact Domain Tips
Valley of Remembrance Strategy
This domain pairs VV with Maiden Beloved sets and gives enemies +75% Physical DMG bonus. Bring Physical carries like Eula, Razor, or Physical Fischl for efficient clears.
Wait until AR45 for guaranteed 5-star drops—farming before then is just wasting resin. The Artifact Strongbox lets you convert unwanted 5-stars at a 3:1 ratio for VV pieces, which helps when RNG hates you.
Quick math: A single 5-star artifact needs 270,475 EXP to reach +20. Daily artifact routes provide additional fodder while conserving resin for domain runs.
Common Mistakes and Optimization Tips
Build Mistakes to Avoid
The biggest mistake I see? Neglecting Energy Recharge. Without consistent burst usage, you're missing resistance shred windows and tanking your team's DPS.
Here's something that might surprise you: Rainbow artifacts with proper EM/EM/EM main stats often outperform a complete 4-piece VV set with incorrect ATK%/ATK%/ATK% stats. Main stats matter more than set bonuses for support characters.
Always verify your VV character is on-field when Swirl triggers. Off-field Swirl won't activate the 4-piece effect, and I've seen too many players wonder why their damage isn't increasing.
The current Spiral Abyss heavily favors VV users due to enemy resistance values and grouping requirements. Investing in versatile users like Kazuha or Sucrose provides long-term account value that extends far beyond any single meta shift.
FAQ
How does Viridescent Venerer 4-piece resistance shred work? Reduces enemy resistance to the swirled element by 40% for 10 seconds. The VV character must be on-field when triggering Swirl. When resistance drops below 0%, shred effectiveness halves for the portion extending below zero.
Which characters benefit most from Viridescent Venerer 4-piece? Kazuha, Sucrose, and Venti excel due to their crowd control and consistent Swirl application. Avoid using it on hypercarries like Xiao and Wanderer who need personal damage artifacts instead.
What are optimal substats for Viridescent Venerer builds? Prioritize Energy Recharge until you hit 160-200% depending on the character, then focus on Elemental Mastery. Target at least 800 total EM with EM/EM/EM main stats for maximum effectiveness.
Can Viridescent Venerer shred multiple elements simultaneously? Yes, through Double Swirl techniques that apply multiple elements before swirling. Multiple VV users can't stack shred for the same element, but they can shred different elements simultaneously.
How much DPS increase does VV resistance shred provide? Roughly 30% damage increase against enemies with 10% base resistance, up to 90% against high-resistance enemies. Against immune enemies with 100% resistance, it enables damage where none existed before.
What team compositions work best with VV users? Anemo National variants, Freeze compositions, and multi-element reaction teams maximize VV effectiveness through dual resistance shred and crowd control synergy.