

Quick Answer: DPS characters prioritize CRIT Rate/DMG > ATK% > Energy Recharge. Support roles focus on Energy Recharge first, then scaling stats (HP%/DEF%/ATK%). Transformative reaction drivers prioritize Elemental Mastery above all. Energy requirements always take precedence over damage optimization.
Look, I've been optimizing artifacts since launch, and I can't tell you how many times I've seen players throw perfect substats on the wrong characters. It's painful to watch someone stack CRIT on a Hyperbloom driver when they should be going full EM. So let's break this down properly.
Character Roles in Genshin Impact
DPS Role Characteristics
Your main damage dealers live and die by CRIT ratios. Period. The hierarchy's pretty straightforward: CRIT Rate/DMG > ATK% > Energy Recharge > Elemental Mastery. But here's where it gets interesting—Vaporize and Melt teams flip this script a bit, pushing EM almost equal to ATK% because those multipliers are just that good.
Hypercarry DPS in mono-element teams? They're all about that CRIT optimization. No reactions to worry about, just pure, unadulterated damage scaling.
For reliable Genesis Crystals recharge, Genshin Impact top up instant 24/7 services ensure you never miss limited-time characters or weapons. BitTopup provides secure, instant top-ups with competitive pricing and 24/7 customer support.
Support Roles: Driver vs Buffer
Now this is where things get spicy. Driver characters are basically the conductors of your elemental orchestra—they're enabling reactions while keeping the team functional.
Hyperbloom drivers? Full EM, no questions asked. I've tested this extensively, and anything else is just leaving damage on the table. Electrocharged drivers need more finesse—you're balancing EM with traditional damage stats because you want both the reaction damage AND the personal contribution.
Buffer supports are a different beast entirely. Energy Recharge becomes your religion here. Bennett needs his burst up constantly for that ATK buff, Sara needs hers for CRIT DMG support. The scaling stats come second—HP% for Bennett's healing, ATK% for Sara's buff scaling.
Defensive Roles: Healer vs Shielder
Both follow the same golden rule: Energy Recharge first, scaling stats second. But the execution differs significantly.
Healers typically scale with HP% or ATK% depending on their kit. Pure healers can completely ignore offensive stats (looking at you, Barbara). Hybrid healer-DPS characters like Kokomi require this delicate dance between healing effectiveness and damage output that honestly took me months to perfect.
Shielders are more straightforward—HP% or DEF% depending on the character, with enough ER to maintain uptime.
DPS Artifact Substat Priority
CRIT Rate vs CRIT Damage Optimization
The 1:2 ratio isn't just a suggestion—it's math. You want 75% CRIT Rate and 150% CRIT DMG for that sweet spot of consistent performance. Below 60% CRIT Rate? Prioritize rate. Above 70%? Shift to damage.
Here's something most guides won't tell you: maximum substat rolls give you 2.7-3.9% CRIT Rate or 5.4-7.8% CRIT DMG. A well-rolled artifact should hit at least 20% CRIT DMG or 10% CRIT Rate from substats alone. Anything less is fodder material.
ATK% vs Elemental DMG Bonus
Standard distribution works for a reason: ATK% Sands, Elemental DMG% Goblet, CRIT Circlet. This maximizes damage across different multiplier categories instead of stacking one type.
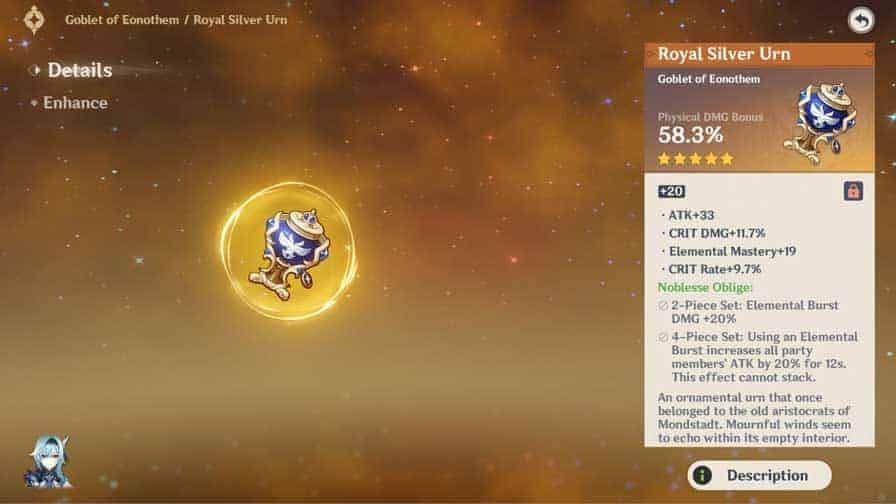
Most characters hit diminishing returns around 1800-2200 total ATK. Beyond that, you're better off investing in other stats. And those Elemental DMG% goblets? They're irreplaceable. The 5% drop rate for specific elements makes them precious—don't fodder a decent one waiting for perfection.
Energy Recharge Requirements
General rule of thumb: 160% for 60-cost bursts, 200% for 80-cost bursts. But team composition changes everything. Good energy generation can reduce these requirements by 20-40%.
Emblem of Severed Fate users get special treatment here—that set converts ER into damage, giving up to 75% Elemental Burst DMG bonus at 300% ER. It's basically free damage for meeting energy requirements.
Driver Character Optimization
Elemental Mastery vs CRIT Balance
Transformative reaction drivers need 800-1000 EM through EM/EM/EM main stats. No compromises. I see too many players trying to squeeze in CRIT stats here—don't. These reactions can't CRIT, so you're literally wasting substats.
Hyperbloom drivers follow the EM > Energy Recharge > HP%/DEF% priority. The damage scaling is so heavily weighted toward EM that everything else is secondary.
Amplifying reaction drivers are different beasts. Since Vaporize and Melt can CRIT, you want that balance of 100-200 EM with strong CRIT ratios.
When maintaining consistent performance, fast Genesis Crystals recharge becomes essential for optimal weapons and constellations. BitTopup's instant delivery system and competitive rates provide reliable top-up services with excellent customer support.
Energy Requirements for Drivers
Anemo drivers need 180-220% ER for consistent Viridescent Venerer uptime. That resistance shred is too valuable to miss rotations.
Electro drivers typically need 160-200% ER, though this varies wildly with team composition. Hydro drivers get off easy—abundant team energy generation means lower requirements across the board.
Pro tip: Favonius weapons can dramatically reduce driver ER needs. The energy generation from those passive procs adds up fast.
Buffer Support Priority
Energy Recharge Priority
ER isn't just important for buffers—it's everything. Bennett needs 200-220% ER minimum, Sara requires 220-250% because of that expensive 80-cost burst.

Kazuha's an interesting case. His EM provides team Elemental DMG% buffs, so you want EM > ER > EM distribution. Target 800-1000 EM with 160-180% ER, and you're golden.
Utility vs Personal Damage
Here's where set bonuses often matter more than perfect substats. Noblesse Oblige 4-piece gives 20% team ATK buff regardless of your individual stats. Anemo supports using Viridescent Venerer should prioritize EM for Swirl damage and resistance shredding over personal optimization.
Sometimes the team buff is worth more than your personal damage. It's counterintuitive, but the math checks out.
Healer Optimization
HP% vs Healing Bonus
Most healers scale with HP%, making it the obvious choice for healing effectiveness. Bennett's a perfect example—his healing scales with HP%, but his ATK buff only cares about base ATK. So HP% > ER > everything else.
Kokomi benefits from HP% for both healing and damage thanks to her passive conversion. It's rare to find such efficient stat allocation.
Energy for Consistent Healing
Burst-based healers like Diona need 180-220% ER for consistent uptime. Miss a rotation in Abyss, and your team's probably dead.
Skill-based healers like Kokomi only need 120-140% ER for utility bursts. The Ocean-Hued Clam set actually makes healing optimization more valuable by converting excess healing to Physical damage—finally, a use for overhealing!
Shielder Optimization
HP% vs DEF% by Character
Zhongli's shield scales exclusively with HP%—use HP%/HP%/HP% main stats with HP% > ER priority. No exceptions.
Diona's shield scales with HP% and gets bonuses from her hit-based passive. Noelle's the oddball here, scaling with DEF% for both shield and healing. DEF%/DEF%/DEF% for pure shielding builds.
Energy for Shield Uptime
Zhongli's skill-based shield doesn't need ER for uptime, just moderate ER (120-140%) for burst utility. Diona needs 160-200% ER for her healing burst.
Favonius users need 30-40% CRIT Rate for energy generation while maintaining their shield focus. It's a balancing act, but worth it for the team energy.
Common Optimization Mistakes
Wrong Stat Investment
Building CRIT on transformative reaction drivers is the biggest waste I see. Hyperbloom Kuki needs full EM, not CRIT stats. Those reactions literally cannot CRIT.
Conversely, building EM on Freeze Ganyu provides zero benefit over CRIT and ATK%. Know your reactions, people.
Ignoring Team Synergy
Bennett in Raiden National needs way less ER than in Childe International because of energy generation differences. Context matters.
Pyro resonance provides 25% ATK%, reducing the value of additional ATK% substats. Geo resonance affects both DPS and shielder optimization. Team buffs change everything.
Advanced Strategies
Calculator Usage
Genshin Optimizer is your best friend for precise damage calculations. It accounts for team buffs and complex mechanics that would take forever to calculate manually.
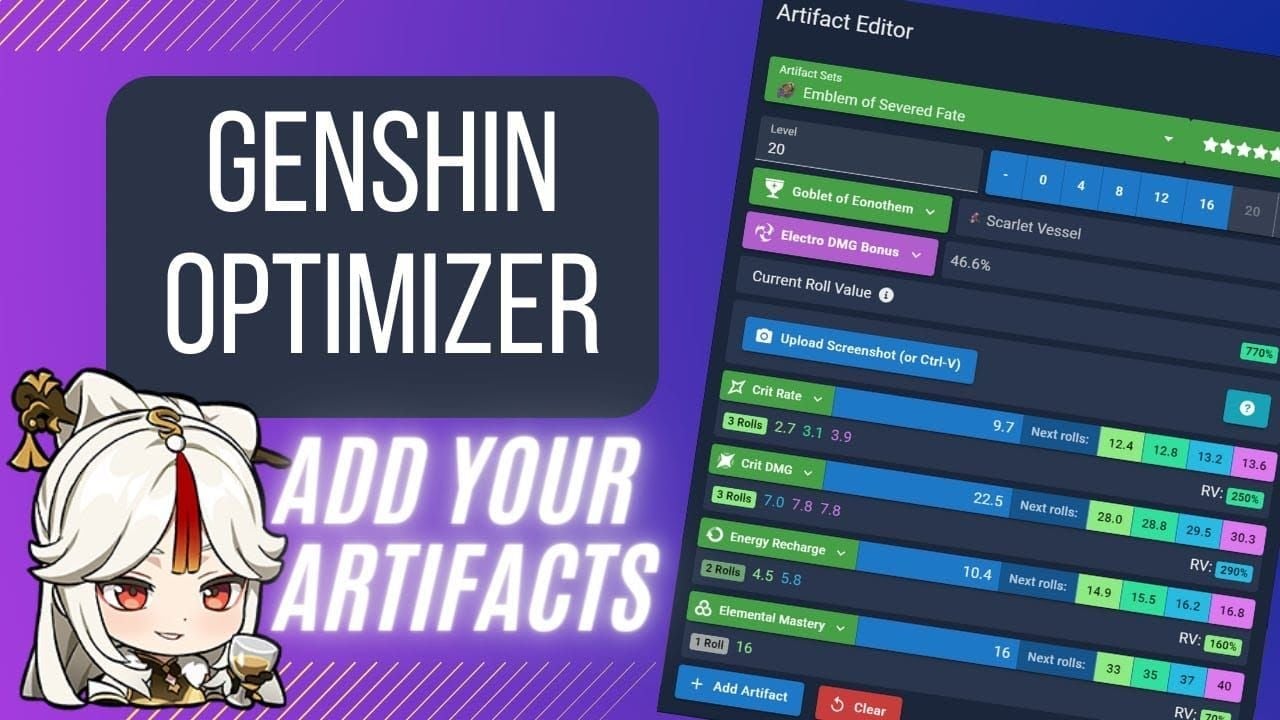
Character-specific configs handle unique mechanics like Nahida's EM-to-CRIT conversion or Furina's HP scaling. Don't try to optimize these manually—you'll go insane.
Substat Efficiency
Each substat has four possible roll values (70-100% efficiency). My level-12 evaluation strategy: if an artifact hasn't rolled desired substats by the third upgrade, it becomes fodder. Harsh? Maybe. Efficient? Absolutely.
High-efficiency artifacts with multiple desired substats provide better long-term value than mediocre pieces with perfect main stats.
FAQ
What's the most important substat for DPS characters? CRIT Rate if you're below 60%, then CRIT DMG. Target that 1:2 ratio for maximum average damage. But if you can't maintain burst uptime, Energy Recharge takes precedence over everything.
How much Energy Recharge do supports need? 60-cost bursts need 160-180% ER. 80-cost bursts need 200-250% ER. Favonius weapons or dedicated energy generators can reduce these requirements by 20-40%.
Should healers prioritize HP% or Healing Bonus%? HP% almost always wins. It often scales shields or damage alongside healing, while Healing Bonus% only affects healing output. More bang for your substat buck.
When should I prioritize EM over CRIT? For transformative reactions (Hyperbloom, Burgeon, Swirl) and Anemo VV supports. These can't CRIT and scale purely with character level and EM. CRIT stats are literally useless here.
How do I evaluate artifact quality? DPS pieces need 20%+ CRIT DMG or 10%+ CRIT Rate from substats minimum. Support pieces need the correct main stat plus at least two desired substats. Use the level-12 evaluation method—it'll save you resin in the long run.
Any differences between Spiral Abyss and overworld building? Abyss demands optimized ER management and strict role-specific priorities for consistent rotations. Overworld lets you get away with hybrid builds and comfort picks—higher damage focus, lower ER requirements. Build for Abyss, enjoy the overworld steamroll.