

Quick Overview: In the 2025 Genshin Impact meta, Kuki Shinobu shines as your off-field Hyperbloom detonator, packing 900-1100 EM and 20-30k HP to crank out 10k+ damage procs and ~5-7k heals per tick. Grab Iron Sting or Freedom-Sworn as weapons, slap on 4pc Flower of Paradise Lost artifacts, and team her up with Nahida, Xingqiu, or Yelan for those juicy 15-20k procs every 15-20 seconds. This guide breaks down stat priorities, slick rotations, and F2P-friendly picks to nail 100% uptime on her 1.5s Electro pulses—perfect for smashing Spiral Abyss.
Getting Kuki Shinobu's Hyperbloom Groove in the 2025 Meta
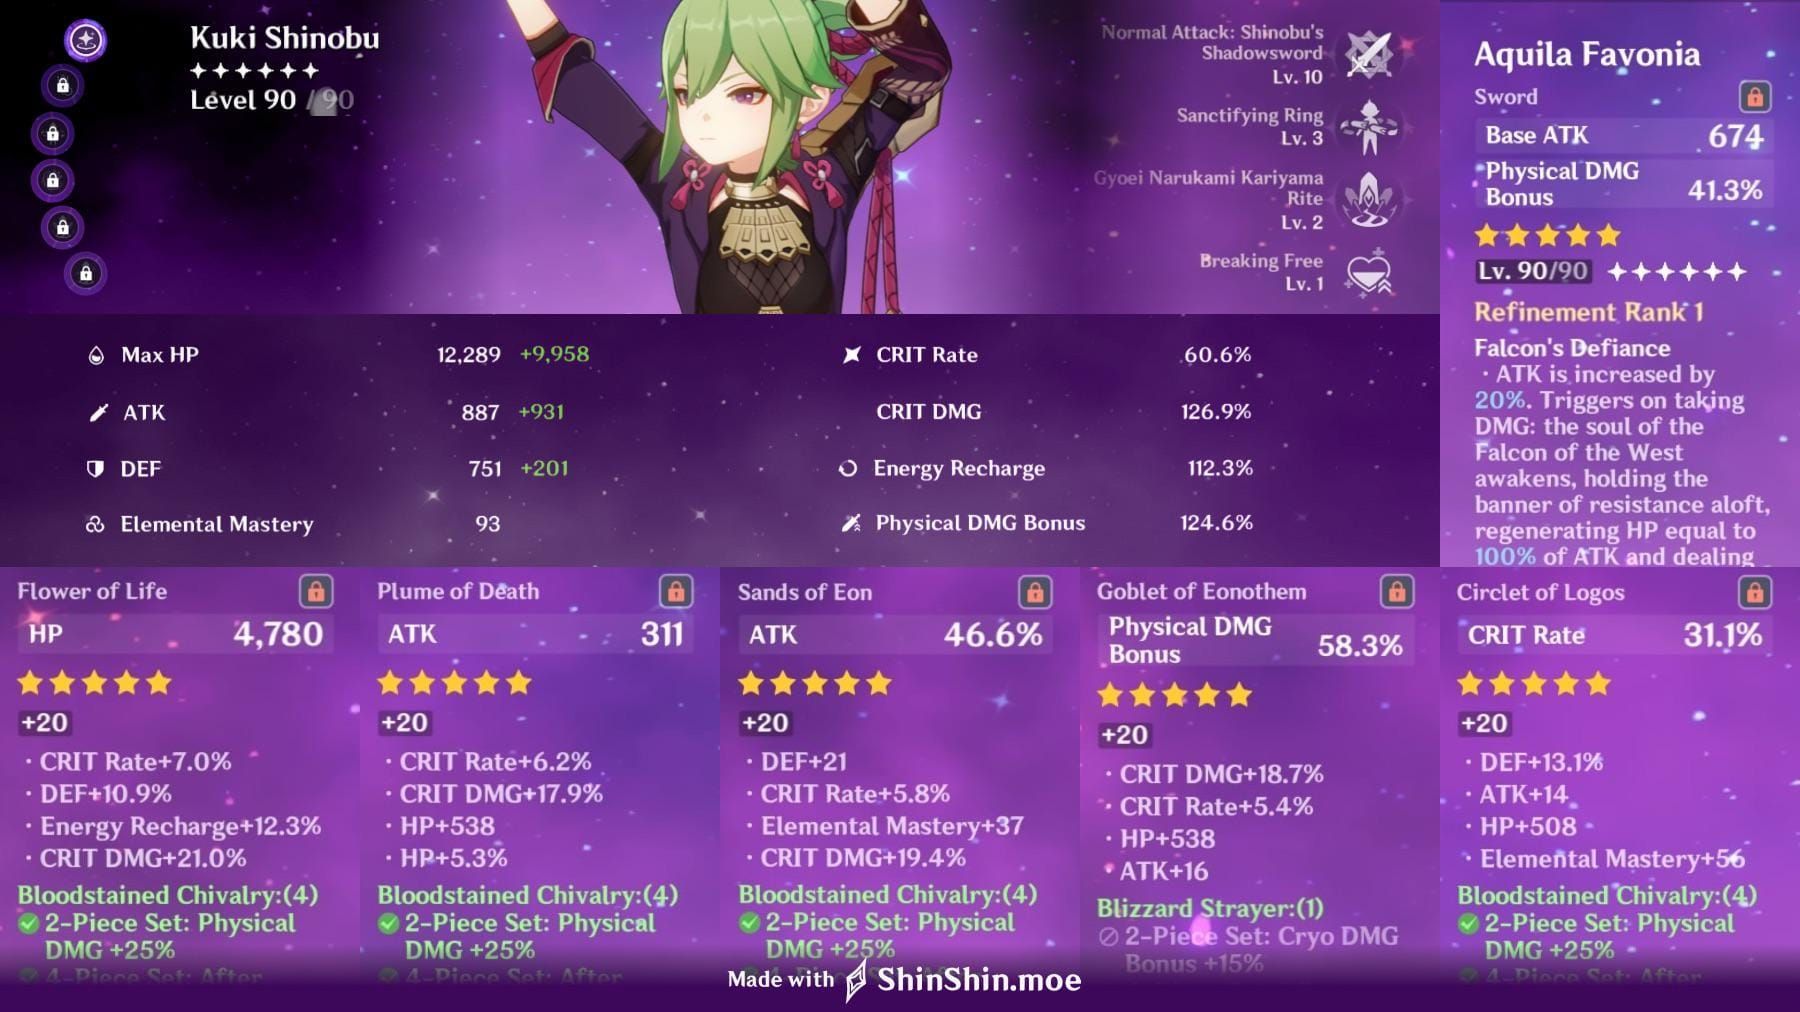
Picture this: Kuki Shinobu at level 90, boasting 12,289 base HP, 212 ATK, 751 DEF, and that sweet 24% HP% ascension stat for her hybrid Hyperbloom setup. Her Elemental Skill drops a 12-second ring that pulses Electro every 1.5 seconds—eight to ten hits total—primed to trigger Hyperbloom on Dendro cores while healing for 3% of your Max HP + 289 + 75% EM per tick, thanks to her A4 passive. At 25k HP and 900+ EM, you're looking at ~5-7k heals and 10k+ damage per proc. Hyperbloom itself dishes out AoE Dendro damage, scaled off the Electro unit's EM, level, and enemy RES, netting 8-12 procs per rotation.
Ever wonder how to set it up just right? Start with Hydro from Xingqiu's Burst, layer on Dendro via Nahida's Skill, then swap to Kuki's Skill to blow those cores sky-high in AOE glory. Pro tip: Cast her Skill before her Burst to heal back 30% of the current HP cost (at least 20% of Max HP). And for C4 owners, weave in N1 normals for extra procs over 15-20 second cycles.
What sets Kuki apart? Her ring sticks to the active character, squeezing out 20-30% more quickswaps in multi-target fights compared to Raiden or Yae Miko—plus, she brings healing they just can't match. In 2025's meta, she's straight-up S-tier in Dendro squads, especially with Lauma, stepping in for Fischl when sustain's key. I've tested her in packed domains; she holds up great, but tweak for Kazuha's Swirl pulling Anemo EM to amp damage. She peaks in Abyss floors 9-12, dropping 150k+ damage in one or two rotations, syncing perfectly with the Version 6.0 rerun. To get her rolling, farm Naku Weed and Vajrada Amethyst (1 Sliver, 9 Fragments, 9 Chunks, 6 Gemstones) for that level 90 push against mobile bosses.
Need a fast track to powering up Kuki? Check out Genshin top up PayPal on BitTopup—it's all about instant Genesis Crystals through secure PayPal, at killer prices with quick delivery, round-the-clock support, glowing user reviews, and top-notch safety plus tons of payment options to keep your grind seamless.
Nailing the EM/HP Balance for Kuki's Hyperbloom Power
Aim for 1000-1100 total EM, pulling from EM Sands, Goblet, Circlet, and Iron Sting's 165 EM sub-stat. Prioritize EM over HP% and ER in subs to hit those 15-20k procs—each point of EM adds about 0.35% damage at level 90. In Sucrose teams slinging 200+ EM buffs, you can dial it back to 850-950 base EM. But don't skimp on HP: 20-30k keeps heals at ~6k per tick with 25k HP and 900 EM via A4, totaling 48-60k over the duration. Push past 30k, and you're just watering down your EM gains.
Take this split, for instance: 900 EM and 25k HP crushes high-density Abyss runs. Roll EM on every piece first, then layer in HP% subs to reach 20k—test it out for ~4k heals per tick. Adjust per team, though: Go 1100 EM in F2P setups with Dendro Traveler, or stick to 900 with Nahida. EM directly juices Hyperbloom, while HP locks in sustain without dropping 20-30% of your reaction DPS.
Here's how to build it step by step: 1. Slot in an EM weapon. 2. Farm Deepwood Memories for those EM pieces. 3. Fine-tune to 130-175% ER at C0 using a calculator—shave off 10-20% if Favonius is in play.
That hybrid EM/HP mix? It pumps reaction damage 2-3x over pure HP builds, with a 50% heal boost to boot. C6 throws in +150 EM when HP dips below 25%. Steer clear of ATK, Electro DMG, or Crit Sands—respec to EM for the full 25% scaling. And keep HP under 50% before Burst for +15% Healing Bonus and a 3.5-second extension with 13 hits. (Editor's take: I've seen players obsess over heals and tank their damage—balance is everything here.)
Full Weapon Breakdown & Why They Rank Where They Do
Freedom-Sworn takes the crown as BiS 5-star, with its 198 EM sub-stat, +10% DMG Bonus, and +16% team ATK after Skill or Burst. It outpaces 4-stars by 20-30% in team DPS—lead with her Skill in quickswaps for Nahida synergy, and watch Alhaitham teams surge 25%. Premium pick, no doubt.
For F2P heroes, Iron Sting at R5 (craftable 4-star) delivers 165 EM plus 6% Elemental DMG per stack (up to 24% after four reactions), no ER strings attached. Pair it with 4pc Flower for 15-20k procs; just craft with 50 Crystal Marrow.
Xiphos' Moonlight ties at 165 EM but adds up to 32% ER from EM (8% per 100), cutting ER needs by 10-20% in Burst-heavy 2025 teams over low-battery woes. Toukabou Shigure matches the 165 EM with some off-field DMG% that's often wasted—stick to Xiphos for ER flexibility across squads.
Key of Khaj-Nisut (5-star) leans into 66.2% HP sub-stat + up to 200 EM at three stacks, bumping heals by ~10k per rotation but trimming damage 15%. Great at C4 for teamwide +0.12% EM per 1% HP. Sapwood Blade (craftable 4-star) slips in ER sub-stats for energy-hungry teams, edging out Favonius when EM's your jam.
Ranked: 1. Freedom-Sworn (DPS beast for premium plays). 2. Iron Sting/Xiphos (F2P sweet spot). 3. Key of Khaj-Nisut (heal-focused hybrid). Test 'em in domains: Equip, run a 15-second rotation, aim for 150k+ team damage. Iron Sting's craftable edge makes it a no-brainer for accessibility.
Artifact Showdown: Gilded Dreams or Flower of Paradise Lost?
4pc Flower of Paradise Lost hooks you with +80 EM from the 2pc, then ramps Hyperbloom DMG up to 100% via four stacks (+25% per proc, max four over 10 seconds each). It builds fast in six seconds with those 1.5s pulses, boosting reaction DPS 20-30%. Farm the Deepwood domain—stacks refresh on new procs, ideal for core-heavy Abyss.
Gilded Dreams 4pc counters with +80 EM (2pc) + 100-150 EM post-reactions, super resin-efficient since it shares the domain, but skips direct DMG bonuses. Mix with 2pc Wanderer's Troupe for 160 total EM. Flower pulls ahead in endgame by 15-20% for tuned teams; Thundering Fury 4pc tacks on +40% Hyperbloom, but it's only off-field solid with quick application.
Main stats? EM Sands, EM Goblet, EM Circlet—subs EM > ER (130-160%) > HP% for 20k+ HP and ~4k heals per tick. Newbies, try 2pc Gilded + 2pc Flower for 160 EM starters. Build steps: 1. Chase 4pc Flower. 2. Roll 20+ EM subs per piece. 3. Swap to Deepwood 4pc sans Dendro holder for 30% RES shred, lifting team DPS 15-20%. (Quick aside: Flower's my go-to—feels like it was made for Kuki's pulse rhythm.)
Prime Kuki Shinobu Hyperbloom Teams for 2025 Domination

Premium squad: Kuki, Nahida (Dendro applicator and EM sharer), Alhaitham (Dendro DPS), Furina or Yelan (Hydro). Nahida's E/Q locks in permanent Dendro, Hydro spawns cores, Kuki detonates off-field. Furina amps DMG, Alhaitham blends Spread and Hyperbloom for single- or multi-target mayhem.
F2P alternative: Kuki, Dendro Traveler (core-gen via Burst), Xingqiu (off-field Hydro), Sucrose (Anemo grouping and 200+ EM buff). Traveler's Burst cooks cores, Sucrose spreads EM so Kuki chills at 850-950 base—Abyss-proof, and swap in Collei for 2025 AoE events.
Double Hydro twist: Kuki, Nahida, Xingqiu, Yelan for single-target focus with Hydro Resonance heals; guarantees 8-12 procs. F2P swap: Collei, Barbara (restart her Skill for Hydro), Fischl—solid open-world workhorse.
Budget build: Kuki, Collei (Dendro), Barbara (Hydro), Fischl (Electro battery off N2). Fischl juices ER, Kuki shreds RES with Deepwood—effective for casual clears.
Raiden Hyperbloom: Kuki, Nahida, Raiden (Electro DPS and battery), Kazuha (Anemo VV shred and -40% RES). Raiden adds triggers and particles, Kazuha Swirls for EM inheritance in multi-target aggravate mixes.
Ayato spin: Kuki, Nahida, Ayato (Hydro DPS with 4pc Thundering Fury for CD cuts), Beidou (Electro sub-DPS). Nails multi-target AOE, Beidou layers Electro-Charged.
Tighnari Spread: Kuki (Deepwood RES shred), Tighnari (Dendro DPS), Fischl (Electro), Sucrose (Anemo). Low-CD speed demon, flips to pure Hyperbloom easy.
Neuvillette setup: Neuvillette (Hydro DPS for cores), Furina (sub), Nahida (Dendro), Kuki (trigger). Beastly AOE against 2025 Version 5.6 bosses.
Quickbloom with Alhaitham + Kuki? It shreds single-target 20% faster via infusion. But standard Nahida teams edge multi-target by 20% DPS against groups. Baizhu slots as a Dendro healer, buffing reactions through HP passive—pairs killer with Yaoyao C2 for resonance.
To get rolling: 1. Pump supports to 80/8. 2. Drill rotations for 100% core pops. 3. Tweak for 2025 bosses, like Neuvillette variants with Furina sub-DPS. (My two cents: F2P teams like Traveler/Xingqiu hold their own—don't sleep on 'em for consistent clears.)
Running low on Primogems for that build push? Hit up buy Genesis Crystals credit card through BitTopup's credit card deals—rapid delivery, competitive rates, ironclad security, flexible payments, stellar after-sales, and a 4.9/5 rating for smooth, boost-filled top-ups.
Rotation Blueprints & Pro Gameplay Tweaks
Standard flow: 1. Slap on Hydro (Xingqiu Skill/Burst). 2. Add Dendro (Nahida or Traveler Burst). 3. Kuki Skill to ignite. 4. Sucrose for grouping and EM buff—loop every 15-20 seconds. Burst if ER's good for bonus procs, keeping Skill at 100% uptime.
Alhaitham + Yelan: Nahida E Q > Yelan Q N1 E N1 > Kuki Q (ready?) > Alhaitham Q > Kuki N1 E > Alhaitham 3[N3D N3CD] N3 > Yelan N1 E N1 > Alhaitham hEP N2CD N3C. Hammer procs during Alhaitham windows; drop Kuki E before her Q.
Nahida core: Nahida E Q > Xingqiu Q N1 > Kuki E N1 > Yelan E N1 Q > Nahida N3 E N3D N3 > repeat. Hydro Resonance patches heals nicely.
Ayato run: Beidou EQ N1 > Nahida E N1 > Kuki E N1 > Ayato E N15 Q > loop. Ayato's TF speeds up core gen.
Raiden vibe: Raiden E > Nahida E Q > Kuki E N1 Q > Kazuha Q > Raiden Q combo.
Tighnari quickie: Kuki E N1 Q > Fischl N2 E/Q > Sucrose ED Q > Tighnari combo.
ER targets: 135-175% at C0 solo (115-140% at C4); use a calculator for 15-20s loops, with 45% particle gen per hit (4-6 at C2). Drop to 100% with Raiden battery. How? 1. Tally team particles. 2. Swap Sands to ER if short. 3. Favonius on Traveler shaves 20%.
Position smart: Ring on active for max AOE—never Electro first. Troubleshooting? Sequence Hydro-Dendro-Electro for reliable procs; C2 extends +3 seconds and 25% more procs at C0 for low uptime fixes.
Constellations & Talent Priorities Unpacked
C0 gets the job done, but C2 (+3s Skill to 15s, 10 hits, extra particles) ups procs 25% and cuts downtime. C4 drops Thundergrass Marks (9.7% Max HP AoE Electro every 5s on ally attacks) for hybrid DPS flair. C6 grants +150 EM below 25% HP.
Talent order: Skill > Burst > Normal (who needs normals?). Max Skill to 90 for +20-30% damage and 30% procs—needs 9/63/114 Elegance books, 18/66/93 Spectral Husks, 18 Tears of Calamitous God, 3 Crowns, and 4.95M Mora. Burst to 6+ (60 Energy, 3.6% HP per hit, 7-13 total).
F2P route: Level to 90 (+25% reaction scaling over 80), talents 8/8/1 (1.6M+ Mora to 10). C2 or C4 seals 2025 viability post-Dendro 3.0. Steps: 1. Raid Inazuma for books and Husks. 2. Skill first for 76% initial DMG + 25.2% ring at 10. 3. Test for 36-star Abyss runs. (Honest opinion: C0's plenty for most—save those wishes unless you're chasing perfection.)
Crushing Spiral Abyss with Kuki: Real Clear Breakdowns
Floor 12? One or two rotations seal it, with 10-15 procs and 150k+ damage. 1000 EM on 4pc Flower nets 12-18k per proc, +50% via Nahida buffs. Chamber 1: Sucrose groups for full AOE blasts. Chamber 3: C2 uptime handles waves.
EM share blessings? They rocket to 200k+. Neuvillette teams dominate 2025 AOE bosses. Quickbloom's 20% faster on single-target; standard multi-teams claim 20% more DPS vs packs. Simulate 15s cycles for 8-12 procs; VV shred adds +50% RES cut. Steps: Run the sims, layer VV—easy 36 stars.
Pitfalls to Dodge & Pro-Level Polish
Big no-no: Dumping too much into HP over EM. Hybrids crush pure healers by 30-40% in reaction damage—respec to EM for 2-3x output in this Dendro era. Timing slips? Electro before cores kills procs—always Hydro-Dendro-Electro. Single-target fizzling? Sucrose groups 'em up.
Go advanced: C4 marks mid-DPS phase; Kazuha VV for -40% Electro RES. Stack EM heavy for 2025+ with Lauma or Neuvillette—ditch non-reaction builds. Steps: 1. Farm those EM rolls. 2. Battle-test vs Abyss foes. 3. Hone quickbloom tweaks.
Kuki outpaces Raiden (faster, no heals) and Thoma (more mobile) by 20-30% in quickswaps—pick her for that heal + AOE punch in 2025 squads. (From the editor's chair: She's underrated; once you feel her rhythm, Abyss feels less like a grind.)
Your Burning Questions on Kuki Shinobu Hyperbloom
How much EM does Kuki need for Hyperbloom?
Shoot for 900-1100 total EM—1000's the sweet spot for 15-20k procs. Drop to 850-950 in EM-buff crews like Sucrose. It scales ~0.35% per EM; 1000 hits 12-18k against standard enemies, +50% with RES shred.
HP or EM first for Kuki's Hyperbloom build?
EM leads (900+ for damage), HP follows (20-30k for ~6k heals/tick via A4 +75% EM). Hybrid nets 2-3x reactions over pure HP while keeping sustain; dip below 50% HP pre-Burst for bonuses.
Best weapon for Kuki Hyperbloom?
Freedom-Sworn's BiS (198 EM + team buffs, 20-30% DPS uplift). F2P? Iron Sting (165 EM +24% DMG stacks) for solid uptime. Xiphos wins on ER (up to 32% from EM) in battery-starved teams.
Top artifact set for Kuki Hyperbloom?
4pc Flower of Paradise Lost (+100% DMG stacks, 20-30% DPS edge). Gilded Dreams as alt (100-150 EM after reactions, easy resin farm). 2pc hybrid each gives 160 EM for versatile starts.
Constellations needed for Kuki Hyperbloom?
C0 works fine, but C2 (+3s Skill/25% procs) and C4 (AoE marks for hybrid DPS) shine—cuts ER 10-40%. They're clutch for full Abyss uptime in 2025.
Best 2025 Kuki Hyperbloom teams?
Premium: Kuki/Nahida/Alhaitham/Furina for multi-target. F2P: Kuki/Dendro Traveler/Xingqiu/Sucrose for Abyss wins. Double Hydro (Nahida/Xingqiu/Yelan) locks single-focus; 8-12 procs per rotation.
✅ Official direct recharge, 100% secure
✅ No waiting – top-up arrives in 7 seconds
✅ Big discounts, low prices to save more
✅ 7×24-hour customer service, ready to assist anytime