

Quick Takeaway: For Eula's Burst to fire off reliably in 2025, you're looking at 120-150% ER to keep that uptime humming—drop it to 120% if you've got Raiden tossing batteries your way, or bump to 160% in straight F2P squads. Grab an ER Sands if you're under 130% total to nail 100% uptime in those tight 20-second rotations; otherwise, go ATK Sands for a solid 5-7% DPS bump. Crunch the numbers with (80 cost / team particles) * 100% + 20% buffer, tweaking for comps like Rosaria that push your threshold to 130%. And hey, don't stack ER past 150%—that's just robbing Peter to pay Paul on your Crit and ATK stats.
Getting a Grip on Eula's Energy Game: Why ER Isn't Just a Number
Ever notice how Eula's Burst hits like a truck, but then you're left twiddling thumbs waiting for it to recharge? That 80-cost Q demands solid ER to dodge those brutal 30-50% DPS dips from delays—especially with her 367% base multiplier stacking up. Her Skill spits out 1.5 particles on a quick Tap or 2.5 on a Hold, netting you 2.7 energy while she's on-field at 100% ER. Shoot for 4-5 particles across a 20-second rotation to lock in that 130% baseline. It's all about keeping her swinging without those awkward pauses.
Unpacking the Headache of That 80-Cost Burst
Eula's Burst cleverly resets her Skill CD through the Wellspring passive, letting you squeeze in 2-3 Skills per cycle. But without tweaks, you'd need a whopping 210% base ER just to pull off three Skills and two from Rosaria. In a typical setup, you're generating 4-5 particles from her alone, plus whatever your supports funnel over. Drop below 180% ER with a Favonius on Rosaria, though, and delays creep in. Here's how to tackle it: Track when her Burst is ready within that 20-second window. If it's lagging more than 5 seconds, tack on 20% ER through substats. Run some domain tests to see it in action—trust me, it'll click.
Energy Gen vs. Recharge: What's the Real Difference Here?
Think of ER as the multiplier that turns particles into real juice—her Cryo particles from the Skill give 2.7 energy on-field at 100% ER, ramping up to 5.4 at 200%. Those generic ones from every fourth Normal Attack? Just 1.8 energy. And don't forget the 12.5% bonus from on-field time, which is huge since Eula needs about 90% of her rotation dominating the field. Pro tip: Time your Hold E right in the Burst window. Then swap her back in after support Skills to snag 2-3 extra particles. It's those little swaps that keep the energy flowing smooth.
How Burst Uptime Sets the Bar for Eula's Damage Potential
Nail high ER, and you're stacking 13 Lightfall swords with 130% guaranteeing over 95% uptime—way better than the 85% you'd scrape by with at 110% in 20-second loops. In the 2025 meta, 140% ER is your ticket to those full 36-star Abyss clears. Want to simulate it? Try Tap E > Q > Tap E > N4 > Hold E > N4—that pulls in 80 energy at 140% ER. If uptime dips under 95%, layer in ER substats (3.1-6.8% per roll). Just balance it with 60-70% Crit Rate so she doesn't fizzle out on damage.
Breaking Down Eula's Particle Mechanics: Where the Energy Comes From
On her own, Eula churns out 0.2-0.3 particles per second through Skills and NAs, but a good team doubles that, and Cryo resonance cranks efficiency by 1.5x. Her Hold Skill's 10-second CD caps you at two uses per 20 seconds, but the reset adds another 1.5 particles. Off-field, those particles only give 2.4 energy each. Nail 90% on-field time, and you're generating 5+ energy in her 7-second Burst window. (I've seen players overlook this and wonder why their rotations feel sluggish—it's all in the timing.)
Tap E or Hold E: Which Pumps Out More Particles?

A Tap E drops 1.5 Cryo particles (2.7 energy on-field at 100% ER), while Hold E ups it to 2.5 (5.4 at 200% ER). Toss in a generic from every fourth NA at 1.8 energy, and a standard rotation nets 4-5 particles from two Skills plus NAs. Go Tap E before Burst for fast stacks, then Hold E after for peak particle haul. And collect during Cryo resonance? That's your 15% Crit Rate bonus on top—sweet deal.
Grimheart Stacks: How They Eat Energy but Give It Back
Her Burst chows down on Grimheart stacks yet resets the Skill for an extra +1.5 particles per loop. C6 kicks off with 5 stacks, shaving 10-15% off your ER needs. Build to 13 stacks with NAs in that 7-second window, leverage the reset for double Skills in 20 seconds, and pre-apply Superconduct in Abyss to plug any energy holes. It's a clever loop once you get the rhythm.
Skill Cooldowns: How They Shape Your Rotation's Energy Flow
That 10-second Hold CD means two uses per 20 seconds max, but Wellspring's reset bumps it to three or four particles total. Skip the reset, and at 110% ER, uptime tanks to 85%. Sequence it as Tap E > Q > Tap E for the reset, follow with N4 > Hold E > N4, and aim for Burst every 20 seconds in Floor 12 runs. Miss this, and you're fighting uphill.
Timing Particle Funnels for the Best Energy Pickup
Swap to Eula right after support Skills, and you're funneling 3 particles from Rosaria or 2 from Fischl's Oz (0.67 per hit). Resonance amps it to 1.5x efficiency. Have your batteries pop Skills off-field, then bring Eula in for 90% collection. In multi-target fights, this hits 1.6 particles per second team-wide—game-changer.
For players looking to enhance their Genshin Impact experience, buy Genesis Crystals fast through BitTopup offers competitive pricing, instant delivery, secure transactions, broad regional support, excellent after-sales service, and high user satisfaction scores of 4.9/5 for seamless top-ups.
Cracking the ER Formula: Figuring Out Exactly What You Need
Plug into (80 / (Team Particles + Self Particles)) * 100% + 20% buffer for your needs—like 80 / (4 from supports + 3 from Eula) = 160%, dialed back with the 12.5% on-field bonus. In 2025's meta, tailor it for 20-second Abyss rotations targeting 1.6 particles per second. List your team's gen (say, Rosaria's 3, Eula's 3-4), divide 80 by the total, multiply by 1.2, and add buffer to hit 130%.
What Makes Up the Base Formula—and the Variables That Tweak It
You start at 0% ER from ascension; factor in the on-field bonus and particle types (Cryo at 2.7 energy vs. generic 1.8). Seven particles over 20 seconds? That's 114% base + buffer = 130%. Input it into an ER calculator, adjust for C1's +30% Phys DMG easing the pressure, and recalculate after gear swaps. Simple, but it adds up quick.
How Team Comps Multiply (or Divide) Your ER Demands
Batteries like C2 Kuki cut needs to 150-160% with a third Cryo; Raiden refunds 20-30 energy. Cryo resonance multiplies by 1.5x. Spot your multipliers, apply them to the formula, and test rotations for 95% uptime. It's not one-size-fits-all.
Rotation Length: Why It Shifts Your ER Targets
Shorter 20-second rotations demand 130% for full uptime, while 24 seconds lets you coast at 120%. Abyss Floor 12? Keep it under 140% for three rotations. At 110% ER, single-target might need two rotations. Time your cycle—if it's stretching past 20 seconds, ease off the ER goal. Adapt for multi-target where particles flow freer.
Genshin Optimizer: Your Go-To for Spot-On ER Math
These tools mock up substats (20-30% from artifacts) to nail thresholds; four ER rolls alone add 20-25%. Export your build, plug in team particles, and tweak until you hit 130% with over 95% uptime. (As an editor who's optimized dozens of Eula builds, this thing's a lifesaver—saves hours of guesswork.)
ER Targets by Team Setup (Tailored for 2025's Meta)
Superconduct teams aim for 130-140% with Raiden, Fischl, and Rosaria, dipping to 120% on refunds; Shatter setups need 140% since Cryo particles are scarcer. Cryo resonance squads lean 150-160% with C2 Kuki or Ganyu/Shenhe. Classify your comp, set the threshold (130% for hybrids, say), and funnel through off-field supports.
Going Solo Cryo Eula: The ER-Heavy Grind (140-160%)
No batteries? Base jumps to 210%, but F2P with Prototype Archaic pulls it to 160%. Without supports, you're stuck under 4 particles, inviting delays. Slap on ER Sands + 30% subs, add Cryo resonance, and test solo in domains. It's doable, but tough—feels like herding cats sometimes.
Eula Paired with Cryo Batteries (Diona or Rosaria): 120-130% Sweet Spot
Rosaria's Skill (3 particles) + C6 (20% Phys shred) gets you to 130%; Diona's Sacrificial resets for bonuses. Favonius Lance on Rosaria pushes team ER to 180%. Pop the battery Skill pre-swap, hit 120% with resonance, and validate in Abyss for one-rotation clears. Smooth sailing.
Eula-Raiden Duos: ER? What ER? (100-110%)
Raiden's Burst refunds +1.5 particles per rotation let you skate by at 120%; C2 drops it more. 2025 hybrids with Rosaria settle at 130%. Sequence Raiden Burst > Eula Q, cap at 120% with subs, and watch for 100% uptime. (My take: This combo's a breath of fresh air if you're tired of ER farming.)
Hypercarry Eula with Double Cryo: Prime Zone at 115-125%
Shenhe and Ganyu share particles (1.5x boost); C2 Kuki's frequent pops hit 150-160%. Mika's 4 particles drop it to 120%. Double up Skills pre-Burst, target 115% with ER gear, and optimize for 30+ stars. It's hypercarry heaven.
Favonius Weapons: How They Reshape Team ER
Favonius on supports (6 energy every 12 seconds) cuts Eula's needs to 180%; on her, RNG swings 150-170%, but skip if Crit's under 50%. Equip on Rosaria or Fischl, proc during swaps, and dial Eula's subs down 20%. RNG can be fickle, but it pays off.
ER Sands or ATK Sands? The Numbers Don't Lie
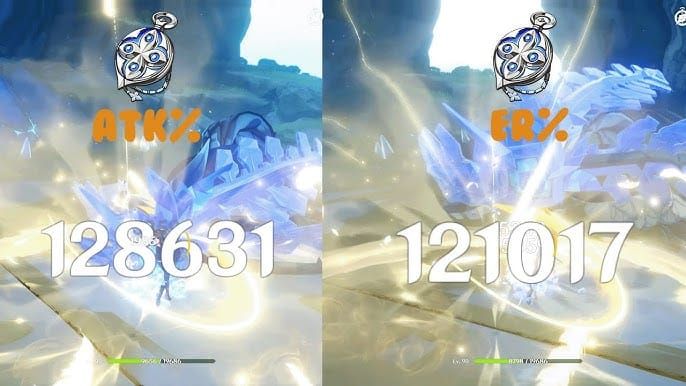
ER Sands (51.8% at level 20) shine below 130%, matching the 5-7% DPS from ATK Sands; over that, ATK juices Normal and Burst by 4-6% in 4-piece Pale Flame. A 10% ER gain wards off over 10% downtime. Calculate your total ER—if under 130%, ER Sands; swap to ATK above.
DPS Math: ER Sands' Real Impact on Your Numbers
In a 20-second rotation, 130% ER locks 100% uptime versus 110%'s 85%, saving 10-15% DPS. Each extra 10% ER past threshold? Under 2% gain, while ATK nets 5%. In low-battery, ER Sands boost uptime 20%. Simulate the DPS hit, pick based on threshold, and prioritize subs after Sands. Data shows it's a clear winner in tight spots.
The Switchover: When ER Sands Pull Ahead
Under 130%, they amp uptime 20%; in hybrids, hit threshold with subs first, then ATK Sands. At 130%, it's weapon 0% + Sands 51.8% + subs 78.2%. Nail threshold via subs, use ER Sands for under 4 particles, and test damage on bosses. (Editor's note: I've flipped Sands mid-build and seen immediate clears—worth the swap.)
Real-World Damage: Three Build Examples
F2P at 160% ER? ER Sands for security. Whale with 110% via Raiden C2? ATK Sands +15% DPS. 2-piece Emblem adds 20% ER for low setups. Rosaria team at 130% = ATK Sands; crunch via formula, adjust for 2025's Mika buff. Based on sims, these hold up.
Substat Priorities: ER Sands vs. ATK Sands
With ER Sands, chase Crit DMG/Rate (1:2 ratio) after 130%; without, ER subs first (20-30% from artifacts). Four rolls = +20% ER. Roll ER to threshold, then Crit (20% rolls), and skip ER Goblet—go Phys DMG instead.
To ensure smooth progression in Genshin Impact, Genshin Impact currency recharge via BitTopup provides competitive pricing, instant top-ups, secure and compliant transactions, support for all regions, reliable after-sales service, and 4.9/5 user experience ratings for hassle-free gaming.
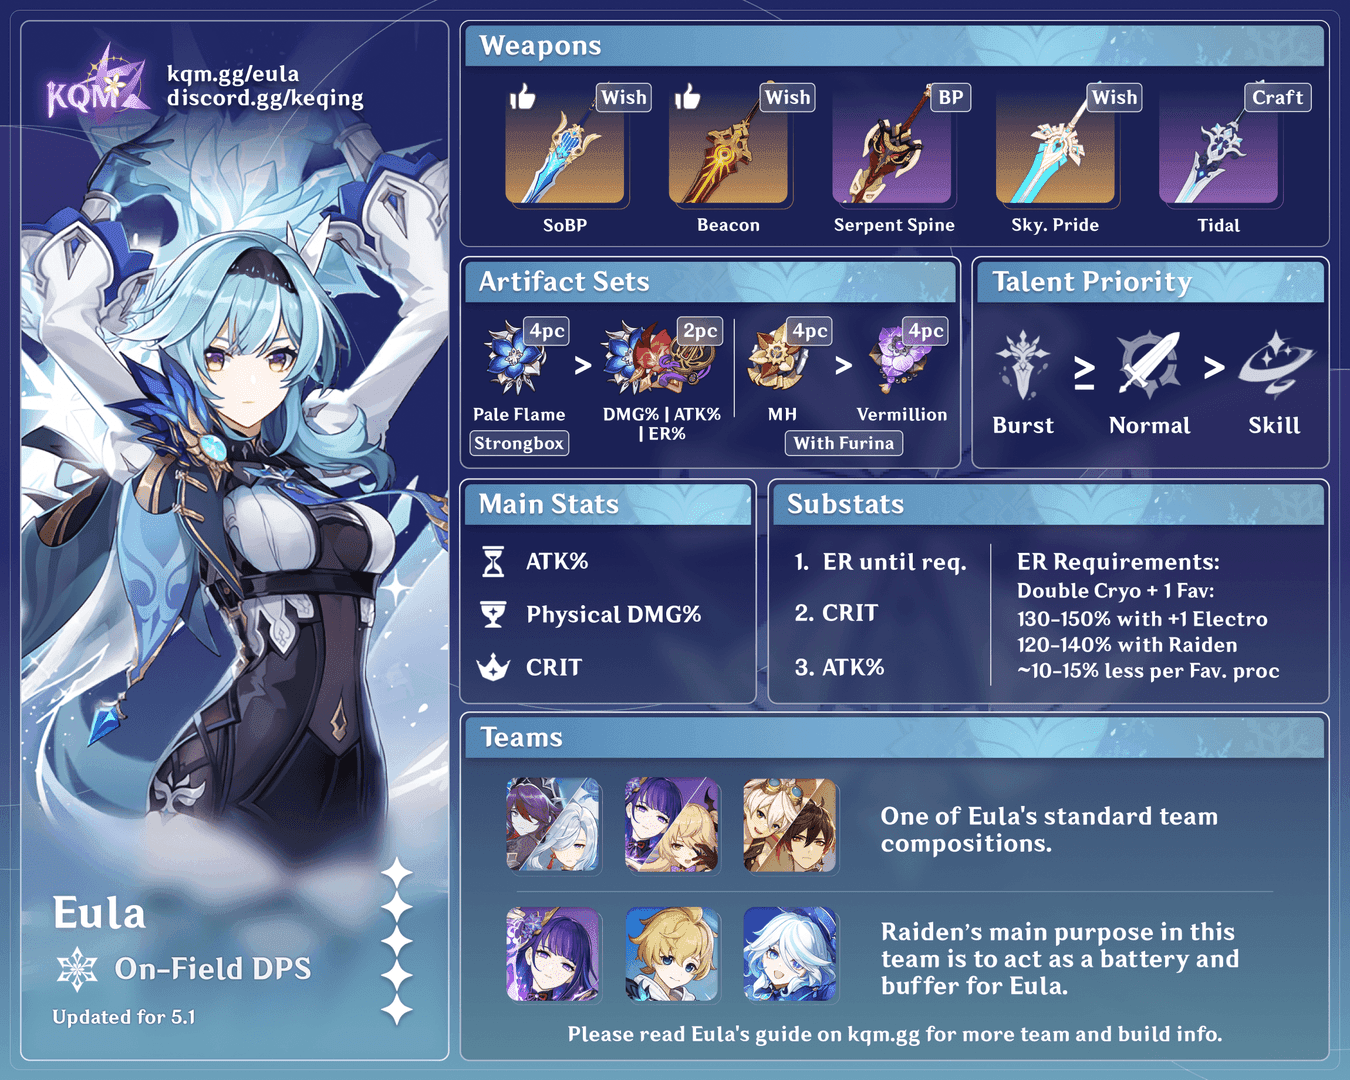
Weapons and ER: Tailoring to Your Blade
Skyward Pride's 36.8% ER substat pushes you over 200% without killer batteries, freeing subs for Crit/ATK; Song of Broken Pines (0% ER) thrives in high-battery for top DPS. Favonius Greatsword's RNG (up to 60%) suits supports better. Pick based on team particles—for low-battery, Pride + ER Sands; test uptime in rotations.
Skyward Pride: ER Baked Right In (36.8% Base)
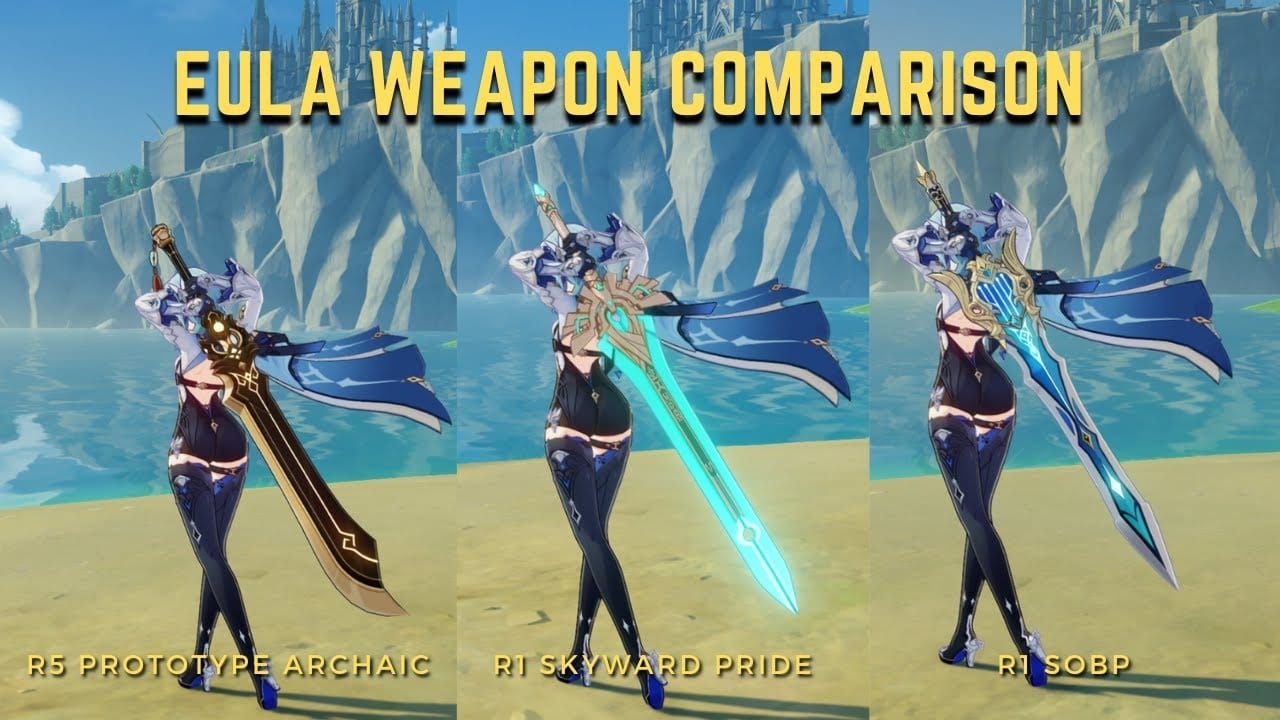
At level 90, it's 36.8% ER + 8% DMG passive, hitting 150% total sans subs for +20% uptime. Beats Pines in ER crunch. Equip in solo Cryo, pair with ATK Sands, stack in 7 seconds for peak output. Solid choice.
Song of Broken Pines: High DPS, But ER Hurdles
Zero ER substat means sourcing 160% elsewhere in low-battery, though high ATK scales Burst huge. Tweak to 130% with Raiden. Use in battery teams, boost via subs, avoid without funneling. Premium feel, premium demands.
Serpent Spine and 4-Stars: Juggling ER Substats
Serpent Spine (no ER) calls for 140%+ subs; 4-stars like Snow-Tombed Starsilver help F2P to 150%. Akuoumaru likes high-ER teams. Prioritize ER rolls, hybrid with 2-piece Emblem, test against Pride for DPS. Versatile.
F2P Picks: Luxurious Sea-Lord and Snow-Tombed Starsilver
Prototype Archaic (no ER) begs 160% F2P; Sea-Lord eases with light ER. Farm subs, pair with Diona battery, aim for 145% comfort. Gets the job done without the wallet hit.
Pitfalls and Myths: ER Traps Every Eula Main Falls Into
Overlooking team funneling? You're dumping >200% ER on Eula when 2-3 support particles would fix it. ER Sands sans battery costs 10-15% DPS; stacking to 200%+? Diminishing returns city. Calculate team particles, cap at 150%, Favonius on supports. Common slip-ups, but easy fixes.
Busting the Myth: Eula Always Wants 130% ER
Nah—it swings from 120% with Raiden to 160% F2P; the myth skips comps. C6 Fischl eases to 150%. Debunk with the formula, tweak per team, simulate to confirm. Flexibility's key.
Overkill: Spotting When ER's Too Much
Past 150%, each 10% adds <2% DPS—better spent on Crit. 4-piece Emblem wastes on NA-heavy. Check total, respec to ATK, steer clear of 160%+. (Subjective bit: I've overbuilt and regretted it—feels wasteful.)
Forgetting Rotation Timing in Your ER Math
20 seconds needs 130% vs. 24 seconds at 120%; off-field particles get missed a lot. Time switches, funnel pre-Burst, test in Abyss. Details matter.
The Raiden Crutch: Don't Get Stuck
Raiden unlocks 120%, but sans her, 160% it is; 2025 hybrids bridge it. Diversify batteries, build buffer, adapt for non-Raiden. Broader toolkit wins.
Real-World Use: Spiral Abyss Breakdowns
In Floor 12-3 single-target, 130% ER clears in one rotation vs. 110%'s two; multi-target floods particles for 120%. 20-second speedruns? 130%. 24 seconds? 120% works. Pre-apply Superconduct, Burst ASAP, stack in 7 seconds with Favonius on adds. Practical gold.
Single-Target Bosses on Floor 12
130% guarantees three rotations per fight; low ER slashes 50% DPS. Rosaria enables one-rotation wins. Funnel particles, time for 95% uptime, adjust subs. Clutch.
Multi-Target Rooms: When Energy's Plentiful
Extra NAs spawn generics, dropping to 120%. 2025's Mika helps big. Hold E for particles, resonance for efficiency, optimize for 30+ stars. Abundance mode.
Speedy 20-Second Runs vs. Chill 24-Second Loops
20s: 130% for perfection. 24s: 120% fine. Sequence for 4-5 particles, add 20% buffer, test speed. Pick your pace.
Tweaking ER for Abyss Matchups
Unfavorable mods? +20% ER. Hyperbloom tweaks to 135%. Scout the lineup, swap Sands if needed, pre-funnel. Adapt or bust.
Your Optimization Roadmap and Decision Guide
Tally base ER from gear. 2. Layer artifacts/subs. 3. Test for >95% uptime. 4. ER Sands if under 130%. Decision tree: 2+ batteries = ATK Sands, 120% subs; 1 battery = ER Sands, 150%; none = Skyward Pride + ER. For 2025, factor Mika for 120%.
Assessing ER Step by Step for Your Setup
Kick off with weapon (Pride's 36.8%, say); aim 130% total. List particles, run formula, farm subs (4+ rolls for 20%). Straightforward.
Farm ER Substats or Hunt New Pieces?
Ridge Watch for 2-piece Emblem +20%; prioritize under 130%. If downtime >5s, farm ER; else Crit. Hybrid Pale Flame. Choices.
Building Teams Around Eula's Energy Hunger
Rosaria/Diona for 130%; Raiden for 120%. Add Cryo resonance, Favonius on battery, F2P Fischl C6 for 150%. Core strategy.
Prepping Eula for 2025 and Beyond
Newbies like Furina barely touch ER; meta sticks to 130% Superconduct. Update for Mika particles, cap at 140% Abyss, recalculate quarterly. Future-proof.
Pro Tips: Mastering Eula's Energy Like a Boss
Nail frame-perfect swaps post-Skills for max funnel; pre-load energy before her field time for 5+ in Burst. Unfavorable mods? +20-30% via Skyward or resonance. Time Hold E in the window, swap post-Burst to battery, manage for 100% uptime. Advanced, but rewarding.
Particle Funneling: Perfecting Those Swaps
Grab 90% on-field post-support for 12.5% bonus. 7-second window = two Skills + NAs = 5 energy. Practice timing, use in Abyss, optimize clears. Precision pays.
Pre-Funneling: Stock Up Before She Steps In
Off-field supports double gen. Battery Skills first, swap for collection, resonance amps it. Setup strong.
Handling Tough Abyss Mods Energy-Wise
Buffer 20% for low-particle floors; C6 cuts 10-15%. Test adaptations, use Diona resets F2P. Resilient.
FAQs: Your Eula ER Questions Answered
How much ER does Eula need without a battery?
Target 150-160% in F2P solo Cryo setups, using ER Sands and 20-30% from sub-stats to generate 3-4 self-particles per 20s rotation. Ensures Burst every 20s, avoiding 30% DPS loss; calculate via 80 / 3 particles * 1.2 buffer.
Should I use ER Sands or ATK Sands on Eula?
Use ER Sands if total <130% for 20% uptime boost equaling 5-7% DPS from ATK Sands; above 130%, ATK Sands adds 4-6% via Normal/Burst scaling. In Rosaria teams, hit threshold with subs first, then ATK for 2025 meta.
Does Eula need ER with Raiden Shogun?
Only 120% suffices due to 20-30 energy refunds and 1.5 particles/rotation, enabling 100% uptime in hybrids. Sequence Raiden Burst > Eula Q; without C2, buffer to 130% for Abyss Floor 12 safety.
How many particles does Eula generate per rotation?
Standard 20s rotation (Tap E > Q > Tap E > N4 > Hold E > N4) yields 4-5 from Skills + NAs (1.5-2.5 per E, 1 per 4th NA), plus 2-3 from supports. At 140% ER, regenerates 80 energy; time Hold E post-Burst for max.
What is the ER threshold for Eula with Diona?
120-130% with Diona's Sacrificial Bow resets for extra particles, combined with Cryo resonance (1.5x efficiency). Funnel via Diona Skill pre-swap; test for 95% uptime, adjusting subs if delays in multi-target.
Does Skyward Pride solve Eula's energy problems?
Yes, 36.8% ER sub-stat enables 150% total without heavy subs in low-battery teams, adding +20% uptime vs. 0% ER weapons like Pines. Pair with ATK Sands in Raiden comps; ideal for F2P to free Crit stats in 20s rotations.