

The To Temper Thyself and Journey Far event (running December 1, 2025 through February 23, 2026) hands you a free 5-star Stella Fortuna—essentially worth anywhere from 90 to 160 pulls. You'll need to knock out 8 weekly training goals over 40 days (just your daily commissions plus spending 120 Original Resin), which unlocks C2 potential for a character of your choice. Let's break down which characters actually deserve that investment in version 6.2's Pyro and Bloom-heavy endgame.
How To Temper Thyself Actually Works
The event spans 12 weeks total, but you only need to complete 8 of those weeks. Each weekly goal is straightforward: finish 5 days of daily commissions and burn through 120 Original Resin. That's 40 active days when you add it all up.
The timing's interesting here. The December 1 launch coincides with version 6.2's Luna I Update, right when the meta's shifting hard toward Pyro damage dealers and Bloom reaction teams. And here's something worth noting—dedicated players can snag 4 free constellations annually through this permanent event structure. That's not nothing.
For players looking to supplement their constellation progress, buy Genshin C2 constellation chain genesis through BitTopup's platform for competitive rates and instant delivery.
What You're Actually Getting
The weekly rewards build toward that final Stella Fortuna: Mystic Enhancement Ore x20 (Week 1), Crown of Insight x1 (Week 2), Hero's Wit x10 (Week 3), Sanctifying Elixir x1 (Week 4), Mora x100,000 (Week 5), Dust of Enlightenment x1 (Week 6), Sanctifying Essence x1 (Week 7), and finally Stella Fortuna x1 (Week 8).
When you factor in the guaranteed constellation without dealing with pity RNG, the cumulative value exceeds 14,000-25,600 Primogems. The Stella Fortuna even carries over between rotations for long-term planning.
You'll need Adventure Rank 14 and completion of the Knights of Favonius Archon Quest to participate. Critical point: the Stella Fortuna only works for characters you already own. Claiming it for someone you don't have completely wastes the reward. The 120 Original Resin requirement fits naturally with artifact farming in universal domains like Emblem of Severed Fate or Crimson Witch of Flames, so you're not really going out of your way.
Understanding C2 Value (Not All Constellations Are Created Equal)
C2 unlocks typically deliver 50-100% damage increases or transformative utility boosts. But they fall into three distinct categories, and understanding these matters.
High-Impact Offensive Boosts are the straightforward damage dealers. Take Klee's C2—it provides 23% DEF shred for her entire team, which amplifies damage significantly against those high-defense Abyss enemies. Combined with her C1 Charged Attack enhancements, she jumps to A-tier Main DPS status in version 6.2's Pyro-favored Abyss floors.
Utility-to-Damage Conversions transform supports into hybrid powerhouses. Albedo's C2 is the poster child here. It adds off-field healing scaled to DEF while buffing party DEF by 30%, elevating him to SS-tier Sub-DPS. Pair him with version 6.2's Geo sword users like Xilonen, and his Fatal Blossom damage increases 40-70% through resonance synergies alone.
Reaction Amplifiers enhance elemental reaction damage team-wide. Nilou's C2 extends Hydro and Dendro RES reduction duration, boosting Bloom team damage 35-50% in sustained rotations. That's immediately valuable in version 6.2's Abyss Floor 12 first half Bloom compositions.
The Utility Side of Things
Hu Tao's C1 eliminates Charged Attack stamina consumption during Paramita Papilio, while C2 extends this with Blood Blossom damage—creating stamina-free rotations that maintain 2,000+ ATK without animation canceling. It's smooth.
Baizhu's C2 adds consistent off-field Dendro application through enhanced healing charges, enabling 800+ Elemental Mastery Dendro Traveler cores without those painful 180% Energy Recharge investments.
Mona's C2 provides 160% Hydro damage buffs and CRIT DMG bonuses for Hexenzirkel characters. This promotes her to SS-tier support through team-wide EM and CRIT scaling in Omen-based freeze compositions—and you only need 40% CRIT Rate via Blizzard Strayer artifacts, which frees up so many substats.
What's Actually Good in Version 6.2
The tier shifts prioritize specific characters. SS-Tier Promotions include Albedo C2 (healing/DEF), Mona C2 (Hydro/CRIT buffs), Fischl, and Sucrose. A-Tier Stabilizations cover Klee, Hu Tao, Xiao, and Ayaka—addressing their stamina, energy, and coverage limitations. Demoted Risks are Ganyu, Thoma, and Xiangling. They're lower priority unless already integrated into your teams.
The event's permanent nature means you can defer choices until future meta shifts. Don't feel pressured to decide immediately.
Optimizing Your Free Pull Strategy
F2P players accumulate roughly 10,000 Primogems per patch (62 pulls). Reaching C2 for rate-up 5-stars typically requires 180-270 pulls (28,800-43,200 Primogems) when you account for 50/50 losses and 90-pull hard pity.
How to Allocate Your Primogems
Owned C1 Characters: Claiming C2 for someone like Shenhe (Energy +1, Spring Spirit charges) or Hu Tao delivers immediate 50%+ performance increases. This is the highest value scenario—equivalent to saving 14,400 Primogems (90 pulls).
Owned C0 Meta Characters: Advancing Albedo, Mona, or Nilou from C0 to C1 establishes the foundation for future C2 chains via subsequent event rotations. It's playing the long game.
Standard Banner Characters: Using Masterless Fortuna for characters like Tighnari enables constellation progression without rate-up commitments. Reserve this for players with complete limited rosters.
For primogems supporting event optimization and banner pulls, Genshin Impact primogems buy Durin quest teams through BitTopup offers fast delivery and secure transactions.
Banner Priority Decisions
Version 6.2 Phase 1 (December 3-23, 2025) features Durin as the rate-up, requiring 71 F2P pulls for average acquisition.
New Character Advantages: Durin's SS-tier Sub-DPS potential with Dark Decay Vaporize amplification (40-70% damage increase) provides roster flexibility for players lacking strong Pyro/Geo options.
Constellation Chain Advantages: Completing C2 for owned meta characters strengthens existing teams without learning new rotations. This suits players with established Abyss clear teams.
The event's 4-per-year frequency allows balanced strategies: claim C2 for immediate power spikes, then save primogems for new character banners.
Working the Pity System
The event Stella Fortuna operates outside standard pity, but understanding the mechanics maximizes combined value. Soft pity increases 5-star rates after 74 pulls with 90-pull hard pity.
Players at 60+ pity should consider whether completing banner pulls or saving for future rate-ups better complements event constellation choices. The event's guaranteed character-specific constella

tion eliminates 50/50 loss scenarios—so if you recently lost 50/50, you can use guaranteed rate-up pulls for new characters while claiming event constellations for existing roster members.
Character-Specific C2 Investment Guide
The Top-Tier Picks
Klee (C2: DEF Shred): Reduces enemy DEF by 23% for 10 seconds when mines and Charged Attacks hit, stacking with C1 damage bonus. In version 6.2's Pyro-dominant Abyss, this enables National Overvape teams clearing Floor 12 chambers under 420 seconds. Her promotion to A-tier Main DPS stems from smoother Charged Attack rotations maintaining 2,000+ ATK without animation canceling.
Albedo (C2: Healing + DEF Buff): Off-field healing scaled to DEF plus 30% party DEF buffs transforms him into SS-tier Sub-DPS. Paired with Durin's Geo resonance and Xilonen support, Fatal Blossom damage increases 40-70%. The healing eliminates dedicated healer slots in Geo teams, freeing positions for additional Sub-DPS. You'll need 140-160% Energy Recharge for consistent Burst uptime.
Mona (C2: Hydro Buff + CRIT DMG): Version 6.2's Hexenzirkel passive updates elevate C2 to SS-tier support through 160% Hydro damage buffs and team-wide CRIT DMG bonuses. Omen debuff extension synergizes beautifully with Freeze teams requiring only 40% CRIT Rate via Blizzard Strayer, redirecting substats to CRIT DMG and ATK%. C2 Charged Attack damage against Omen-affected enemies adds personal damage beyond pure support.
Nilou (C2: RES Reduction Extension): Extending Hydro and Dendro RES reduction duration creates 35-50% team damage increases in sustained rotations. Version 6.2's Abyss Floor 12 first half favors Bloom and Lunar-Bloom compositions. Pairs optimally with Baizhu C2 for consistent Dendro application and off-field healing.
Baizhu (C2: Dendro Application): Enhanced healing charges provide consistent off-field Dendro for Hyperbloom teams, solving energy issues that would otherwise require 180% Energy Recharge. This frees artifact substats for 800+ Elemental Mastery builds on Dendro Traveler. A-tier support status stems from Universal Diagnosis C1 chaining to C2's application frequency.
Situational Value Characters
Hu Tao (C1 Foundation): C1 eliminates stamina consumption during Paramita Papilio; C2 adds Blood Blossom damage requiring specific team compositions. Players owning C1 should prioritize event constellation for stamina-free rotations, but C0 players gain more value from other options unless committed to Pyro carry investments.
Xiao (C1: Skill Charge): Additional Lemniscatic Wind Cycling charge improves plunge rotation flexibility, but C2's Burst coverage extension provides the true power spike. Event Stella Fortuna should target C1→C2 chains rather than C0→C1 unless Xiao serves as your primary DPS. A-tier Main DPS status requires 140-180% Energy Recharge even with constellations.
Ayaka (C2: Burst Coverage): Improved Kamisato Art: Soumetsu coverage enhances Freeze team sustainability, but damage scaling relies more on artifact quality (70% CRIT Rate, 160% CRIT DMG benchmarks) than constellation depth. Situationally valuable for players with established Freeze teams lacking other priorities.
Shenhe (C1 Foundation): C1 Energy +1 and Spring Spirit charge increases position her as top priority for Freeze teams, with C2 extending benefits. Limited team compatibility (Cryo DPS only) makes this investment situational versus universal supports like Albedo or Mona.
Characters to Skip at C2
Standard Banner 5-Stars Without Masterless Fortuna: Claiming event Stella Fortuna for Standard Banner characters like Tighnari, Dehya, or Qiqi wastes the reward unless using Masterless Fortuna variant for permanent pool characters.
Demoted Tier Characters: Ganyu, Thoma, Xiangling experienced tier drops in version 6.2.
Their C2 investments offer lower returns than promoted SS/S-tier options unless already integrated into established teams with significant artifact investment.
Unowned Characters: Event Stella Fortuna applies exclusively to owned characters. Selecting constellations for unacquired units completely wastes the reward with no carryover. Don't make this mistake.
Resource Management for Constellation Chains
Budgeting Your Resin
The 120 Original Resin daily requirement aligns with natural regeneration (180/day), leaving 60 resin for flexible use. Here's optimal allocation:
Universal Artifact Domains (80-100 Resin/Day): Emblem of Severed Fate and Crimson Witch provide artifacts for multiple archetypes. Emblem's 4-piece converts 25% Energy Recharge to Burst DMG, supporting Durin (140-160% ER) and Xiao (140-180% ER).
Talent Domains (20-40 Resin/Day): Minimum 6/6/6 talent levels for DPS and 1/6/6 for supports ensure constellation upgrades translate to performance gains. Week 2's Crown of Insight enables 9→10 upgrades for primary damage talents.
Boss Materials (0-20 Resin/Week): Reserve Fragile Resin (2-3 per cycle) for emergency boss farming if ascension gates constellation effectiveness. Prioritize domains during event weeks.
Planning Long-term
The permanent 4-per-year structure enables multi-rotation chains:
Rotation 1 (Dec 2025-Feb 2026): Claim C2 for highest-priority owned C1 character.
Rotation 2 (Est. Mar-May 2026): Advance second-priority C0→C1 or complete alternative C1→C2.
Rotation 3 (Est. Jun-Aug 2026): Target new character acquisitions from intervening banners.
Rotation 4 (Est. Sep-Nov 2026): Reassess meta shifts and tier changes, prioritizing buffed characters or new artifact synergies.
This balances immediate power spikes with long-term development. Don't tunnel vision on one character.
Emergency Reserves
Maintain 1,600 Primogems (10 pulls) as emergency reserves for unexpected rate-up banners. The event's guaranteed constellation reduces pressure to pull duplicates, allowing primogem accumulation for new character acquisitions. Keep at least 20 Fragile Resin in reserve for talent domain farming during double-drop events or emergency character building.
Event Reward Maximization
Daily Task Optimization
Completing 5 daily commissions requires 15-20 minutes with optimized routing.
Commission Clustering: Prioritize Mondstadt and Liyue where locations cluster near teleport waypoints. Inazuma, Sumeru, and Fontaine involve longer travel times.
Resin Spending Efficiency: Use Condensed Resin (maximum 5 stored) to complete artifact domains in 2-3 runs instead of 6, reducing active playtime to 5-10 minutes.
Parametric Transformer Integration: The weekly gadget converts excess materials into talent books, weapon crystals, and Mora without additional resin. Time the 7-day cooldown to align with event week transitions.
Shop Priority Rankings
Week 2 Crown of Insight: Highest priority for talent 9→10 upgrades on primary DPS receiving C2 constellations. Limited availability (~30 total in-game) makes this irreplaceable.
Week 4/7 Ascension Materials: Sanctifying Elixir and Essence reduce boss farming by 1-2 runs (40-80 resin saved), equivalent to 2-4 artifact domain attempts.
Week 5 Mora: 100,000 Mora covers roughly 40% of a single talent 8→9 upgrade cost (420,000 total).
Week 1/3 Experience Materials: Mystic Enhancement Ore and Hero's Wit provide incremental value but are easily farmable.
Time-Efficient Completion
The 12-week window with 8-week completion requirement allows 4 weeks buffer.
Minimum Engagement: 5 days/week × 8 weeks = 40 total days. You can miss up to 16 days while claiming all rewards.
Catch-Up Mechanics: Weeks don't require consecutive completion. Missing Week 2 still allows Week 3-10 progression if 8 total weeks reach thresholds before February 23, 2026.
Resin Overflow Prevention: The 120 daily resin requirement prevents capping at 160/160 but doesn't require perfect optimization. Spending 120+ resin even inefficiently fulfills training goals.
Team Synergy and C2 Integration
Meta Team Compositions
National Overvape (Pyro Focus): Hu Tao C2 (stamina-free Charged Attacks) + Xingqiu (Hydro) + Xiangling (Sub-DPS) + Bennett (healing/ATK) dominates version 6.2's Pyro-favored Abyss second half. Hu Tao's C2 enables consistent Vaporize without animation canceling, maintaining 2,000+ ATK through Bennett's Burst while Xiangling provides off-field Pyro for Overload.
Geo Resonance (DEF Scaling): Albedo C2 (healing/DEF buff) + Durin (Vaporize amplification) + Xilonen (support) + Flex (Pyro/Geo) leverages version 6.2's Geo sword synergies. Albedo's 30% DEF buff amplifies Durin's Dark Decay damage 40-70%, while off-field healing eliminates dedicated healer requirements. Both need 140-160% ER for Burst rotation consistency.
Bloom Dominance (Dendro/Hydro): Nilou C2 (RES reduction) + Baizhu C2 (Dendro application) + Dendro Traveler (800+ EM cores) + Hydro Flex creates 35-50% damage increases through extended RES shred. Baizhu's enhanced healing charges solve energy generation, allowing Dendro Traveler full EM investment without ER substats. Optimal for Abyss Floor 12 first half Bloom chambers.
Freeze Optimization (Cryo/Hydro): Ayaka C2 (Burst coverage) + Mona C2 (Hydro/CRIT buffs) + Shenhe C1 (Spring Spirit charges) + Anemo Flex (VV shred) requires only 40% CRIT Rate through Blizzard Strayer 4-piece, redirecting substats to 160%+ CRIT DMG. Mona's SS-tier promotion through Hexenzirkel buffs provides team-wide EM and CRIT scaling.
Elemental Reaction Optimization
Vaporize Amplification: Klee C2 DEF shred + Mona C2 Hydro buffs create multiplicative damage scaling. Klee's mines trigger Vaporize on Mona's Hydro application, with DEF reduction amplifying the 1.5x/2.0x reaction multiplier by an effective 23% damage increase against high-DEF enemies.
Bloom Consistency: Nilou C2 + Baizhu C2 extends Dendro Core damage windows through RES reduction duration and application frequency. Each Bloom reaction benefits from extended -30% Hydro/Dendro RES, with Baizhu's healing charges ensuring consistent Dendro aura.
Crystallize Utility: Albedo C2 healing reduces Crystallize shield reliance in Geo teams, allowing aggressive rotations. The 30% DEF buff applies to shield strength calculations, creating 40-50% stronger Crystallize shields for interruption resistance.
Common Constellation Investment Mistakes
Impulse Pulling Prevention
Mistake: Claiming C2 for recently acquired characters without testing playstyle compatibility.
Solution: Spend 1-2 weeks using new C0 characters in Spiral Abyss and domains before committing event Stella Fortuna.
Example: Players acquiring Xiao should test plunge rotations and high ER requirements (140-180%) before using event constellations. If C0 feels unsatisfying, C1/C2 won't fundamentally change the experience.
FOMO Management
Mistake: Prioritizing limited character constellations over Standard Banner options due to perceived rarity despite lower value.
Solution: Evaluate constellation impact objectively using damage calculators.
Example: Albedo's SS-tier promotion through C2 healing/DEF buffs offers universal Geo team value, while a limited character's C2 improving personal damage only 15-20% provides narrower benefits. The event's 4-per-year frequency allows claiming both over multiple rotations.
Value Miscalculations
Mistake: Assuming all C2 constellations provide equal 50%+ damage increases without accounting for diminishing returns.
Solution: Research character-specific constellation breakpoints. Some gain more from C1 (Hu Tao stamina) or C4/C6 (Tighnari) than C2.
Example: Ayaka's C2 improves Burst coverage but doesn't address core dependency on Freeze compositions and 40% CRIT Rate artifact requirements. Players lacking strong Hydro applicators gain minimal value versus investing in support constellations enabling multiple team compositions.
Advanced Optimization Strategies
Calculation Tools and Methods
DPS Calculators: Input character stats, weapon, artifacts, team buffs, and constellation levels to compare C0 vs C2 damage outputs. Reliable calculators account for rotation timings, energy generation, and elemental reaction uptime—providing realistic damage estimates.
Key Metrics: Focus on sustained DPS over 20-second rotations rather than single-hit burst damage. C2 constellations improving energy generation or reducing cooldowns often provide higher sustained DPS despite lower screenshot numbers.
Constellation Efficiency Ratios: Divide estimated DPS increase by primogem cost (14,400 for guaranteed constellation). Event Stella Fortuna offers infinite efficiency at zero cost, but comparing C2 options reveals which characters gain most.
Account Progression Planning
Early Game (AR 1-45): Avoid using event Stella Fortuna until reaching AR 45 and unlocking guaranteed 5-star artifact domains. Character constellations provide minimal value without proper artifact sets.
Mid Game (AR 45-55): Target C2 for primary DPS with established artifact sets meeting 70% CRIT Rate / 160% CRIT DMG benchmarks. Support constellations offer lower returns until DPS characters reach damage thresholds.
Late Game (AR 55+): Optimize support and Sub-DPS constellations (Albedo C2, Mona C2, Baizhu C2) enabling faster Abyss clears and alternative team compositions. Account flexibility outweighs raw damage increases on single carries.
Future Banner Preparation
Version 6.3+ Predictions: Historical patterns suggest Pyro and Geo character rate-ups following version 6.2's focus. Players claiming C2 for Klee or Albedo position accounts for potential synergistic new characters or artifact sets.
Rerun Tracking: Limited characters typically rerun every 6-12 months. Players at C1 for characters due for reruns should reserve event Stella Fortuna for immediate C2 completion rather than starting new C0→C1 chains.
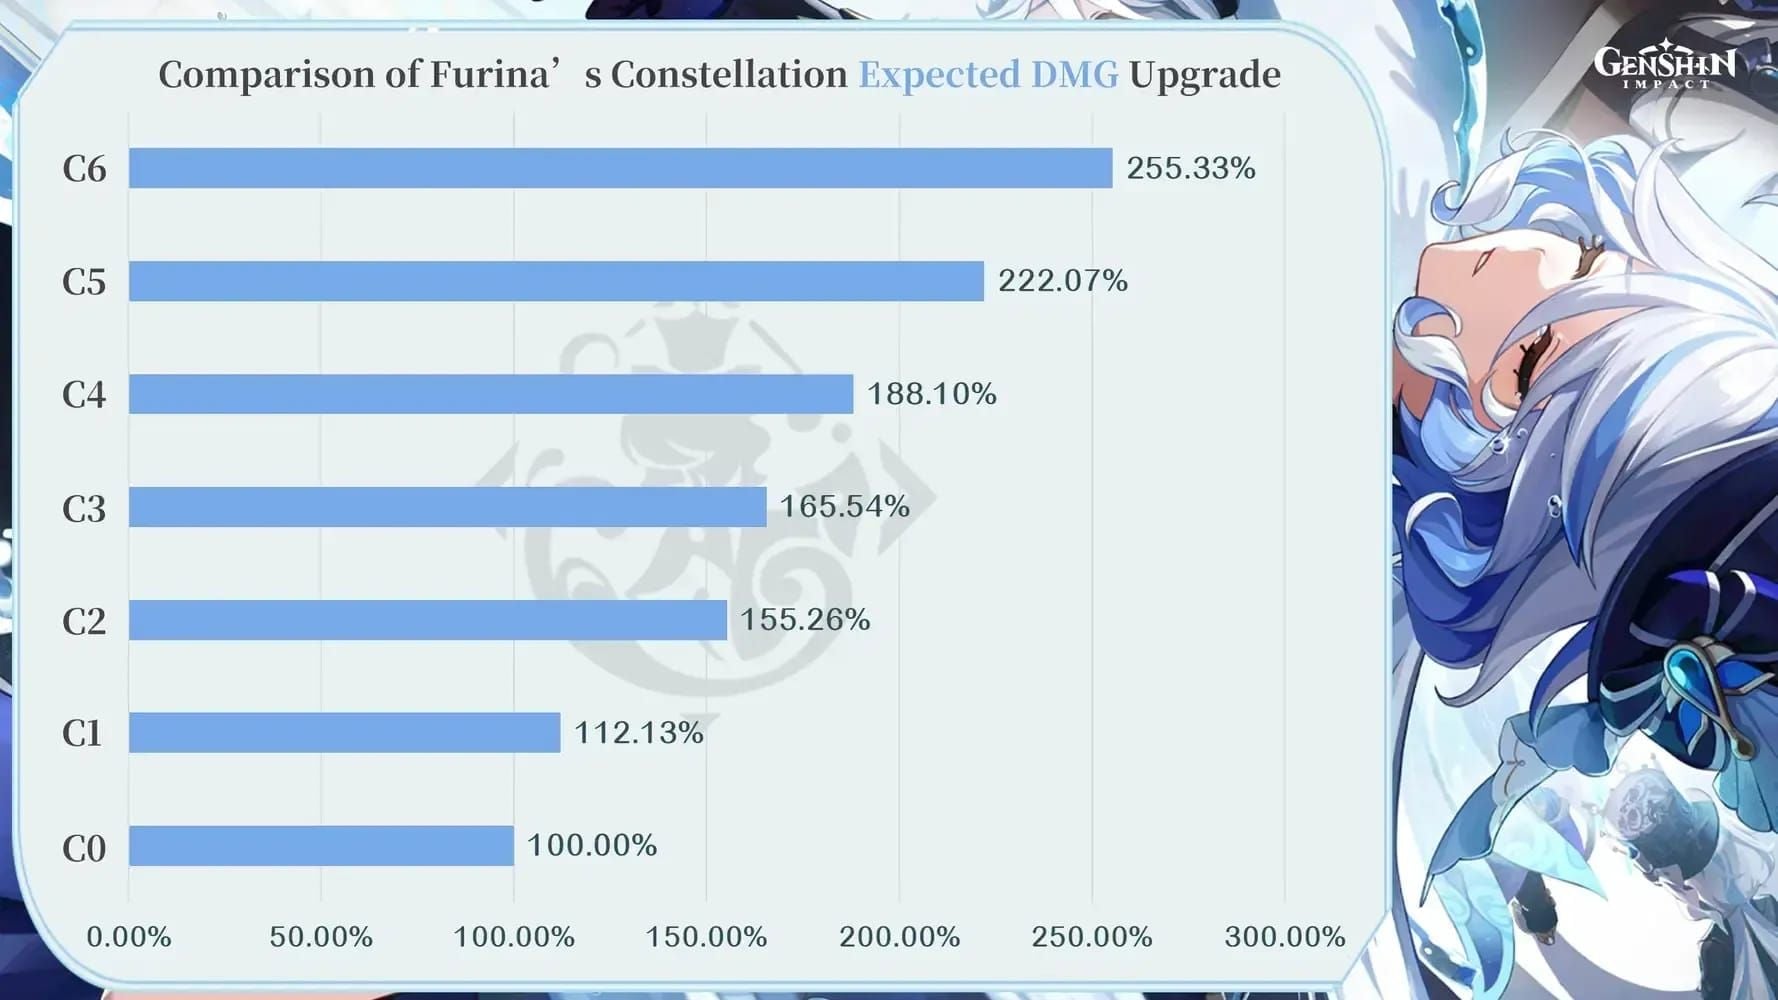
Archon Constellation Value: Archon characters (Venti, Zhongli, Raiden, Nahida, Furina) historically maintain meta relevance across versions. Their C2 constellations often provide transformative upgrades—prioritize event Stella Fortuna for owned Archons at C1.
FAQ
How does the To Temper Thyself event work in Genshin Impact? Complete 5 daily commissions and spend 120 Original Resin per day for 5 days each week across 8 weeks within December 1, 2025 – February 23, 2026 to unlock a free character-specific Stella Fortuna (constellation) in Week 8, plus Crown of Insight and ascension materials.
Is C2 worth it for free-to-play players? Absolutely. C2 for meta characters like Klee, Albedo, Mona, or Nilou provide 50-100% damage increases worth 14,400-25,600 Primogems (90-160 pulls). The event's guaranteed constellation eliminates gacha RNG, making it the highest-value F2P resource in version 6.2.
What are the best characters to get C2 constellations for? Prioritize Albedo (SS-tier healing/DEF buffs), Mona (SS-tier Hydro/CRIT support), Klee (A-tier DEF shred), Nilou (Bloom RES reduction), and Baizhu (Dendro application) based on version 6.2 tier promotions. Choose characters owned at C1 for immediate power spikes.
How many free pulls can you get from To Temper Thyself event? One guaranteed 5-star constellation (Stella Fortuna) worth roughly 90-160 pulls in primogem value, plus Crown of Insight, ascension materials, and 100,000 Mora. Total value exceeds 15,000 Primogems accounting for material costs.
Should I pull for C2 or save for new characters? Use event Stella Fortuna for C2 on owned meta characters while saving primogems for new acquisitions. Version 6.2's permanent event provides 4 free constellations yearly—balance immediate optimization (C2 for established carries) with roster expansion (new characters from banners).
Which C2 constellations provide the biggest damage increase? Klee C2 (23% DEF shred), Hu Tao C2 (stamina-free Charged Attacks with Blood Blossom), and Nilou C2 (35-50% Bloom damage through RES reduction) deliver the largest DPS increases. Supports like Albedo C2 and Mona C2 provide 40-70% team-wide damage improvements through buffs and healing utility.