

Genshin Impact's 6.2 update drops Durin on December 3, 2025—a 5-star Pyro Sword character who's already shaking up the meta. The Hexerei domain mechanics enable some seriously powerful hypercarry strategies through RES shred (20-35%) and damage amplification that can hit +75%. Early player testing shows teams like Durin/Venti/Bennett/Fischl clearing 36-star Spiral Abyss with optimized builds: Emblem 4-piece, 2,500 ATK, 60-70% CRIT Rate, 140-180% ER. The dual White/Dark forms open up Overload, Vaporize, and Melt reactions in ways we haven't seen before.
Understanding Genshin 6.2 Durin Quest Domain Mechanics
The Hexerei system completely reshapes how hypercarry viability works through multiplicative damage scaling. Here's the thing—you need two qualifying Magic characters like Venti to make it work properly.

White Form triggers a hefty 35% Pyro RES shred on Swirl/Burning reactions that lasts 6 seconds. When Venti's Burst Swirls with Hexerei active, you're looking at +50% damage for 4 seconds. Dark Form takes a different approach, focusing single-target damage with +40% Vaporize/Melt amplification (jumping to 70% with Hexerei active).
The Ascension passives are where things get interesting. At Ascension 1, you unlock +75% damage when running 2+ Hexerei qualifiers. Ascension 4 adds another +75% ATK-based damage on Burst stacks through something called Primordial Fusion.
For players who need to recharge Genshin temper thyself primogems fast before the December 3-23 Phase 1 banner, BitTopup offers competitive rates with instant delivery.
New Environmental Interactions
Witch's Eve Rite is a game-changer—it amplifies elemental damage by 50% when Magic characters trigger reactions. Floor 12 Spiral Abyss now grants 6 Hermit Seeds that apply -40% RES debuffs through Bloom reactions.
One quirk to watch out for: Overload knockback. You'll need to position enemies against walls for clustering, but Venti's Burst grouping maximizes White Form AoE during those critical 20-second rotation windows.
Elemental Resonance Changes
Pyro Resonance (+25% ATK) synergizes beautifully with Bennett's Ascension 4 passive. In practice, this pushes Durin's ER from a baseline 100-120% up to 140-180%, which means you can skip ER Sands entirely and run ATK% main stats to hit that 2,500 ATK benchmark.
Electro Resonance works too in Overload comps with Fischl, generating particles during Oz's off-field duration.
Timing-Based Buff Systems
Hexerei operates on strict windows—and I mean strict. You've got to execute Venti Skill → Burst (Swirl Pyro) → Durin E (White) + E + Q within 6 seconds for full RES shred. Miss that window and you're leaving damage on the table.
The 12-second Burst cooldown and 70 Energy cost demand precise particle collection. What works best is funneling during Venti's Skill, which recovers 15-20 Energy. Bennett's 12-second ATK buff requires you to fire off Durin's Burst within 2 seconds of Bennett's animation to maximize those +75% ATK DMG passive stacks.
Top Hypercarry Characters for Durin Quest Teams
Durin's already hit SS-tier Sub-DPS status on the December 3, 2025 tier list alongside Jahoda, Fischl, Chevreuse, Sucrose, Mona, Klee, Venti, and Razor. That's reflecting some serious endgame dominance through future-proof Pyro application and transformative reaction scaling.
Pyro Hypercarry Analysis
Durin's damage ceiling sits at 29,702 DPS with the signature Athame Artis (608 Base ATK, 33.1% CRIT Rate, +32% Burst DMG). But here's what experienced players know: Wolf-Fang R5 achieves 26,717 DPS—that's 93.83% efficiency with 510 ATK and 27.6% CRIT Rate. Not bad for a craftable weapon.
The Burst peaks at a 281.5% single-target multiplier, scaling with 10 Primordial Fusion stacks that grant +75% damage post-Burst.
Arlecchino/Durin/Fischl/Chevreuse leverages Light Form for 40% Pyro/Electro RES shred. The rotation goes: Chevreuse Skill/Burst → Durin Skill (Light) → Burst → Arlecchino maintains 100% Overload uptime. Player testing cleared Floor 12-3's 10M HP boss in 90 seconds flat.
Hydro Hypercarry Potential
Kinich/Durin/Emilie/Bennett exploits Dark Form's +40-70% Vaporize amplification. The rotation applies Hydro → Durin Skill + Normal Attack (Dark) → Burst → main DPS swap, capitalizing on that 30-second Dark Decay cooldown. Bennett's +25% ATK elevates ER to the sweet spot of 140-180%.
Anemo Hypercarry Strategies
Venti hypercarry represents the Hexerei pinnacle. Venti + Durin unlocks +75% damage through dual Magic qualifiers, and Viridescent Venerer 4-piece (-40% shred) stacks multiplicatively with White Flame's -35% shred.
Daybreak Chronicles (44.1% CRIT DMG, 60% DMG Bonus) outperforms Polar Star by 15-20% for Venti in this setup. You're targeting 2,500+ ATK, 60-70% CRIT Rate, 150%+ CRIT DMG, and 140-180% ER.
Optimal Hypercarry Team Compositions and Synergies
Player-tested 36-star Spiral Abyss clears validate four main archetypes: Overload, Vaporize, Melt, and National Overvape.
Core Team Structure
Durin/Venti/Bennett/Fischl (Overload): This is the bread-and-butter comp. Venti C0 provides Hexerei qualification and -40% Anemo RES shred through Viridescent Venerer. Bennett C0 delivers +25% ATK and healing. Fischl C0's Oz triggers continuous Pyro Overload. Clears Floor 12 chambers under 420 seconds with E0S1 investment.
Durin/Venti/Xiangling/Bennett (National Overvape): Xiangling's Pyronado snapshots Bennett's ATK buff for dual Pyro application. You sacrifice some of Hexerei's full potential, but you gain AoE quadratic scaling in grouped scenarios.
Durin/Venti/Rosaria/Barbara (Melt): This targets Dark Form's +70% Melt amplification. Rosaria provides CRIT Rate sharing and Cryo application; Barbara enables Freeze extensions. Rotation: Barbara Skill → Rosaria Burst → Durin E (Dark) + Burst → Venti Burst maintains Cryo aura for Melt on that 281.5% Burst multiplier.
Support Character Selection
Bennett's non-negotiable for ATK scaling and ER補正. His Ascension 4 passive (+25% ATK) pushes Durin from 100-120% to 140-180% ER. Talent Level 9+ increases base ATK scaling, amplifying Durin's +75% ATK DMG passive.
Fischl alternatives exist—Lisa provides Electro and DEF shred—but Oz's 10-second duration and particle generation (0.6-0.7 per hit) offer superior energy economy. Xingqiu enables F2P National teams (Xiangling/Durin/Xingqiu/Bennett) through Hydro application and damage reduction, achieving 36-star clears without 5-star Nod-Krai characters.
Elemental Reaction Optimization
Overload: Light Form's AoE damage and 35% RES shred shine here. Wall positioning mitigates knockback issues. The 20-second rotation: Venti Skill → Burst (Swirl Pyro) → Durin E+E+Q (White Flame) → Bennett Q → Fischl Oz → Venti Burst cycles Hexerei with 100% uptime.
Vaporize: Dark Form's +70% amplification for single-target content. Hydro application precedes Durin's Skill + Normal Attack. Kinich/Durin/Emilie/Bennett achieves this through Emilie's off-field Hydro.
Melt: Cryo from Rosaria/Kaeya works beautifully. Kaeya/Durin/Rosaria/Barbara applies Cryo → Durin Skill (Dark) → Burst, leveraging that 1.5x Melt multiplier on 281.5% Burst for effective 422.25% scaling before CRIT and RES shred calculations.
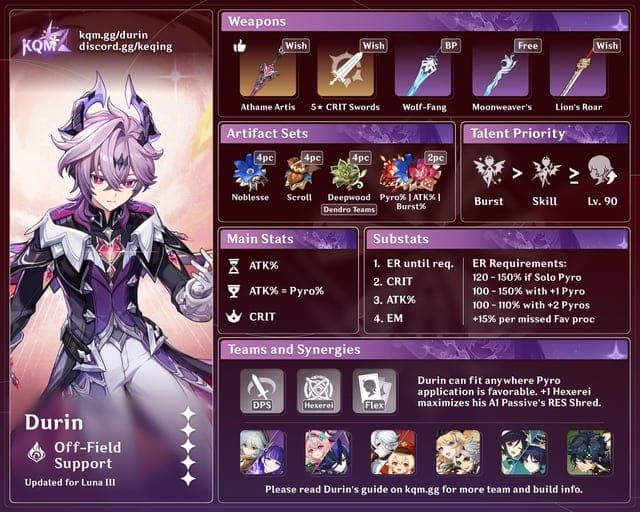
Artifact Sets and Stat Optimization for 6.2 Meta
Emblem of Severed Fate 4-piece dominates through +20% ER and +25% Burst DMG per 50% ER. At 140% ER, you're looking at +70% Burst DMG, which scales multiplicatively with Hexerei's +75% damage and Athame Artis's +32% Burst DMG.

Primary Stat Priorities
Sands: ATK% when Bennett provides ER補正 to 140-180%. ER% Sands becomes mandatory below 140% ER, though you're sacrificing 46.6% ATK for 51.8% ER. The breakpoint calculation: (70 Energy ÷ 12s CD) × (1 - ER%) = particles required. At 140% ER, Durin needs 30 particles; Venti Skill (3-4) + Bennett Skill (2-3) + Fischl Oz (0.6/hit × 10s) + natural regen (1/3s) provide 25-30.
Goblet: Pyro DMG% grants 46.6% damage, outperforming ATK% Goblet's ~20%. Elemental DMG bonuses apply multiplicatively with ATK, CRIT, and RES shred.
Circlet: CRIT Rate% until you hit 60-70%, then switch to CRIT DMG%. The 1:2 ratio optimization shows 70% Rate with 140% DMG outperforms 60% Rate with 120% DMG. Durin's Level 90 ascension grants +38.4% CRIT DMG baseline.
Substat Distribution
Benchmarks to aim for: 2,000-2,500 ATK, 60-70% CRIT Rate, 150-200% CRIT DMG, 140-180% ER.
Prioritize CRIT Rate/DMG until your ratios stabilize, then ER to threshold, finally ATK%. An ideal +20 Emblem Flower would have: 3.9% CRIT Rate, 7.8% CRIT DMG, 5.8% ER, 5.8% ATK%.
ER below 140% causes Burst rotation failures. Player testing shows 120% ER builds miss 1-2 Bursts per Floor 12 chamber, reducing DPS by 15-25%. Don't skimp here.
Set Bonus Comparisons
Emblem 4pc: +20% ER, +25% Burst DMG per 50% ER. At 160% ER, you're getting +80% Burst DMG. Best-in-slot for Burst-focused rotations.
Noblesse 4pc: +20% Burst DMG, team +20% ATK for 12s. Inferior for personal damage; Bennett typically carries this set instead.
Crimson Witch 4pc: +15% Pyro DMG, +40% Burst DMG on reactions. Requires triggers within 10 seconds. Emblem outperforms in sustained scenarios.
Viridescent Venerer 4-piece on Venti/Sayu for -40% RES shred stacks multiplicatively with Durin's -35%: (1 - 0.40) × (1 - 0.35) = 0.39 total resistance, effectively -61% shred against enemies with 10% base Pyro RES.
Weapon Recommendations and Passive Exploitation
Athame Artis (signature): 608 Base ATK, 33.1% CRIT Rate, +32% Burst DMG. Burst hits grant +40% ATK with team +32% ATK under Hexerei. The passive's 16-32% CRIT DMG on Bursts scales with refinement (32% at R5). Achieves 104.31% DPS efficiency.
5-Star Weapon Analysis
Primordial Jade Cutter: 542 Base ATK, 44.1% CRIT Rate, +20% HP and +1.2% ATK per 1% Max HP. Reaches 2,200-2,400 ATK with HP scaling but lacks Burst DMG amplification. Achieves 95-98% of Athame Artis DPS.
Mistsplitter Reforged: 674 Base ATK, 44.1% CRIT DMG, +12-28% Elemental DMG based on stacks. Requires Normal/Charged Attack sequences for 3 stacks, which complicates Burst rotations. Performs at 92-96% efficiency.
4-Star Alternatives
Wolf-Fang R5: 510 Base ATK, 27.6% CRIT Rate, +32% Burst DMG and +40% CRIT Rate for 6s after Burst. Achieves 93.83% of signature DPS (26,717 vs 29,702)—this is your premier F2P option. Requires R5 for competitive performance, though.
Absolution: Event-exclusive with CRIT DMG substat and Burst DMG passive. Comparable to Wolf-Fang R5 but limited availability makes it less accessible.
Moonweaver's Dawn R1: Quest-free with ATK% substat. Lacks damage passives, performing at 80-85% efficiency.
For players seeking to top up Genshin 6.2 domain hypercarry cheap, BitTopup provides secure transactions and excellent customer service with high user ratings.
Advanced Rotation Strategies for Domain Mechanics
The 20-second core rotation maximizes Hexerei uptime and Burst windows. Execution precision determines 15-25% DPS variance—no exaggeration.
Energy Management Techniques
Venti Skill generates 3-4 Anemo particles on a 6s cooldown. Casting during grouping funnels particles to Durin during swap, recovering 15-20 Energy before field time. Bennett Skill produces 2-3 Pyro particles (2s cooldown, 4s hold), enabling double-cast within rotation gaps.
Fischl's Oz generates 0.6-0.7 Electro particles per hit over 10 seconds, totaling 6-7 particles. Positioning Oz to hit grouped enemies doubles generation. Collecting particles during Durin's field time provides 1.8-2.1 Energy per particle (same element), off-field grants only 0.6 Energy.
Natural regen contributes 1 Energy per 3 seconds, adding 6-7 Energy per 20-second rotation. Combined sources: Venti (15-20) + Bennett (4-6) + Fischl (6-7) + Natural (6-7) = 31-40 Energy, exceeding Durin's 70 Energy cost at 140% ER.
Buff Window Optimization
Hexerei's 6-second RES shred demands precise sequencing. Venti Burst (Swirl Pyro) → Durin E (White) must execute within 2 seconds for full -35% shred. Delays beyond 6 seconds lose the buff entirely, reducing damage by 20-25%.
Bennett's 12-second ATK buff begins on Burst cast. Fire off Durin's Burst within 2 seconds of Bennett's animation to maximize +75% ATK DMG passive's 10-stack duration. Late casts waste 2-3 seconds, losing 10-15% effective ATK.
Fischl's Oz lasts 10 seconds (12s cooldown). Summoning Oz immediately after Durin's Burst ensures Overload triggers during Primordial Fusion's +75% damage window.
Elemental Skill Timing
Durin's dual Skill casts (E + E) generate White/Dark state based on timing. Rapid double-tap within 1 second activates White Form (AoE); 2+ second delays trigger Dark Form (single-target). Floor 12 mob waves require White; boss phases demand Dark.
Venti's Skill → Burst provides 1.5 seconds grouping before Burst animation. Casting Durin's Skill during Venti's Burst startup captures enemies mid-pull, maximizing White Form AoE hits.
Bennett's Skill tap (2s) versus hold (4s) affects rotation length. Tap-casting twice generates 4-6 particles in 4 seconds; hold-casting produces 2-3 particles in 4 seconds. Tap-casting doubles generation—always tap unless you need the shield.
Character Build Examples with Damage Calculations
Three investment tiers using Floor 12-3's 10M HP boss benchmark.
High Investment Builds
Durin C0 + Athame Artis R1:
ATK: 2,500 (Base 608 + Artifact 1,892)
CRIT Rate: 70% (Weapon 33.1% + Artifact 36.9%)
CRIT DMG: 180% (Ascension 38.4% + Artifact 141.6%)
ER: 160% (Emblem 20% + Artifact 140%)
Burst DMG: 281.5% × (1 + 1.80) × 0.70 = 552.21% average
Hexerei: +75% = 552.21% × 1.75 = 966.37%
RES Shred: -61% (VV -40%, White Flame -35%) against 10% base = 71% effective
Final: 966.37% × 1.71 = 1,652.49% per Burst
DPS: 29,702
Team: Durin/Venti/Bennett/Fischl | Clear Time: 90s (Floor 12-3) | Investment: 1,840+ resin, 420,000 Mora (Ascension), 7M Mora (Triple Crown)
Budget-Friendly Options
Durin C0 + Wolf-Fang R5:
ATK: 2,200 (Base 510 + Artifact 1,690)
CRIT Rate: 65% (Weapon 27.6% + Artifact 37.4%)
CRIT DMG: 150% (Ascension 38.4% + Artifact 111.6%)
ER: 145% (Emblem 20% + Artifact 125%)
Burst DMG: 281.5% × (1 + 1.50) × 0.65 = 457.44% average
Hexerei: +75% = 457.44% × 1.75 = 800.52%
RES Shred: -61% = 71% effective
Final: 800.52% × 1.71 = 1,368.89% per Burst
DPS: 26,717 (93.83% of signature)
Team: Durin/Venti/Bennett/Fischl | Clear Time: 105-110s (Floor 12-3) | Investment: 1,600 resin, 350,000 Mora (Ascension), 4M Mora (Talents 9/9/9)
Constellation Breakpoints
C0 → C1: +8-12% DPS through extended Primordial Fusion duration. Low priority for Burst builds.
C1 → C2: +15-18% DPS through flat Pyro DMG increase. This is essential for maximizing Burst scaling.
C2 → C6: Incremental gains (+3-5% per constellation). C0-C2 provides 80% of C6 performance.
Wolf-Fang R1 → R5 grants +12% Burst DMG and +20% CRIT Rate, totaling +18-22% DPS. Prioritize R5 refinement before Durin constellations if you're F2P.
Common Mistakes and Team Building Misconceptions
Overvaluing Certain Stats
ER Starvation (< 140%): Builds with 100-120% ER fail to Burst every rotation, missing 1-2 casts per Floor 12 chamber. That's a 25-35% DPS reduction. Bennett's Ascension 4 fixes this; teams without Bennett require 160-180% ER.
Excessive ER (> 200%): Sacrificing CRIT for ER beyond 180% yields less than 5% DPS gains. Emblem's +25% Burst DMG per 50% ER caps practical value at 160-180%.
ATK% Over-investment: 3,000+ ATK without 60% CRIT Rate actually reduces average damage. The formula ATK × (1 + CRIT Rate × CRIT DMG) shows 2,500 ATK with 70% Rate and 180% DMG (5,650) outperforms 3,000 ATK with 50% Rate and 140% DMG (5,100).
Support Character Misuse
Bennett Burst Timing: Casting Bennett's Burst after Durin's wastes +75% ATK DMG passive's 10-stack window. Correct sequence: Bennett Q → Durin Q within 2 seconds.
Venti Burst Positioning: Casting before enemy grouping scatters targets, negating White Form's AoE. Wait for natural grouping or use Venti Skill to pull before Burst.
Fischl Oz Placement: Summoning Oz outside enemy range wastes particle generation and Overload triggers. Position centrally during Venti's grouping.
Rotation Timing Errors
Hexerei Window Misses: Delaying Durin's Skill beyond Venti's 6-second Swirl window loses -35% RES shred. Execute Venti Burst → Durin E within 2 seconds—no exceptions.
Burst Animation Canceling: Swapping during Durin's Burst animation cancels damage, losing that entire 281.5% multiplier. Allow the full animation (2.5s) before swapping.
Particle Collection Off-Field: Collecting particles while Durin is off-field provides 0.6 Energy versus 1.8-2.1 on-field. Swap to Durin during Venti/Bennett Skill casts for maximum efficiency.
Resource Investment Guide and Primogem Optimization
Durin's December 3-23, 2025 Phase 1 banner demands strategic resource allocation, especially for F2P players targeting C0 with Wolf-Fang R5.
Priority Upgrade Paths
Day 1-7 (Pre-Farm):
168 Frostlamp Flowers (zero resin, Final Night Cemetery exploration)
46 Kuuvahki Cores (40 resin per run, Level 30+ Super-Heavy Landrover boss)
Agnidus Agate farming (1/9/9/6 fragments, Pyro Hypostasis/Primo Geovishap)
Day 8-14 (Ascension Priority):
160-180 daily resin: 60-70% world bosses (Kuuvahki Cores), 30-40% talent domains
Ascension breakpoints: 20/40/50/60/70/80 (Level 80 requires 6 Gemstones, 20 Cores, 60 Flowers)
Warrants: Tattered (18), Immaculate (30), Frost-Etched (36) from Fatui enemies
Day 15-30 (Talent Focus):
Talent domains Wednesday/Saturday/Sunday (Jahoda/Durin Ballad books)
Weekly boss: Eroded Sunfire from Signora/Azhdaha (3 per week, 60 resin each)
Talent levels 9/9/9: 3 Crowns, 18 Sunfire, Ballad 9/63/114, Warrants 6/22/31, ~7M Mora
Total Investment: 1,840+ resin (Ascension + Talents), 420,000 Mora (Ascension), 7M Mora (Triple Crown)
Cost-Benefit Analysis
Talent Level Scaling:
Level 6 → 7: +8-10% damage, 120 resin
Level 7 → 8: +8-10% damage, 160 resin
Level 8 → 9: +8-10% damage, 200 resin + 1 Crown
Level 9 → 10: +5-7% damage, 240 resin + 1 Crown
Prioritize Burst (Q) to Level 9, Skill (E) to Level 8, Normal Attack (A) to Level 6. That's the most efficient path.
Artifact Farming:
Emblem domain: 20 resin per run, 5-6 runs daily (100-120 resin)
Average +20 artifact: 8-10 runs (160-200 resin)
Full set (5 pieces): 40-50 runs (800-1,000 resin)
Farm artifacts after hitting Ascension 80 and Talent 9/9/9. Don't waste resin on artifacts early.
Long-Term Planning
Primogem Budget (F2P):
Version 6.2 total: 10,240 Primogems = 71 pulls
Soft pity: ~74 pulls (50/50 chance)
Guaranteed pity: 180 pulls (28,800 Primogems)
Sources:
November 21 Livestream: 900 Primogems (codes: 1203Kuunrukous, Dragon1203Durin = 60 each)
December 3 Patch: Daily Commissions (60/day × 20 days = 1,200)
December 19 – January 5 Snowbound Journey: Event rewards (~1,500)
Spiral Abyss: 600 per reset (December 1, 16)
Story Quest: 60 Primogems + materials (168 Frostlamp Flowers, 46 Kuuvahki Cores)
Pull Priority: Durin > Xilonen (Geo support) > Varesa (Electro Catalyst) > Venti (if lacking Anemo support). Cap pulls at 70 to avoid accidental pity unless you're prepared.
Constellation vs. Weapon: C0 Durin + Wolf-Fang R5 (F2P craftable) achieves 93.83% of C0 + Athame Artis R1 performance. Prioritize weapon refinement over constellations—it's just more cost-effective.
FAQ
What are the best hypercarry characters for Genshin 6.2 Durin Quest?
Durin (Pyro Sword) leads as SS-tier hypercarry with 29,702 DPS using Athame Artis, or 26,717 DPS with Wolf-Fang R5. Venti hypercarry using Daybreak Chronicles outperforms Polar Star by 15-20% when paired with Durin for Hexerei activation. Arlecchino and Kinich serve as alternative hypercarries in Overload and Vaporize teams respectively.
How do new domain mechanics affect team building in Genshin 6.2?
Hexerei requires two Magic characters (like Venti) to activate +75% damage and -35% RES shred, which mandates compositions like Durin/Venti/Bennett/Fischl. White Form prioritizes AoE for mob content; Dark Form targets single-target bosses with +70% Vaporize/Melt amplification. It's a fundamental shift in how you approach team building.
What artifacts work best for hypercarry builds in Durin domain?
Emblem of Severed Fate 4-piece is king: +20% ER, +25% Burst DMG per 50% ER, granting +70-80% Burst DMG at 140-160% ER. Main stats: ATK% Sands (or ER% if below 140%), Pyro DMG% Goblet, CRIT Rate/DMG Circlet. Target 2,500 ATK, 60-70% CRIT Rate, 150-200% CRIT DMG, 140-180% ER. Viridescent Venerer 4-piece on Venti for -40% RES shred.
Which weapons are optimal for Genshin 6.2 hypercarry teams?
Athame Artis (608 ATK, 33.1% CRIT Rate, +32% Burst DMG) achieves 104.31% DPS efficiency—it's the ceiling. Wolf-Fang R5 (510 ATK, 27.6% CRIT Rate, +32% Burst DMG) reaches 93.83% efficiency as the premier F2P option. For Venti hypercarry, Daybreak Chronicles (44.1% CRIT DMG, 60% DMG Bonus) outperforms Polar Star by 15-20%.
How much energy recharge do hypercarry teams need in 6.2?
Durin requires 140-180% ER for consistent Burst rotations. Bennett's Ascension 4 passive (+25% ATK) elevates baseline 100-120% ER to 140-180%, eliminating ER Sands dependency. Teams without Bennett demand 160-180% ER from artifacts. Below 140% ER causes rotation failures, reducing DPS by 25-35%. This isn't optional.
What are the most effective elemental reactions in Durin Quest?
Overload (Pyro + Electro) exploits White Form's AoE and -35% RES shred for Floor 12 mob waves. Vaporize (Pyro on Hydro) leverages Dark Form's +70% amplification for single-target boss damage. Melt (Pyro on Cryo) provides 1.5x multiplier on Durin's 281.5% Burst, achieving 422.25% effective scaling. Burning and Swirl trigger Hexerei's -35% RES shred, stacking multiplicatively with Viridescent Venerer's -40% for -61% total shred—which is absolutely massive.