

Quick Overview: In the 2025 meta, Keqing shines as your Aggravate main DPS with that trusty 4pc Thundering Fury set—it's all about squeezing out 20% extra Aggravate damage while slashing Skill cooldowns for non-stop Electro infusions. Team her up with Fischl, Nahida, and Kazuha to lock in 100% Quicken uptime, and you're looking at smooth 36-star Abyss clears even at C0. Aim for 200-250 EM, grab Mistsplitter Reforged if you can, and nail those N1C rotations. Oh, and her banner's rerunning from January 21 to February 11, 2025—don't sleep on it.
Getting a Grip on Keqing's Aggravate Flow in the 2025 Scene
Picture this: Keqing zipping around Quickened enemies, her Normal and Charged Attacks layering Electro like clockwork. That's the heart of Aggravate right there—it amps her Electro damage by 1.20x base, plus 0.15x for every 100 EM you stack. In Dendro-heavy spots, this setup crushes traditional builds by 10-15%, no contest. Hit 200 EM, and you're tacking on about a 30% multiplier to those N1C combos (that's Normal 1 at 41% + Charged at 76.8% + 86% DMG at Lvl 1).
How does it play out? Start with Nahida's Skill dropping that Quicken aura for 7-13 seconds. Then Keqing recasts Stellar Restoration for her 5-second Electro infusion. From there, it's N1C during the infusion, and a quick jump after the Charged to keep the momentum—costs just 25 stamina, but man, it feels efficient.
Why Aggravate Feels Like It Was Made for Keqing
Keqing's Skill clocks in at a zippy 7.5-second cooldown, and that 5-second infusion? It means you can keep Electro pumping into Quickened enemies without a hitch—100% uptime, folks. Her five-strike Normal string deals around 269.3% DMG at Lvl 1 and triggers reactions every 0.8 seconds, dodging ICD like a pro. Then there's her Burst: 88% initial hit, followed by 8x24% slashes and a whopping 189% final AoE at Lvl 1. It chains Aggravates left and right, handing you a 15% CRIT Rate and ER buff over 8 seconds.
To make it sing: Pump Normal Attacks to Lvl 10 first. Keep EM between 200-250 through substats or an EM Sands. And yeah, test it out—aim for at least 150% Electro DMG bonus to feel the difference. (Editor's take: I've seen players undervalue this; it's the infusion uptime that turns good clears into great ones.)
How Patches Shaped Keqing's Comeback—Dendro's Big Shift
Ever since Patch 5.0 dropped, Dendro's changed everything. Aggravate now taps into Dendro Resonance for +50 EM across the party, plus another +20 EM after reactions for 6 seconds—that's a solid 20% boost for Keqing in Abyss floors 10-12. Back in the day, we leaned on Overload, which locked her into 10-15 seconds of field time, kinda like Cyno's Burst dependency. Now? She's freer. Stock up on Vajrada Amethyst during events—six gems for ascension, easy.
Keep an eye on HoYoLAB for patch notes. For Sumeru runs, swap ATK priority for EM. And with that January 21–February 11 rerun looming, it's prime time to adapt.
Breaking Down Reactions: Aggravate, Quicken, and Hyperbloom Head-to-Head
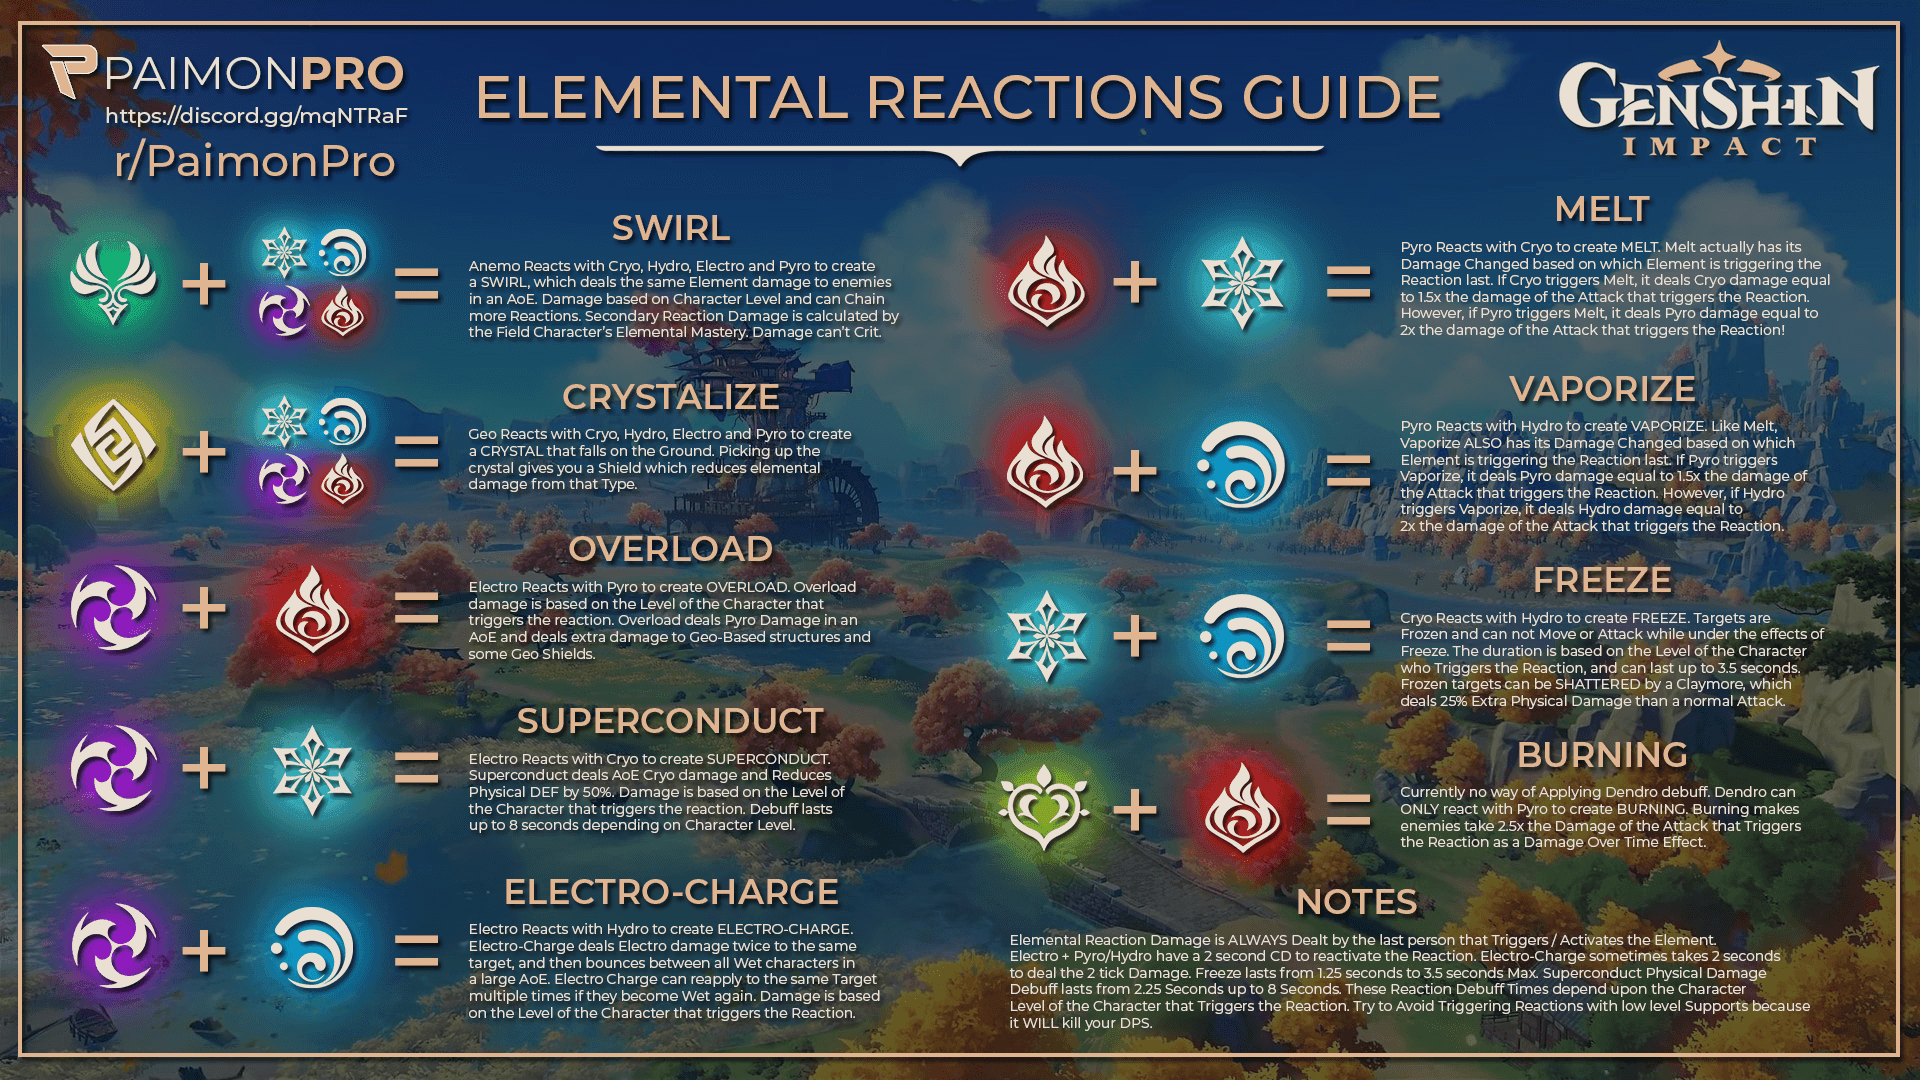
So, what's the deal with these? Aggravate lets Electro slam Quicken for up to 150% Electro DMG boost via EM, and Keqing stays on-field without eating the aura. Quicken itself? That's Dendro + Electro for a 7-second window, setting up Aggravate or Spread—Keqing just follows up after the Dendro lands. Hyperbloom, on the other hand, needs a Dendro core plus Hydro and Electro; it dings Keqing's Electro scaling by 5-10% compared to straight Aggravate.
From what the data shows, Aggravate shaves 10% off clear times versus Hyperbloom. Pro tip: Steer clear of Hydro to avoid Bloom overriding your setup. Let Fischl handle off-field Electro. And always double-check for that green Quicken glow before sending Keqing in.
If you're itching to level up your Genshin game, check out discount Genesis Crystals via BitTopup—they've got killer pricing, instant delivery, rock-solid security, support for tons of servers, top-notch after-sales, and a 4.8/5 user rating that makes topping up a breeze.
The Case for 4-Piece Thundering Fury Ruling Aggravate Keqing

Let's talk 4pc Thundering Fury: The 2pc gives 15% Electro DMG, while the full set throws in 40% to reactions and a straight 20% Aggravate bump, plus a 1-second Skill CD cut every 0.8 seconds on Quicken or reactions. It turns Keqing into a quickswap beast, edging out other sets by 8-12% DPS. On Quickened fields, her CD drops to about 6.5 seconds, locking in 100% infusion and pumping N1C output by another 20%.
Farm it on Mondays and Thursdays in Midsummer Courtyard. Go ATK% Sands unless your substats are starving for EM. And run it through Genshin Optimizer to confirm that 10-15% lead over Gladiator's—trust me, the numbers don't lie.
Unpacking the Set: 40% Electro DMG Bonus and Those Sweet CD Cuts
This set cranks Aggravate by 20%, stacking to a 1.40x total on Electro hits. Skill CD? Down to 6.5 seconds in Quicken, meshing perfectly with the 5-second infusion. Over a 15-second rotation, you snag 1-2 extra Skills, chaining reactions 15% harder. Grab an Electro DMG Goblet. Use Nahida's marks for multi-target resets. And skip teams without reactions—they won't trigger the magic.
Spamming Skills: Getting Stellar Restoration to 100% Uptime
Stellar Restoration's press hits for 50.4% Electro AoE, and recast? Either a 168% slash or 84% x2 Charged, all with that 5-second infusion. Thundering Fury lets you recast every 6.5 seconds or so—full uptime, no gaps. After a reaction, recast to Blink reposition in Abyss; it's a lifesaver. Hold the Skill for mid-air jumps. Sequence it as Press > Burst > Recast > N1C. Kazuha's grouping keeps the auras tight.
Crunching the Numbers: Thundering Fury vs. Gilded Dreams in DPS Terms
Based on sims, TF 4pc's 20% Aggravate and CD perks give a 5-10% DPS win—your 200 EM Keqing lands 30% harder on Quickened foes. Gilded Dreams? It mimics +50 EM but drops 8-12% in pure Aggravate scenarios. A 2TF + 2Gladiator mix nets 15% Electro and 35% Normal DMG but trails TF by 3-5%. Against Thundersoother in Dendro, TF pulls ahead by 7%.
Calculate with 70% CRIT Rate and 140% DMG. Farm TF first. Only pivot to GD if EM supports are MIA.
Dialing in Artifacts for Peak Aggravate Keqing
Stick to 4pc Thundering Fury: ATK% or EM Sands, Electro DMG Goblet, and CRIT Rate or DMG Circlet. Substats? CRIT Rate/DMG at a 1:2 ratio (70%:140%) tops the list, then EM to 200-250, ATK% last. At Lvl 90 (13,103 HP; 323 ATK; 799 DEF; 88.4% CRIT DMG base), layer in 50% CRIT Rate from subs for 70% total. Hunt 20%+ CRIT DMG per piece. Switch to EM Sands under 200 EM. Weekly farm goal: 20-40 pieces.
Prioritizing Main Stats: Sands, Goblet, Circlet Breakdown
Sands: ATK% for most cases, but EM if your team's EM is skimpy (push to 250 sans Nahida). Goblet: Always Electro DMG Bonus at 46.6%. Circlet: CRIT DMG if you're at 88.4% base, or Rate to hit 60% minimum.
An EM Sands at 200 EM? That's ~20% uplift, but it plateaus after 250. Check your menu stats. Unequip for tweaks. Goblet first—20%+ Electro amp is non-negotiable.
Balancing Substats: The CRIT-EM Tug-of-War
Aim for 70% CRIT Rate (5% base + 15% from A4 + subs), 140%+ DMG, and 200-250 EM fueled by +50 Resonance and Nahida. Four 20-EM subs get you to 200, layering on 30% Aggravate. Sort your inventory by CRIT. Cap EM at 250—anything over wastes <5%. Squeeze 30%+ ATK% from the pieces too.
Farming Smart: Hitting Midsummer Courtyard Right
It drops TF pieces on Days 1, 4, and 7 (Mondstadt time). 200 Resin nets 4-6 pieces; chase those 5-star mains. Time it with events for a 20% drop boost. Head in near the Inazuma border. Run 8-12 cycles per go. Buff with food for +10% drops—small edges add up.
Bridge Sets While You Grind
Gladiator's Finale 4pc: 35% Normal DMG, but 5% DPS dip. Martial Artist 4pc: 25% Normal/Charged after Skill—solid F2P starter. Or 2TF + 2ATK for 15% Electro until the full set lands. Equip for Abyss pushes. Transition after 20 runs. Ditch non-Electro stuff.
Top Team Cores for Keqing Aggravate, Ranked by Raw Power
Premium teams? They blitz Abyss 20% quicker thanks to EM buffs and RES shred. The gold standard: Keqing/Fischl/Nahida/Kazuha for 100% aura uptime and Aggravate on every N1C. EM/ER on supports, rotate them first, and test co-op vibes.
The Dream Team: Keqing, Fischl, Nahida, and Zhongli or Kazuha
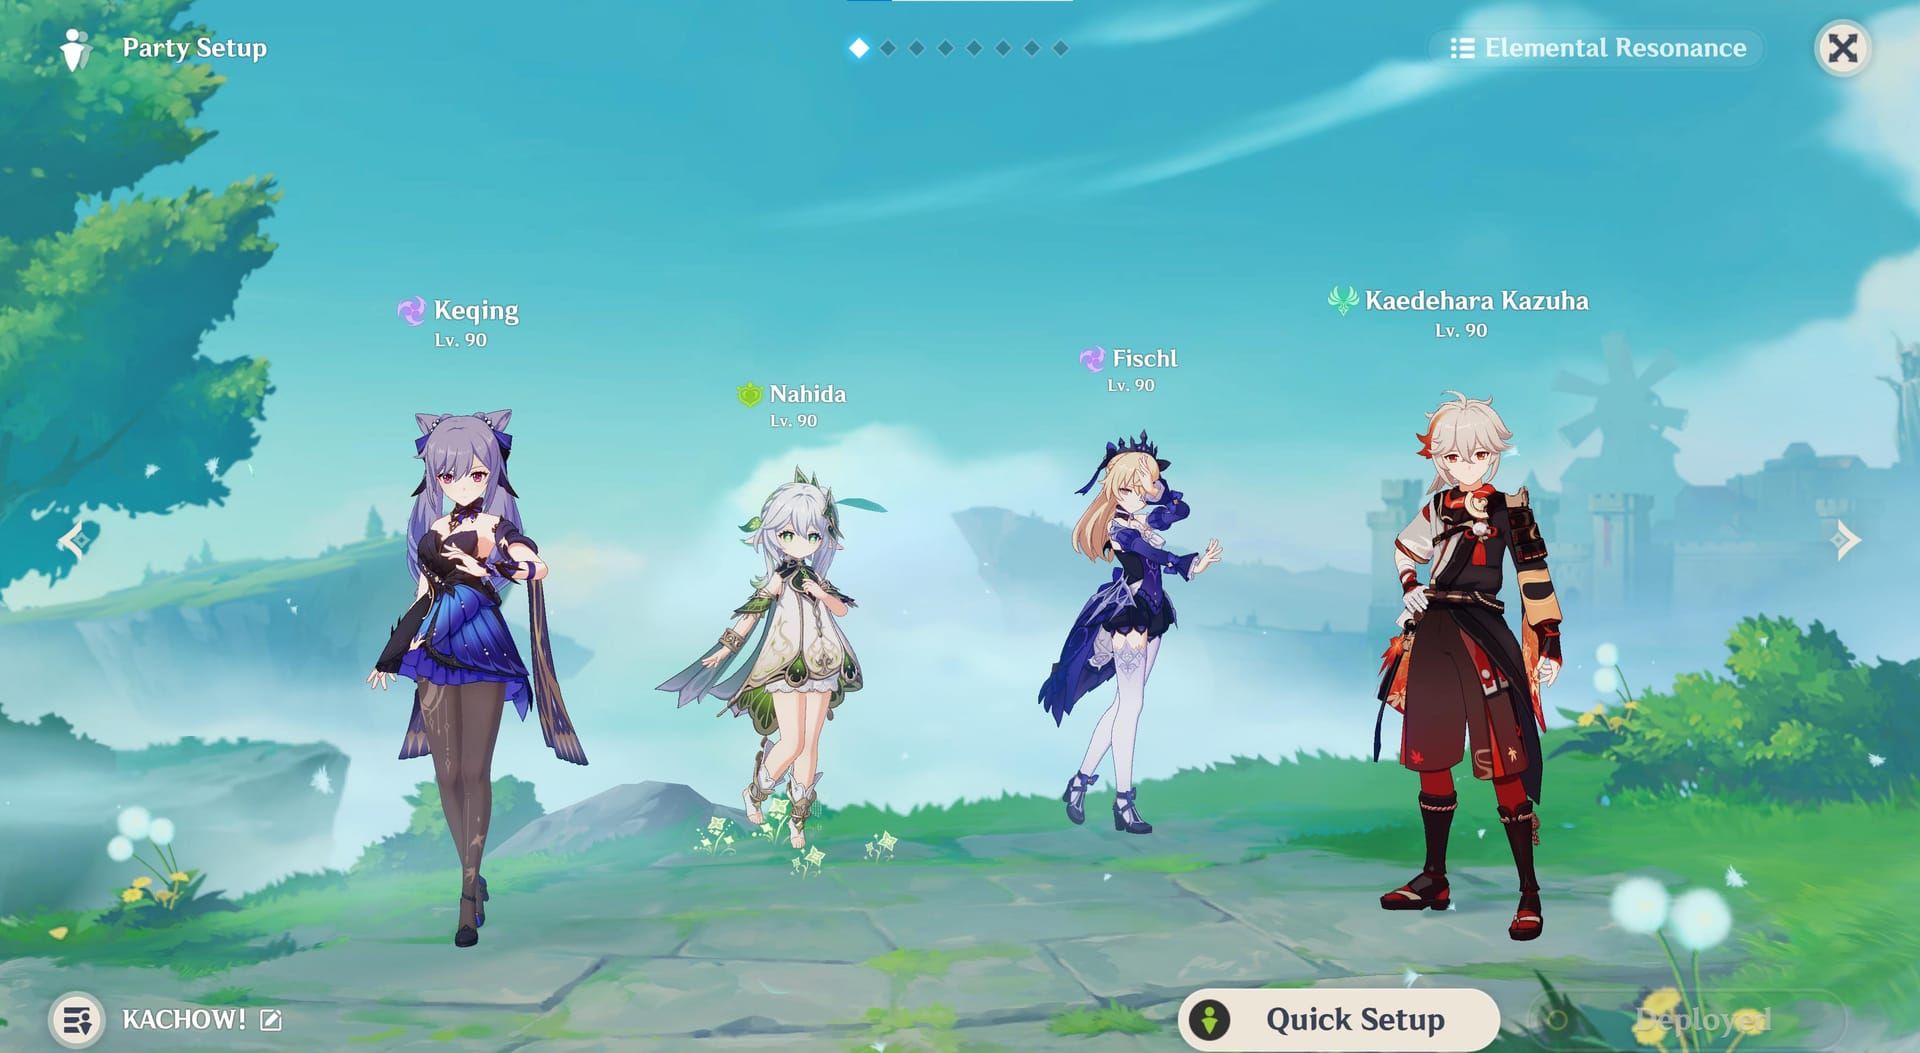
Keqing in TF 4pc, Fischl summoning Oz for Electro, Nahida in Gilded Dreams sharing EM, Kazuha with VV 4pc shredding 40% Electro RES. Five stars all the way—Nahida's C2 cuts enemy DEF by 30%, Fischl's C6 extends Oz by 2 seconds. Nahida Burst for +200 EM. Fischl E for the aura. Kazuha Burst to group and buff.
F2P-Friendly: Keqing, Fischl, Dendro Traveler, Shinobu
Keqing leads, Fischl backs Electro, Dendro Traveler in ToTM 4pc drops Dendro every 9 seconds, Kuki Shinobu in Gilded Dreams heals with HP/EM. Four stars, totally viable. Shinobu's Skill keeps heals flowing and Aggravate alive. Traveler Burst for marks. Shinobu maintains Quicken. Sub Collei if Nahida's out of reach.
Hybrid Twist: Keqing, Nahida, Xingqiu, Kuki for Hyperbloom Vibes
Keqing on-field, Nahida coring Dendro, Xingqiu off-field Hydro, Kuki as Electro healer. Four stars, but mixed—Bloom can steal the show from Aggravate. Xingqiu's rainswords pop Hyperblooms on seeds. Nahida Skill for seeds. Keqing triggers Aggravate/Hyperbloom. Dial back Hydro to hold Quicken.
Flex Slots: Healer, Shielder, or Buffer?
Healers like Kuki or Baizhu keep HP steady; Baizhu's Dendro shield guards the aura. Shielders such as Zhongli add 20% RES shred and block interruptions. Buffers—Kazuha or Sucrose—Swirl EM/DMG%, with Sucrose sharing 50 EM. Zhongli for high-mobility spots. Kuki for pure sustain. Kazuha owns multi-target chaos.
Stuck mid-roster tweak? BitTopup's Genshin Impact top up guide makes resource grabs painless—fast top-ups, ironclad security, sharp prices, server-wide coverage, stellar after-sales, and a 4.9/5 rating for that seamless flow.
Picking Weapons That Amp Aggravate Keqing
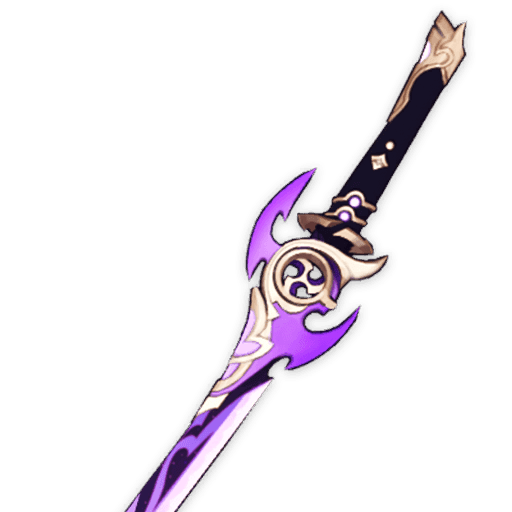
Mistsplitter Reforged leads with 674 Base ATK, 44.1% CRIT DMG, and stacks up to 28% Elemental DMG. It nudges Aggravate 5-8% higher through constant uptime. Stacks build on Normals/Bursts in Quicken, hitting full 28% during infusions. R1 adds 12% base. Pair with CRIT Circlet. Chase it on banners.
5-Star Showdown: Mistsplitter, Jade Cutter, Light of Foliar
Mistsplitter Reforged takes #1—28% DMG for a 5-8% DPS lead. Primordial Jade Cutter's #2 with 44.1% CRIT Rate and 20% HP/ATK to balance Rate. Light of Foliar Incision ranks #3, EM-heavy but CRIT-light. In EM teams, Mistsplitter pulls 10% ahead. Prioritize Mistsplitter. Jade if Rate's low. Skip non-CRIT 5-stars.
Solid 4-Stars: Lion's Roar, Iron Sting, Amenoma
Lion's Roar at R5: 36% DMG vs Electro-affected enemies, 3-5% edge over Iron Sting in Quicken. Iron Sting R5: 165 EM +12% reaction DMG for EM builds. Amenoma Kageuchi: 55.1% ATK + Energy seeds, but ER dips below 100%. Lion's uptime juices N1C by 36%. Craft Iron Sting for EM. Pull Lion's. Amenoma only if ER's tight.
How Weapon Passives Sync with Aggravate
Mistsplitter refreshes stacks on Aggravate triggers. Lion's pumps Electro post-Quicken. Fast attacks to proc. Avoid non-Electro passives. Favonius on supports for ER.
Nailing Rotations and Sequences for Aggravate Mastery
Kick off with supports for auras, then Keqing's 15-20 second cycles with 100% Electro and N1C at ~25 stamina. Nahida > Fischl > Kazuha > Keqing Skill/Burst/N1C wipes waves in 10 seconds flat. Nahida Burst/Skill for Dendro/EM. Fischl Burst for Electro. Kazuha Burst for shred/grouping. Keqing: Skill > Burst > Recast > N1C x3-4. Loop it.
Your Go-To Rotation: Dendro Setup to Fischl E to Keqing Combo
Refresh Dendro every 9 seconds for that 7-second aura. A 15-second cycle maxes TF triggers. After Kazuha, infusion slams Quickened for chain Aggravates. Dendro 1-2U. Fischl Electro. EQE to time the Burst.
Timing the Burst: Starward Sword Sweet Spot
Burst costs 40 Energy on a 12-second CD—drop it mid-rotation after Skill for +15% CRIT/ER. Low cost fits 100-120% ER. Fischl particles post-Burst ensure 100% uptime with A4. Early for ER buff. On clustered enemies. Funnel from Fischl C2+.
Handling Infusions: Electro Over Physical, Always
Recast Skill for 5 seconds of Electro; don't let Physical linger. TF resets overlap seamlessly. Press Skill upfront. Recast after Burst. Dash/jump to reposition.
ER Needs by Team Setup
100-120% ER total, boosted by Electro Resonance particles. Amenoma + Fischl handles the 40-cost Burst. Check menu. Favonius Kazuha if ER's low. EM over excess ER.
Talent Priorities and Where to Invest
Normal Attack > Burst > Skill, all to Lvl 10—max NA juices Charged to 162.8% total. Lvl 10 Burst adds 50%+ to slashes. Use Prosperity books on Mon/Thu/Sun. Three Crowns. It'll run you 4,957,500 Mora + 177 Nectars.
Leveling Sequence: Skill, Burst, Then Normal Attack
For Aggravate, it's NA > Q > E since attacks drive it. NA Lvl 10 ramps procs. NA to 9 early. Q to 10 for AoE punch. E last for utility.
Constellations Worth It? C0 vs. C1/C2/C6
C0 gets the job done for 36-star clears. C4's +25% ATK post-reaction (10 seconds) adds 15% output via constant procs. C6 stacks +6% Electro per initiation. Stop at C0/C4. Dodge Standard 50/50. Pull the Jan 21-Feb 11 banner.
Resin Smarts: Books vs. Artifacts
Ascension needs 168 Cor Lapis + 46 Lightning Prism, plus 420,000 Mora base. Daily commissions for Mora. Dvalin boss for Rings. 80% Resin to artifacts first.
Pitfalls to Dodge in Your Keqing Build
Cap EM at 250—diminishing returns kick in <5% beyond. Balance with CRIT. 300 EM only adds 10% over 250's 30%. Calculate multipliers. Pull EM from resonance/buffs. Reforge weak pieces.
Overstacking EM: Why 200-300 Is the Sweet Spot
Including +50 resonance, 250's your cap. Nahida's +200 shares cover a lot. Test with DPS logs. Swap to ATK Sands if needed.
Rotation Blunders: Snapshots and Buff Windows
Bursts snapshot at start; Kazuha before Keqing. Nahida's EM snapshots the whole rotation. Buffs pre-combo. Skip EEQ. N1C then jump.
Energy Woes in Electro-Heavy Squads
Low Burst means skimpy particles. Fischl C2 for extras. Cap at 120% ER. Lean on resonance reactions.
Wasting Points on Physical DMG
Infusion wipes Physical—go Electro. No Physical Goblet. TF for reactions. Watch your stance.
Crushing Spiral Abyss and Endgame with Aggravate Keqing
This build nails 36 stars on Floor 12, especially multi-wave setups. It thrives on Dendro-weak foes with clustering; 9-12 seconds per chamber alongside Kazuha. Anemo for grouping. Shield interruptions. N1C bosses hard.
Floor 12 Breakdown: Chamber Tactics
Chamber 1: Nahida marks > Keqing infusion for waves. 20% faster on non-Dendro. Dendro appliers. Zhongli vs. knockback. 15-second cycles.
Real DPS Targets: What to Expect
C0 TF at 200 EM, 70/140 CRIT: 50k+ per Quickened N1C. Full rotation hits 1M+ team DPS. Log your Abyss. Tweak EM. Cyno's 10% slower by comparison.
Stacking Up Against Meta Picks: Cyno, Raiden, Yae
Keqing's mobility and F2P access make her 10% quicker in fast teams. Cyno locks into Burst with his signature, less infusion flex. Raiden and Yae go off-field; Keqing owns on-field Aggravate. Her versatility shines. Yae for budget hybrids.
Building Keqing to Last: Future-Proof Tips
4pc TF + EM keeps her Dendro-ready. 2025 buffs hype Aggravate. Nahida pairs adapt to newcomers. Farm domains early. C4 for ATK. Eye Sumeru changes.
Dendro Newcomers on the Horizon
Nahida/Collei as cores; Baizhu for shields. EM builds. Resonance pairs. Traveler subs.
Guessing Future Artifact Shifts
TF stays meta; watch new Electro sets. Dendro locks it in. Stock CRIT/EM subs. Update post-patch. Simulate changes.
Why Aggravate Stays Meta-Resilient
Post-5.0 reactions vaulted Keqing. Versatile teams. Monitor HoYoLAB. Resin up materials.
FAQ
Is 4pc Thundering Fury the top pick for Keqing Aggravate in 2025?
Absolutely—its 20% Aggravate DMG and 1s Skill CD reduction on Quicken beat Gilded Dreams by 5-10%. Hit Midsummer Courtyard, and lock in that 46.6% Electro Goblet for chaining N1C on Quickened enemies.
Best buddies for Keqing Aggravate squads?
Fischl as off-field Electro battery, Nahida for Dendro/EM in Gilded Dreams, Kazuha shredding 40% RES. F2P swap: Dendro Traveler and Kuki Shinobu for healing. Locks 100% Quicken, +20% Abyss DPS.
How much EM for Keqing's Aggravate?
200-250 total, including +50 Resonance and Nahida. Nets ~30% multiplier; EM Sands if short, but cap at 250 to dodge <5% waste—prioritize 70/140 CRIT.
Constellations a must for Aggravate Keqing?
C0 handles 36-star clears fine; C4's +25% ATK post-reaction adds 15% from procs. Skip C6; grab the Jan 21–Feb 11 banner without chasing 50/50.
Optimal rotation for Keqing Aggravate?
Nahida Burst/Skill for Dendro. 2. Fischl Burst Electro. 3. Kazuha Burst for shred/group. 4. Keqing Skill > Burst > Recast infusion > N1C x3-4. Loop every 15-20s for auras and TF resets.
ATK% or EM Sands on Aggravate Keqing?
ATK% if buffs hit 200 EM; EM Sands below that for +20% multiplier. Cap 250—simulate to let CRIT lead, since excess EM dips <5% after resonance.