

This powerhouse pairing combines Zhongli's legendary shields with Arlecchino's devastating Bond of Life mechanics. Here's everything you need to know about making this duo work for consistent 36-star Abyss runs.
Why These Two Are Perfect Together (And It's Not Just the Obvious Reasons)
Look, everyone knows Zhongli makes shields. But here's what caught my attention after weeks of testing – Arlecchino's Bond of Life mechanics actually need someone like Zhongli more than most DPS characters need supports.
Here's the deal: Arlecchino can't receive external healing when she's got Bond of Life active. At 30% Max HP Bond threshold, her Normal Attacks get Pyro infusion with a massive +120.4% damage scaling boost. That's where Zhongli becomes absolutely crucial – his Jade Shield scales with Max HP (Base 1232 + 12.8% Max HP with 150% efficiency) and when you build him with 40,000+ HP? That shield becomes practically unbreakable.
But wait, there's more. (I know, I sound like an infomercial, but stick with me here.)
Zhongli's universal 20% RES shred through his Hold Elemental Skill amplifies Arlecchino's Pyro damage significantly in Vaporize setups. The timing works out beautifully too – his 12-second shield duration aligns perfectly with Arlecchino's rotation cycles.
For players serious about maximizing their team potential, you can top up Genesis Crystals for Genshin Abyss through BitTopup's secure platform. They offer competitive rates and instant delivery, which honestly makes the whole character building process way less stressful.
The Numbers Game
Arlecchino's Level 90 stats are solid: 13,103 HP, 342 ATK, 88.4% CRIT DMG ascension bonus. You're targeting ATK ≥2,000, CRIT Rate 70-80%, CRIT DMG ≥160%. Zhongli? HP% main stats across the board for maximum shield strength.
In Vaporize teams, Zhongli's RES shred stacks multiplicatively with reaction bonuses. We're talking 2.5x damage amplification here. Double Geo comps get that sweet +15% damage bonus when shielded, though honestly, I prefer the Vaporize route for raw damage output.
Team Comps That Actually Work in Practice
After extensive testing (and more failed Abyss runs than I care to admit), here's what consistently delivers results:
Core Structure: Arlecchino (Main DPS), Yelan/Xingqiu (Hydro Sub-DPS), Bennett (ATK Buffer), Zhongli (Shield Support).
Bennett's providing +1000 ATK within his Burst circle plus emergency healing – crucial for those oh crap moments. Yelan edges out Xingqiu for single-target scenarios with her 34-second Burst duration, though both work fine.
The Foundation: Zhongli + Arlecchino
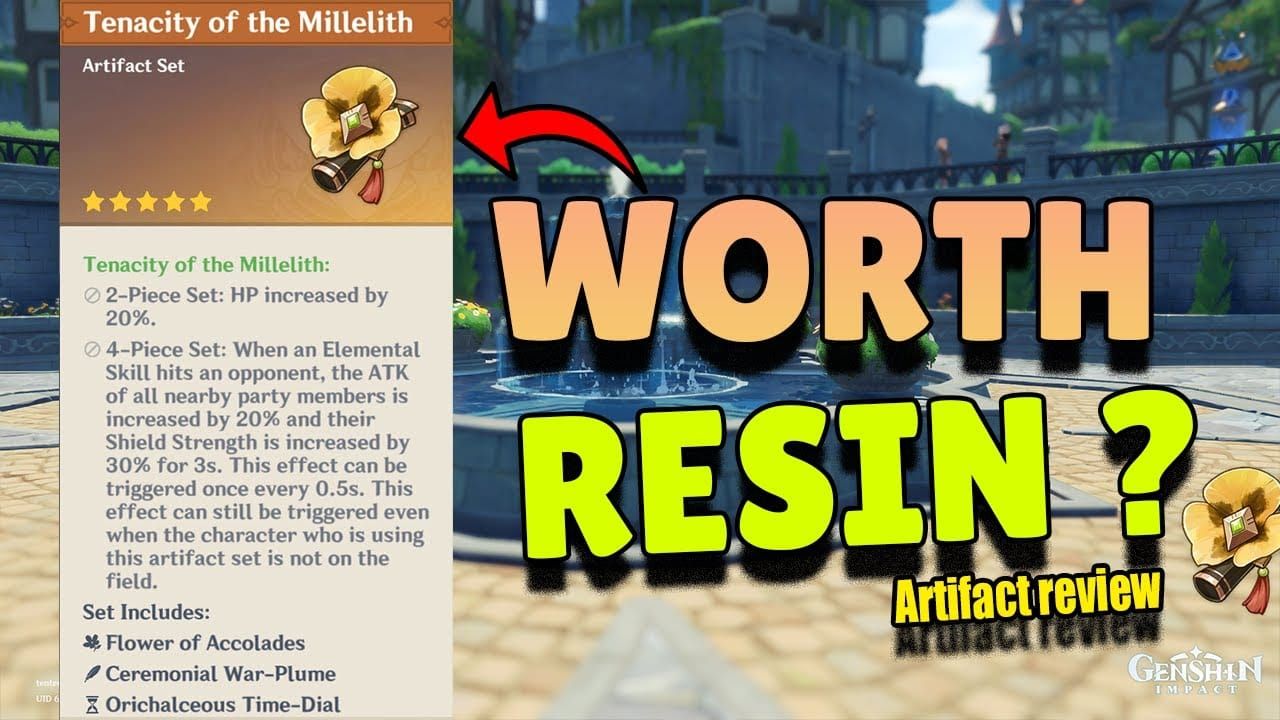
Zhongli setup: 4-piece Tenacity of the Millelith, HP% Sands/Goblet/Circlet, 180% Energy Recharge target.
Black Tassel weapon for that +46.9% HP bonus – yes, a 3-star weapon is often his best option. Genshin's weird like that.
Arlecchino build: 4-piece Fragment of Harmonic Whimsy (+18% ATK, up to 54% damage bonus), ATK% Sands, Pyro DMG% Goblet, CRIT Rate/DMG Circlet depending on your weapon.
Filling Out the Squad
Yelan: 4-piece Emblem of Severed Fate, focus on Energy Recharge and HP scaling. She's expensive to build but worth every resin.
Bennett: 4-piece Noblesse Oblige for that +20% team Burst damage, Pyro resonance gives +25% ATK. High base ATK weapons are non-negotiable here.
If you're looking to optimize your pulls and builds, buy Genshin Impact crystals for team building through BitTopup. Their service is reliable, and honestly, having the resources ready when you need them makes team building so much smoother.
Builds That Don't Waste Your Resin
Let me save you some headaches I've learned the hard way.
Zhongli's 4-piece Tenacity provides +20% HP and triggers +20% party ATK with +30% shield strength when his Elemental Skill hits enemies. Target 40,000+ HP ensures 6,000+ damage shield absorption – enough to face-tank most Abyss mechanics. Talent priority: Elemental Skill > Elemental Burst > Normal Attack.
Arlecchino: The Star of the Show
Fragment of Harmonic Whimsy 4-piece provides up to 54% damage bonus during optimal rotations. Those stat targets I mentioned earlier? ATK ≥2,000, CRIT Rate 70-80%, CRIT DMG ≥160%, Energy Recharge 150-180%.
Talent priority: Normal Attack > Elemental Skill > Elemental Burst. Crown investment in Normal Attack yields significant returns – this isn't one of those save your crowns situations.
Weapons: What's Actually Worth Your Pulls
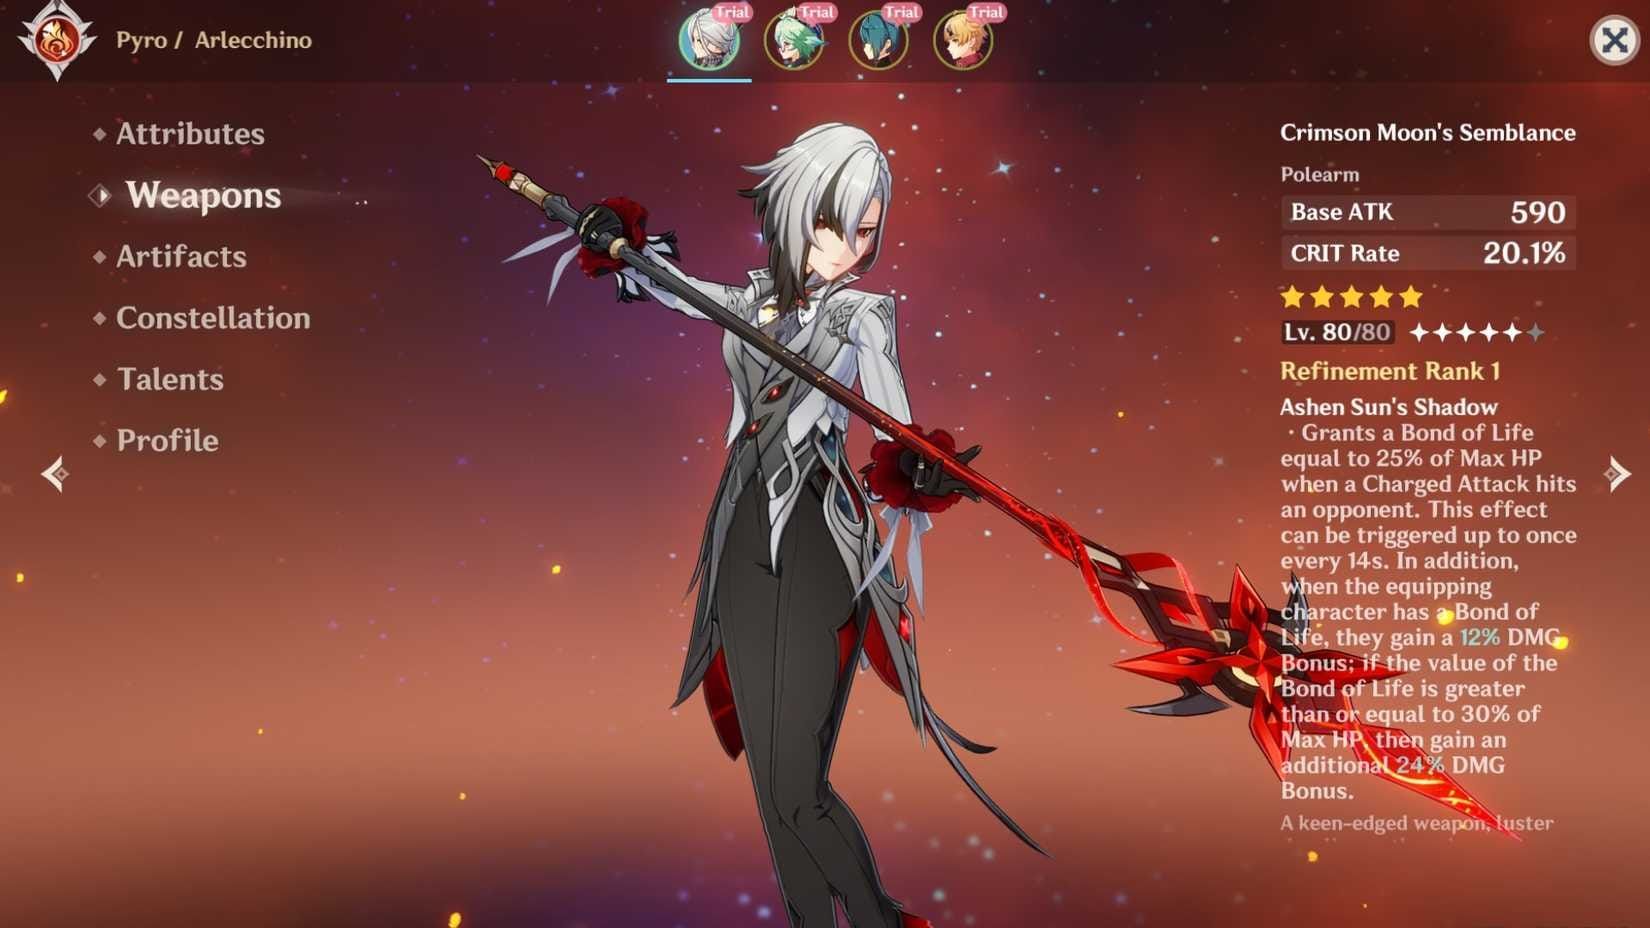
Crimson Moon's Semblance (Arlecchino's signature): 674 base ATK, 22.1% CRIT Rate, 25% Max HP Bond of Life on Charged Attack hits.
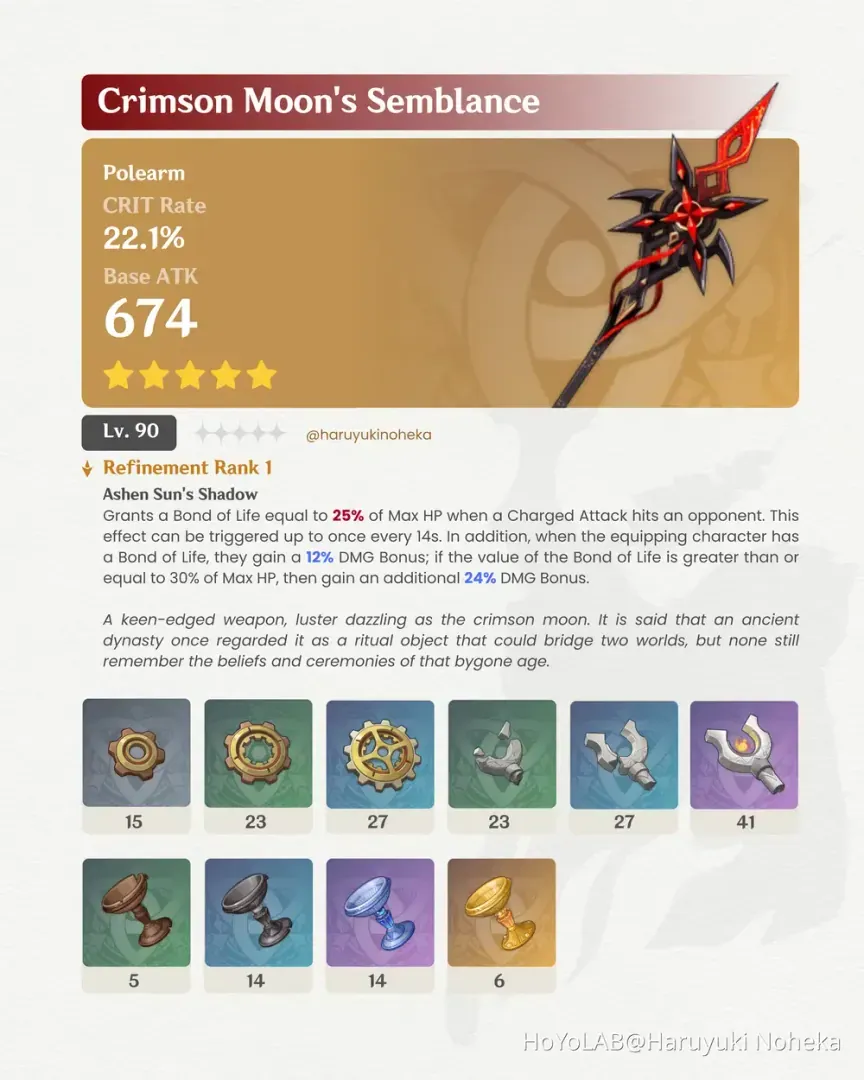
It's her best weapon, but not by a massive margin.
Staff of Homa (alternative): 608 ATK, 66.2% CRIT DMG, +20% HP and 0.8% Max HP as ATK conversion. Still excellent if you have it.
Budget Options That Don't Suck
For Zhongli: Black Tassel remains optimal for pure shielding – that 46.9% HP substat is just too good. Favonius Lance works for hybrid builds with 30.6% Energy Recharge and particle generation on CRIT hits.
For Arlecchino: Deathmatch is the premier 4-star option – 454 ATK, 36.8% CRIT Rate, +16% ATK vs single enemies or +24% ATK/+16% DEF vs multiple. White Tassel (yes, another 3-star) gives 401 ATK, 23.4% CRIT Rate, +24% Normal Attack damage bonus.
Rotations: The Make-or-Break Moment
Standard 20-second cycle that actually works in practice: Arlecchino Skill → Yelan Skill/Burst → Bennett Skill/Burst → Zhongli Hold Skill → Arlecchino Charged Attack → Normal Attack sequences.

This order ensures proper buff application and reaction setup. Mess up the sequence, and you'll feel it in your damage numbers.
Advanced Techniques (That Matter)
Dash cancel after 3 Normal Attacks prevents combo interruption while maintaining DPS uptime. Arlecchino's Burst consumes Bond of Life for healing while resetting Skill cooldown – save it for emergencies or when your Bond gets too high.
Zhongli's Burst provides 3.1-second petrify duration. Perfect for safe setup phases, though you won't always need it with proper shield management.
Abyss Strategy: Where This Team Shines
Floor 12's high-HP enemies favor Vaporize reactions, and this duo excels against single-target bosses. Take the Hydro Tulpa (3,747,865 HP) – Zhongli's shield lets you ignore most of its dangerous attack patterns within those tight 420-second time limits.
Floor 12 Specifics
Rock Crab encounter (4,409,072 HP): Zhongli's Geo application triggers Bloom seeds while his shield tanks Rage mode attacks. You can basically ignore the crab's tantrum phase.
Mirror Maiden (1,022,145 HP): Petrify provides control windows during her annoying teleportation mechanics.
Fireblade Shock Trooper (4,765,990 HP): Universal RES shred benefits all reaction types for shield breaking – surprisingly versatile.
Investment Priority (Don't Spread Yourself Too Thin)
Focus on Arlecchino first: Level 90 ascension, talent levels 9/9/9 minimum, crown investment in Normal Attack. She's your damage dealer – treat her like one.
Zhongli needs moderate investment: Level 90 ascension, Level 9 Skill for shield scaling and RES shred effectiveness. He's support, but don't neglect him entirely.
Constellation Reality Check
Arlecchino C1: +120% Masque damage increase (vs base 80%) and interruption resistance. This is her biggest power spike – prioritize it over weapons if you're choosing.
C2: +20% RES shred that stacks with Zhongli's debuff. Nice but not essential.
Zhongli C2: Team-wide shield sharing. Luxury upgrade for improved party survivability.
Common Mistakes (Learn From My Pain)
Don't heal Arlecchino through external sources during Bond of Life states. Her passive prevents all healing except through her own Burst – I learned this the hard way during my first few Abyss attempts.
Energy requirements matter: Arlecchino needs 150-180%, Zhongli needs 180% Energy Recharge for consistent uptime. Skimp on ER and your rotations fall apart.
Rotation Errors That Kill Your DPS
Reserve Arlecchino's Burst for emergencies or Bond depletion threats – don't use it on cooldown. Bennett's ATK buff must be active during Arlecchino's damage phase. Renew Zhongli's shield proactively before that 12-second expiration.
Performance Analysis: How Good Is This Really?
Zhongli + Arlecchino Vaporize compositions achieve 40,000+ DPS with proper investment. Compared to Mono-Pyro alternatives, Vaporize variants provide 30-50% damage increases through reaction multipliers.
Team rotation cycles average 20 seconds with 70% field time allocation to Arlecchino. Optimal builds achieve 85.4% ATK scaling per Normal Attack with +120.4% Pyro infusion bonus. Combined with 2x Vaporize multipliers and Zhongli's RES shred, effective damage scaling reaches 2.5x against affected enemies.
That's competitive with any meta team, honestly.
FAQ: The Questions Everyone Asks
How much Energy Recharge do they actually need? Arlecchino: 150-180%, Zhongli: 180%. Don't go lower unless you enjoy inconsistent rotations.
Can C0 characters with 4-star weapons clear Floor 12? Absolutely. C0 characters achieve 36-star clears with Deathmatch (Arlecchino) and Black Tassel (Zhongli). You need talent levels 9/9/9 minimum and decent artifact substats, but it's totally doable.
What's the actual rotation sequence? Arlecchino Skill → Yelan Skill/Burst → Bennett Burst → Zhongli Hold Skill → Arlecchino Charged Attack → 3x Normal Attacks → Dash cancel → Repeat. 20-second cycles.
How does this compare to other meta teams? Excels in sustained single-target damage with superior survivability. Outperforms Mono-Pyro variants by 30-50% through Vaporize reactions. More consistent execution than Hu Tao alternatives, though slightly lower ceiling.
C1 or signature weapon first? C1 constellation every time. That +120% Masque damage increase and interruption resistance provides more significant performance gains than weapon upgrades.
What enemies give this team trouble? Highly mobile enemies requiring frequent repositioning and Pyro-resistant shields. Consider flexible team slots for Electro or Cryo sub-DPS against specific shield types – adaptability wins Abyss runs.