

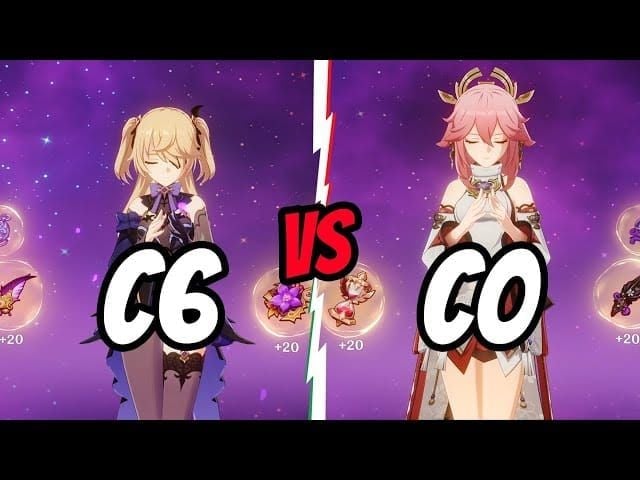
The Bottom Line: Fischl dominates single-target scenarios with her A4 passive that has zero Internal Cooldown, while Yae Miko absolutely crushes groups with superior AoE potential. Here's the kicker—C6 Fischl often outperforms C0 Yae Miko, but honestly? They work best as a power duo.
Let's Talk Aggravate—Because It's Not Just Another Reaction
The Quicken-Aggravate Dance
So here's how this works: Aggravate kicks in when your Electro attacks smack enemies that are already vibing with Quicken aura (that's your Electro + Dendro combo lasting 7 seconds). Unlike those transformative reactions that do their own thing, Aggravate is additive—meaning it plays nice with your CRIT stats and damage bonuses.
The math behind it? Base Reaction Damage × (1 + 5 × EM/(EM + 1200) + DMG Bonus) × Level Multiplier × RES Multiplier.
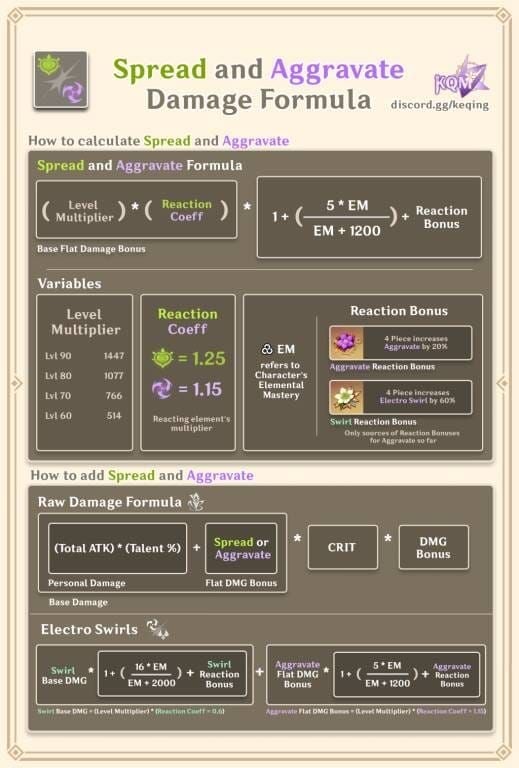
Quick editor note: Level 90 isn't just a flex here—it genuinely gives you 15-20% more damage compared to level 80. And that sweet spot for EM? Somewhere between 100-300. Push beyond 300, and you're better off chasing CRIT stats instead.
For those looking to maximize their Aggravate investments, Genshin crystals low-fee top up through BitTopup offers competitive pricing with instant delivery—because nobody wants to wait when you're ready to pull.
Yae Miko: The Elegant Chaos
Her Kit's Secret Sauce
Yae's Elemental Skill drops these turrets that just... work. Consistent off-field Electro damage without you babysitting them. But here's where it gets interesting—her A4 Passive creates this double-dip effect where EM converts to Skill DMG at 0.15% per EM point. So your EM boosts both Aggravate damage AND your base Skill damage.
Her Charged Attacks? No Internal Cooldown. Every. Single. Hit. Can trigger Aggravate.
Now, that 90-energy Burst is a bit of a diva—massive AoE damage but demands careful energy management. C1 basically cuts that cost from 90 to 66 energy by giving you 24 back. C2 pumps your Skills by roughly 25%. And C6? Ignores 60% enemy DEF. Yeah, it's as broken as it sounds.
Building the Fox Lady Right
4-piece Golden Troupe is your best friend here—the Skill damage boost is just chef's kiss. Alternatives include 4-piece Gilded Dreams or mixing 2-piece sets if your substats are godly.

Priority order: Energy Recharge (130-160% at C0, drops to 100% at C1+) > CRIT Rate/DMG > ATK% >= EM.
Main stats are straightforward: ATK%/EM Sands, Electro DMG Goblet, CRIT Circlet.
Weapon-wise? Kagura's Verity if you're going all-in, A Thousand Floating Dreams for Aggravate focus, The Widsith for us 4-star folks, or Hakushin Ring if you're F2P and proud.
Fischl: The Reliable Powerhouse
Oz and the Magic of No ICD
Here's why Fischl mains are so smug: her A4 Passive triggers Thundering Retribution (80% ATK as Electro DMG) with absolutely no Internal Cooldown when your active character triggers Electro reactions while Oz is chilling on the field.
Oz has near 100% uptime—10-second duration, 25-second cooldown that resets with her Burst. It's almost unfair.
C6 Fischl though? That's where things get spicy. Coordinated attacks at 30% ATK triggered by your active character's attacks. The performance gap between C0 and C6 is honestly massive enough that I'd prioritize getting her to C6 before chasing other characters.
Building the Prinzessin
4-piece Golden Troupe again, or mix 2-piece sets if you've got better substats. Priority: CRIT Rate/DMG > ATK% > EM. Energy needs are pretty chill at 110-130% in double Electro teams.
Best weapons: The Stringless (that 4-star king), Polar Star, or Aqua Simulacra if you're feeling fancy.
The Head-to-Head Breakdown
Single Target vs Groups—The Eternal Question
Fischl just demolishes single targets. Her A4 passive mechanics plus C6 coordination attacks create this relentless stream of damage that accumulates into something beautiful over full rotations.
Yae Miko? She's the AoE queen. Those turrets can engage multiple enemies simultaneously, and her Burst coverage is just massive. The performance gap actually narrows when you use Yae to drive Fischl's abilities—which is why smart players use both.
For building the ultimate team setup, Genesis Crystals instant delivery 24/7 through BitTopup ensures you can grab both characters and their optimal weapons without any waiting around.
Team Building That Actually Works
Your Dendro Backbone
Nahida is the gold standard—100% Dendro uptime, substantial EM buffs, and she hits like a truck herself. Baizhu offers role compression with healing, shielding, AND Aggravate/Spread buffs.
Budget options? Yaoyao for healing or Kirara for shields, both giving you that sweet Dendro resonance.
The Flex Spot Dilemma
Anemo supports like Kazuha or Sucrose bring crowd control, Elemental DMG% bonuses, VV shred, and EM buffs. Defensive options like Zhongli let you ignore mechanics and provide universal RES shred.
Your choice really depends on how comfortable you are with dodging and the content difficulty.
Rotation That Flows
Sample rotation: Yae 3E setup → Kazuha Q for grouping → Fischl E → Kirara EQ → Kazuha tEP for VV → Yae Q+3E+driving → maintenance phase.
The key principle? Keep your buffs active during peak damage windows. Sounds obvious, but you'd be surprised how often rotations fall apart here.
Investment Reality Check
What You're Actually Signing Up For
Yae Miko demands higher initial investment—she's a 5-star with a 90-energy Burst and constellation dependency. But hey, at least Gilded Dreams domain is efficient for multiple characters.
Fischl offers exceptional 4-star value, though she really wants that C6 for peak performance. Both benefit significantly from level 90 because of how Aggravate scaling works.
F2P Truth Bombs
Prioritize Fischl development. She's accessible, performs well at C0, and craftable weapons like Hakushin Ring actually work. Yae Miko is a higher-risk F2P investment—but if you're committed to Aggravate teams, her unique kit and damage ceiling might be worth it.
Real-World Performance
Spiral Abyss Reality
Both excel in Abyss, just in different scenarios. Yae's AoE shines against mob floors; Fischl's sustained damage melts high-HP bosses. Aggravate teams consistently achieve 36-star clears with proper energy management—I've seen it countless times.
Overworld and Events
Yae makes overworld exploration a breeze with turret placement and AoE clearing. Fischl offers consistent damage with minimal field time. Both adapt well to whatever weird mechanics events throw at us.
Don't Make These Mistakes
Build Blunders I See Constantly
Over-investing ER on Fischl (she barely needs any in double Electro). Under-investing ER on Yae Miko (then wondering why her Burst is never up). Forcing 4-piece bonuses when your 2-piece combinations have way better substats.
Team Synergy Fails
Misunderstanding Internal Cooldowns kills your team effectiveness. Poor Dendro timing causes Quicken downtime. And please—stop comparing your C0 characters to C6 showcase videos. It's not realistic.
The Questions Everyone Asks
Is Yae Miko actually better than Fischl for Aggravate? It's complicated. C6 Fischl often beats C0 Yae Miko in single-target because of that no ICD A4 passive and coordinated attacks. Yae brings superior AoE and higher damage ceiling. Honestly? Use both.
How does this Aggravate scaling actually work? It's additive—adds flat damage to Electro attacks hitting Quickened enemies. Scales with character level and EM. Level 90 is highly recommended because the multiplier impact is significant.
What artifacts should I farm for Yae Miko Aggravate? 4-piece Golden Troupe is best, 4-piece Gilded Dreams works, or mix 2-piece sets. ATK%/EM Sands, Electro Goblet, CRIT Circlet. Priority: meet ER requirements first, then CRIT, then ATK% and EM.
Does C6 Fischl really outdamage C0 Yae Miko? In single-target scenarios? Usually yes, thanks to those coordinated attacks and no ICD passive. Yae keeps her AoE advantages and higher burst potential though.
Which one works better with Nahida? Both are excellent. Fischl maximizes Nahida's application and EM buffs. Yae creates tons of reactions while benefiting from EM sharing. The optimal choice? Use both together.
How much EM do I actually need for Aggravate? 100-300 EM is the sweet spot. Beyond 300, chase CRIT stats instead. ATK% Sands often outperform EM Sands. Team buffs from Nahida or Sucrose reduce individual EM requirements significantly.