

The Real Talk: Sucrose dominates when you've got the artifacts and constellations to back her up—we're talking 200+ EM buffs that make reaction teams absolutely sing. But here's the thing: Heizou's way more forgiving to build and still delivers that crucial 80 EM buff without breaking your artifact farming schedule. If you're not running heavy reaction comps, he might actually be your better bet.
What Even Is a Driver in Genshin? (And Why You Should Care)
The Basics That Actually Matter
Look, a driver isn't just some fancy term the theory-crafters throw around. It's your on-field character whose job is basically to be the conductor of your team's orchestra—keeping everyone's off-field abilities humming while they're chilling in the background.
Anemo catalyst users? They're the MVPs here. Their Normal Attacks deal Anemo damage, which means constant Swirl procs and that sweet, sweet 4-piece Viridescent Venerer uptime. This triggers coordinated attacks from characters like Xingqiu (those orbiting swords aren't just for show) or Beidou's lightning chains.
The magic formula: consistent reactions + team buffs + not being a complete wet noodle damage-wise. Heizou leans into that personal damage angle, while Sucrose is all about making your team's reactions hit like trucks.

Why Anemo Drivers Hit Different
That 40% Elemental RES shred from Viridescent Venerer? It's not optional—it's the difference between tickling enemies and actually clearing content. Plus, Swirl reactions spread elements around like they're going out of style, creating chain reactions that make your screen light up like a fireworks show.
For players looking to enhance their Genshin Impact experience with reliable top-ups, Genshin Impact PayPal recharge through BitTopup offers secure transactions with competitive rates and fast processing times, ensuring you can focus on optimizing your team compositions without interruption.
Heizou: The Scrappy Underdog Who Packs a Punch
How His Kit Actually Works in Practice
Heizou's 'Heartstopper Strike' is where the magic happens—stack up to 4 Declension charges for maximum oomph. His passive 'Paradoxical Practice' builds these stacks through Swirl reactions (one stack per Swirl, every 0.1 seconds, because MiHoYo loves their precise timing). Hit 4 stacks and boom—'Conviction' status with beefier damage and AoE that actually matters.

But here's what I find really clever about his design: 'Penetrative Reasoning' gives a flat 80 EM buff to everyone except himself for 10 seconds after his skill connects. No EM investment required on Heizou's end. It's like getting a discount coupon that doesn't expire.
The rotation's pretty straightforward—set up your off-field skills, bring Heizou out to play, Normal/Charged attack until you've got 4 stacks from Swirls, then unleash that fully-charged skill. His 40-energy burst with a 12-second cooldown keeps rotations snappy.
What It'll Actually Cost You
Two paths here, and honestly, both work fine. ATK%/Anemo DMG/CRIT with 4VV if you want him to actually hurt things, or triple EM if you're all about those Swirl numbers. His base ATK of 225 at level 90 isn't embarrassing, which helps the damage route.
Substats? CRIT > ATK% > ER > EM for damage builds. Energy-wise, you're looking at 100-130% ER if you're using his skill twice per rotation—pretty reasonable, honestly.
Weapons are where he gets flexible. The Widsith (that 4-star everyone has collecting dust), Skyward Atlas if you're feeling fancy, Sacrificial Fragments for EM builds, or just craft a Mappa Mare and call it a day.
Where He Actually Shines
Freeze teams love this guy. Why? Because EM buffs do absolutely nothing for Freeze reactions, so Heizou's personal damage becomes the tiebreaker. Single-target Taser scenarios also favor him over Sucrose's more AoE-focused approach.
That core Taser setup—Heizou, Fischl, Beidou, Xingqiu—lets him drive all those coordinated attacks while dropping a significant skill nuke every 10 seconds. It's satisfying in a way that spreadsheet optimization can't quite capture.
Sucrose: The Proven Veteran (When You Treat Her Right)
The EM Buffing Queen
Sucrose runs a two-buff system that's honestly pretty elegant. 'Catalyst Conversion' gives 50 EM for 8 seconds to whoever matches the swirled element, while 'Mollis Favonius' shares 20% of her total EM with the whole party for 8 seconds.
A properly invested Sucrose—and I mean properly invested—can hand out 200-250 EM like candy. That's transformative for Vaporize, Melt, and especially Hyperbloom teams. Her driving style uses Normal/Charged attacks for constant Anemo application, keeping those reaction chains flowing.
The Investment Reality Check
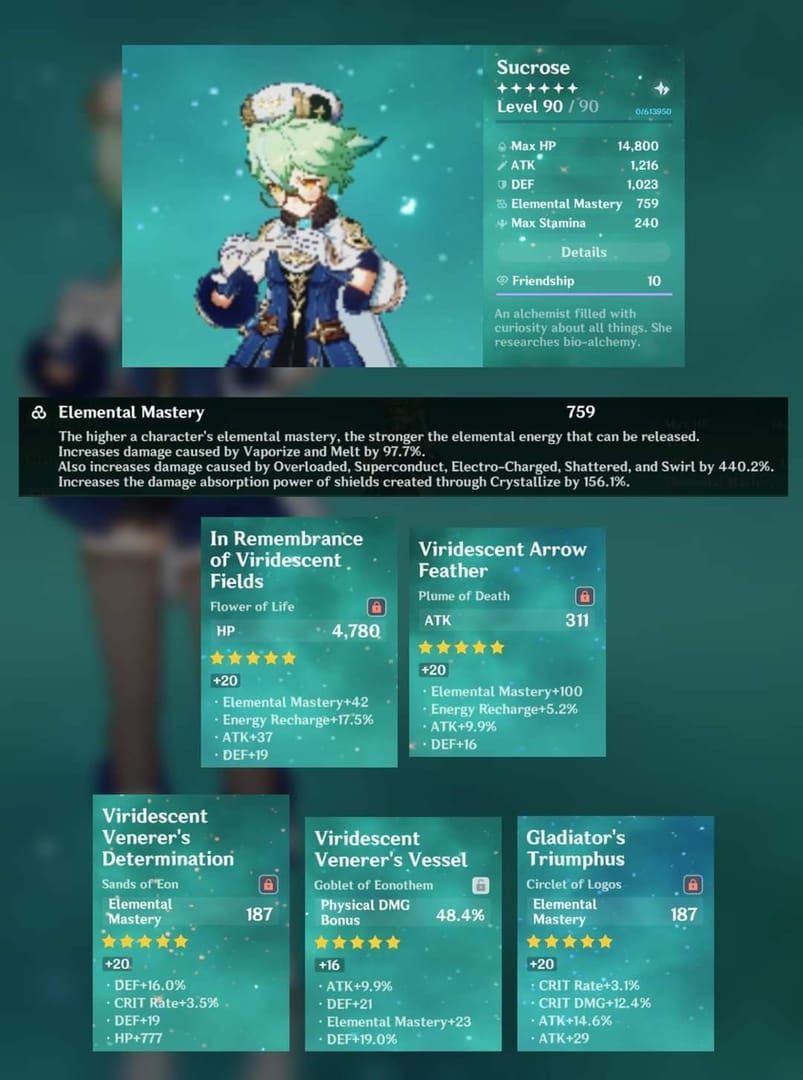
Here's where Sucrose gets demanding. She wants full EM artifacts (triple EM mainstat) with 4VV, ER substats as priority, then more EM on top. Level 90 isn't negotiable—it's about 34% more Transformative Reaction damage compared to level 80.
C1 is where she really comes online. That extra Elemental Skill charge cuts down on the 15-second cooldown pain significantly. Her 80-energy burst? You're looking at 160-180% ER when she's off-field, 120-140% when driving. Those are real numbers that affect your artifact farming priorities.
For convenient character acquisition and constellation upgrades, Genshin top up via card through BitTopup provides multiple payment options with instant delivery, helping players access the characters and constellations needed for optimal team performance.
Where She Dominates the Meta
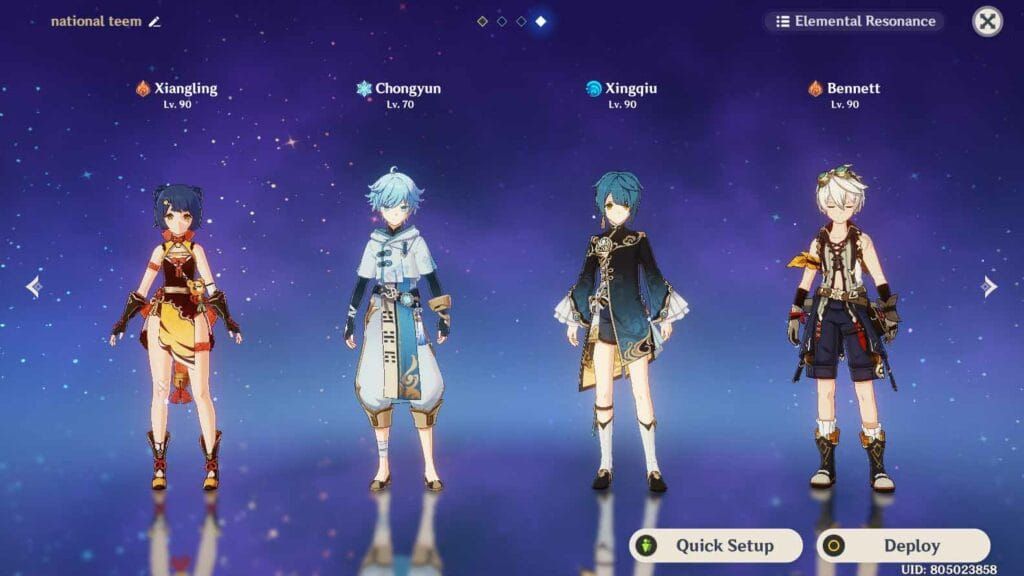
EM-scaling teams are Sucrose's playground. National team variants showcase her at peak performance—those EM buffs turn Xiangling's Vaporize damage from decent to delete button. Dendro reaction teams, especially Hyperbloom setups, make her EM sharing even more valuable.
The Real Cost-Efficiency Breakdown
Weapon Investment: What Actually Matters
Heizou's got options, which translates to budget flexibility:
Cheap and cheerful: Magic Guide (3-star EM stat stick), The Widsith, Mappa Mare
Worth the investment: Solar Pearl (Battle Pass value), Skyward Atlas if you're lucky
Sucrose prioritizes utility over personal damage:
Support focus: Thrilling Tales (3-star ATK% buff for your carry), Sacrificial Fragments
Premium option: A Thousand Floating Dreams (her actual BiS, if you can get it)
The Artifact and Talent Reality
Both want 4VV, but Heizou's build flexibility means you can pivot between ATK%/Anemo/CRIT or triple EM depending on what artifacts the domain decides to give you. Sucrose? She's married to EM/EM/EM for optimal performance.
Talent investment tells the story—Heizou benefits from leveling his talents for damage builds, while Sucrose's value comes almost entirely from EM scaling. Her talents can stay at level 1 and she'll still do her job.
Who Actually Enables Reactions Better? (The Numbers Game)
Swirl Damage and the EM Scaling Reality
Both deal Swirl damage that scales with character level and EM, but the application differs significantly. Heizou's Swirl damage comes in burst windows from his skill and burst usage. His 80 EM buff applies regardless of how you build him—it's just there.
Sucrose's Swirl happens more frequently through Normal Attacks. Her higher EM investment (we're talking 800+ EM) creates individually stronger Swirls, while her team EM buffs amplify all reaction damage across the board.
Crowd Control: The Unsung Hero
This is where Sucrose pulls ahead significantly. Her skill and burst provide continuous enemy grouping—and in a game where AoE damage rules, grouping is king. Heizou's crowd control comes from his burst's minor pull effect (enhanced at C2, but still weaker overall).
Team Scenarios: Where Each One Actually Works
National Team: The Classic Test
Sucrose typically wins here through sheer EM buffing power. Xiangling's Pyronado with 200+ EM boost? That's the difference between 3-starring Abyss floors and retrying them. Heizou remains viable when you don't have a well-built Sucrose, with his 80 EM buff and personal damage partially making up the difference.
Taser Teams: The Flexibility Test
Multi-target scenarios favor Sucrose's grouping and EM buffs. Single-target situations let Heizou's personal damage shine through. Both maintain VV uptime effectively, so it often comes down to the specific encounter.
Freeze Teams: Heizou's Strongest Case
This is where Heizou makes his strongest argument. EM literally doesn't affect Freeze reactions, so his personal damage contribution becomes the deciding factor while both provide equal RES shred utility.
Build Optimization: The Practical Guide
Artifacts and Weapons That Actually Matter
4VV is non-negotiable for both. Heizou's stat priorities shift based on build—CRIT Rate/DMG > ATK% > ER (100-130%) > EM for damage, or EM > ER for pure reaction support. Sucrose keeps it simple: EM > ER (120-180%) > everything else.

Weapon recommendations that won't break your account:
Heizou damage: Skyward Atlas > The Widsith > Solar Pearl
Heizou EM: Mappa Mare > Magic Guide
Sucrose support: Thrilling Tales > Sacrificial Fragments > A Thousand Floating Dreams
Both benefit massively from level 90 for Swirl damage—it's not optional if you're serious about their performance.
Energy Management: The Rotation Reality
Heizou's 40-energy burst with 100-130% ER and double skill usage per rotation is pretty forgiving. Sucrose's 80-energy burst demands 120-140% ER on-field, 160-180% off-field. C1 and Sacrificial Fragments make her energy management significantly less painful.
Meta Relevance: The Long Game
Current Spiral Abyss Performance
Both clear content effectively. Sucrose excels when there are multiple enemies to group and trigger AoE reactions. Heizou competes in single-target scenarios where personal damage carries more weight.
Future-Proofing Your Investment
Sucrose represents the safer long-term investment due to her unique EM buffing niche. New reactions and EM-scaling mechanics typically maintain or increase her relevance. Heizou offers solid immediate value with lower investment barriers—sometimes that's exactly what you need.
The Questions Everyone Actually Asks
Is Heizou actually better than Sucrose as a driver? It depends on your team and how much you've invested. Sucrose dominates EM-scaling teams when properly built, but Heizou performs better in Freeze teams or when you haven't fully invested in Sucrose yet.
What makes someone a good driver anyway? Consistent on-field presence, reliable elemental application, VV uptime, and either good damage or strong buffs. Anemo catalyst users excel because their Normal Attacks deal Anemo damage for constant Swirls.
Which one's more F2P friendly? Heizou, honestly. His flat 80 EM buff works regardless of investment, he's functional at C0 with budget weapons, and his build flexibility means you can work with whatever artifacts you get. Sucrose needs specific EM pieces and really wants C1.
Can Heizou replace Sucrose in National team? Yes, but Sucrose usually provides better team damage through EM buffs. Heizou's personal damage and 80 EM buff can partially compensate when Sucrose isn't available or under-invested.
What artifacts should I actually farm? Both need 4VV from the Viridescent Venerer domain. Heizou can use ATK%/Anemo/CRIT for damage or triple EM for reactions. Sucrose wants triple EM for optimal buffing. Both need level 90 for maximum Swirl damage.
How much investment do they actually need? Heizou: moderate for damage builds (6/6/6 talents, decent CRIT artifacts) but works immediately with basic EM builds. Sucrose: specific EM artifacts and ideally C1, but minimal talent investment required.