

Quick Answer: Genshin Impact features 7 fishing rods with region-specific bonuses and 8 bait types for different fish species. Regional rods like Windtangler (Mondstadt), Wishmaker (Liyue), and Narukawa Ukai (Inazuma) reduce struggle time in their respective areas. Fruit Paste Bait catches Medaka family fish, while specialized baits like Sugardew and Flashing Maintenance Mek target region-specific species in Sumeru and Fontaine.
Getting Started: What You Actually Need to Know About Fishing
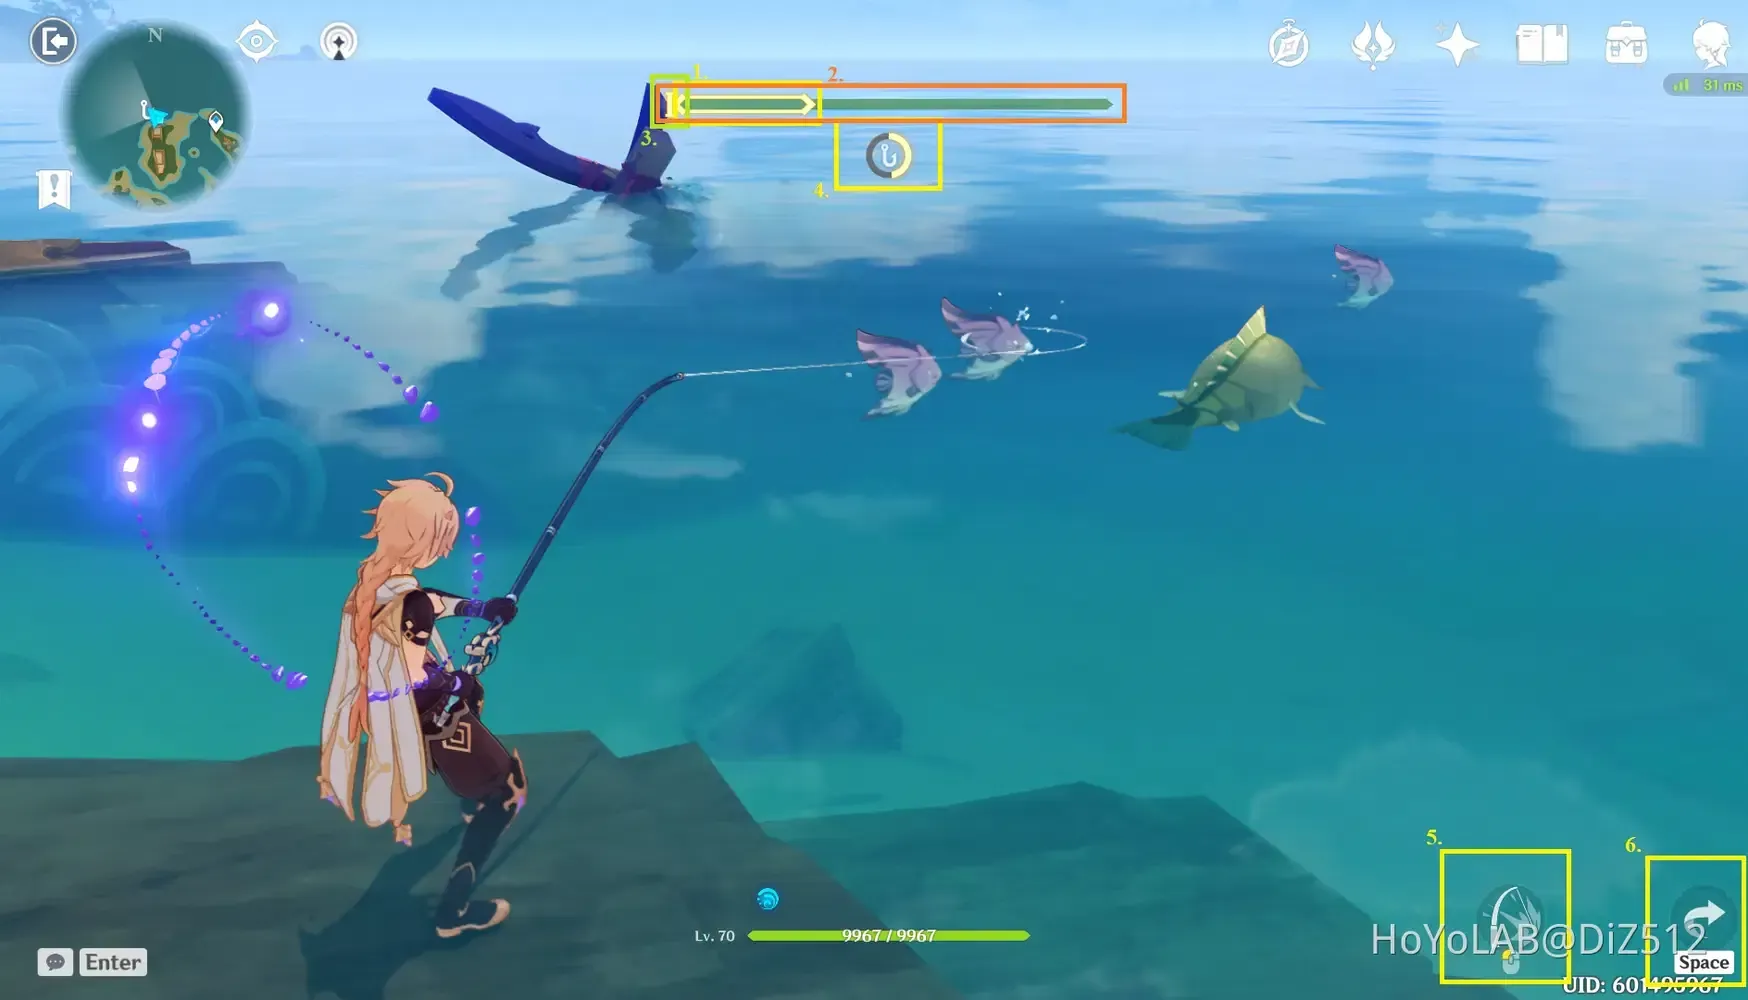
The Real Deal on Fishing Mechanics
Look, I'll be straight with you – fishing in Genshin isn't just cast and wait. It's a tension-based minigame that'll test your patience more than any Spiral Abyss floor. Fish respawn every three real-world days (yes, actual days), with completely separate pools for day (06:00-18:00) and night (18:00-06:00).
The key? That yellow Ideal Tension Zone during struggle phases. Miss it, and you're starting over. When things get intense, the zone turns orange and moves like it's had too much coffee – that's when you need those regional rod bonuses most.
Equipment Stats That Actually Matter
Here's what the game doesn't tell you upfront: regional fishing rods aren't just cosmetic upgrades. They slash struggle duration by 25-35% and boost your success rate significantly in their designated areas. The Moonstringer? Universal benefits, but it's unforgiving – one slip outside the Ideal Zone and you're back to square one.
Bait selection determines everything. Wrong bait = wrong fish = wasted time. Period.
Unlocking This Whole System
You'll need Adventure Rank 35, an unlocked Serenitea Pot, and completion of both A New Star Approaches and A Teapot to Call Home. Then chat with Katheryne in Mondstadt to start Exploding Population.
Your starter pack includes: 1 Wilderness Rod, 10 units each of four bait types, and the Fruit Paste Bait recipe. Not much, but it's enough to get rolling.
The Complete Rod Breakdown (And Which Ones Actually Matter)
Wilderness Rod - Your Training Wheels
Basic equipment with zero special effects. It works everywhere but excels nowhere – struggle times run 25-35% longer than regional alternatives. Fine for learning the ropes, but you'll want to upgrade fast.
Windtangler - Mondstadt's MVP
This rod transforms Mondstadt fishing from tedious to tolerable. Particularly clutch for those aggressive Venomspine Fish that seem determined to break your line.
Getting Your Hands on One:
Trade with Nantuck at Mondstadt Fishing Association
Cost: 20 Medaka, 20 Aizen Medaka, 20 Venomspine Fish, 20 Tea-Colored Shirakodai
Reality check: 15-20 fishing trips minimum
Wishmaker - Liyue's Game-Changer
Honestly? This should be your first priority rod. Liyue hosts the Golden Koi and Rusty Koi you'll need for The Catch weapon, and this rod makes that grind 30-40% faster.
The Exchange:
Find Jiawei at Liyue Fishing Association
Fish needed: 20 Medaka, 20 Sweet-Flower Medaka, 20 Betta, 20 Brown Shirakodai
Timeline: 12-18 real days without co-op help
Narukawa Ukai - Inazuma's Necessity
Not optional if you want The Catch. Those Raimei Angelfish only spawn at night near the Tatarasuna shipwreck, and they're absolute nightmares without this rod. You need 18 total Raimei (6 for the weapon, 12 more for refinement) – good luck doing that efficiently with anything else.
Acquisition Details:
Vendor: Kujirai Momiji at Inazuma Fishing Association
Cost: 20 Medaka, 20 Glaze Medaka, 20 Lunged Stickleback, 20 Purple Shirakodai
Strategic importance: Mandatory for serious players
Moonstringer - The One That Got Away
The only rod with universal regional bonuses. Problem? It was exclusive to the September 10-20, 2021 Lunar Realm event. If you missed it, you're out of luck permanently.
It's genuinely good – universal struggle reduction across all regions – but completely resets if you exit the Ideal Tension Zone. High risk, high reward.
Bait Guide: What Actually Catches What
Fruit Paste Bait - Your Foundation
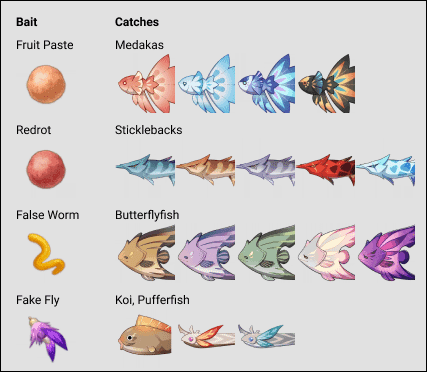
This is where everyone starts, and for good reason. Recipe's simple: 1 Sunsettia + 1 Wheat = 10 bait units. Targets the entire Medaka family (6 species total), which you'll need for literally everything else in the fishing system.
You need 9 Medaka just to buy other bait recipes, so craft this in bulk first.
Redrot Bait - For the Aggressive Ones
Targets the fighters – Stickleback family and other aggressive species. Recipe: 1 Dendrobium + 1 Fowl = 10 units. Catch? Dendrobium only grows in Inazuma, so plan accordingly.
Attracts: Lunged Stickleback, Betta, Venomspine Fish, Akai Maou, Snowstrider. Costs 3 Medaka from Mondstadt's association.
False Worm Bait - The Premium Option
This is your ticket to high-value catches, including those crucial Raimei Angelfish. Recipe: 1 Slime Condensate + 1 Berry = 10 units.
Essential targets: Raimei Angelfish, all Shirakodai variants, Abiding Angelfish. If you want The Catch, you'll be crafting this constantly.
Fake Fly Bait - Koi Specialist
Golden Koi and Rusty Koi for The Catch? This is your bait. Recipe: 1 Sakura Bloom + 1 Horsetail = 10 units. Also works for Pufferfish variants and rays.
The Regional Specialists
Sugardew Bait handles Sumeru's 9 unique species, including that massive Halcyon Jade Axe Marlin. Flashing Maintenance Mek Bait is the only way to catch Fontaine's mechanical fish – no alternatives exist. Sour Bait targets Fontaine's Jade Heartfeather Bass specifically.
Natlan brings Spinelgrain and Emberglow baits for standard and fire-element fish respectively. All regional baits cost 3 fish from their respective associations.
Regional Strategies That Actually Work
Mondstadt: The Learning Curve
Start here with Windtangler once you've got it. Focus on Fruit Paste and Redrot baits initially. Key targets: Medaka family for progression, Venomspine Fish for rod trades, Tea-Colored Shirakodai for completion.
Fish both day and night cycles – different species spawn at different times.
Liyue: The Koi Grind
Wishmaker rod is non-negotiable here. Fake Fly bait becomes your best friend for those 20 Golden Koi and 20 Rusty Koi needed for The Catch. False Worm handles the Shirakodai requirements.
Pro tip: Koi farming is tedious but essential. Plan for multiple sessions.
Inazuma: Night Shift Required

Narukawa Ukai rod, False Worm bait, and a lot of patience. Those 18 Raimei Angelfish only spawn at night (18:00-06:00) near the Tatarasuna shipwreck. No shortcuts here – just consistent grinding.
The good news? Once you've got The Catch, the hardest fishing is behind you.
The New Regions
Sumeru, Fontaine, and Natlan each demand their specific rods and regional baits. Fontaine's particularly interesting with those mechanical fish – it's the first time bait choice becomes absolutely mandatory rather than just optimal.
Advanced Tips From Someone Who's Been There
Time Manipulation is Your Friend
Don't wait for natural day/night cycles. Use the Paimon menu to instantly switch between day and night pools. Raimei Angelfish spawn exclusively at night – no point waiting around when you can just change the time.
The Three-Day Rotation System
Fish respawn every three real-world days. Smart players maintain rotation circuits across multiple spots. The game's Fish Display Limit means spots contain more fish than visible – complete depletion reveals the full population.
Achievement Hunting
Stabilizer achievement requires 10 perfect tension catches. Much easier with regional rods. Most fishing achievements provide 5-20 Primogems each, so they're worth pursuing for F2P players especially.
For those looking to speed up progression, Genshin Impact Top Up services offer quick Genesis Crystal access for resin refreshes and material purchases – can significantly cut down fishing timelines.
Mistakes I See Everyone Make
Rod Selection Errors
Using the Wilderness Rod after getting regional alternatives is like using a dull knife when you have a sharp one. Those 25-35% efficiency gains add up fast over hundreds of catches.
Bait Waste
Fishing at depleted spots or using wrong bait types. Keep a species reference chart handy and track your respawn timers. Nothing's more frustrating than burning through bait for fish that aren't even spawning.
Timing Issues
Attempting to catch night-spawning fish during day hours. Always verify spawn conditions before settling in for a long session.
The Catch Weapon: Your End Goal
This 4-star polearm requires serious commitment: 6 Raimei Angelfish, 20 Golden Koi, 20 Rusty Koi just for the weapon. Full refinement demands another 12 Raimei, 40 Pufferfish, 40 Bitter Pufferfish.
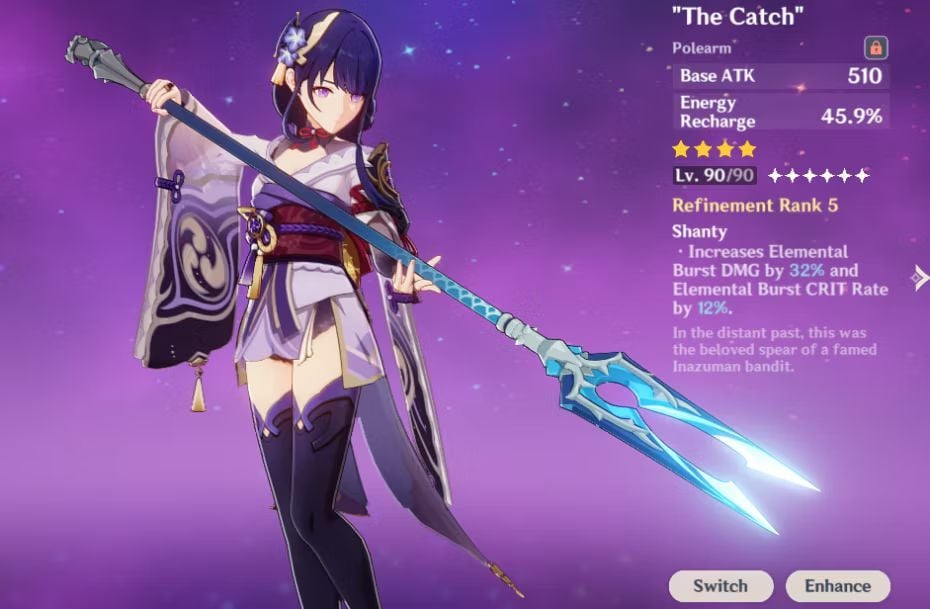
Timeline reality: 6-8 weeks solo, 2-3 weeks with consistent co-op help. It's a marathon, not a sprint.
Association Rewards Worth Pursuing
Beyond The Catch, you've got furnishings like the Pool of Sapphire Grace (10 Medaka from Liyue), regional rods (80 fish each), and specialized bait recipes (3 fish each). Plan your progression accordingly.
Your Fishing Roadmap
Foundation Phase: Farm 9 Medaka for bait recipe access
Efficiency Phase: Get regional rods for your primary areas
Grind Phase: Rare fish farming for The Catch
Completion Phase: Achievements and collection goals
For players wanting to accelerate this timeline, Buy Genesis Crystals through BitTopup provides resources for resin refreshes and material purchases while maintaining account security and competitive pricing.
FAQ: The Questions Everyone Asks
What's the actual best fishing rod for general use? Moonstringer if you have it (universal bonuses), otherwise prioritize the regional rod for wherever you fish most. That 25-35% efficiency boost isn't just numbers – it's sanity preservation.
How do I farm Raimei Angelfish without losing my mind? Night fishing only (18:00-06:00) at Tatarasuna shipwreck. False Worm Bait, Narukawa Ukai rod. You need 18 total. Co-op fishing cuts the timeline from 6-8 weeks to 2-3 weeks – use it.
Which bait should I prioritize crafting? Fruit Paste Bait first (50+ units minimum) for those 9 Medaka needed to unlock other recipes. Then False Worm for Raimei access, followed by Fake Fly for Koi species.
Does co-op fishing actually help? Absolutely. It bypasses the 3-day respawn timer completely. Fish go to your inventory, not theirs. Always ask permission first – it's basic courtesy. Essential for efficient rare fish farming.
Are all regional rods basically the same? Within their regions, yes – identical struggle reduction and success rate boosts. The only difference is where they work. Moonstringer's unique with universal benefits, but good luck getting one now.
What's the most efficient unlock path? Complete Exploding Population at AR35, farm 9 Medaka for recipes, get the regional rod for your main fishing area (80 fish investment), then focus on The Catch requirements using co-op strategies. Don't try to do everything at once – you'll burn out.