

Quick Answer: The Spiral Abyss is Genshin Impact's premier endgame challenge featuring 12 floors with monthly resets on floors 9-12. Success requires understanding core mechanics like elemental reactions, team synergy, proper investment priorities, and adaptation to rotating enemy lineups and blessing effects.
Look, I'll be straight with you – the Spiral Abyss is where Genshin Impact stops being nice. This challenging domain on Musk Reef (unlocked at Adventure Rank 20) represents the ultimate test of everything you've learned about team building, character investment, and combat strategy. But here's the thing that keeps us all coming back: those 800 monthly Primogems for full completion make mastering this content absolutely essential for long-term progression.
After covering endgame content for years, I can tell you that understanding the fundamentals will serve you far better than chasing the latest meta trends.
Understanding Spiral Abyss Core Mechanics
Floor Structure and Reset Cycles
The Abyss splits into two distinct sections. First, there's the Abyss Corridor (Floors 1-8) – think of this as your one-time treasure chest offering 2,400 Primogems that never reset. Then comes the real challenge: Abyssal Moon Spire (Floors 9-12), which resets monthly on the 16th at 04:00 Server Time.

Here's where things get interesting (and expensive). Starting at Floor 5, you'll need two completely separate teams with zero character overlap. That's right – your beloved Bennett can't carry both sides anymore. Each chamber forces you to commit characters to either the first or second half, effectively doubling your investment requirements overnight.
Timer Systems and Star Requirements
Time pressure defines the Abyss experience. Floors 1-4 give you a generous 300 seconds per chamber, but Floors 5-12 bump that up to 600 seconds – which sounds like more until you realize you're now fighting significantly tankier enemies.
The star system gets brutal fast. For Abyssal Moon Spire, you need more than 180 seconds remaining for 1 star, 300+ for 2 stars, and 420+ for that precious 3-star clear. Enemy HP scaling makes these timers genuinely challenging: Floors 3-7 feature 150% HP, Floors 8-11 reach 200%, and Floor 12 hits a punishing 250% of normal values.
Progress requires 6+ stars per floor, but here's a saving grace – individual chamber achievements save retroactively. Failed that second half? Your first half progress stays locked in.
Blessing Effects and Ley Line Disorders
Every floor throws permanent Ley Line Disorders at you. Some are gifts (like +75% Electro-Charged damage that makes Taser teams absolutely sing), others are nightmares (Corrosion bypassing your carefully built shields). Learning to read these effects and adjust accordingly separates casual players from Abyss masters.
Benedictions offer three rotating tactical choices per chamber. These effects can last the entire chamber, the whole floor, or activate immediately depending on type. Daily server resets shuffle available Benedictions, so that perfect strategy you planned? Might need tweaking tomorrow.
Essential Team Building Fundamentals
Core Roles and Character Functions
Effective Abyss teams aren't just four strong characters thrown together – they're carefully balanced ecosystems. You need a main DPS for primary damage windows, sub-DPS for off-field damage and reactions, utility for crowd control and buffs, and survival through healing or shielding.
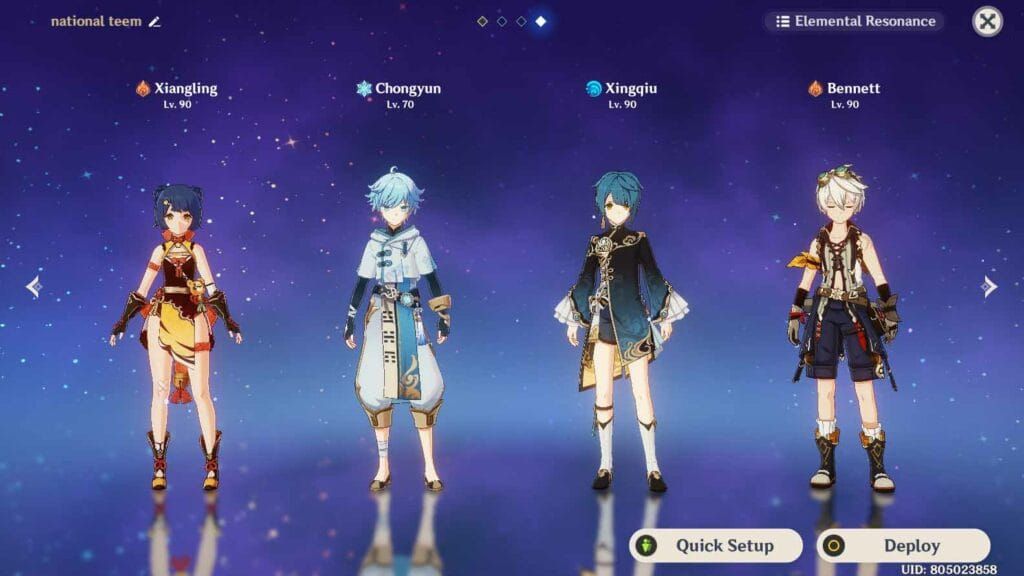
The National Team (Xiangling/Xingqiu/Bennett/flex DPS) remains relevant because it demonstrates perfect synergy: constant Vaporize reactions with minimal field time requirements. Hyperbloom teams deliver exceptional single-target damage with surprisingly low investment. Freeze compositions provide crowd control alongside high damage output.
But here's my editor's take: don't get trapped thinking you need these exact teams. Understanding the principles behind why they work matters more than copying builds blindly.
Elemental Synergy Principles
Reactions fall into distinct categories with completely different scaling. Amplifying reactions (Vaporize, Melt) multiply your triggering damage by 1.5x-2.0x, scaling with all your normal DPS stats – ATK, DMG%, Crit, and EM.
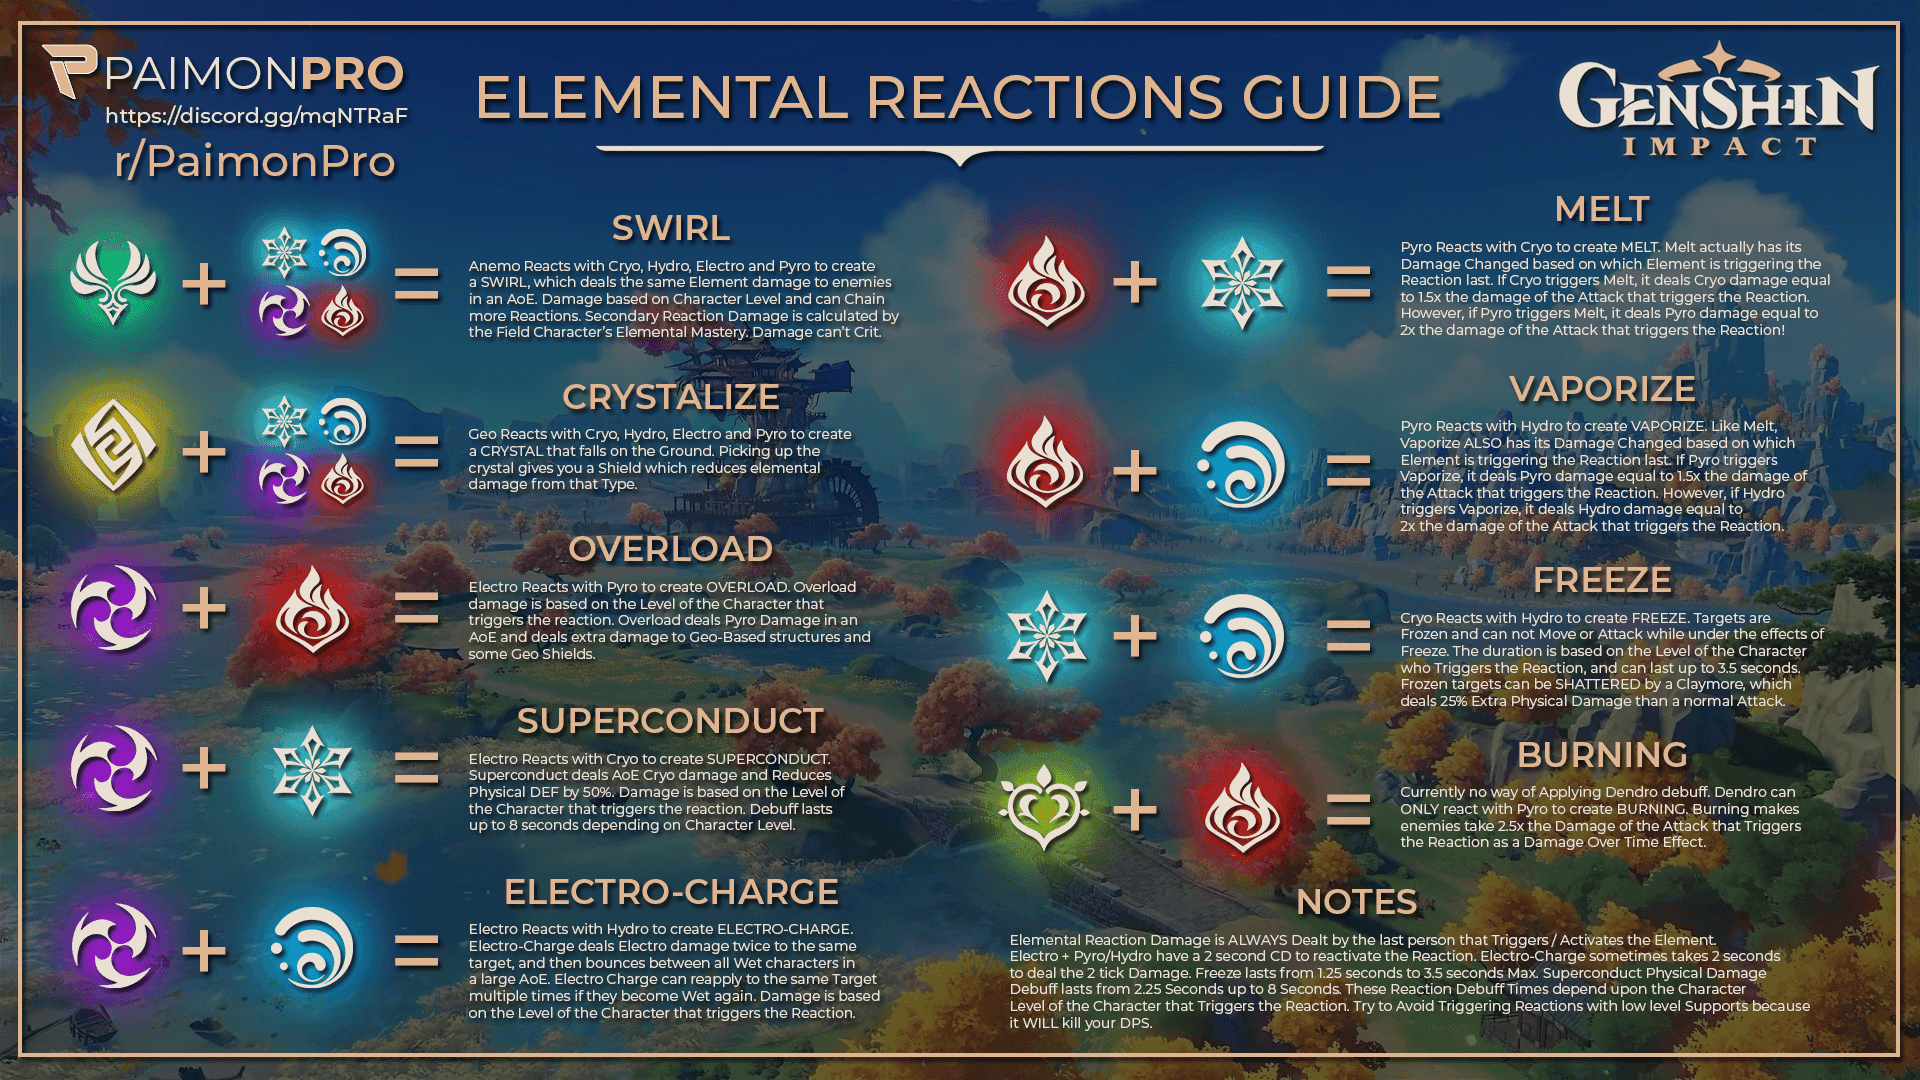
Transformative reactions (Overloaded, Superconduct, Swirl) work entirely differently. They deal separate damage instances that scale only with Character Level and EM while completely ignoring DEF. This is why you see Level 90 Kuki builds focusing purely on EM.
Additive reactions (Aggravate, Spread) add flat damage bonuses scaling with Level and EM. Meanwhile, Superconduct reduces Physical Resistance by 40% for 12 seconds – suddenly those Physical DPS characters don't look so outdated, do they?
Investment Priority Framework
Character Level and Talent Priorities
Main DPS characters need Level 80/90 minimum, with Level 90 becoming crucial for Transformative reaction scaling. Primary damage talents should hit Level 8 at minimum, while supports can focus on their Skill and Burst talents instead.
Here's something many guides won't tell you: key supports like Bennett function perfectly at Level 70/80 with Level 8+ Burst. You don't need to max everything. However, reaction triggers like Kuki benefit significantly from Level 90 ascension due to how Transformative reactions scale.
Weapon levels to 90 consistently provide better returns than pushing talents from 8 to 9. Keep that in mind when allocating resources.
Artifact Main Stats and Substats
Main DPS characters want the holy trinity: Crit Rate/DMG, ATK%, and Elemental DMG Bonus. Target that classic 1:2 Crit ratio everyone talks about. Supports prioritize Energy Recharge first, then whatever scaling stat they use (HP%/DEF%/EM).
Set bonuses create major power spikes. 4pc Viridescent Venerer enables 40% resistance shred – that's massive. 4pc Noblesse offers team ATK buffs that benefit everyone. These effects often matter more than perfect substats.

Substat priorities shift based on what your main stats already cover and your ER requirements. Don't chase perfect pieces while ignoring functional upgrades.
Weapon Selection Criteria
5-star weapons provide superior stats, but 4-star alternatives deliver 80-90% effectiveness. That's not a small gap, but it's manageable.
Craftable weapons guarantee specific stat distributions: Prototype Archaic (ATK%), Iron Sting (EM), Amenoma Kageuchi (ER). You can plan around these. Refinement priorities favor supportive weapons over DPS options – Sacrificial series weapons reduce cooldown RNG, while Thrilling Tales extends buff duration.
Combat Optimization Strategies
Skill Rotation Fundamentals
Effective rotations layer buffs strategically before main DPS windows. Anemo supports Swirl for VV resistance shred, Bennett provides ATK buffs, then you unleash your primary damage dealer. It's like conducting an orchestra – timing matters.
Energy management requires understanding particle generation mechanics. Same-element characters receive bonus energy from particles. Sacrificial weapons can double particle generation. Battery characters like Fischl exist specifically to support energy-hungry teammates.
Pro tip: Burst animations provide i-frames for dodging major attacks. Learn to use them defensively.
Positioning and Movement
Enemy positioning directly impacts damage efficiency. Group scattered enemies for AoE abilities, prioritize ranged enemies and healers to prevent constant disruption. Environmental effects demand awareness – Bennett's circle only provides buffs within range, damage zones deplete HP rapidly.
Movement skills enable both offensive and defensive positioning. Dash canceling and strategic placement prevent knockback while maintaining optimal damage ranges.
Adaptation Strategies for Rotations
Reading Enemy Lineups
Enemy compositions determine team selection through multiple factors. Shield types break with specific elements (Pyro shields crumble to Hydro). HP distribution matters – single high-HP targets versus multiple medium-HP enemies require different approaches. Special mechanics like Corrosion demand healing, while energy drain requires higher ER investments.
Understanding these factors prevents composition failures and enables strategic preparation rather than reactive scrambling.
Team Composition Adjustments
Successful adaptation focuses on understanding core functions over rigid character selections. National principles work with various Pyro DPS characters. Hyperbloom mechanics function across different Dendro/Electro combinations.
Elemental coverage adjustments address specific challenges without complete team overhauls. Substitute Anemo supports, swap reaction triggers, adjust utility characters while maintaining core synergies. Flexibility beats perfection.
F2P and Low-Spender Success Paths
4-Star Character Focus
Characters like Xiangling, Xingqiu, Bennett, and Fischl provide performance comparable to 5-star alternatives through guaranteed acquisition methods. The National team demonstrates 4-star effectiveness through powerful reactions and natural synergy.
Hyperbloom teams offer exceptional value with characters like Kuki triggering reactions that require minimal investment to excel. Constellation effects provide significant power increases through repeated pulls that happen naturally over time.
For strategic roster enhancement, Buy Genesis Crystals Online through BitTopup provides excellent value with competitive pricing and instant delivery for key 4-star constellations and weapons.
Craftable Weapon Strategies
Craftable weapons provide guaranteed stat access without gacha RNG. Prototype Archaic (Claymore ATK%), Iron Sting (Sword EM), Amenoma Kageuchi (Sword ER) cover most needs. Refinement materials accumulate through exploration and events, enabling gradual upgrades.
R5 craftable weapons often outperform R1 gacha alternatives with clear, achievable upgrade paths.
Resource Allocation Guidelines
Resin efficiency prioritizes artifact domains only after character levels and talents reach functional thresholds. Talent books should focus key abilities for core characters – Level 8 provides substantial improvements over Level 6.
Weekly boss materials limit progression, making efficient usage crucial. Event participation provides superior resource value through limited-time rewards that often exceed daily farming efficiency.
Common Mistakes and Misconceptions
Over-Investment Traps
Players consistently over-invest in marginal improvements while neglecting fundamental upgrades. Chasing perfect artifact substats before securing proper main stats and set bonuses wastes enormous resources.
Weapon refinements typically provide 15-25% damage increases, while properly built support characters can double team effectiveness. Talent levels beyond 8 require significant investment for modest gains. Level 90 provides minimal benefits except for Transformative reaction characters where it's essential.
Team Synergy Errors
Building characters in isolation ignores team interactions and reaction optimization. Neglecting Energy Recharge prevents consistent Burst usage, reducing overall effectiveness. Ignoring elemental application rates causes reaction inconsistency that kills DPS rotations.
Survival neglect leads to failed clears despite adequate damage potential. Dead characters deal zero DPS – sometimes the best offense is a good defense.
Progressive Clearing Methodology
Early Game Abyss Approach
Focus the Abyss Corridor for one-time Primogems and character unlocks (Xiangling from Floor 3-3, Collei from Floor 4-3). Your starter team plus Barbara can handle early floors with proper investment levels.
Elemental reaction understanding becomes crucial at Floor 5 when team splitting begins. Resource investment should prioritize 1-2 main DPS characters initially before expanding to support development.
Mid-Game Transition Strategies
Develop two functional teams for Floors 5-8, requiring 4-6 well-invested characters minimum. Team composition flexibility addresses enemy variety through multiple elemental coverage options.
Artifact farming begins after character levels and talents reach functional thresholds. Focus main stats and set bonuses initially – substats come later.
For progression acceleration, Genshin Impact Top Up services from BitTopup offer secure transactions and competitive rates, enabling strategic resource acquisition for key upgrades.
Endgame Optimization
36-star clears require deep understanding of rotation mechanics, enemy attack patterns, and optimization techniques including buff stacking and energy funneling. Character investment reaches diminishing returns, making synergy and execution paramount.
Meta adaptation maintains multiple viable compositions for rotating challenges. Community engagement through theorycrafting provides ongoing learning opportunities that keep you ahead of new content.
Tools and Resources for Success
Damage Calculators and Simulators
Genshin Optimizer provides comprehensive damage calculations and artifact optimization tools. Spiral Abyss databases track enemy lineups, blessing effects, and clear rates across different investment levels.
ER calculators determine optimal Energy Recharge requirements for specific compositions. Team DPS calculators enable direct composition comparison and character selection optimization.
Community Resources and Databases
Character guides from established theorycrafters provide build recommendations and strategic insights. Clear showcases demonstrate successful strategies across various investment levels and character rosters.
Meta analysis tracks usage rates and composition trends, helping identify emerging strategies. For consistent resource acquisition, Cheap Genshin Top Up options from BitTopup provide excellent value with fast delivery.
Practice and Preparation Methods
Test runs identify team weaknesses and optimization opportunities before committing to full attempts. Rotation practice develops muscle memory for complex ability sequences.
Enemy pattern study builds understanding of attack telegraphs and vulnerability windows. Build experimentation identifies optimal configurations for specific challenge types.
Frequently Asked Questions
How often does the Spiral Abyss reset and what changes? Abyssal Moon Spire resets monthly on the 16th at 04:00 Server Time, offering 800 Primogems for full completion. Resets introduce new Floor 11-12 enemy lineups, rotate Blessing effects, and change available Benedictions. Floors 9-10 update annually, while the Corridor provides one-time rewards that never reset.
What investment level is needed for 36-star clears? Main DPS characters at Level 80/90 with Level 8+ talents, proper +20 artifacts, and Level 90 weapons. Supports function effectively at Level 70/80 with Level 6-8 talents and appropriate Energy Recharge. Total investment involves 6-8 well-built characters, with 4-star alternatives remaining viable.
Which team compositions work best for F2P players? National variations and Hyperbloom compositions offer exceptional F2P value through powerful 4-star characters. National leverages consistent Vaporize reactions, while Hyperbloom provides high single-target damage with minimal investment requirements. Both scale effectively with constellation upgrades and craftable weapon refinements.
How do I adapt teams to different rotations? Focus on understanding enemy shield types, HP distributions, and special mechanics rather than memorizing specific lineups. Maintain elemental coverage for shield breaking, adjust team allocation for single-target versus AoE scenarios, and prepare countermeasures for mechanics like Corrosion. Flexible builds enable strategic responses to changing conditions.
What are the most important artifacts and weapons? 4pc Viridescent Venerer provides crucial resistance shred, while 4pc Noblesse offers valuable team ATK buffs. Sacrificial weapon series enable enhanced energy generation, Thrilling Tales provides significant ATK buffs, and craftable weapons deliver competitive performance. Main stats and set bonuses matter more than perfect substats initially.
How do elemental reactions impact performance? Reactions provide the majority of damage output through different scaling mechanisms. Amplifying reactions multiply attack damage scaling with traditional DPS stats, while Transformative reactions deal separate damage instances scaling only with Character Level and Elemental Mastery. Understanding these distinctions enables proper character building and team optimization.