

Master Serenitea Pot trust farming through strategic load optimization. Prioritize high-rarity, low-load furnishings like Pine Folding Screens (90 Adeptal Energy) and Stone Lion Statues. Craft every blueprint once for Trust EXP, purchase daily Vials of Adeptal Speed, and maintain 20,000 Adeptal Energy for maximum 30 RC/hour generation.
Understanding Serenitea Pot Trust System and Load Mechanics
Let's be honest here – the Serenitea Pot system can feel overwhelming at first. But once you understand the core mechanics? It's actually pretty straightforward.
Trust Rank Progression Overview
Here's the thing about Trust EXP that trips up most players: you only get it when crafting something new. Craft that Pine Folding Screen for the tenth time? Zero Trust EXP. The game's basically rewarding you for variety, not quantity.
The Trust EXP breakdown is simple enough:
Rarity 2 (Green): 30 Trust EXP
Rarity 3 (Blue): 60 Trust EXP
Rarity 4 (Purple): 90 Trust EXP
Trust Rank progression unlocks features that'll make your life significantly easier. At Rank 1, you're stuck with one furnishing creation queue slot and a measly 300 Realm Currency storage – which fills up embarrassingly fast. By Rank 10? You've got 5 creation slots running simultaneously and 2,400 RC storage that actually gives you breathing room.
The real game-changers come with additional realm layouts at Ranks 8 and 10, plus those exterior areas at Ranks 5, 7, and 9. And let's not forget the 600 total Primogems for hitting Rank 10 (that's 60 per rank) – not exactly whale money, but hey, every gem counts.
Load System Fundamentals
Load Limit is your biggest constraint, and there's no way around it. Think of it like Tetris – you've got limited space, and you need to make every piece count.
Each area has its own load budget, which is actually brilliant design (though it doesn't feel that way when you're trying to cram everything into one room). Dynamic objects like companions are load hogs – they consume way more than static furnishings. It's the difference between placing a decorative screen versus having Zhongli standing around looking contemplative.
Pine Folding Screen: Billowing Sails is the gold standard here – 90 Adeptal Energy with minimal load consumption. For outdoor areas, Stone Lion: The Knowing offers identical energy output with similarly low load impact. Meanwhile, each companion adds 300 Adeptal Energy but eats up load equivalent to 10-15 high-efficiency furnishings. The math doesn't always work in their favor.

Trust vs Load Balance Strategy
This is where strategy gets interesting. Trust farming wants you crafting everything once, while energy optimization screams mass-produce the efficient stuff!
My recommendation? Focus on Trust Rank advancement first. Craft every available blueprint once to unlock those additional creation queue slots and higher RC storage limits. Once your blueprint variety starts running thin – and it will – pivot hard toward Adeptal Energy optimization through mass production.
Essential Trust Farming Strategies for Maximum Efficiency
High-Value Furniture Prioritization
Purple furnishings are your best friends. At 90 Trust EXP compared to green's 30 EXP, they're literally three times more valuable per craft. The math is brutal for anyone ignoring rarity.
Pine Folding Screen: Billowing Sails requires Pine Wood x12, Fabric x3, and Red Dye x3. Not exactly rare materials, but you'll need to plan your farming routes. The blueprint costs 240 Realm Currency, but you're getting maximum Trust EXP and excellent energy output – it's a no-brainer.
Stone Lion: The Knowing is even more resource-friendly, needing only White Iron Chunk x12. Pine Wood farms efficiently around Mondstadt city and Dragonspine (though Dragonspine's a bit annoying to navigate). Fabric means Silk Flower hunting in Liyue. For dyes, you've got options: Red from Sunsettia, Carrot, or Valberry; Yellow from Berry or Cor Lapis; Blue from Mint or Wolfhook.
Companion Placement Optimization
Each companion provides exactly 300 Adeptal Energy while consuming significant load and generating passive Companionship EXP. The trick is prioritizing characters whose Friendship Level isn't maxed yet – no point in wasting that passive EXP generation.
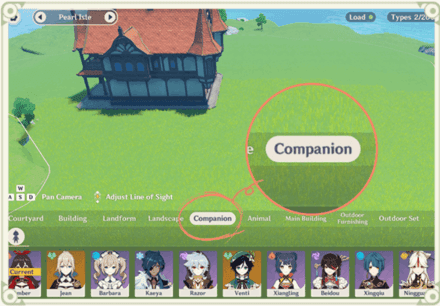
You can place up to 8 companions at Trust Rank 9, but load constraints often prevent using all available slots. Which is probably for the best – 8 companions would eat up most of your load budget.
Favorite Furnishing Sets create interesting optimization opportunities. Each character has specific preferences that provide one-time rewards including Primogems, Mora, and character materials. These sets cost 240 RC each, with 15 different sets available. Worth pursuing, but don't let them derail your main Trust farming goals.
Daily Trust Farming Routine
Priority 1: Collect that accumulated Realm Currency from Tubby immediately upon login. Storage caps at 2,400 at Rank 10, and there's nothing worse than losing RC to the cap.
Priority 2: Buy all 5 daily Vials of Adeptal Speed for 10 RC each. Use these on 4-star furnishings with their 16-hour craft times – the time savings add up fast.
Priority 3: Purchase new furnishing blueprints with remaining RC. Always prioritize 4-star blueprints for maximum Trust EXP efficiency.
Priority 4: Queue new furnishing crafts to maintain constant production. Focus on uncrafted blueprints for those Trust EXP gains.
This routine takes maybe 5 minutes daily but makes the difference between efficient progression and spinning your wheels.
Load Optimization Techniques and Calculations
Furniture Load Value Database
Small, static furnishings offer the best load efficiency, hands down. Screens, statues, and decorative items consume 1-3 load points while providing substantial Adeptal Energy. Medium furnishings jump to 4-8 load points. Large structures? 15+ load points with variable energy returns that often don't justify the space.
Pine Folding Screen represents the gold standard for indoor optimization – 90 Adeptal Energy with minimal load consumption. Landforms and animals look pretty, but they consume disproportionate load relative to energy contribution. Each companion eats load equivalent to 10-15 high-efficiency furnishings while providing only 300 Adeptal Energy. Sometimes the math just doesn't work out.
Load Calculation Methods
Step 1: Target 20,000 Adeptal Energy for maximum 30 Realm Currency per hour generation.

This is your endgame goal.
Step 2: Calculate required furnishing quantities. Using Pine Folding Screens, you need approximately 222 screens (20,000 ÷ 90 = 222.2). Sounds like a lot? It is.
Step 3: Distribute furnishings across all available areas with separate load budgets. Don't try cramming everything into one room.
Step 4: Reserve some load budget for decorative elements while maintaining high energy output. Pure efficiency looks boring.
Step 5: Monitor that load indicator and push each area to maximum capacity without exceeding limits. Every point of unused load is wasted potential.
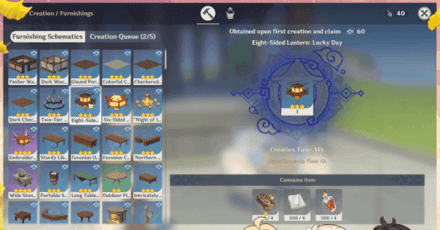
Blueprint Acquisition and Crafting Priority Guide
Trust-Efficient Blueprint Selection
4-star blueprints cost 240 RC and provide 90 Trust EXP, yielding 0.375 Trust EXP per RC. While 2-star blueprints provide identical ratios (80 RC for 30 Trust EXP), 4-star blueprints offer higher Adeptal Energy output and use less crafting queue time. Efficiency matters when you're managing multiple creation slots.
The Realm Depot stocks 50+ blueprints across all rarity tiers. Players generating 30 RC per hour (720 daily) can afford three 4-star blueprints daily. Secondary sources include Adeptal Mirror missions, Trust Rank rewards, and Chubby's weekend inventory – which brings us to everyone's favorite traveling salesman.
Resource Management for Crafting
Wood is your primary crafting material, and you'll burn through it faster than you expect. I recommend stockpiling 200+ units of each wood type before going on crafting sprees. Fabric requires Silk Flowers from Wangshu Inn and Liyue Harbor farming routes – you can get 20+ flowers per cycle if you know the spots.
Dye crafting offers material flexibility through multiple ingredient options, which is honestly a relief. Metal materials require mining expedition management at Guyun Stone Forest and Mingyun Village. For players wanting to accelerate progression, Genshin Impact Top Up services provide additional resources through Genesis Crystal purchases.
Weekly Traveling Salesman Strategy
Chubby appears every weekend (Friday 4 AM to Monday 4 AM GMT+8) with randomized inventory that makes weekend visits essential for complete blueprint collection. His timing isn't exactly convenient for most players, but missing him means missing unique items.

Purchase priority always favors blueprints over animals or pre-crafted furnishings. Blueprints provide permanent unlocks contributing to Trust farming, while pre-crafted items are just expensive shortcuts. Maintain sufficient currency reserves for valuable Chubby offerings while continuing daily Realm Depot purchases – it's a balancing act.
Furniture Set Optimization for Trust and Aesthetics
High-Trust Furniture Sets
Favorite Furnishing Sets provide structured Trust farming approaches, though they're not always the most efficient route. Each of 15 available sets costs 240 RC and provides one-time rewards when corresponding characters are invited to completed sets. The rewards are nice, but the real value is the Trust EXP from crafting set components.
Load efficiency varies dramatically between sets. Compact indoor arrangements offer better load utilization than sprawling outdoor installations that eat up space for minimal benefit. Here's a pro tip: set placement can be temporary. Construct sets to claim rewards and Trust EXP, then dismantle for more efficient individual furnishings.
Set Bonus Maximization
Character reward values vary based on ascension material requirements. Sets providing rare materials like talent books offer higher practical value than common items you can farm anywhere. The one-time nature creates completion urgency for active players who want to maximize their Serenitea Pot investment.
Set completion timing should align with character development needs. For enhanced character development beyond Serenitea Pot limitations, Buy Genesis Crystals can provide additional resources.
Advanced Realm Layout Strategies
Multi-Realm Trust Distribution
The three-realm system unlocked at Trust Ranks 8 and 10 enables sophisticated optimization that most players underutilize. Designate one realm for pure energy farming, another for aesthetics, and the third for experimental layouts. Remember: Realm Currency generation derives from the single realm with highest Adeptal Energy, not combined totals.
Shared inventory enables rapid layout transitions without crafting delays – you can completely redesign a realm in minutes. Realm-specific unlocks like Silken Courtyard (requires Silken Print from Sacred Sakura) and Sublime Spicewood (requires Nature's True Fruit from Sumeru) create natural progression gates that keep things interesting.
Layout Design for Efficiency
Grid-based placement systems provide structured furnishing distribution that looks more organized than random placement. Establish regular spacing patterns for high-efficiency items, then fill remaining spaces with complementary furnishings. Position Tubby and crafting stations centrally to minimize navigation time – those seconds add up over hundreds of visits.
Zoning strategies separate functional areas: energy farming, aesthetic display, companion interaction, and experimental placement. Visual landmarks help navigate optimized layouts that prioritize efficiency over natural aesthetics. It's not always pretty, but it works.
Companion System and Trust Interactions
Optimal Companion Placement
Each companion provides exactly 300 Adeptal Energy regardless of character rarity, which seems fair until you consider load impact varies between characters based on model complexity. Adult characters consume more load than younger characters – apparently even virtual people take up more space as they age.
Friendship Level prioritization should focus on characters not yet at maximum friendship (Level 10). Eight-companion maximum at Trust Rank 9 creates selection pressure that forces strategic thinking. Prioritize based on friendship status, favorite furnishing set availability, and personal preferences.
Central placement enables easy interaction while distributed placement creates more natural environments. Your choice depends on whether you're optimizing for efficiency or aesthetics.
Gift-Giving Strategy
Gift preferences vary by character with some items providing higher friendship gains – though honestly, the differences aren't huge. Furnishings crafted within Serenitea Pot can serve as gifts, creating synergy between Trust farming and character development. Combine gift distribution with currency collection and blueprint purchasing to minimize time investment.
For maximized character development, Genshin Top Up Online services provide convenient access to additional resources supporting both Trust farming and gift-giving activities.
Common Trust Farming Mistakes and Solutions
Load Overflow Issues
Problem: Attempting to place high-load items without considering capacity limits. Solution: Calculate total load requirements before placement. Use high-efficiency items like screens and statues. Remove existing items to create capacity. Prevention: Monitor that load indicator continuously and plan layouts using efficient items first.
Problem: Concentrating furnishings in single areas while leaving others empty. Solution: Distribute placement across all available areas to maximize capacity utilization. Every area has separate load budgets – use them all.
Inefficient Furniture Choices
Problem: Placing large, complex furnishings that consume excessive load relative to energy contribution. Solution: Replace with high-efficiency alternatives like Pine Folding Screens or Stone Lion Statues. Sometimes bigger isn't better.
Problem: Crafting multiple copies expecting Trust EXP from each craft. Solution: Craft each blueprint exactly once before creating duplicates. Use the blue icon indicator for uncrafted blueprints – it's there for a reason.
Time Management Problems
Problem: Spending excessive time on aesthetics while neglecting Trust advancement. Solution: Complete essential tasks (currency collection, blueprint purchases, crafting queue management) before aesthetic projects. Function before form.
Problem: Allowing crafting queues to remain empty. Solution: Maintain constant crafting activity. Use Vials of Adeptal Speed on longest craft times. Empty queues are wasted time.
Weekly Maintenance and Long-term Progression
Weekly Trust Farming Schedule
Monday Reset: Realm Depot refreshes weekly. Prioritize Transient Resin (1,200 Realm Currency) at Trust Rank 6 for highest value conversion – it's basically free resin.
Weekend Chubby Visits: Review inventory immediately for valuable blueprints. Budget reserves for exceptional offerings, but don't hoard currency indefinitely.
Mid-Week Blueprint Acquisition: Focus on 4-star blueprints for maximum efficiency. Consistency beats sporadic big purchases.
Resource Farming Cycles: Establish weekly material gathering routes coordinated with daily commissions. Efficiency is about systems, not individual efforts.
Trust Rank Milestone Planning
Trust Rank 4: Unlocks second furnishing creation queue slot, doubling crafting capacity. This is your first major efficiency boost.
Trust Rank 6: Unlocks Transient Resin purchases. Reach this within 2-3 weeks for weekly resin supplementation – it's essentially free resources.
Trust Rank 8: Second realm layout unlock enables specialization strategies. Typically requires 4-6 weeks with consistent daily routines.
Trust Rank 10: Maximum rank provides third realm layout and highest storage limits. The endgame goal for most players.
Post-Rank 10: Shift focus to Adeptal Energy optimization and aesthetic development. Time to make things actually look good.
Frequently Asked Questions
How fast can you realistically farm Trust Rank in Serenitea Pot? With optimal daily routines generating 720 Realm Currency, players can purchase three 4-star blueprints daily for 270 Trust EXP. Reaching Trust Rank 10 requires approximately 3,000 total Trust EXP, theoretically achievable in 10-15 days with perfect efficiency. Reality check: blueprint availability typically extends this to 3-4 weeks.
What happens when you exceed the load limit in Serenitea Pot? Load limit is a hard constraint that cannot be exceeded – the system prevents any placement beyond capacity with error messages. You must remove existing items to create capacity for new additions. No exceptions, no workarounds.
Which furnishings provide the highest Trust EXP per Realm Currency spent? All rarities provide identical ratios (0.375 EXP per RC), but 4-star blueprints offer superior overall value through higher Adeptal Energy output, better load efficiency, and reduced crafting time consumption. The math favors purple items.
How do you calculate the optimal Adeptal Energy target for Realm Currency farming? Maximum generation reaches 30 per hour at 20,000 Adeptal Energy. Using Pine Folding Screens (90 energy each) requires 222 screens distributed across all areas, generating 5,040 Realm Currency weekly. That's a lot of screens.
Can companions be efficiently used for both Trust farming and Friendship EXP? Companions provide mixed efficiency with 300 Adeptal Energy while consuming load equivalent to 10-15 high-efficiency furnishings. Optimal approach involves temporary placement during early progression, followed by removal during advanced optimization phases. They're useful, but not always optimal.
What should you prioritize when Chubby's weekend inventory conflicts with daily blueprint purchases? Chubby's unique inventory takes priority due to limited availability and exclusive items. Budget 500-800 Realm Currency reserves for potential purchases while maintaining daily depot acquisition. Prioritize Chubby's 4-star blueprints over depot alternatives – you can always buy depot items later.