

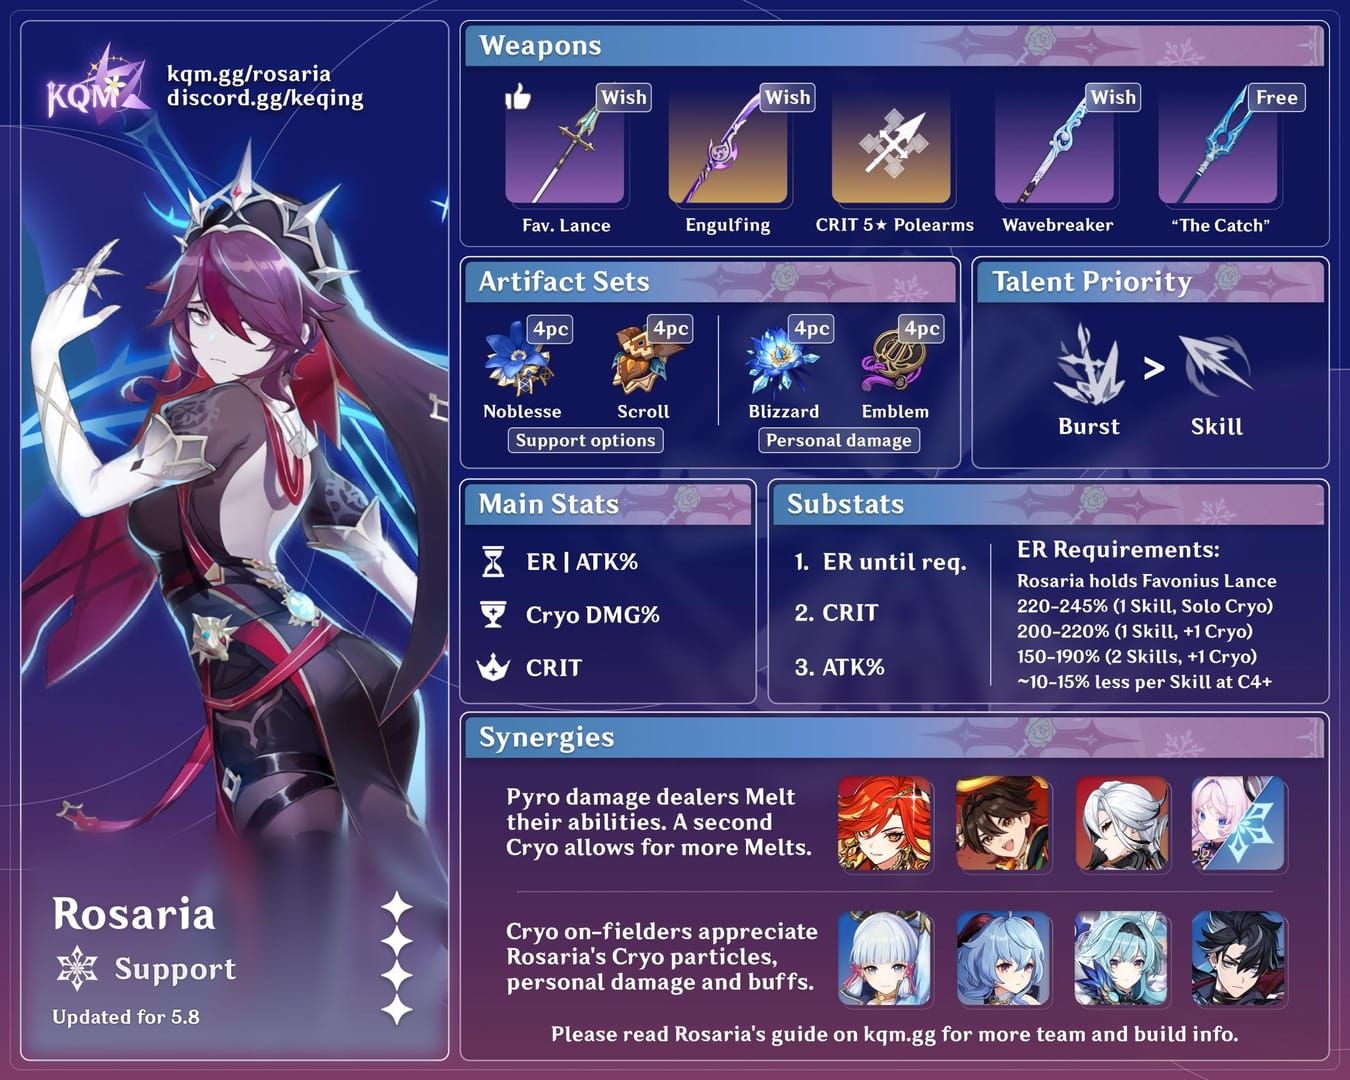
Quick Overview: Rosaria's A4 passive, Shadow Samaritan, kicks in when she pops her Burst, handing out 15% of her CRIT Rate (capped at 15%) to the whole team—minus herself—for 10 seconds. We're talking Sub-DPS builds hitting 85-100% personal CRIT Rate with polearms like Deathmatch or Staff of the Scarlet Sands, 4pc Noblesse Oblige artifacts, and 180-200% ER. Slot her into Superconduct teams alongside Eula for over 50% team CRIT and that juicy -40% Physical RES shred. Talent priority? Burst to 10, Skill to 9. Rotations keep her at 66-80% uptime in Physical or Melt setups—solid for any player grinding those Abyss floors.
Getting the Hang of Rosaria's A4 Passive: Shadow Samaritan Breakdown
Ever wonder why Rosaria feels like the ultimate team player in Genshin? Her A4 passive fires off right when her Burst drops, sharing 15% of her CRIT Rate (topping out at 15%) with everyone else in the party for a full 10 seconds. It pulses through Ice Lances—four over 8 seconds, or six if you've got C2. The key? It snapshots her CRIT Rate at the moment of activation, and those pulses deal Cryo damage without any ICD, making her a quickswap Sub-DPS dream.
Picture this: With 100% CRIT Rate on her, your allies snag that full 15% buff. Stack it with Cryo Resonance for +15% against Cryo-weak enemies, or 4pc Blizzard Strayer's +20-40% in Freeze teams, and you're looking at 55-70% team CRIT in frozen chaos. Oh, and it pairs nicely with her A1 passive, which gives her a 12% CRIT Rate boost for 5 seconds after her Skill crits from behind.
To pull it off smoothly: First, stack 85%+ CRIT Rate using a CRIT Rate Circlet and Deathmatch (that's 36.8% CRIT Rate baked in). Then, fire her Burst after grabbing buffs like Bennett's ATK to lock in that snapshot for the full 10 seconds. Finally, swap to your main DPS and watch the AoE Superconduct reactions light up the field.
The Nitty-Gritty of CRIT Rate Sharing (Formula and How Long It Lasts)
At its core, the formula grabs 15% of her snapshotted CRIT Rate (capped at 15%) and dishes it out for 10 seconds through those lance pulses every 2 seconds. C2 bumps it to 12 seconds with six pulses, pushing uptime to around 80%. Don't overdo your personal CRIT Rate—cap it at 88% outside Freeze to avoid wasting stats beyond 100%. Start with her baseline 5% innate, add Deathmatch's 36.8%, and layer on substats to hit 85%.
Here's how I'd approach it: Plug your setup into Genshin Optimizer for a baseline of 74% CRIT Rate and 149% CRIT DMG, then tweak for that +40% from Blizzard Strayer in Freeze. Test her Burst on Cryo-affected enemies to trigger resonance. And yeah, double-check the 15% ally CRIT boost through combat logs—it's always satisfying to see the numbers pop.
Snapshotting in Action: Does the A4 Buff Lock In Your Buffs?
Absolutely, her A4 snapshots everything at Burst activation—your CRIT Rate, buffs like Bennett's ATK or Kazuha's EM—and holds onto it for 10-12 seconds, even if those sources fizzle out. Those pulses let you squeeze in 4-6 reactions per Burst for Melt or Superconduct, all without ICD getting in the way.
Take this sequence: Drop Zhongli's E for -20% RES, follow with Raiden's E for Electro application, then Rosaria's Q to open the window for Eula's Physical rampage.
Making it happen: Layer on team buffs first. Hit Rosaria's E (for particles and that A1 proc on small enemies), then Q. Swap to DPS, and refresh her ER with a quick E on cooldown.
Rosaria's A4 vs. Other CRIT Buffers in Genshin Impact
What sets Rosaria's A4 apart? It's a flat 15% CRIT Rate share for 10 seconds on Burst (skipping herself), perfect for AoE quickswaps in Freeze or Superconduct teams. Compare that to Kaeya's C2, which spreads 30% CRIT DMG for 8 seconds via Skill or Burst (and includes herself)—great for F2P Physical builds, but it's tied to a 15-second Skill CD.
From what I've seen in team testing—Rosaria shines when you need raw team CRIT Rate for someone like Eula, hitting 66% base uptime. Kaeya fits better in low-Rate setups with less AoE punch.
To decide: Gauge your team's needs—Rate or DMG? Build Rosaria to 85% Rate for the cap. Integrate her for that 66% uptime, and you'll feel the difference in clears.
Hitting the Sweet Spot: Optimal CRIT Rate Targets for Peak A4 Value
Aim for 85-100% CRIT Rate on Rosaria to max out that 15% share in Sub-DPS mode—prioritize Rate over DMG, starting from a baseline of 74% Rate and 149% DMG. In Freeze teams with 4pc Blizzard Strayer, even 72% base gets you reliable crits. Simulations back this: 5% innate + 36.8% from Deathmatch + substats nails 85%, and non-Freeze caps at 88%.
Putting it into play: Grab a CRIT Rate Circlet. Farm substats in order of ER > CRIT Rate > CRIT DMG. Run it through Genshin Optimizer to confirm you're over that 85% threshold.
The Bare Minimum CRIT Rate Thresholds (60% vs. 70% vs. 80%)
Dip below 60%, and you're basically throwing away A4's potential. At 70%, you get about 10.5% share; push to 80%+ for a solid 12-15% buff, landing your team at 50%+ CRIT on carries like Ayaka.
For instance, 85% personal + resonance equals 30% total against Cryo foes—game-changer.
How to build it: Start with 5% innate + weapon base. Pump artifact substats to 80%. Test against bosses to cap at 100% personal without overflow.
Balancing CRIT Rate vs. CRIT DMG in Sub-DPS Builds
For A4's sake, lock in 80%+ CRIT Rate to hit the cap—flip that usual 1:2 ratio to a 2:1 Rate focus. In Superconduct, 74% Rate works with a Blizzard Strayer hybrid. Stick to Deathmatch for its 36.8% Rate; skip DMG-heavy weapons like Staff of Homa unless you're at C6 Physical.
To dial it in: CRIT Rate Circlet all the way. Substats to 85% Rate, then layer DMG. Optimize ER for any hybrid damage output.
How Constellations Shift Your CRIT Rate Needs
C0 works fine at 85%, but C2 stretches A4 to 12 seconds for extra pulses. C4 slashes ER needs to 120%, freeing up 10-15% Rate from substats. C6 keeps the Rate focus but pivots toward Physical.
Example in action: C4 + Favonius drops ER from 200% to 130%, letting you stack 20% more Rate.
Your plan: C0 means targeting 200% ER. With C2 or C4, ease to 150% ER for 90%+ Rate. Recalculate once you snag those constellations.
For players looking to enhance their Genshin Impact experience with quick and reliable top-ups, Genshin Impact quick recharge through BitTopup offers competitive pricing and instant delivery, ensuring secure transactions and broad support for in-game currencies to keep your account progressing smoothly without interruptions.
Top Polearms for Rosaria's A4 CRIT Share Builds
When it comes to weapons, Staff of the Scarlet Sands (5★, 44.1% CRIT Rate, converts 52% EM to ATK on Skill hits with 3 stacks) pulls ahead by about 10% in Gilded Dreams Reverse Melt teams. For F2P folks, Deathmatch (4★, 454 ATK, 36.8% CRIT Rate) delivers +16-32% ATK with 2+ enemies, edging out Ballad in multi-element fights. Scarlet Sands lets you hit 100% Rate easy; Deathmatch is your Rate king.
Steps to gear up: Hunt for CRIT Rate substat weapons first. Refine Scarlet Sands at R1 for that EM-to-ATK swap. Pair with ER Sands if your uptime dips below 90%.
Standout 5-Star Picks: Staff of Homa, Engulfing Lightning, Primordial Jade Winged-Spear
Staff of Homa (608 ATK, 66.2% CRIT DMG, +20-40% ATK from HP loss) shines in hybrid Superconduct for low-HP DMG spikes. Engulfing Lightning (55.1% ER, turns ER into ATK) ensures 100% off-field uptime. Primordial Jade Winged-Spear (22.1% CRIT Rate, builds ATK stacks on hits) fits quickswaps like a glove.
Real talk—Scarlet Sands beats Homa for Melt A4 setups, turning +52% EM into ATK.
Picking one: Go Scarlet Sands for Melt. Engulfing for ER-heavy teams. Test DPS in Optimizer to see what clicks.
Solid 4-Star Choices: Deathmatch, Favonius Lance, The Catch
Deathmatch leads with 36.8% Rate and +24-48% ATK in solo play—core for A4. Favonius Lance (30.6% ER) spits out 6 particles on 60% CRIT procs, cutting team ER needs by 15-20%. The Catch (craftable, 45.9% ER, +32% Burst DMG at R5, +6-12% Burst CRIT) is F2P gold for uptime, letting you flex off CRIT Rate Circlet.
Quick comparison:
Deathmatch: Maximizes Rate share.
Favonius: Particle machine.
The Catch: ER and Burst powerhouse.
How to roll: Craft The Catch to R5. Use Favonius if your CRIT procs reliably. Deathmatch if A4 is priority one.
F2P-Friendly Alternatives: Prototype Starglitter, Dragonspine Spear
Prototype Starglitter (45.9% ER, +8-16% NA/CA after Skill) works for quickswaps. Dragonspine Spear? Low Rate—steer clear for A4 builds.
Case in point: The Catch at R5 matches 5★ ER levels for full 100% share.
Equipping them: Craft those prototypes. Refine for ER gains. Simulate against 5★ options to compare.
Artifact Sets and Main Stat Priorities
Go 4pc Noblesse Oblige for +20% Burst DMG and +20% team ATK for 12 seconds post-Burst—pairs perfectly with Superconduct ATK scalers like Eula, boosting your A4 CRIT. For high-ER Sub-DPS DoT, 4pc Emblem of Severed Fate gives +20% ER and +25% Burst DMG per 100% ER (up to 75%). Hybrid vibe? 2pc Noblesse + 2pc Blizzard Strayer for +20% ER and +20-40% Rate in Freeze.
Main stats: Sands in ER (under 180%) or ATK%; Goblet Cryo DMG%; Circlet CRIT Rate. Substats: ER > CRIT Rate (at least matching CRIT DMG) > ATK% > EM for Melt.
Farm plan: Hit the Mondstadt domain for Noblesse. Prioritize CRIT Rate pieces. Use strongbox substats to push 80%+ Rate.
4pc Noblesse Oblige: The Team Buffer Beast
With 4pc Noblesse, that +20% team ATK on Q amps up A4 CRIT for Eula, all at 155-165% ER.
Example: Her post-Q ATK snapshot lasts 12 seconds in rotations—timeless synergy.
Building it: ER Sands if you're short. Substats to 180% ER. Team it with Deathmatch for flow.
4pc Emblem of Severed Fate: Amping Personal Damage
Emblem turns ER into Burst DMG scaling (200% ER = +50% DMG), ideal for Sub-DPS with three pre-Burst Skills and over 30% Cryo damage.
From the data— it lets you run lower ER at 100-150% in double Cryo setups.
Steps: ATK% Sands for high-ER plays. CRIT Rate Circlet. Cap at 200% ER for max output.
Hybrid Set Combos: 2pc Noblesse + 2pc Blizzard/Emblem
2pc NO + 2pc BS nets +20% Burst DMG and +40% CRIT Rate in Freeze for hybrid Superconduct, starting from 72% base Rate.
Spot on: That +40% Rate against Frozen enemies squeezes full value from A4.
Farming route: Dragonspine for BS pieces. Mix substats thoughtfully. Test in Freeze versus Superconduct to feel the difference.
Main Stats and Substat Priorities (CRIT Rate Leads, ER Follows, ATK% Rounds Out)
Sands: EM or ATK% for Melt, ER (+46.6% substat) for Superconduct. Goblet: Cryo DMG (+46.6%). Circlet: CRIT Rate. Substats aim for 200% ER and 80%+ Rate.
ER Sands over ATK? ER if uptime's under 90%; ATK for C4 or Favonius users.
Filter tips: Hunt CRIT/ER pieces. Simulate breakpoints. Skip Physical Goblets unless you're C6 deep.
If you're gearing up for tougher challenges and need a seamless way to acquire Genesis Crystals, Genesis Crystals online purchase on BitTopup provides fast processing times under 5 minutes, robust security measures, and excellent customer support with high user ratings for hassle-free recharges across all regions.
Sub-DPS Build Essentials: Maxing Damage and CRIT Share
As a Sub-DPS, Rosaria's all about Cryo DMG plus A4 utility: Level Burst to 10 for 187.2% initial + 273.6% Cryo (237.6% per pulse); Skill to 9-10 for 105.12% + 244.8% Cryo and 3 particles on the second hit. ER at 180-200% without C4 (1-2 Skills pre-Burst); run 4pc Emblem or Noblesse; CRIT Rate weapon. Stats goal: 200% ER, 80%+ CRIT Rate, +24% ATK from ascension; over 30% Cryo damage outside Physical.
Ascend to 90 for 12,289 HP and 240 base ATK. Talents: 1,625,500 Mora, 1 Crown, Ballad books. Combo flow: E (A1 if it procs) > Q > swap out.
Ideal Stat Spread
Shoot for 85% CRIT Rate, 150%+ CRIT DMG, 180% ER, and 1,500+ ATK. Superconduct leans into Physical RES shred at C6.
Example setup: 74% Rate / 149% DMG with Deathmatch—reliable.
Achieving it: ER substats first. CRIT Rate to cap. EM Sands for Melt variants.
Talent Priority: Burst First, Skill Next, NA Last
Burst to 10 maximizes A4 and DoT; Skill to 9 for particles and A1; NA to 6 since she's off-field. C3/C5 add +3 levels (up to 15 max).
Costs break down: To 10—6 Shadows, 18/66/93 Insignias, 9/63/114 Ballads.
Weekly grind: Childe bosses for Shadows. Prioritize Q. Slot into Sub-DPS rotations for payoff.
Rotations and Burst Timing for Top Uptime
Standard play: E (from the rear for A1 on small mobs) > Q (A4 + DoT) > swap. For Superconduct, Q then E front-loads particles to Electro appliers like Raiden. Quickswap meta: Chain multiple Es with teammates.
Example cycle: Rosaria E N1 Q > Eula Burst > Rosaria E (16-20 seconds total).
Timing it right: Q after buffs for snapshot magic. Skip three Es if ER's over 200%. Base 66% uptime, 80% with C2—feels smooth.
Killer Superconduct Teams with Rosaria

Superconduct core: Rosaria as Sub-DPS + Eula DPS + Raiden Electro + Zhongli shield. Her Q pulses Cryo every 2 seconds (no ICD), triggering -40% Physical RES for 12 seconds with Electro; A4 buffs Eula to 50%+ CRIT via BS; C6 stacks another -20% RES for 52% total shred.
Rotation walkthrough: 1. Zhongli E (-20% RES). 2. Raiden E (Electro aura). 3. Rosaria E > Q (A4 + DoT). 4. Eula NA/CA/Burst. 5. Loop with Raiden Q.
ER sweet spot: 150% in double Cryo; Deathmatch weapon. Build steps: 4pc Noblesse on Rosaria. Funnel particles to Eula. Test for 100% A4 uptime—it's worth it.
Eula + Rosaria + Raiden + Flex: High-End Physical Squad
Flex in Diona for shield, heal, and resonance. Delivers massive Physical DPS; shields block interruptions.
Example: A4 + resonance + BS = 70% CRIT on Eula. Brutal.
Running it: Rosaria Q leads. Weave Raiden for battery. 16-second cycles keep momentum.
Razor + Rosaria + Fischl + Bennett: Budget Superconduct Bliss
Fischl's Oz for Electro; Bennett for ATK/heal (skip Pyro to preserve Physical). Rotation: Bennett Q E > Rosaria E Q > Fischl E > Razor Burst > Rosaria E.
Data dive: -40% RES + C6 = 52% shred; ER at 130-150% with Fischl help.
Steps: Favonius on Rosaria. Keep Oz off-field. Snapshot Bennett before Q.
Rotation Examples and Energy Funneling Tricks
Alt F2P: Rosaria + Eula + Fischl + Diona. Funnel via Skill's 3 particles (6s CD) + Favonius's 6 on 60% CRIT to your DPS.
Example: Double Skill swaps shave 20-25% off ER in Venti absorbs.
Pro tips: Calc ER with tools. C4 adds 5 Energy on Skill CRIT. Raiden Q batteries the whole squad.
Other Team Ideas: Reverse Melt and Freeze Variants
Reverse Melt twist: Rosaria + Bennett + Xiangling + Kaeya. Rosaria's Q for A4/Cryo app; Xiangling's Pyro for 1.5x Melt. Rotation: Bennett Q E > Rosaria E Q > Xiangling Q > Kaeya E > Rosaria E.
Pros: Reaction DMG explodes. Cons: ER hungry (C4 helps). Flex Shenhe for Cryo buffs.
Steps: EM Sands on Rosaria. 4pc Gilded Dreams for EM/ATK. Melt on Pyro auras only.
Reverse Melt Refined: Rosaria + Bennett + Xiangling + Kazuha
Kazuha's VV shred + EM share. A4 buffs Xiangling's CRIT; no ICD means 4-6 Melts per Q.
Example: Those lance pulses trigger 4-6 Melts—vaporizes groups.
Optimizing: Q on Pyro timing. ER 155-165% with three Skills. Dodge Dendro interference.
Freeze Support Role: Rosaria + Ayaka/Ganyu + Hydro + Anemo
Rosaria + Ayaka + Shenhe + Kokomi: A4 + BS + resonance hits 70% CRIT on Ganyu. Rotation: Anemo VV > Rosaria Q > Hydro app > Ayaka Burst.
Data point: +40% BS in Freeze covers AoE nicely.
Steps: 4pc BS artifacts. Quickswap Q for share. Tailor to Cryo DPS like Ganyu.
Picking the Right Team Archetype
Superconduct for Physical Eula bosses; Melt for Xiangling bursts; Freeze for Ayaka's sustained CRIT. Physical edges out Melt for her personal DPS.
Superconduct: Boss melters, C6 synergy.
Melt: Vaporize swaps with Xingqiu.
Freeze: Mobile add control.
Match A4 to CRIT-starved DPS. That 15% CRIT boost? 10-20% output jump. Flex Bennett for ATK always.
Constellation Breakdown: From C0 to C6 and A4 Impacts
C0 gets the job done, but C2 extends Burst to 12 seconds (six pulses), bumping A4 uptime +25% to 80%. C4 refunds 5 Energy on Skill CRIT (once per cast), dropping ER 20-30% to 120-130%. C6 layers -20% Physical RES for 10 seconds, stacking to 52% with Superconduct—ideal for Eula or Freminet Physical Sub-DPS.
Prioritize C2/C4. For C6, try Archaic Petra (+35% shard DMG). Adjust ER after C4 hits.
C1: Attack Speed Perks in Synergy
C1 grants +10% NA SPD after Skill; stacks with Night Walk's +10% team SPD from 18:00-6:00.
Usage: Mostly ignore in combat. Lv.90 +24% ATK ascension still rules.
C2: Stretching Burst Duration (Uptime Game-Changer for A4)
C2 makes Burst 12 seconds, with 10 seconds of full A4 overlap in a 15-second CD—80% uptime versus base 66%.
Steps: Q early in cycles. Quick E Q E refreshes. Eases Rate requirements too.
C4 and C6: Whale-Level Tweaks
C4 frees ER for 90%+ Rate. C6's -20% Physical RES multiplies (52% total shred).
Example: C6 unlocks Forward Melt on Pyro DPS.
Build notes: C4 + Favonius = 120% ER. C6: Hybrid 4pc Pale Flame. Test in Eula teams.
Energy Recharge Needs and ER Calc Tips
ER baselines: Solo Cryo without C4 hits 200-210% (two Skills pre-Burst); C4 drops to 120-130%; double Cryo 100-150%. Burst costs 60 Energy on 15s CD; Favonius shaves 15-20%, Engulfing adds +30% post-Q. Superconduct with Raiden/Fischl? 130-150%; don't overdo three Skills.
Steps: Use an ER Calculator—input your team for 90%+ uptime. C4 + Favonius = 120%. Over 250%? Swap to ATK.
ER Breakpoints by Team (120-180% Range)
Superconduct: 130-150% with Raiden batteries. Melt: 155-165% (EM focus). Freeze: 180% (fewer particles).
Example: Double Cryo + Venti cuts 20-25%.
Hitting targets: ER Sands under 180%. The Catch R5 for 45.9% ER. Model in tools.
Favonius Lance vs. Pure Non-ER Weapons: The Trade-Offs
Favonius (30.6% ER, 6 particles on 60% CRIT) lowers needs 15-20%; Rate takes a backseat to Deathmatch's 36.8% Rate.
Tradeoff? Favonius batteries; Deathmatch maximizes share.
Steps: Favonius if CRIT >70%. Check proc rates in mastersheets. Pair with C4.
Particle Generation and Battery Plays
Skill drops 3 particles on second hit (6s CD); C4 adds +5 on CRIT. Favonius +6 (60%) supports 150-200% ER, batteries Cryo allies.
Example: Funnel straight to Eula DPS.
Steps: E every 6 seconds. Quickswaps funnel energy. Raiden Q for team-wide juice.
Pitfalls to Dodge and Pro Optimization Hacks
Common trap: CRIT Rate under 70% squanders A4—use Rate weapons and substats to 85%+ for full 15% share. Neglect ER in quickswaps? ER Sands or Favonius to 180%; C4 to 120%. Forgetting A1's rear positioning—limited to small mobs like Mitachurls; bosses like Ruin Guards? Skip it. Bad timing—Q after buffs for snapshots; before DPS Burst.
Hack it better: Pre-DPS Q in Superconduct for A4; cap ER under 250%—Engulfing excess to ATK.
Steps: Optimizer for stats. Test rotations live. Rosaria's AoE Rate trumps Kaeya in my book.
Pitfall #1: Skimping on Energy Recharge for Burst Reliability
Uptime under 90% kills momentum—calc with tools; 180% for two Skills, lower in double Cryo.
Example: Favonius plugs a 20% gap easy.
Pitfall #2: Dumping Too Much into CRIT DMG Over Rate
Rate's the scarce resource for A4—Circlet Rate, substats Rate first.
Data shows: 74% Rate baseline > 149% DMG.
Pitfall #3: Botching Burst Timing in Rotations
A4 fizzling mid-fight? C2 + quick E Q E fixes it; snapshot buffs properly.
Example: Teammate buffs > Rosaria Q > DPS > E refresh.
Pro Hacks: Positioning for A4, Buff Snapshots
A1 only on small enemies; Night Walk's +10% SPD for night farms (Valberry, Stormterror's Lair). Snapshot after team buffs for 10-12 seconds.
Steps: Skip rear on bosses. Time Melt with no ICD. Fixed AoE lances handle mobile fights.
Rosaria vs. Kaeya: Head-to-Head on CRIT Share

Rosaria's A4 (15% Rate for 10s on Burst, excludes self) excels in AoE quickswaps for Freeze/Superconduct; Kaeya's C2 (30% DMG for 8s on Skill/Burst, includes self) suits F2P Physical low-Rate teams on a 15s Skill CD. KQM leans Rosaria for modern A4 value; Kaeya wins on accessibility. Both shred -40% Physical RES in Superconduct; Rosaria's C6 adds -20%.
Rosaria: Flat Rate, pulsing AoE.
Kaeya: DMG share, needs investment.
Steps: Build Rosaria to 85% Rate. Eula pairs better with her than Razor with Kaeya. Rosaria's Melt no-ICD edge seals it.
A4 CRIT Share vs. Kaeya's C2 ER Boost
Kaeya's C2 is DMG, not Rate—Rosaria plugs that hole; Kaeya's particles help ER secondarily.
Example: +15% Rate from Rosaria > +30% DMG from low-Rate Kaeya.
Team Synergy Nuances
Rosaria: Eula/Raiden Physical powerhouses. Kaeya: Fischl/Bennett F2P ease. Rosaria owns AoE bosses.
Data: Rosaria C6 matches Kaeya C6 Physical output.
When Rosaria Edges Out Kaeya
A4 shines mid-game at AR45+ for Superconduct/Melt shares. Kaeya for beginners—free and simple.
Steps: If Rate buffer's key. Rerun banners v5.3 Jan 21–Feb 11, 2025 for Arlecchino. Rosaria's standard since Apr 6, 2021 v1.5.
FAQ
How does Rosaria's A4 passive talent Shadow Samaritan work?
It triggers on Burst, sharing 15% CRIT Rate (max 15%) with the team for 10s through 4 Ice Lance pulses (8s, no ICD; 6 at C2). Snapshots buffs at activation, skips Rosaria, stacks with resonance/BS for 30-55% CRIT. Quickswap style: E > Q > swap; aim 85%+ personal Rate as Sub-DPS.
What is the best CRIT Rate for Rosaria to maximize A4 sharing?
85-100% personal for the full 15% share; 80% minimum, 88% non-Freeze cap. CRIT Rate Circlet + Deathmatch (36.8%) + substats; Freeze BS at 72% base. Shift to 2:1 Rate:DMG; Genshin Optimizer baseline 74% Rate / 149% DMG.
Which polearms are best for Rosaria's CRIT share build?
Staff of the Scarlet Sands (5★, 44.1% Rate, EM-to-ATK Melt); Deathmatch (4★, 36.8% Rate, ATK buffs). F2P: The Catch (45.9% ER, +32% Burst DMG R5). Prioritize Rate substats; Scarlet Sands +10% in Gilded Dreams. Refine R1-R5, ER Sands for 180% uptime.
Does Rosaria's A4 CRIT share snapshot?
Yes—snapshots CRIT Rate/buffs (Bennett ATK, Kazuha EM) at Burst start, holds 10-12s (C2) even after expiry. No ICD for 4-6 reactions. Q after team buffs; Zhongli E > Raiden E > Rosaria Q for Eula windows.
What artifact sets should I use for Rosaria Sub-DPS?
4pc Noblesse Oblige for +20% team ATK post-Q with A4 in Superconduct; 4pc Emblem for ER-to-Burst DMG (+75% at 300% ER). Hybrid 2pc NO + 2pc BS for +40% Rate in Freeze. ER/ATK Sands, Cryo Goblet, CRIT Rate Circlet; substats ER > Rate. Farm Mondstadt/Dragonspine.
How much Energy Recharge does Rosaria need for consistent burst uptime?
180-200% without C4 (2 Skills pre-Burst); 120-130% with C4/Favonius in double Cryo. Superconduct 130-150% via Raiden particles. ER Calculator: Skill 3 particles (6s CD) + C4 5 CRIT Energy. Avoid >250%; Engulfing for excess; target 90%+ A4 uptime.