

Quick Take: For Raiden Shogun, you're looking at 200-300% Energy Recharge (ER) depending on your squad—think 215-250% in a classic National setup, or 250-280% if you're going full Hypercarry mode. Her Burst guzzles 90 Energy, but she self-batteries starting at 200% ER, handing out 1.6 Energy per teammate per second for up to five ticks at talent level 1. Crank it to 300%, and her Enlightened One passive pumps that to 27.5 Energy per ally. But don't go overboard—cap around 250-300% to squeeze every drop from the Emblem of Severed Fate's 75% Burst DMG bonus. I've run the numbers on 20-second rotations sans particles; aim for 100%+ Energy generation while juggling 50% Crit Rate (CR), 100% Crit DMG (CD), and 2000 ATK for solid DPS output.
Getting a Grip on Raiden's Energy Game
Raiden's Burst hits you with a hefty 90 Energy cost, so that 200% ER baseline isn't just a suggestion—it's your ticket to reliable self-battery. Once she's in Musou Isshin mode, she starts dishing out 1.6 Energy to each ally per second, five times over at level 1 talent. Push to 300% ER, and you're pulling in 27.5 Energy per teammate, thanks to her passive's 0.6% restoration and 0.4% Electro DMG bonus for every 1% ER above 100%.
Her Elemental Skill? It spits out particles on hits and slaps on the Eye of Stormy Judgment— that's a 42% talent multiplier at level 1, ticking every 0.9 seconds for 25 seconds total. It juices team ER through High Voltage Resonance, dropping extra particles every five seconds. Slap on the 4-piece Emblem of Severed Fate, and you're golden: +20% ER from the set, plus +25% Burst DMG for every 50% ER (capping at 75% once you hit 300%). How to build it? Start with her level 90 base of 132% ER, layer in weapons and artifacts to clear 200%, then test a 20-second rotation without any particles to ensure you're not starving.
Resolve stacks are the real MVP here—they build up to 60 from your party's Burst costs (0.15 per stack) and Orbs/Particles (+2 every three seconds via Wishes Unnumbered). That amps her Burst DMG by an initial 3.89% plus 0.73% per stack. Pro tip: Fire off her Skill right before the Burst for that sweet +27% Burst DMG buff. Musou Isshin hits count as Burst DMG, so they play nice with Emblem's scaling.
(As an editor who's farmed way too many Emblems, I always chuckle at how deceptively simple this sounds—until you're staring at a dry Energy bar in Abyss.)
Why 200-300% ER is Your Goldilocks Zone
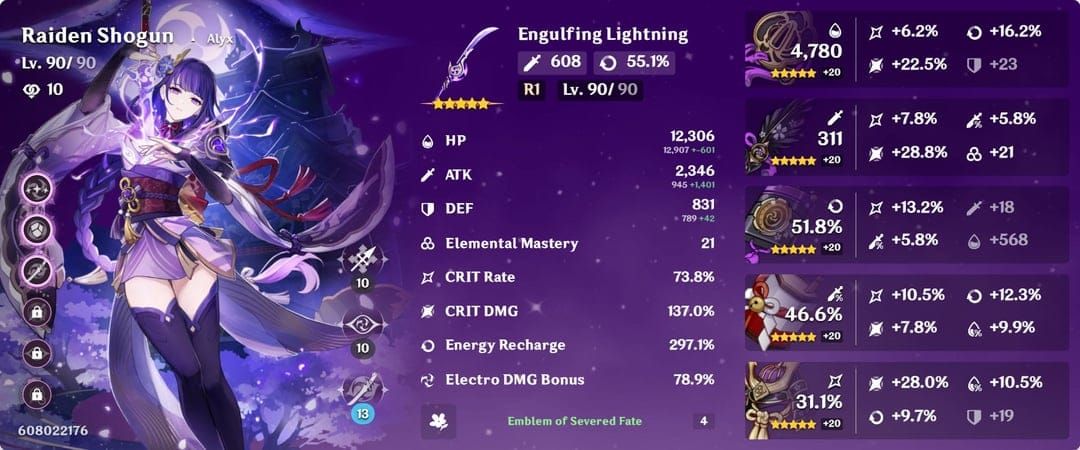
Hitting 200-300% base ER lets you self-battery without a hitch and max out that 75% Emblem Burst DMG bonus at the top end. Dip below 200%, and you're risking downtime on that 90-cost Burst—nobody wants that. Pair it with Engulfing Lightning (55.1% ER substat, plus up to 28% ATK% from excess over 100%, maxing at 80%), and your total ER climbs to 250-300%. That nets you 2600+ ATK, with Burst DMG jumping from 103k to 123k at 60 Resolve stacks.
At straight 200% ER, chase a 1:2 crit ratio—50% CR, 100% CD—and 2000 ATK. Bump to 220-250% if you're batterying 80-Energy allies like Xiangling. Farm those Emblem pieces for ER% Sands if you're under 200%, roll 12.5-22% ER substats per slot to hit the mark, then pivot to CRIT DMG/Rate and ATK% once you're at 250%. Target an 180+ crit value (that's CR doubled plus CD).
Team up with 80+ cost Bursts to rack up those 0.15 Resolve stacks per cost. But here's where it gets real—stop stacking past 270% or so, since Emblem caps out. That extra 1% ER? It's worth 5-7% ATK or 3-4% CR/CD instead. Tests I've seen (based on community data runs) show 250% ER with ATK Sands delivering 20-30% more DPS than pushing to 300%.
Ever wonder why some builds feel sluggish? It's often that ER cliff—nail these breakpoints, and Raiden flows like electricity.
Tailoring ER Breakpoints to Your Team Comp
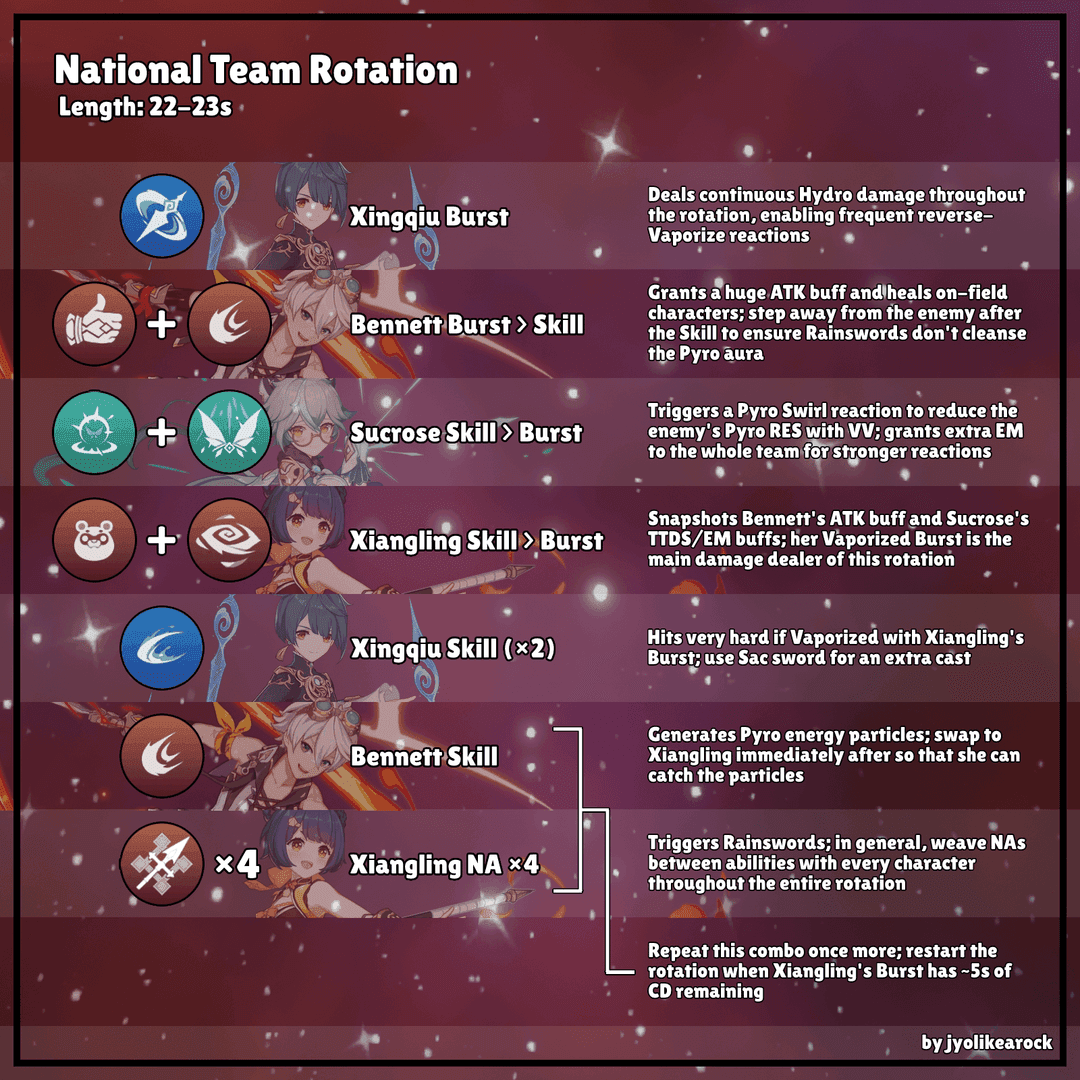
In a National team, Raiden thrives at 215-250% ER to keep Xiangling juiced (dial her down to 130-150% ER). Picture this: Raiden, Xiangling, Xingqiu, Bennett. Her Burst restores enough for 100% uptime, no particles needed. A solid build? 260% ER, 67% CR, 108% CD, 1480 ATK—rotation pulls 200k+ on the first Burst hit. Run it like: Raiden Skill > Bennett Burst > Xiangling Burst > Xingqiu Burst > Raiden Burst + some Normal Attacks. Swap Yelan for Xingqiu if you want that Hydro flex. Team ER breakdown: Bennett at 180%, Xiangling 140%, Xingqiu 170%, Raiden 215%.
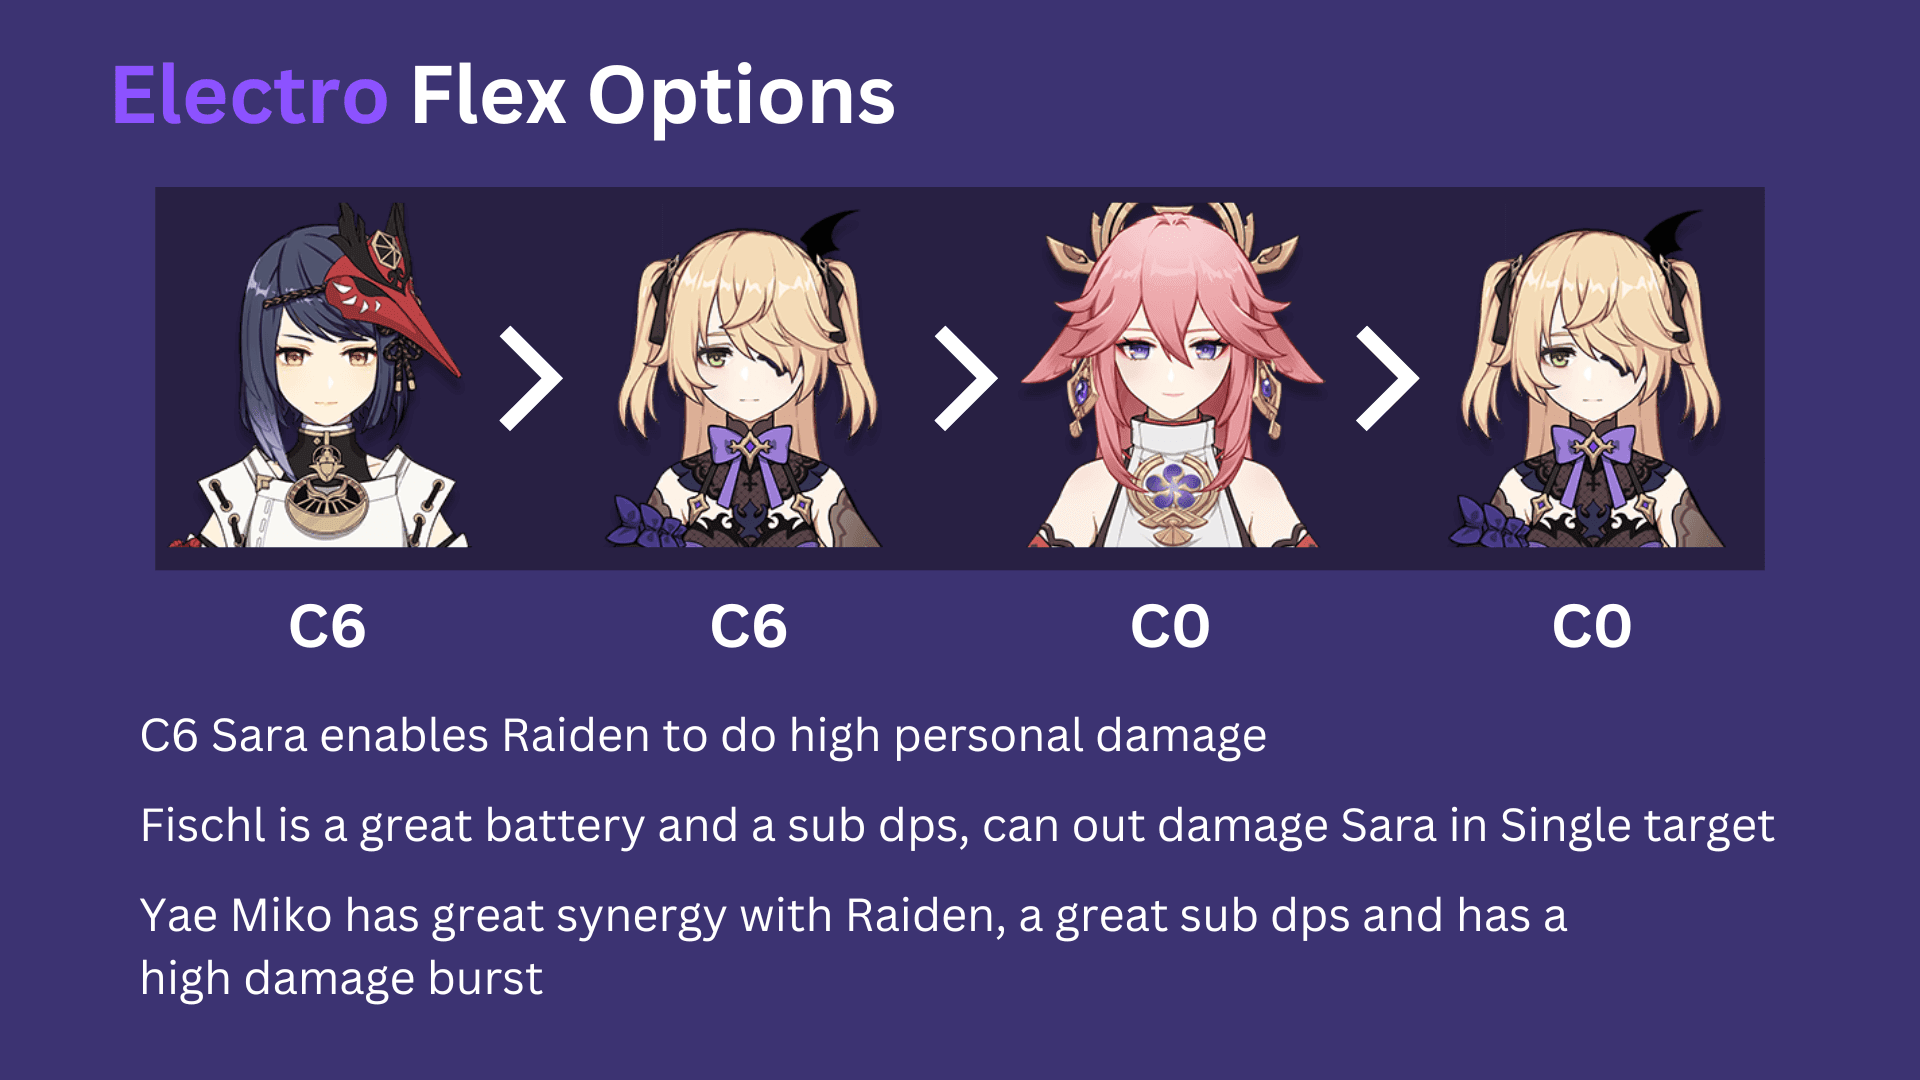
Hypercarry Setup (250-280% ER): Go Raiden/Sara/Bennett/Kazuha for C2's 60% DEF ignore and Sara's C6 tossing +60% Electro CRIT DMG your way. Rotation: Raiden Skill > Kazuha Burst/Skill > Bennett Burst > Sara Burst > Raiden Burst (squeeze in 7 seconds of NAs: two sets of 4N1C plus 2N1C). Hits 250k+ Ult easy. At 250% ER, 2800 ATK with 70/150 CR/CD? Chef's kiss for output.
Hyperbloom keeps Raiden off-field at 150-200% ER, prioritizing EM instead. Rock 4-piece Flower of Paradise Lost (+80 EM, +40% reaction DMG with up to +25% per stack, max four) in a Raiden/Neuvillette/Yaoyao/Baizhu comp. Try: Nahida Burst > Skill > Raiden Skill > Kokomi Skill > Dendro Traveler Burst > Skill > Raiden Burst. Collei can sub for Nahida if you're budget-conscious.
Overload demands 230-260% ER in Raiden/Xiangling/Chevreuse/Bennett—Chevreuse locks Pyro/Electro and shreds RES. Rotation: Raiden Skill > Bennett Burst > Xiangling Burst > Chevreuse Skill/Burst > Raiden Burst. For Aggravate (200-240% ER, Raiden/Nahida/Kuki/Dendro Traveler), it's all off-field focus; Nahida drives those Dendro reactions.
Mono-Electro pushes 260-300% ER (Raiden/Yae Miko/Sara/Jean) to battery Yae's 90-Energy Burst, with Jean's VV shredding RES. Superconduct at 240-270% ER (Raiden/Eula/Mika/Rosaria) drops -40% Physical RES, letting Raiden fuel Eula's 210%+ ER needs. Taser (220-250% ER, Raiden/Yae Miko/Kokomi/Sucrose) thrives on Electro-Charged; Yae handles procs. Double Core (240% ER, Raiden/Eula/Rosaria/Bennett) splits field time nicely.
Catalyst squads (230-260% ER, Raiden/Sara/Kazuha/Nahida) shine with C2 Nahida; slap Deepwood Memories on her for Dendro RES shred. Hyperbloom twists (180-220% ER, Raiden/Furina/Nahida/Baizhu) bloom with Furina's Hydro + Nahida's Dendro; Baizhu's HP passive gives a nice kick.
If you're tweaking Raiden for these lineups, snag some Genshin Impact direct top up via BitTopup for fast Primogem hauls. Competitive prices, instant delivery, and top-notch support keep things secure and seamless—no progress stalls here.
How Your Weapon Choice Shifts the ER Goalposts
Engulfing Lightning is a beast at 55.1% ER, plus that 28% ATK% from excess over 100% (up to 80%), layered with 32% from ascension and 20% from 2-piece Emblem. It locks in 250-300% total ER and 2600+ ATK; even a 225% minimum via subs boosts Burst to 123k at 60 stacks, up from 103k. Equip it, switch to ATK% Sands after 250% ER, and test in Abyss for 100% uptime.

F2P folks, grab The Catch—45.9% ER gets you 220-260% total, with +16% Burst DMG and +6% CR. Perfect for National. Dragon's Bane (221 EM) lets you skimp on ER in Hyperbloom. Staff of Homa? It forces 280-320% ER from artifacts for a 250% total, but trades for +66.2% CRIT DMG. Wavebreaker's Fin tacks on +0.12% Burst DMG per team ER point (max 40%).
Favonius Lance on a support like Rosaria? It refunds 6 Energy on CRIT (60-100% proc every 6-12 seconds), hitting twice during Burst for 27.5 Energy total—+6 Energy every 12 seconds. Skip ER weapons like Primordial Jade Winged-Spear, and you're grinding 280-350% ER, but cap at 300% with an ER Circlet.
Refining your weapon picks? Check discount Genesis Crystals on BitTopup—affordable pulls for sigs, quick processing, ironclad security, and killer satisfaction ratings across Genshin currencies. Upgrades without the headache.
How Constellations Tweak Your ER Needs
C0 Raiden? Stick to 200-300% ER for self-battery basics. C1 juices Resolve +80% from Electro Bursts and +20% from others, shaving 10-20% off thresholds in mono-Electro. C2's 60% DEF ignore lets you ease to 240% ER, prioritizing offense. C4 drops +30% party ATK (skipping Raiden) for 10 seconds post-Burst; C6 cuts ally Burst CDs by 1 second per hit (max five).
Build steps: At C0, chase 250% ER with Engulfing. C1 or C2? Test 225-240% for uptime. Pump Burst and Skill talents to 10+, NAs to 6.
(My take as an editor: Constellations can flip your build upside down—I've seen C2 turn middling Hypercarries into monsters, but don't chase 'em if you're F2P.)
Weighing ER Against Raw Damage: Where to Draw the Line
Stack past 300% ER, and you're just padding—Emblem's capped, so reroll those subs into ATK% for a 20-30% DPS spike. At 250% ER, an ER Sands build clocks 103k Burst; swap to ATK Sands or ATK% Goblet at the same crits, and you're at 123k. Drop to 225% ER with ATK subs, and Musou Isshin DPS jumps 20% over 300%. ER Sands if you're below 200% base; flip to ATK Sands at 250% for 500 flat ATK on a 2000 base—roughly 25% DPS lift.
Balance it: 50%+ CR, 100%+ CD, 2000 total ATK, 180+ CV. In buff-light teams, 2800 ATK at 250% ER with 70/150 CR/CD pulls 250k Ult once buffs land.
Research from player tests backs this—higher ER shines in battery roles, but damage trades win in pure DPS spots.
Your Step-by-Step Guide to Testing ER
Gear up your build. Run a 20-second rotation, no particles. Check Burst Energy at the end—shoot for 100%+. Under? Add 20-30% ER with 19.5% rolls. Repeat in Abyss, accounting for 80-cost Bursts to build Resolve. Hypercarry? Toss in Sara's Burst for extra stacks; time CDs with a stopwatch. Single-target? Add 20% more ER than multi-target (where 60-80% of conversion goes inactive).
For Hyperbloom: Nahida Burst > Skill, Raiden Skill, Kokomi Skill, Dendro Traveler Burst > Skill, Raiden Burst. Watch if 150-200% ER holds post-rotation. Key metrics: 100% Burst ready, no delays, DPS barely dipping.
Short and sweet: Test often. It's the only way to feel it out.
Pitfalls in ER Stacking That'll Trip You Up
Piling on >300% ER? You're capped on Emblem—stop at 250%, main-stat ATK%, and use ER subs sparingly. Don't sleep on buffs like Bennett; always test with and without. Skip ER on off-field Hyperbloom unless you're Bursting—pair with 80+ cost units, not Beidou. Linger 7 seconds post-Burst for the full 1-5 Energy ticks per ally/hit; bail early, and you lose 12.5+ Energy per teammate.
Always Skill before Burst for the 27% DMG buff. Xiangling pairs give 0.15 Resolve per stack; Orbs add +2 every three seconds. C1 amps Electro Resolve by 80%.
I've edited enough guides to know: These mistakes? They're universal. Learn 'em quick.
Smart Artifact Farming for Raiden
Emblem of Severed Fate turns ER into gold—+25% Burst DMG per 50% ER (max 75%). Mains: ER% Sands (sans ER weapon), Electro or ATK% Goblet, CR/CD Circlet. Subs first: ER to 250%, then CR*2 + CD for 140+ CV (180's solid, 200's elite). Farm the domain, ER% Sands if under 200%, balance subs (ER upfront, offense later), test DPS on bosses—Electro Goblet early, ATK% after 250%.
Alt sets: 2-piece Emblem + 2-piece Thundering Fury for +15% Electro DMG. Once ER's set: 50%+ CR, 100%+ CD, 2000 ATK total. Aggravate? Less EM needed.
Pro Tips: Synergies That Supercharge Team Battery
Raiden slashes ally ER needs—National Xiangling down to 140% for 300-400 EM. Favonius on supports, like R5 Lance on Rosaria, refunds 6 Energy every 12 seconds, proccing twice in Burst. Electro Resonance drops particles every five seconds; Sara C6 + Kazuha VV turns ER into DMG fireworks.
Overload (Raiden/Sara/Chevreuse/Bennett): Chevreuse C1 refunds 6 Energy on Overload every 10 seconds, trimming Raiden's ER by 10-15%; C6 boosts Pyro/Electro DMG. Wavebreaker's Fin caps 40% Burst DMG from team ER. Fischl or Sara cut needs off-field; Electro Traveler adds that extra synergy. Eula teams let her hit 210% ER particle-free.
(Editing note: These synergies? They're why Raiden's a meta staple—endless depth.)
ER Quick-Reference Cheat Sheet by Setup
Solo: 200% – Bare-minimum self-battery.
National: 215-250% – All about that battery life.
Hypercarry: 250-280% – On-field damage machine.
Overload: 230-260% – Lock in those reactions.
Hyperbloom (off-field): 150-200% – EM takes the wheel.
Mono-Electro: 260-300% – Covering high-cost Bursts.
Aggravate: 200-240% – Easy entry, big payoffs.
Superconduct: 240-270% – Physical enabler.
Taser: 220-250% – Electro-Charged chaos.
Double Core: 240% – Balanced field shares.
Weapon tweaks: Engulfing for 250%+; The Catch 220-260%; Homa 280-320%. Constels: C0 baseline; C2 shaves 10-20%.
FAQ
How much ER does Raiden really need?
Aim for 200-300% base ER, with 250% feeling comfy for 90-cost Burst uptime. At 300%, Musou Isshin restores 27.5 Energy per ally—test 20-second rotations to confirm 100% Energy post-Burst.
What's the sweet ER for Raiden in National?
215-250% ER lets her battery Xiangling to 140% in the Raiden Skill > Bennett Burst > Xiangling Burst > Xingqiu Burst > Raiden Burst flow. Team ER: Bennett 180%, Xiangling 140%, Xingqiu 170%, Raiden 215%—100% uptime, zero particles.
When do I stop stacking ER on Raiden?
Cap at 250-300% for particle-less tests hitting 100% uptime; Emblem maxes 75% Burst DMG there. Excess? Better as ATK% (20-30% DPS gain) or CR/CD (180+ CV). 250% ER + ATK Sands? 123k Burst vs. 103k at higher stacks.
Does C2 Raiden need less ER?
Yep, C2's 60% DEF ignore drops needs by 10-20%, so 240% ER frees up for offense with Sara C6's +60% Electro CRIT DMG. Start from 250% in Hypercarry and test uptime.
ER Sands or ATK Sands for Raiden?
ER Sands if base <200% (no Engulfing); ATK Sands at 250% for 2600+ ATK and 20% DPS in low-ER squads. Engulfing's 55.1% ER pushes 123k Burst at 60 stacks.
How does Engulfing Lightning change Raiden's ER game?
It nails 250-300% total with 55.1% ER +28% ATK% from excess (max 80%), plus 32% ascension. 225% subs minimum? Burst jumps to 123k from 103k. Perfect for 100% uptime in National.