

Master Nefer's Lunar-Bloom DPS potential in Genshin Impact v6.1 with this comprehensive build guide. Learn optimal artifacts, weapon choices, team compositions, and F2P strategies to maximize her damage output through enhanced Bloom reactions and CRIT-scaling mechanics.
Nefer Character Overview & Lunar-Bloom Mechanics
Character Kit Analysis
Here's what makes Nefer special—she's Genshin's first 5-star Dendro Catalyst DPS built entirely around Lunar-Bloom reactions. Her base stats at Level 90 aren't groundbreaking (12,704 HP, 344 ATK, 799 DEF), but that 88.4% CRIT DMG ascension stat? That's where things get interesting.
Her Elemental Skill Senet Strategy: Dance of a Thousand Nights gives you two charges with 9-second cooldowns each. Pop it and you're in Shadow Dance state, where your Charged Attacks transform into these devastating Phantasm Performance combos. We're talking 5 hits total: 2 Dendro hits from Nefer herself, plus 3 Lunar-Bloom hits from her shade.

The scaling at Talent Level 13 is honestly impressive—162.32% ATK + 324.63% EM for the skill activation, then 52.36% + 104.72% EM and 68.07% + 136.14% EM for those Phantasm hits. But here's the kicker: this all depends on Verdant Dew stacks, which you'll need to manage carefully.
Her Burst Sacred Vow: True Eye's Phantasm hits like a truck with massive AoE Dendro damage (15-second cooldown, 60 Energy cost). At Level 13, you're looking at 477.36% ATK + 954.72% EM for the first hit, then 716.04% ATK + 1432.08% EM for the second. Veil of Falsehood stacks add +49% damage per stack—and trust me, you want those stacks.
Editor's note: If you're serious about optimizing Nefer, you'll probably want her signature weapon. For reliable Genesis Crystal purchases, I've had good experiences with Genshin Impact top up Genesis Crystals through BitTopup—competitive pricing and instant delivery beats waiting around.
Lunar-Bloom Reaction Guide
Okay, let's talk about what makes Lunar-Bloom different from regular Bloom. First off, you need Nod-Krai characters (basically Lauma or Aino) to even trigger it. But here's why it matters: Lunar-Bloom cores can CRIT.
Regular Bloom cores? They just explode for flat damage. Lunar-Bloom cores benefit from CRIT Rate, CRIT DMG, and DMG% bonuses. The formula is [Base Core DMG + (EM × 4.608)] × Multipliers, with 1.7x base damage compared to standard Bloom.
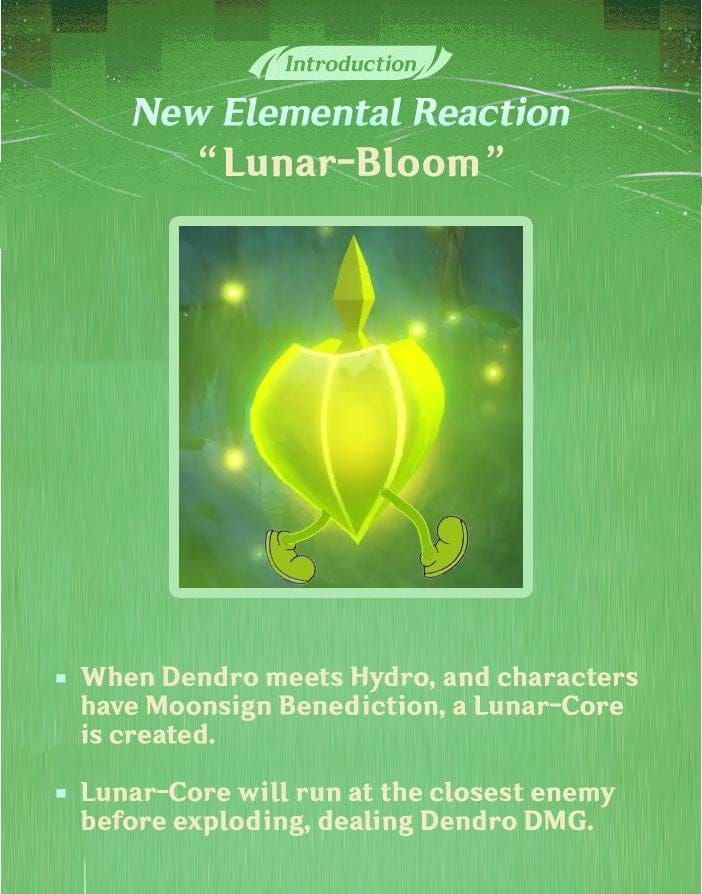
The cores detonate faster too—1.2 seconds versus 2 seconds for regular Bloom. Larger AoE (3.5m vs 2m), they ignore enemy DEF completely, and they create this 2-second Moon Eclipse Dendro field after detonation. Pretty neat, right?
The Moonsign system adds another layer: Nascent Gleam (1 Nod-Krai character) gives +15% CRIT Rate and +100% CRIT DMG for Bloom variants. Ascendant Gleam (2+ Nod-Krai) provides +10% CRIT Rate and +20% CRIT DMG specifically for Lunar-Bloom.
Verdant Dew generation happens through Lunar-Bloom reactions—1 stack per reaction, max 3, with a 2.5-second cooldown. Her A4 passive gets wild: during Shadow Dance, if your party triggers Lunar-Bloom within 5 seconds, you enter Slither state for extra Dew (1 every 2.5 seconds for 2.5 seconds, max 3 additional). The bonus scales with EM too—10% increase per 100 EM over 500, capping at +50% when you hit 1000+ EM.
Role in Current Meta
Nefer excels as an on-field Main DPS with surprisingly straightforward gameplay. Those dash cancels provide i-frames, which means less reliance on shields or healing. Her damage rivals top-tier DPS units when properly supported—especially with Lauma providing Dendro RES shred and CRIT buffs.
Without Lauma though? Damage drops 15-30%. That's significant.
She achieves S+ tier performance in Spiral Abyss and Imaginarium Theater, delivering 146k/146k/184k Charged Attack damage against 40-resin bosses. The hybrid EM/CRIT builds consistently outperform pure EM builds because of those CRIT-scaling reactions.
Best Artifacts for Nefer DPS Build
4-Piece Set Recommendations
4-piece Night of the Sky's Unveiling is Nefer's undisputed BiS. No contest here.
The 2-piece gives +80 EM, which is nice. But the 4-piece effect? That's where the magic happens: +30% CRIT Rate when on-field during Lunar triggers, plus +10% Lunar-Bloom damage per Gleaming Moon effect. You can get +15-30% CRIT Rate through Intent/Nascent/Ascendant Gleam effects (each lasting 4 seconds).
With Lauma's buffs stacked on top, you're looking at up to 40% additional CRIT Rate. This lets you focus entirely on CRIT DMG and EM substats instead of chasing CRIT Rate rolls.
4-piece Gilded Dreams works as a transitional alternative—+80 EM from the 2-piece, reaction-based buffs from the 4-piece. But it falls significantly behind Night of the Sky's Unveiling for actual damage output.
2-Piece Combinations
When you can't get the optimal 4-piece yet: 2-piece Wanderer's Troupe (+80 EM) + 2-piece Gilded Dreams (+80 EM) gives you +160 EM total. Solid placeholder.
2-piece Deepwood Memories provides +15% Dendro DMG, but honestly? Put that on your supports instead of Nefer. Budget option: 4-piece Instructor gives +80 EM plus +120 party EM on reactions.
Substat Priority Guide
Priority order: Energy Recharge to requirement > CRIT Rate/DMG > Elemental Mastery.
ER requirements are pretty manageable—100% with double or triple Dendro teams, 105% if you're running solo Dendro. CRIT targets: aim for 60% Rate and 220%+ DMG before set bonuses kick in. With Night of the Sky's Unveiling + Lauma (that's roughly 40% CRIT Rate in combat), you only need about 52% base Rate from substats.
EM targets: 500+ is basic functionality, 800-1000+ is optimal. At 800 EM, you get the maximum 14% Base DMG bonus from her kit.
Weapon Tier List & Recommendations
5-Star Weapon Rankings
Reliquary of Truth (her signature weapon) is the clear winner. 542 base ATK, 88.2% CRIT DMG substat. The passive provides +8% CRIT Rate and +120 EM on Skill use (12 seconds), plus +24% CRIT DMG on Lunar-Bloom triggers (4 seconds). When both effects are active, you get +50% enhanced effects.

This weapon maintains a 15-20% damage advantage over alternatives. To put that in perspective, it's equivalent to having C1 Nefer over an R5 Blackmarrow Lantern.
Nightweaver's Looking Glass offers 542 base ATK with 265 EM. The passive gives +60 EM on Hydro/Dendro Skill use, +40% Lunar-Bloom damage on triggers. With both effects active: +120% Bloom, +80% Hyperbloom/Burgeon, +40% Lunar-Bloom damage. The EM secondary stat suits reaction builds, but it lacks those crucial CRIT stats.
4-Star Alternatives
Dawning Frost takes the crown for best 4-star option. 510 base ATK, 55.1% CRIT DMG. Charged hits give +72-144 EM (10 seconds), Skill hits provide +48-96 EM (10 seconds). Even at R1, it outperforms R5 Blackmarrow Lantern.
Quick tip: If you're planning weapon banner pulls, I've found buying Genesis Crystals online through BitTopup provides secure transactions with competitive rates and fast delivery.
The Widsith remains solid with 510 base ATK and CRIT DMG substat. The Interlude effect gives 480 EM (10 seconds, 30-second cooldown). At R5, it averages similar performance to R5 Blackmarrow, and good RNG can match R5 Dawning Frost.
F2P Weapon Options
Blackmarrow Lantern (craftable) deserves respect. 454 base ATK, 221 EM. Provides +48% Bloom damage, +12% Lunar-Bloom damage, with an additional +12% under Ascendant Gleam. At R5: +96% Bloom, +24% Lunar-Bloom damage.
Surprisingly competitive with higher-rarity options for pure Lunar-Bloom builds.
Optimal Team Compositions
Meta Team Builds
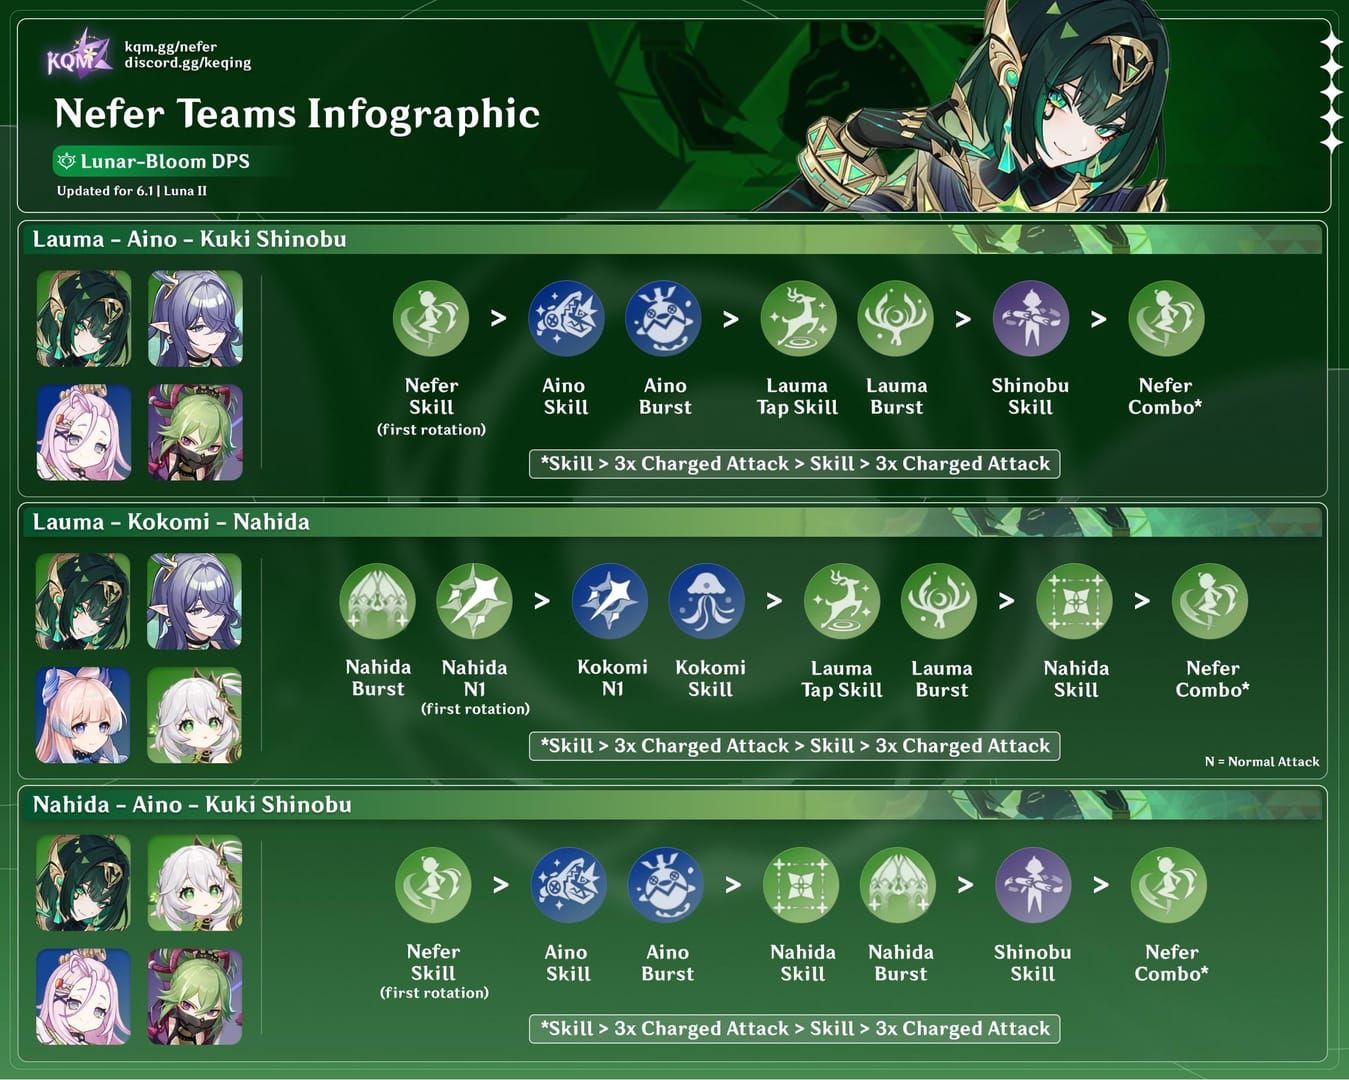
The premium composition: Nefer (Main DPS) + Lauma (Sub-DPS, core generation/buffs) + Kokomi/Aino (Hydro/healing) + Yelan/Dahlia (Sub-DPS). This ensures consistent Hydro application for Verdant Dew and Veil generation while maximizing Lunar-Bloom through proper Moonsign levels.
Lauma is essential for optimal performance. Her Dendro RES shred and Lunar-Bloom CRIT buffs often exceed the value of C1 or signature weapon upgrades. She converts Dendro Cores to Seeds of Deceit and enables Ascendant Gleam.
Don't forget—one team member needs 4-piece Deepwood Memories for that Dendro RES reduction.
F2P Team Options
Budget teams work fine: Nefer + Dendro Traveler + Xingqiu + Aino/Kirara. Alternative: Nefer + Nahida + Kuki Shinobu + Aino. Focus on EM buffers like Nahida with 4-piece Instructor or Sucrose with Sacrificial Fragments.
Baizhu, Kirara, and Yaoyao all provide solid sustain options without breaking the bank.
Situational Compositions
For AoE encounters, Nilou variants work despite A1 passive conflicts. Nilou C1 extends Hydro duration, C2 provides -35% Dendro RES.
Hyperbloom teams with Kuki Shinobu or Raiden Shogun excel in single-target scenarios. For Spiral Abyss, bump up ER requirements 20-40% above standard recommendations.
Talent Priority & Leveling Guide
Skill Priority Order
Elemental Skill gets priority 1—it's your primary damage source through Phantasm Performance. Level this to 10 immediately; Crown investment is justified here. At Level 13: 162.32% ATK + 324.63% EM scaling.
Elemental Burst takes priority 2 for AoE damage and Verdant Dew generation. Level 13: 477.36% ATK + 954.72% EM first hit, 716.04% ATK + 1432.08% EM second hit.
Normal Attack? Leave it at Level 1. Minimal damage contribution.
Investment Breakpoints
80/90 ascension is crucial for the A4 passive and CRIT DMG stats. Get Skill and Burst to Level 10 before considering Crown upgrades. F2P players: Skill 8-10 first, then Burst 6-8.
Material Requirements
Ascension costs: 420,000 Mora, Nagadus Emerald materials (1 Sliver, 9 Fragments, 9 Chunks, 6 Gemstones), 168 Moonfall Silver, 46 Radiant Antler, plus Warrant materials (18 Tattered, 30 Immaculate, 36 Frost-Etched).
Talents run 1,652,500 Mora per talent to Level 10, Elysium Books (3 Teachings, 21 Guide, 38 Philosophies), and Ascended Sample: Rook from the weekly boss.
Constellation Analysis
C0 Performance Review
C0 performs admirably with proper team support. You'll need careful Verdant Dew and Veil management plus precise timing, but it's totally doable. Prioritize her signature weapon over early constellations for consistent value.
Key Constellation Upgrades
C1 provides +60% Lunar-Bloom Base DMG from EM. This rivals signature weapon value—seriously impressive for a first constellation.
C2 extends Veil duration by +5 seconds, increases max stacks to 5 (+40% DMG), gives 2 instant stacks on Skill use, plus +200 EM at 5 stacks (8 seconds). Major rotation efficiency upgrade.
C6 converts Phantasm's second hit to AoE (85% EM), adds AoE damage (120% EM), and provides +15% Lunar-Bloom under Ascendant Gleam. Eliminates the need for dash cancels entirely.
Investment Value Assessment
C1-C2 offer excellent value for committed players. C3/C5 provide talent levels (+3 Skill/Burst respectively). C4 improves Dew generation and adds -20% enemy Dendro RES. C6 represents the ultimate investment for whale players.
Rotation Guide & Gameplay Tips
Optimal Skill Rotations
Preferred rotation: E 3[CD] E CD CQ CD (E=Skill, C=Charged/Phantasm, D=dash cancel, Q=Burst). This provides alternating i-frames with maximum DPS output.
Full team rotation: Nahida E Q > Aino E Q > Lauma E Q > Aino E > Nefer E 3[CD] E CD Q.
Alternative without dash cancels: E 3[C] E 3[C] for more stable Dew management.
Energy Management
Target 100% ER with double/triple Dendro, 105% with solo Dendro. The Skill generates 2.6667 particles with two charges. Time your Burst during Dew downtime or Veil consumption windows.
Use ER calculators for team-specific requirements—it varies more than you'd think.
Combat Scenarios
Those frequent dashes provide excellent i-frame coverage, reducing your reliance on healers or shielders. Just watch out for self-damage from that 3.5m Lunar-Bloom AoE.
Against resistant enemies, stack RES shred: Lauma Hold E (-25%), VV (-40%), Nilou C2 (-35%), Deepwood (-30%).
Damage Calculations & Performance Metrics
DPS Comparisons
S+ tier performance delivers 146k/146k/184k Charged Attack damage versus 40-resin bosses. Lunar-Bloom's 1.7x base damage plus CRIT scaling provides 200-400% damage increases with Lauma support.
C1R1 examples achieve 99% CRIT Rate, 354% CRIT DMG, 1226 EM. Those numbers speak for themselves.
Reaction Damage Analysis
Lunar-Bloom formula: [Base Core DMG + (EM × 4.608)] × Multipliers. 1000 EM yields 10,240 base damage before CRIT and DMG% multipliers kick in. That 1.2-second detonation enables much faster damage cycles.
Target 800-1000+ EM with 60-70% CRIT Rate and 140-180% CRIT DMG for optimal performance.
Build Performance Tests
Hybrid EM/CRIT builds consistently outperform pure EM builds by 15-25%. Reliquary of Truth maintains its 15-20% advantage across all scenarios. R5 Blackmarrow achieves 80-85% of signature weapon performance—not bad for F2P.
Lauma's presence increases damage by 200-400% versus non-Nod-Krai teams. That's not a typo.
Common Mistakes & Troubleshooting
Build Optimization Errors
Don't prioritize ATK% over EM/CRIT stats. Bennett and Sara provide minimal value here—focus on EM amplifiers like Lauma, Sucrose, and Nahida instead.
Calculate exact ER needs rather than following general recommendations blindly. Use hybrid EM/CRIT builds, not pure EM approaches.
Team Synergy Issues
Avoid Nilou without C2 due to core mechanic conflicts. Align buff durations with those 9-second Shadow Dance windows. Always ensure 1+ Dew stack before entering Shadow Dance.
Coordinate Lauma's Hold E usage carefully—timing matters.
Resource Management Tips
Low Dew generation? Ensure proper Dendro/Hydro resonance, positioning, and 1000+ EM for A4 passive benefits. Stack multiple RES shred sources against resistant enemies.
Use double Dendro compositions, consider Favonius weapons, and increase ER by 20-40% for Spiral Abyss runs.
FAQ
Q: What are the minimum stats for effective Nefer? Target 500+ EM, 60% CRIT Rate, 150% CRIT DMG, and 100-105% ER. With Night of the Sky's Unveiling plus Lauma, you'll achieve 40% additional CRIT Rate in combat.
Q: Is Nefer worth pulling without Lauma? Damage drops 15-30% without Lauma, but she remains viable. Use Aino for Moonsign effects and focus on EM amplifiers like Nahida or Sucrose.
Q: How does Nefer compare to other DPS in the current meta? S+ tier with proper support, delivering 146k+ Charged Attack damage. CRIT-scaling Lunar-Bloom provides consistent damage against varied enemies, especially high-DEF targets.
Q: What's the optimal C0 rotation? E 3[CD] E CD CQ CD for maximum DPS, or E 3[C] E 3[C] for stable management. Setup: Nahida E Q > Aino E Q > Lauma E Q > Aino E > Nefer rotation.
Q: Weapon or constellations priority? Prioritize Reliquary of Truth (15-20% damage increase) over early constellations for C0. C1 offers comparable weapon value, while C2 provides major rotation improvements.
Q: Can Nefer work in Hyperbloom/Burgeon teams? Yes, for single-target scenarios with Electro triggers. But Lunar-Bloom teams provide 200-400% higher damage than alternative compositions.