

Lauma vs Nahida: Quick Comparison Overview
Character Roles and Classifications

Here’s where things get interesting. Lauma functions as a Reaction Amplifier and Debuffer – think of her as the specialist who takes your existing Bloom reactions and cranks them up to eleven. She’s all about enhancing Bloom, Hyperbloom, and Burgeon reactions through CRIT-enabling mechanics and this new Lunar-Bloom system that honestly feels like a game-changer for reaction teams.
Nahida? She’s the Reaction Enabler and Buffer we’ve all come to rely on. Consistent off-field Dendro application with no internal cooldown restrictions while throwing massive Elemental Mastery buffs at your on-field characters. It’s that reliability that’s kept her relevant since 3.2.
What strikes me most about this comparison is how Nahida’s versatility extends across all Dendro-based team archetypes. Quicken, Hyperbloom, Burgeon, Bloom – she’s your Swiss Army knife. Lauma’s specialization, though? That’s laser-focused on Bloom-family reactions. Her value is directly tied to how much you’ve invested in these particular team compositions.
Key Stat Differences
At Level 90, Lauma brings 10,654 HP, 254 Base ATK, 668 DEF, with +115.2 Elemental Mastery Ascension Bonus. Her passive talents are where she starts flexing – increasing Elemental Skill damage by 0.04% per EM point (capping at 32% increase) and reducing Charged Attack cooldown by 0.02% per EM point (maximum 20% reduction).
Nahida’s A4 passive remains one of the most elegant scaling mechanics in the game: 0.1% Bonus DMG and 0.03% CRIT Rate per EM point beyond 200. Cap that at 1000 total EM and you’re looking at 80% Bonus DMG and 24% CRIT Rate. Beautiful design, honestly.
Banner Timing Considerations
Version 6.0 Phase 1 runs September 10-30, 2025, featuring both characters simultaneously. The timing coincides with Genshin Impact’s 5th Anniversary – and that’s not coincidental. We’re getting a free standard 5-star character choice, first-time top-up bonus reset, and 20 free pulls through login rewards.
For Genshin Top Up Online planning, those 1600 Primogems from mail plus 10 Intertwined Fates reduce effective pulling costs significantly. Smart move by HoYo, if you ask me.
Lauma Character Analysis: Abilities and Kit Breakdown
Elemental Skill Deep Dive
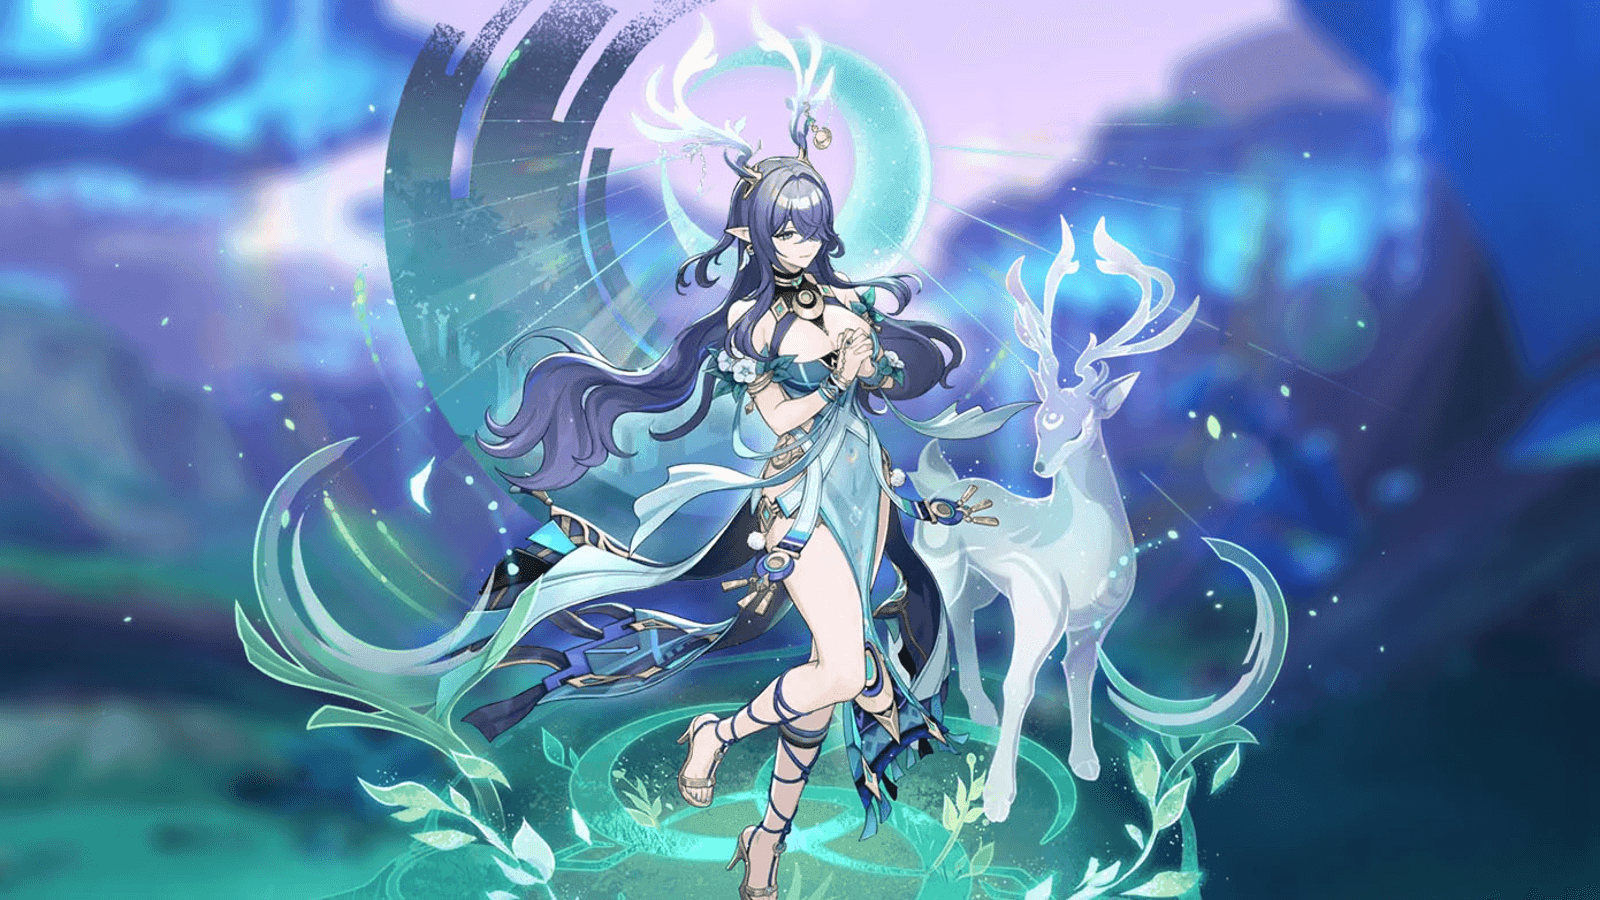
Runo: Dawnless Rest of Karsikko – and yes, I had to look up the pronunciation too – operates through a dual-mode system that interfaces directly with Bloom mechanics. Tap version deals AoE Dendro DMG like you’d expect. Hold version? That’s where it gets spicy.
The hold version consumes Verdant Dew (generated by Bloom reactions) to trigger powerful Lunar-Bloom instances. At Talent Level 10, you’re getting 25% Dendro and Hydro RES shred lasting 10 seconds. 15-second duration, 12-second cooldown.
Verdant Dew generation creates this resource management mini-game where Bloom frequency directly impacts your burst damage potential. Teams with high Bloom rates (8-12 reactions per rotation) can utilize the hold version multiple times per rotation. Slower teams rely on tap version for consistent application.
Elemental Burst Mechanics
Runo: All Hearts Become the Beating Moon provides the Pale Hymn stack system with 18 charges enhancing reaction damage based on Lauma’s EM. Each Bloom, Hyperbloom, Burgeon, or Lunar-Bloom consumes one stack to amplify damage.
15-second duration with 15-second cooldown and 60 Energy Cost. You’ll need 160-180% ER depending on team composition – which, let’s be honest, is pretty reasonable in today’s meta.
Passive Talents Impact
This is where Lauma gets really interesting. Light for the Frosty Night passive enables CRIT mechanics on Bloom-family reactions. After using Elemental Skill, these reactions gain 15% CRIT Rate and 100% CRIT DMG for 20 seconds.
At higher Moonsign levels, Lunar-Bloom reactions receive additional +10% CRIT Rate and +20% CRIT DMG. Stack this with Nahida’s C2 constellation and you’re looking at 35% total CRIT Rate on Bloom reactions. That’s… substantial.
The Lunar-Bloom conversion automatically upgrades all standard Bloom reactions when Lauma’s in your party. These scale with character level, talent level, CRIT stats, and EM – functioning as direct damage rather than transformative reactions.
Nahida Character Analysis: Archon Capabilities Review
Dendro Application Efficiency

All Schemes to Know marks up to 8 opponents with Seed of Skandha for 25 seconds, triggering Tri-Karma Purification every 2.5 seconds when marked enemies take elemental reaction or Dendro Core damage.
This application rate? It still surpasses every other Dendro character with no internal cooldown restrictions. The 25-second mark duration covers multiple rotation cycles, reducing skill recast requirements. It’s efficient design that’s aged incredibly well.
Support vs DPS Potential
Nahida’s Illusory Heart Burst provides elemental synergy bonuses: Pyro increases TKP damage, Electro reduces trigger intervals, Hydro extends duration. 50 Energy Cost and 13.5-second cooldown maintain excellent uptime.
The Burst enables her A1 Passive granting up to 250 EM to on-field characters – often representing 30-40% damage increases. Not flashy, but devastatingly effective.
Her DPS potential emerges through A4 passive scaling. 1000 EM provides 80% Bonus DMG and 24% CRIT Rate to TKP. Combined with consistent application rate, she achieves respectable personal damage while maintaining full support functionality.
Constellation Value Assessment
Nahida’s C2 provides dual benefits that honestly feel like cheating sometimes. Enables Burning, Bloom, Hyperbloom, and Burgeon reactions to CRIT with 20% CRIT Rate and 100% CRIT DMG, while applying 30% DEF shred for 8 seconds after Quicken reactions.
The DEF shred benefits all party members’ damage, creating multiplicative scaling for entire teams. It’s one of those constellations that fundamentally changes how you play.
Combat Performance Comparison
Damage Output Analysis
Nahida’s personal damage through TKP hits 15,000-25,000 per trigger at optimal builds (1000 EM, appropriate CRIT ratios). Her consistent trigger rate generates substantial sustained damage throughout encounters.
Lauma’s damage contribution focuses on reaction amplification. Lunar-Bloom conversion increases individual Bloom damage by 40-60% compared to standard Blooms. Teams with high Bloom generation experience 200-300% total reaction damage increases. That’s not a typo.
The multiplicative nature of Lauma’s 25% Dendro/Hydro RES shred affects all team damage. High-investment Bloom teams featuring Nilou, Neuvillette, or Kokomi see dramatic total DPS increases when Lauma’s debuffs enable damage threshold breakthroughs.
Spiral Abyss Performance
Current Spiral Abyss cycles favor both characters through different advantages. Floors with multiple waves benefit from Nahida’s multi-target marking and AoE application. High-HP single targets showcase Lauma’s amplified reaction damage.
Floor 12’s emphasis on elemental shields and high-HP enemies particularly favors Lauma’s RES shred capabilities. But here’s the thing – Nahida’s versatility allows adaptation to various scenarios through team composition flexibility.
Her universal applicability ensures consistent performance regardless of floor mechanics. Lauma’s specialization creates higher peak performance in favorable scenarios but less consistent results across all floor types.
Team Composition Strategies
Best Teams for Lauma
Premier composition: Lauma + Nilou + Nahida + Aino (new 4-star Hydro) maximizes both Lunar-Bloom and Bountiful Core generation. It’s expensive but devastatingly effective.
Hyperbloom variation: Neuvillette + Lauma + Ineffa (new Electro) + Furina provides consistent Hydro application and enhanced Hyperbloom reactions. Budget option: Lauma + Xingqiu + Kuki Shinobu + Collei achieves 70-80% of premium performance with accessible characters.
Optimal Nahida Compositions
Universal Hyperbloom template: Nahida + Xingqiu + Kuki Shinobu + Flex. It demonstrates her adaptable nature perfectly.
Quicken compositions benefit massively from C2’s DEF shred: Nahida + Fischl + Keqing/Cyno + Zhongli/Kazuha. Nilou Bloom teams: Nahida + Nilou + Kokomi + Dendro Traveler enable Bountiful Core generation with EM buffing.
Character Synergy Analysis
Combined teams achieve 35% CRIT Rate on Bloom reactions (15% Lauma + 20% Nahida C2), 25% Dendro/Hydro RES shred, and 250 EM buff. This synergy enables unprecedented reaction damage.
But here’s the catch – it requires careful energy management with combined 110 Energy Cost and substantial particle generation needs.
Investment Requirements and Costs
Ascension Material Comparison
Lauma requires new Nod-Krai regional materials, creating farming barriers for unprepared players. Total Mora cost reaches approximately 420,000 for full ascension. Nahida’s established Sumeru materials provide easier access – most returning players have surplus materials from previous farming.
Weapon Recommendations

Lauma’s signature Nightweaver’s Looking Glass provides 25-40% damage increases for Lunar-Bloom reactions. However, free event weapon Etherlight Spindlelute achieves 90% of signature performance at R5. That’s… actually pretty generous by HoYo standards.
Alternative options include Fruit of Fulfillment and Wandering Evenstar providing 70-80% performance.
Nahida’s weapon flexibility represents strong F2P advantages. Magic Guide (3-star) often outperforms 4-star alternatives due to high EM substat. Sacrificial Fragments and Wandering Evenstar provide excellent 4-star alternatives.
Artifact Optimization
Lauma’s BiS Silken Moon’s Serenade (4-piece) provides ER +20% and party-wide EM buffs with Lunar Reaction bonuses. Main stats: EM Sands, EM Goblet, CRIT Rate/DMG or EM Circlet. ER needs range 160-180% depending on team composition.
Nahida optimization depends on team role. Deepwood Memories (4-piece) provides team-wide Dendro RES shred, while Gilded Dreams maximizes personal damage. EM targets aim for 1000 total to maximize A4 passive benefits.
F2P vs Spender Recommendations
Budget-Friendly Options
F2P players should prioritize Nahida for universal value and lower investment requirements. Her 3-star weapon options, established material availability, and broad team compatibility provide excellent returns on limited resources.
Lauma’s F2P viability centers on free Etherlight Spindlelute and specialized role enhancement for existing Bloom investments.
Anniversary rewards significantly impact F2P calculations. Free standard 5-star choice, 20 free pulls, and top-up bonus reset provide substantial value – effectively reducing character acquisition costs.
Constellation Priorities
Nahida’s C2 ranks among highest-value constellations in Genshin Impact. It’s often compared to pulling an entirely new character in terms of account impact. 30% DEF shred benefits all team damage while CRIT-enabling transforms Bloom and Quicken performance.
Lauma’s C1 provides healing utility, while C2 delivers substantial damage increases through additional EM scaling.
Long-term Value Assessment
Archon characters historically maintain meta relevance across multiple versions – supporting Nahida’s long-term investment value. Her foundational Dendro role ensures continued utility regardless of future releases.
Lauma’s long-term value ties to Bloom reaction meta relevance. She maintains value as long as these reactions remain viable.
Meta Relevance and Future-Proofing
Current Endgame Viability
Both characters demonstrate exceptional endgame performance through different approaches. Nahida’s versatility allows adaptation to varying enemy types and shields, providing stable 36-star Abyss performance.
Lauma’s impact concentrates in Bloom-favorable scenarios, creating damage ceilings previously impossible for reaction teams.
Upcoming Content Considerations
Version 6.0’s Nod-Krai region introduces new enemy types potentially favoring both kits. Environmental Hydro effects may emphasize Bloom compositions, increasing Lauma’s value.
Introduction of Lunar reactions as permanent mechanic suggests HoYoverse’s commitment to expanding this system. That gives Lauma first-mover advantages.
Power Creep Analysis
Genshin Impact’s horizontal expansion approach supports both characters’ long-term viability. CRIT-enabling mechanics represent fundamental changes to reaction scaling rather than simple damage increases.
Historical Archon precedent supports character longevity. Venti, Zhongli, and Raiden maintain relevance across multiple years.
Final Verdict: Who Should You Pull?
Scenario-Based Recommendations
New Players/Minimal Dendro Investment: Prioritize Nahida for universal value and team-building foundation. Her versatility enables multiple future compositions while requiring minimal additional investment.
Established Bloom Team Players: Lauma provides transformative upgrades for existing investments. Players owning Nilou, Kokomi, or Bloom-focused characters experience substantial performance increases from Lunar-Bloom mechanics.
Nahida Owners Considering C2: Decision depends on team diversity. Players utilizing both Bloom and Quicken teams benefit more from Nahida C2’s universal enhancements. Bloom-focused players may prefer Lauma’s specialized improvements.
Competitive/High-Investment Players: Both offer meta-defining capabilities. Lauma enables previously impossible reaction damage ceilings, while Nahida C2 provides account-wide performance improvements.
Banner Strategy Tips
Simultaneous banner timing creates unique opportunities. Players with 320+ wishes can guarantee both characters, while budget-conscious players must choose based on account needs.
Anniversary rewards provide 20+ wishes toward either character, improving guarantee calculations.
Consider weapon banner carefully – Lauma’s signature provides substantial improvements while Nahida performs excellently with F2P options. Timing considerations include Nahida’s regular Archon reruns versus Lauma’s debut banner potentially not returning for 6-12 months.
Frequently Asked Questions
Is Lauma better than Nahida for new players?
No, Nahida remains better for new players due to universal Dendro support and lower investment requirements. She enables multiple team archetypes with minimal additional characters. Lauma requires existing Bloom foundations.
Can Lauma replace Nahida in existing Dendro teams?
Lauma can’t fully replace Nahida due to different roles – Lauma amplifies reactions while Nahida enables them. Teams requiring consistent Dendro application for diverse reactions still need Nahida’s superior enablement.
How much does it cost to guarantee both characters?
Guaranteeing both requires up to 360 wishes worst-case (180 each), though average costs range 150-200 wishes total. With Anniversary rewards providing 20+ free pulls, budget approximately 300-340 wishes for high confidence acquisition.
Which character has better F2P weapon options?
Nahida significantly outperforms in F2P accessibility. Magic Guide (3-star) often outperforms 4-star alternatives due to high EM substat. Lauma’s best F2P option is free Etherlight Spindlelute achieving 90% of signature performance.
Do I need Nahida’s C2 if I have Lauma?
Nahida’s C2 and Lauma’s passive stack for 35% CRIT Rate on Bloom reactions. However, C2’s investment (averaging 166 wishes) may exceed value from stacking effects. Prioritize C2 for diverse Dendro teams beyond Bloom compositions.
Which character performs better in Spiral Abyss?
Nahida’s versatility allows adaptation to any floor mechanics, providing more consistent reliability. Lauma achieves higher peak performance in Bloom-favorable scenarios but may struggle in encounters limiting reaction opportunities.