

Kuki Shinobu, that 4-star Electro healer, shines by triggering Dendro reactions for some serious AoE damage while keeping your team patched up. Go for EM-focused builds, slap on Freedom-Sworn as her weapon, and team her up with Nahida and Yelan to crush Spiral Abyss floors. We've got artifacts, rotations, materials, and all the 2025 meta tweaks covered here.
Getting Started with Kuki Shinobu's Hyperbloom Setup
Kuki Shinobu hit the scene back in Version 2.7 on June 21, 2022, and she's all about that off-field Electro application every 1.5 seconds through her Sanctifying Ring. It turns Dendro Cores into Sprawling Shots that scale off her Elemental Mastery (EM) – hit 1000 EM, and you're looking at around 30,000 damage per proc. Push her to level 90 for 12,289 HP and 212 ATK. You'll need to farm 168 Naku Weed from Seirai Island and 46 Runic Fang from The Chasm's Ruin Serpent – Condensed Resin makes it way less of a grind. In squads like Nahida, Xingqiu, Yelan, and Kuki, she nails 100% uptime at C2. She's pulling in Version 6.0 Phase 1 Event Wish from September 10–30, 2025, so mark your calendars.
Ever wonder why some characters just click in certain metas? Kuki's one of those – her kit feels tailor-made for Hyperbloom, blending damage and support without forcing you to babysit her.
Why Pick Kuki Shinobu for Hyperbloom?
Stack her to 1000-1100 EM, and those Hyperbloom cores can hit ~30k damage each, juiced up by her A4 passive for +250 DMG and +750 healing. Figure out your Energy Recharge (ER) needs at 135-175% for C0 if she's your only Electro – tools like Genshin Optimizer are lifesavers here. Test it out in Spiral Abyss; aim for clears under 90 seconds. It's satisfying when it all comes together, right?
A Quick Dive into Hyperbloom Mechanics
Team her with Nahida to keep those cores centralized. The flow? Start by applying Hydro to pump up the Dendro AoE, layer on Dendro for Bloom, then pop Kuki's ring to spark 4-6 Hyperblooms per rotation. Keep an eye on those in-game indicators – they tell you when things are popping off.
Kuki Shinobu's Spot in Hyperbloom Teams

At level 90, she's rocking 12,289 HP and 751 DEF, plus a +24% HP ascension bonus. Pile on EM to break 1000 for that sweet damage and healing balance. The upsides? At C2, her 15-second duration matches the cooldown for perfect uptime, and there's a 45% particle chance per hit. Downsides include single-target healing that only ramps up with her A1 bonus when HP dips below 50% – so yeah, you've gotta manage that carefully. Here's how: Fire off her Skill to drop HP, swap to your DPS, and watch those HP bars to prevent over-healing. Buffed right, this nets 30k+ Hyperbloom DMG per proc.
For players looking to enhance their Genshin Impact experience, consider recharge Genesis Crystals through BitTopup, which offers competitive pricing, instant delivery, secure transactions compliant with global standards, broad payment support, excellent after-sales service, and high user ratings for seamless top-ups.
Her Support and Healing Game
That Sanctifying Ring heals for 5.4% Max HP + 635.61 flat at level 10, amped by +75% EM from A4 and +15% when HP's low via A1 – in EM builds, that's ~5-6k per 1.5-second tick. Shoot for 20,000+ HP through substats to make her a tanky healer against those brutal Spiral Abyss bosses. (As an editor who's sunk hours into Abyss runs, I gotta say – reliable healing like this can be the difference between a 36-star clear and rage-quitting.)
Strengths in Electro Application
Her Skill dishes out 8 ticks (10 at C2) of 45.43% Electro DMG at level 10, plus +25% EM from A4, making it prime for AoE Hyperbloom. In rotations, drop it after Dendro and Hydro to max out procs. Simple, effective – and it just works.
Top Weapons for Kuki Shinobu in Hyperbloom
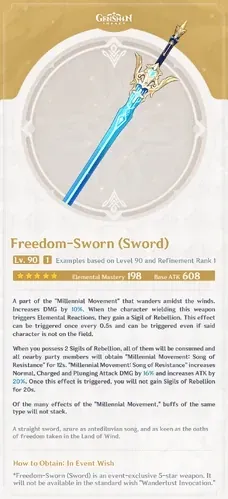
Freedom-Sworn, that 5-star with 608 Base ATK and 198 EM, gives +20% ATK and +16% attack DMG at 2 stacks from reactions – refine to R1 and trigger it with her ring for a +10% DMG bonus. Then there's Xiphos' Moonlight, a 4-star packing 165 EM, granting 0.036% ER per EM every 10 seconds; at 1000 EM, that's ~36% team ER. Forge or pull it, refine to R5, and pair with ER substats for her personal 130% ER. Key of Khaj-Nisut (5-star, 66.2% HP) builds 0.12% Max HP into EM up to 3 stacks, which pop instantly at C4 – run it through calculators, and research shows it can edge out Freedom-Sworn by +15% team DPS in some setups.
Prime 5-Star Picks
Freedom-Sworn: 198 EM with killer reaction synergy for +20% ATK buffs.
Key of Khaj-Nisut: HP scaling that converts to EM stacks up to 3, shareable with the team.
Budget-Friendly Options for F2P Players
Iron Sting (craftable, 165 EM, +6-12% Elemental DMG stacks): Head to the blacksmith and forge it – no wishes needed.
Toukabou Shigure (event, 165 EM): Grab it from past events or wait for reruns.
Breaking Down Weapon Stats
Focus on EM substats to hit 1000 total alongside artifacts; ER comes second to meet that 135% threshold. It's all about that balance – don't sleep on it.
Best Artifact Sets and Stats for Peak Performance
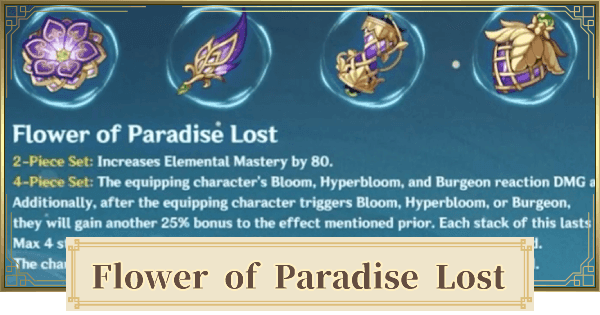
The 4pc Flower of Paradise Lost set gives +80 EM from the 2pc, plus +40% Hyperbloom DMG and +25% per stack up to 4, ramping to +140% – farm it in the Spore domain or via Strongbox, and slap EM mains on Sands, Goblet, and Circlet for 1000-1100 total, dishing ~30k DMG. Alternatively, 4pc Gilded Dreams offers +80 EM plus +50 EM per different element up to +150, netting +230 EM in Dendro/Hydro teams. Start by farming Gilded, upgrade to FoPL, then optimize substats like EM > HP% > ER. At 1000 EM, her A4 kicks in +750 healing boost. Solid progression, if you ask me – I've seen players transform mediocre builds into monsters this way.
Sets I'd Recommend
Flower of Paradise Lost: Maxes out at +140% Hyperbloom DMG. Game-changer.
Gilded Dreams: +230 EM in those meta Dendro/Hydro lineups.
Prioritizing Main Stats
Sands: EM. Goblet: EM. Circlet: EM – it all scales directly off that.
Optimizing Substats
EM is king for scaling. HP% bumps heals by ~1k per tick with +20% HP. ER hits the 135-175% mark using calculators. Mix it up right, and she's unstoppable.
Talent Priorities and How to Level Her Up
Pump her Elemental Skill to level 10 first (45.43% DMG +5.4% HP heal every 1.5s), followed by Burst (6.49% HP per hit, up to 77.86% total below 50% HP). Level the character to 90 with 8,362,650 Hero's Wit – the 80-90 stretch alone needs 3.4M EXP. For one talent to 10, that's 1,652,500 Mora, 1 Crown, 6 Tears of the Calamitous God, 3/21/38 Elegance books, and 6/22/31 Spectral items; triple it for all talents: 4,957,500 Mora and 3 Crowns. Farm Violet Court on Tue/Fri/Sun, take down Raiden weekly for Tears, and use Dream Solvent to convert. At 1000 EM, A4 adds +250 DMG and +750 healing per tick – worth every material.
Skill Leveling Order
Elemental Skill: Handles triggers and healing – your bread and butter.
Elemental Burst: For those Electro explosions.
Normal Attack: Honestly? Skip it.
What You'll Need for Talents
Books: Elegance series from those Tue/Fri/Sun domains.
Boss drops: Tears from Raiden – craft extras with solvents.
Commons: Spectral bits from Inazuma Specters.
How Constellations Shape Her Build
C2 stretches her Skill to 15s for 100% uptime, tossing in 2 extra ticks and particles – she's featured in Version 6.0 Phase 1, September 10–30, 2025. C4 drops a Thundergrass Mark for 9.7% HP Electro every 5s, sparking more Hyperbloom. C0 is totally viable, but C2/C4 can boost output by 20-30%; target C2 first, use C4 for Key stacks, and test in Abyss. C6 grants +150 EM at low HP and a once-per-60s survival mechanic, adding ~5k DMG per proc over C0. (In my view as an editor who's theorycrafted plenty, C2 is that sweet spot where she goes from good to great without breaking the bank.)
Standout Constellations
C2: +3s duration for seamless uptime.
C4: Extra triggers through separate reactions.
Comparing C0 to C6
C0 holds its own with a strong base. C6? It adds +150 EM for a ~5k DMG bump per proc – noticeable in tough content.
To keep your account topped up for pulling constellations like C2 on Kuki Shinobu, buy Genshin Genesis Crystals via BitTopup, featuring affordable rates, rapid crediting, fully secure and compliant processes, wide global support, responsive customer service, and top-rated user satisfaction for hassle-free gaming.
Team Setups That Make Her Shine
Nahida, Xingqiu, Yelan, Kuki – perfect for single-target focus with double Hydro resonance and heavy Hyperbloom. Or try Alhaitham, Nahida, Yelan, Kuki for double Dendro and on-field DPS. F2P option: Dendro Traveler, Xingqiu, Sucrose, Kuki with VV shred. Pick based on your roster, test synergies, and tweak for Abyss. Quickbloom variant: Alhaitham, Kuki, Nahida, Furina blends Spread with Hyperbloom.
Must-Have Teammates
Nahida: Nails Dendro application and shares EM.
Yelan: Off-field Hydro to spawn those cores.
Synergy Spotlights
With Kazuha: Swirl spreads EM like wildfire.
With Baizhu: HP buffs amp her damage output.
Other Team Ideas
F2P-friendly: Collei, Barbara, Fischl, Kuki.
AoE-focused: Ayato, Beidou, Nahida, Kuki.
Rotations and Playstyle Advice
Standard rotation: Xingqiu Q, Nahida E Q, Kuki E (add N1 for C4), then DPS takes the field; slip in Kuki Q if ER permits, for 4-6 procs in a 15-20s cycle. For advanced play, go E N1 Q to drop HP and trigger C4. Sequence Hydro > Dendro > Electro, swap fast, and keep HP under 50%. Target 900-1100 EM for 30k DMG in close quarters. It's all about timing – get it right, and the battlefield lights up.
Using Burst and Skill Smartly
Lead with Skill for the ring. Burst follows for 12 quick hits at low HP. Boom.
Strategies for Max Hyperbloom Procs
Group enemies with Anemo; time your swaps right after cores spawn. Efficiency is key.
Dodging Common Pitfalls
Don't overdo ER – calculators say 135-175% for C0 solo is plenty; focus substats on EM instead. Avoid leading with Electro; always Hydro first, and throw in Sucrose for grouping. Low HP deaths? Use Burst for invulnerability and add shields. Farm FoPL through Strongbox to speed things up.
Build Traps to Watch For
ER hogging over EM: Flip that priority.
Chasing wrong stats: CRIT? Ignore it here.
Fixing Team Synergy Issues
No grouping? Sucrose fixes that. Bad sequencing? Hydro leads the way.
Ascension Materials and Farming Tips
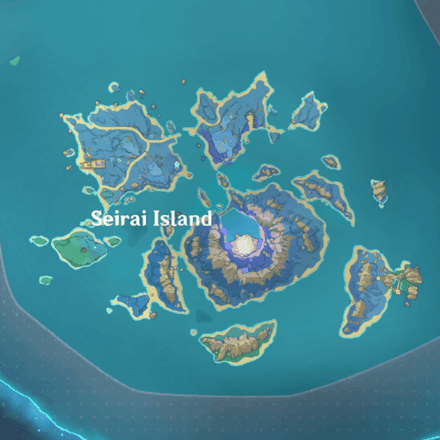
To hit 90: 420,000 Mora, 46 Runic Fang, 1/9/9/6 Vajrada Amethyst, 168 Naku Weed, 18/30/36 Spectral. Runic Fangs respawn in Chasm, Naku from 129 Seirai spots (buy 5/day from Aoi). Daily: Hunt level 60+ Specters for Nucleus. Weekly: Bosses for Vajrada. Grow Naku in your Serenitea Pot – smart farming pays off.
Full Material Breakdown
Boss: Runic Fang from the Ruin Serpent.
Commons: Spectral drops across Inazuma islands.
Best Farming Paths
Hit Seirai for Naku and Spectral; Chasm for Runic; domains on Tue/Fri/Sun for books. Plan your routes – it saves sanity.
2025 Meta Shifts and Keeping Her Relevant
She's popping up in Chronicled Wish v5.6 from May 27–Jun 17, 2025, and Event Wish v6.0 September 10–30; pair her with Lauma for fresh synergies. Farm EM artifacts now, pull during banners, and test in the updated Abyss. Skip Dendro-immune enemies by swapping her out – adaptability is everything.
What's New in Patches
Reactions stay stable; banners make her easier to snag.
Tweaking the Build for the Future
EM remains top dog. C4's extra triggers shine in new content. (From my editing perch, she's future-proof if you build smart – no regrets here.)