

Quick Overview: Kazuha's Double Swirl lets you trigger reactions with two elements at once, slashing 40% resistance through 4VV and dishing out about 64% elemental DMG bonus at 800 EM thanks to his A4 passive. Absorption sticks to Pyro > Hydro > Electro > Cryo. Go for Hold Skill to drop 2U Anemo in National or Taser teams, aiming for 170-200% ER. This guide dives into the mechanics, rotations, and builds for Vaporize, Melt, EC, and Freeze setups – expect 15-32% team DPS spikes.
Unpacking Kazuha's Double Swirl: The Mechanics That Make It Tick
Ever wonder why Kazuha feels like the ultimate team buffer? Double Swirl is where he shines, firing off Swirl reactions with two elements to shred 40% resistance on both for 10 seconds via 4VV. On top of that, you get 0.04% elemental DMG bonus per EM point per element, stacking up to ~64% at 800 EM through A4. Take Vaporize teams – swirling Hydro first, then Pyro, and you've just boosted Xiangling's Pyro DMG by 27.78% effective uplift on a 10% base RES. Peek at your stat screen after a Swirl to confirm those buffs; stack 800+ EM on artifacts for that sweet 60% Swirl DMG kick from 4VV.
Double Swirl Defined: How It Stacks Up Against Single-Element Swirls
Picture this: Double Swirl grabs two elements – say, Hydro and Pyro – and hits them with VV shred and A4 activation all at once. In International teams (Bennett, Xiangling, Childe, Kazuha), it pushes team DPS to 100% compared to 85% for single-element plays. Start with the first aura (Childe's Skill for Hydro), layer on the second without wiping the first (Bennett's Burst self-applies Pyro), then unleash Kazuha's Burst for 6 total Swirls – that initial slash plus 5 field ticks – all in 8 seconds.
Why Bother with Double Swirl? The DPS Edge It Gives Your Squad
It's all about those dual buffs: ~32% from A4 per element, plus VV's 27.78% DMG boost. In Taser teams, swirling Electro-Charged (Hydro + Electro) amps Fischl's off-field damage like nobody's business. Stick to swirlable elements – Pyro, Hydro, Electro, Cryo – and let Kazuha's grouping suck enemies into those dual-aura hot zones for full 6-Swirl bursts. Honestly, once you nail it, reactions feel unstoppable.
The Nuts and Bolts of Swirl Reactions and Elemental Application
Swirl packs Anemo DMG (scaling off ATK and CRIT) alongside the swirled element's DMG (Level and EM-based), and Double Swirl throws in a third hit for good measure. Absorption follows that strict Pyro > Hydro > Electro > Cryo order. At Level 90 with 800 EM, each Swirl lands solid AoE damage, juiced by 4VV's 60% boost. Time your applications to fit the priority – Hydro first in EC setups – and use Hold Skill's 2U Anemo to strip one aura for a clean second Swirl. (As an editor who's theorycrafted this endlessly, it's like conducting an elemental orchestra – one wrong note, and the symphony falls flat.)
Kazuha's Elemental Absorption Priority: Breaking Down the Full Hierarchy
Kazuha's Skill and Burst snag the highest-priority element from enemies: Pyro > Hydro > Electro > Cryo, infusing your Swirls and plunges. Burst ticks apply 1U per tick. In Hu Tao Vaporize, a quick Hold Skill sequence keeps Burning at bay. Here's how: 1. Wipe unwanted auras with Hold Skill (9s CD, 4 particles). 2. Layer target elements in reverse priority (like Cryo then Electro). 3. Double-check with the visual infusion color.
The Official Order: Pyro Trumps Hydro, Electro, and Cryo
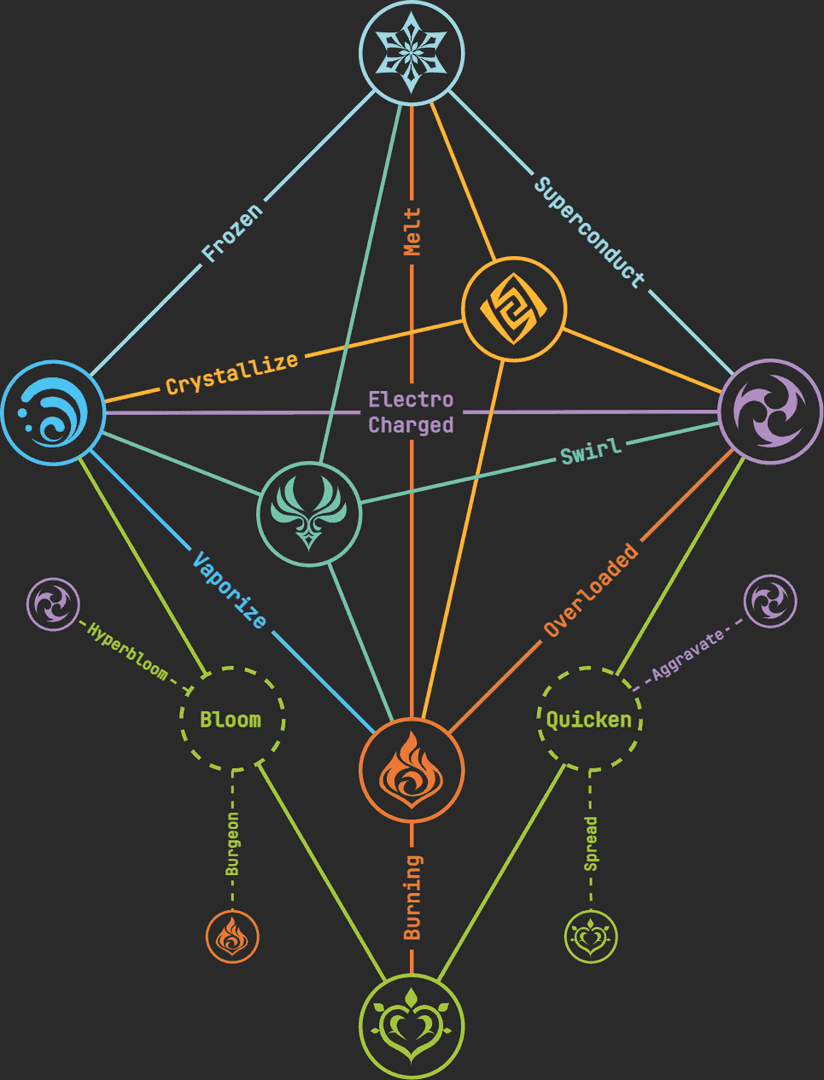
Pyro bulldozes everything else if it's around. For Melt teams, slap on Electro aura first, then Pyro; Kazuha absorbs Pyro reliably. Test it yourself: Bennett's Burst self-applies Pyro over enemy Hydro for a slick Reverse Vape Double Swirl.
How the Game Picks What to Absorb
It scans enemy auras at cast time; the strongest gauge unit (2U is ideal) takes priority. Hold Skill's 2U Anemo lets you chain sequential Swirls. In Freeze, Hydro and Cryo hang out together, so positioning absorbs both naturally. Try this: 1. Build 2U auras (Kokomi's Skill for Hydro). 2. Get Kazuha in position. 3. Hold Skill or Burst for dual triggers.
Elemental Gauge Units and Aura Strength Demystified
1U for a light touch, 2U for the heavy hitter; Burst craves 2U for full infusion. Childe's Skill drops 2U Hydro, perfect for layering a second element without drama. Lean on 2U tools like Hold Skill's 1s field for AoE control; skip 1U in sequences to dodge premature reactions.
Spotting Absorbed Elements: Visual Cues You Can't Miss
The infused element lights up your blade and plunge trails – Pyro's a fiery red glow. Hit the stat page post-Swirl for A4 buffs. Quick steps: 1. Trigger the Swirl. 2. Watch the color shift. 3. Confirm dual buffs (Hydro and Pyro icons popping up).
For players looking to enhance their Genshin experience without hassle, top up Genesis Crystals cheap through BitTopup offers competitive pricing, instant delivery, secure transactions, 24/7 support, broad device compatibility, and high user satisfaction ratings for seamless progression.
Kazuha's Kit Deep Dive: Skill vs. Burst Absorption in Action
Both Elemental Skill (Chihayaburu) and Burst (Kazuha Slash) absorb elements. Skill handles grouping: Tap for 6s CD, 3 particles, 1U Anemo, 0.5s field; Hold for 9s CD, 4 particles, 2U Anemo, 1s field. Burst runs 8s with 60 Energy cost and 15s CD, enabling 6 Swirls (initial 2U Anemo slash + 5 ticks at 1U absorbed each). Routine: 1. Hold Skill before Burst to set the stage. 2. Plunge with A1 passive for 200% ATK absorbed DMG. 3. Max both at Level 90.
Chihayaburu (Elemental Skill) Absorption Timing
It absorbs on cast, fueling your Midare Ranzan plunge. Hold Skill in an EC field? Instant Hydro/Electro Swirls. Do it like this: 1. Hold for about 1s for bigger AoE. 2. Chain into a Normal for plunge Swirl. 3. No ICD on Skill means you can spam chains without worry.
Kazuha Slash (Elemental Burst) Absorption Window
Burst snapshots your stats on activation, locking in one element for every tick. Position in a dual-aura zone for Double Swirl across 8s. Steps: 1. Prep those elements. 2. Fire the Burst. 3. Let the field carry off-field damage.
Plunge Attack Swirl Interactions
A1 passive infuses plunges right after Skill, sparking reactions with zero ICD – prime for Double setups. Go: 1. Absorb with Skill. 2. Plunge your N1. 3. Sequence for that second element infusion.
ICD Rules That Shape Your Rotations
Skill and Burst Swirls dodge ICD entirely; Normals face 2.5s/3 hits, so you can chain back-to-back Doubles. Tips: 1. Space Normals to sidestep ICD. 2. Lean on Skill/Burst for the heavy lifting. 3. Perfect for quickswap teams. (I've fixed so many rotations by just respecting ICD – it's the silent killer of smooth plays.)
Step-by-Step: Nailing a Reliable Double Swirl Every Time
Whether sequential or co-existing auras, Double Swirl clicks. Use Hold Skill's 2U Anemo for EC or Freeze; in single-target, Bennett's self-Pyro over Hydro nets dual A4 buffs. Break it down: 1. Drop first element (Xingqiu for Hydro). 2. Add the second (Fischl for Electro). 3. Kazuha Hold Skill + Burst in the zone. 4. Eyeball dual visual effects for confirmation.
Pre-Requisites: Team Setup and Element Application
Craft teams around swirlable elements and energy batteries. National (Bennett, Xiangling, Xingqiu, Kazuha) thrives on self-Pyro for Reverse Vape. Pick Pyro/Hydro supports; hit 170% ER on Kazuha.
Method 1: Skill-Based Double Swirl Setup
Hold Skill yanks and Swirls multi-targets with its 1s field for AoE Doubles. Spread Hydro/Pyro on separate enemies, then pull 'em together. 1. Disperse elements. 2. Hold Skill. 3. Plunge to seal it.
Method 2: Burst Absorption Double Swirl
The Burst field keeps it going with 5 ticks, chaining EC into Hyperbloom. 1. Dual auras set. 2. Cast Burst. 3. Herd your team into the field.
Timing Windows and Frame-Perfect Execution
Sync within 0.5-1s for co-existence; Childe E > Bennett Q > Kazuha Q nails Reverse Vape. Practice 2-3s rotations; C1 resets Skill for extras.
Enemy Positioning Requirements
Kazuha's pull funnels everything for absorption; Skill field lasts 0.5-1s. 1. Cluster the heavies. 2. Dodge lifts in Freeze. 3. Infinite climb (X + E + W) for height advantage. Short and sweet: positioning wins fights.
Practical Team Compositions for Double Swirl Success
Double Swirl rules reaction teams. National flips to Reverse Vape for Hydro/Pyro duality; Taser exploits EC co-existence; rotations pump DPS by 64% through buffs. For National: 1. Bennett E. 2. Kazuha Skill (Swirl Pyro). 3. Burst. 4. Xiangling Q. 5. Childe attacks.
Kazuha National: Bennett + Xiangling + Xingqiu Rotation
Reverse Vape flow: Childe E > Bennett Q > Kazuha Q tEP (N1) > Xiangling Q E > Childe Q E N2. Dodges Pyro theft; 190% ER on Kazuha doubles down on Vaporize buffs.
Kazuha Taser: Electro-Charged Double Swirl Setups
Xingqiu E Q > Beidou E > Kazuha hEP Q N1 > Fischl E/Q > Beidou Q E. 2U ensures dual Swirls; 155-170% ER with Raiden battery; EC chains forever.
Freeze Teams: Hydro + Cryo Absorption Strategies
Ayaka D > Kazuha tEP Q > Shenhe tE Q > Kokomi E > Ayaka D N1 E Q. Swirls Hydro/Cryo for perma-Freeze; EM sands for Shatter; skip post-Mona plunges.
Soup Teams: Multi-Element Chaos Management
Overvape: Ayato Q > Fischl E > Kazuha N1 tEP > Ayato E N15 > Bennett E Q. Dual Vape/EC buffs; 2U sequencing; Kazuha as the chaos conductor.
Sunfire Kazuha: Advanced Jean Interaction
Jean's permanent Pyro aura? Sequence Skill before Sunfire kicks in. Slot Kazuha > Jean in 4TF for ER; Kazuha's buffs just edge out. (Editor note: Sunfire's fun, but Double Swirl's the real meta mover here.)
Optimizing your Genshin Impact account often involves efficient resource management, and Genshin Impact currency top up via BitTopup provides fast, affordable Genesis Crystals with top-tier security, broad device support, 24/7 customer service, and excellent user experience ratings.
Common Double Swirl Pitfalls and How to Sidestep Them
Wrong absorption – like snagging Pyro in Freeze – hijacks reactions; priority's the culprit, but sequential apps fix 90% of it. 1. Hold to clear. 2. Reapply targets. 3. Disable Bloom for clearer visuals.
Problem: Only One Element Gets Absorbed
Auras won't co-exist? Self-apply with Bennett's Burst. Single-target? Guoba for a quick Pyro flash. 1. Hydro aura down. 2. Self-second element. 3. Burst away.
Problem: Wrong Element Priority Absorbed
Hierarchy calls the shots; apply reverse (Cryo first). Hu Tao tweak: Thoma pre-Kazuha to dodge Pyro. 1. Low priority sequence. 2. Skill Hold. 3. Color check.
Problem: Swirl Happens Too Early or Too Late
Timing slips the window; drill 0.5s Holds. ICD-free Skills give wiggle room. 1. Pre-position. 2. Match CDs. 3. C4 for energy padding.
Problem: Elements Disappear Before Absorption
Reaction theft strikes; go heavy with 2U apps. EC/Freeze co-exist naturally. 1. Build those gauges. 2. Kazuha immediately. 3. Checklist: Auras still visible?
Troubleshooting Checklist
ER at 170%+?
Dual auras pre-cast?
Priority matched?
No Anemo interference?
Visual buffs active?
Optimizing Kazuha's Build for Double Swirl Peak Performance
Aim 800+ EM for ~32% A4 per element; 4VV is non-negotiable for 40% shred; ER 170-200% solo, 105-110% with double Anemo; full EM beats ADC (100% vs 85% DPS at 140% ER). 1. Lock in 4VV. 2. EM Sands/Goblet/Circlet. 3. Freedom-Sworn weapon for +20% team ATK buff.
Elemental Mastery: How Much Do You Really Need?
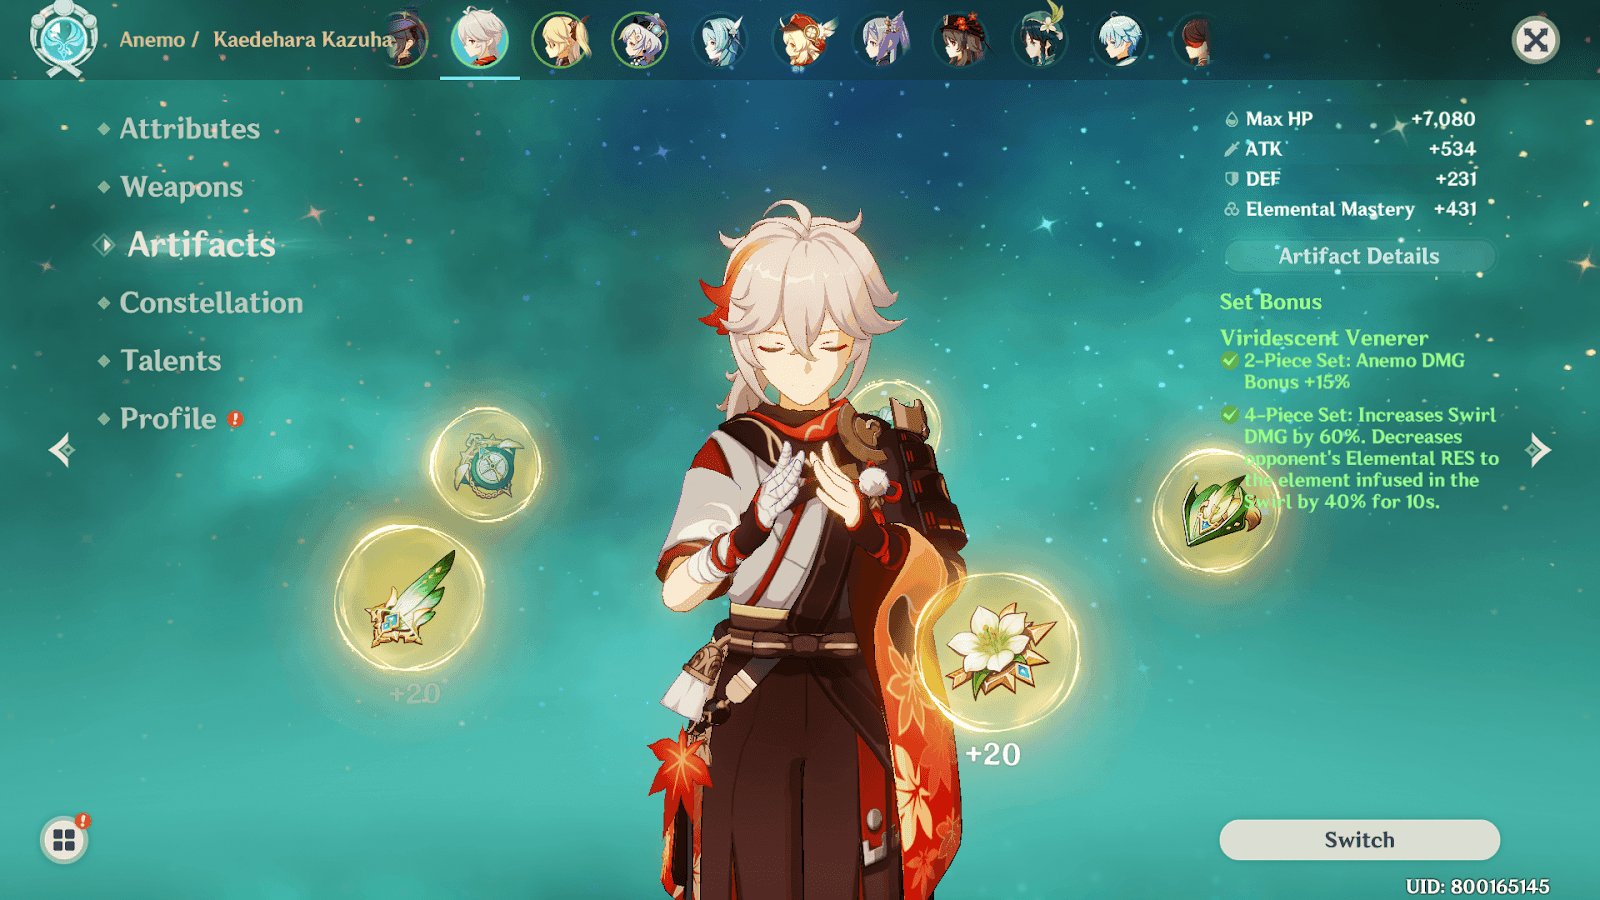
800-1000 EM hits the sweet spot; base 115 + artifacts (187 per main) + Iron Sting (165); C2 tacks on 200 in Burst. Sub EM everywhere; crunch for that 64% Double bonus.
Viridescent Venerer 4-Piece: Mandatory or Optional?
2pc: +15% Anemo DMG; 4pc: 40% shred; 27.78% effective up per element. Farm those EM subs; 4TF niches for EC quickswaps.
Weapon Choices: Freedom-Sworn vs Iron Sting vs Xiphos' Moonlight
Freedom-Sworn leads with buffs; Xiphos' best 4-star (EM/ER); Favonius cuts 30-50% ER need (72% proc vs 2 foes). 1. Nail ER first. 2. EM next. 3. Sacrificial for resets.
Energy Recharge Requirements for Rotation Consistency
190-200% for Tap+Hold; C4 drops it with 3-4 energy regen; Raiden teams at 155%. Favonius helps; batteries shave 15-25%.
Advanced Techniques: Triple Swirl and Beyond
Triple Swirl via C6 or multi-Anemo; C6 infuses Anemo for 5s post-cast; C2's +200 EM pushes A4 to ~48% per element. 1. C2 Burst in dual field. 2. Layer multi-Anemo. 3. Infinite climbing for AoE reach.
Triple Swirl Conditions and Setup
C6 unlocks the third via infusion; chain three elements after. 1. Stack high EM. 2. Precise positioning. 3. Rare beast – Double's your daily driver.
Quadruple Swirl: Theoretical vs Practical
Possible with heavy multi-elements, but impractical. Meta says focus Double. Use in Abyss mob swarms.
C2 Kazuha Impact on Double Swirl Strategies
Game-changer; laps Sucrose in reactions; +200 EM in field fuels Hyperbloom. Prioritize C2; snapshots amp those ticks. (My take: C2 Kazuha's the investment that pays off forever.)
Speedrun and Abyss Optimization Tactics
Abyss demands tight rotations; Double crushes single in PECH teams. 1. National for floors 9-12. 2. Group heavies. 3. EM focus all the way.
Damage Calculations: Double Swirl vs Single Element Focus
Double Swirl doubles shreds and buffs for ~64% A4 + 55.56% VV effective uplift; team DPS hits 100% vs 85% single. 1. Scale EM properly. 2. Test rotations. 3. Hit 800 EM as the threshold.
DPS Comparison: When Double Swirl Outperforms
Shines in Vape/Melt/EC; single for Mono Pyro. International Double? 64% bonus. Multi-element teams only.
Elemental DMG Bonus Stacking Mechanics
A4 lives per element; no overlap with Sucrose EM share; shows on stats. Sequence Swirls to activate.
Team Rotation DPS Calculations
National gets ~30% uplift from dual; Reverse Melt with Rosaria/Nahida. Time Bennett Q before Kazuha.
Diminishing Returns and Optimization Thresholds
EM caps at 1000; ER priority; low ATK loves EM. 800 EM's the goldilocks zone.
Frequently Asked Questions About Kazuha Double Swirl
How does Kazuha double swirl work?
Triggers two Swirls via sequential or co-existing auras, absorbing per priority for dual VV shred and A4 buffs; use Hold Skill in EC for auto-dual; ~64% bonus at 800 EM.
What is the elemental absorption priority for Kazuha?
Pyro > Hydro > Electro > Cryo for Skill/Burst; sequence low-priority first (e.g., Cryo then Pyro); Hold Skill clears for reliability in Freeze.
Can Kazuha swirl two elements at once?
Yes, in AOE via grouping or EC/Freeze co-aura; Burst sustains 8s with 6 triggers; Taser with Xingqiu/Beidou for instant dual.
Why does my Kazuha double swirl fail?
Wrong absorption or aura loss; fix with self-apply (Bennett) and 2U sequencing; check ER 170%+ and no Sunfire Pyro interference.
What is the best rotation for Kazuha double swirl?
National: Bennett E > Kazuha Skill/Burst > Xiangling Q > Childe attacks; Taser: Xingqiu E > Beidou E > Kazuha hEP Q; 190% ER for uptime.
How much Elemental Mastery does Kazuha need for double swirl?
800+ for ~32% A4 per element; full EM via 4VV and Xiphos; C2 adds 200 in Burst; > ADC for team DPS.