

Constance The Dahlia debuts December 16, 2025 as a 5-star Fire Nihility Super Break support revolutionizing Break Effect teams. This E0 guide covers optimal Iron Cavalry relic builds targeting 360%+ Break Effect, signature Light Cone synergies, team compositions with Firefly and Boothill, material pre-farming schedules, and strategies for clearing Trailblaze Continuance bosses in under 60 seconds.
Constance Dahlia Character Overview and Role in HSR 3.8 Meta
Constance The Dahlia arrives as a Fire Nihility character from the Ever-Flame Mansion faction, and she's doing something that's never been possible before in Honkai: Star Rail—enabling Super Break damage before enemies even enter Weakness Broken state.
Let me explain why that's huge.
Her kit revolves around deploying a 3-turn Zone that boosts all allies' Weakness Break Efficiency by 50% while converting Toughness Reduction against non-broken enemies into immediate Super Break damage. Her Skill Lick... Enkindled Betrayal deals 160-200% ATK Fire damage to blast targets while establishing this Zone. Here's the catch—duration decreases by one turn each time Dahlia acts, which means Speed tuning actually matters more than you'd think.
The Dance Partner system is where things get interesting. Through her Talent Who's Afraid of Constance?, she grants Dance Partner status to herself and the ally with highest Break Effect. When Dance Partners attack Weakness Broken enemies, their Toughness Reduction converts to Super Break damage. But when the other Dance Partner attacks, Dahlia triggers a Follow-Up Attack dealing 30% ATK Fire damage that bounces 1-5 times with Super Break conversion—once per turn. This synergizes exceptionally well with high-frequency attackers like Firefly during Complete Combustion state.
Her Ultimate Wallow... Entombed Ash inflicts a 4-turn Wilt debuff dealing 300-360% ATK Fire damage while reducing DEF by 18-23%. The game-changing component? It applies all Dance Partners' elements as enemy Weaknesses, enabling Fire-weak enemies to become vulnerable to Physical, Imaginary, or other elements. For players seeking to maximize their roster, top up HSR delayed banner pulls secure through BitTopup ensures sufficient Stellar Jades for guaranteed acquisition.
Character Kit Analysis
At Level 80, Constance reaches 679 ATK, 606 DEF, 1086 HP, 96 Speed with 130 Energy capacity. Those aren't spectacular defensive stats, which is fine—she's a support who scales aggressively with Break Effect, not someone you're building tanky.
Ascension traces prioritize Break Effect bonuses (5.3%-10.7%), Speed increases (2-3 points), and Effect RES boosts (4-8%). Her Basic Attack Fiddle... Fissured Memory delivers 100-140% ATK Fire damage with 20 Energy regeneration and 30 Weakness Break value. You won't use this much in optimized rotations where Skill deployment takes priority.
The bonus traces fundamentally enhance her support capabilities. Outgrow the Old grants allies receiving Weakness implants +30% Speed for 2 turns, with Fire allies gaining +20 Fire Toughness Reduction and +10% Max Energy regeneration (capped at 50%). Yet Another Funeral provides 24% Break Effect to Dahlia while granting 50% of that value to all allies for 1-3 turns upon combat entry or receiving healing. Lament Lost Soul recovers 1 Skill Point every 2 Follow-Up Attacks, addressing SP economy concerns.
E0 Performance Expectations
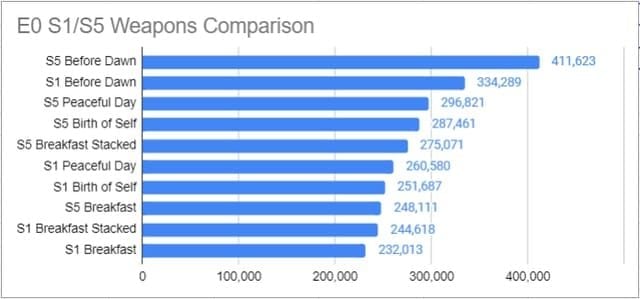
At E0 with signature Light Cone, Constance achieves approximately 237% base Break Effect before relic optimization. With Iron Cavalry 4-piece and Forge of the Kalpagni Lantern 2-piece, players consistently reach 360%+ Break Effect—the threshold where DEF ignore mechanics and Super Break scaling reach optimal efficiency.
Player-tested data shows Firefly teams with E0 Dahlia clearing the Swarm SAM and Calamity dual boss encounter in 52-68 seconds, compared to 90+ seconds with traditional Ruan Mei compositions. That's a 30-40% clear time reduction stemming from eliminating Firefly's downtime between Weakness Break cycles.
Memory of Chaos Floor 12 clears demonstrate E0 Dahlia's viability, with F2P teams using Harmony Trailblazer and Gallagher achieving full star clears. The HP Count mechanic introduced in 3.8 bosses—where enemies at 0 HP enter downed state ignoring healing—synergizes perfectly with Dahlia's burst damage windows.
Meta Positioning
Constance occupies a unique niche as the premier Super Break enabler, directly competing with Ruan Mei for team slots. Unlike Ruan Mei's universal buffing, Dahlia specializes in accelerating Break damage cycles, making her optimal for Firefly, Boothill, Rappa, and future Break-focused DPS characters.
Her Weakness implant mechanic solves a critical problem for mono-element Break teams facing resistant enemies. The DEF reduction component (18-23% at max level) stacks multiplicatively with Iron Cavalry's 10-25% DEF ignore, creating substantial damage amplification.
The December 16, 2025 release positions her in Phase 1 alongside Firefly, Boothill, and Rappa reruns—enabling players to construct complete Break teams. Phase 2 (January 6-27) features Fugue, Lingsha, and Yunli. The 42-day version duration offers ample time for material farming.
Best Relic Sets for Constance Dahlia E0 Builds

Iron Cavalry Against the Scourge 4-piece stands as the undisputed optimal relic set. It provides +16% Break Effect baseline with conditional DEF ignore scaling from 10% at 150% Break Effect to 25% at 250%+ Break Effect. This DEF ignore applies specifically to Break damage, synergizing perfectly with Dahlia's Super Break conversion and her Ultimate's DEF reduction.
At 360% Break Effect—the recommended build target—Iron Cavalry provides maximum 25% DEF ignore, stacking multiplicatively with her Ultimate's 18-23% DEF reduction. Against enemies with 1000 DEF, this combination effectively reduces resistance to approximately 577 DEF (1000 × 0.75 × 0.77), translating to 42% increased damage.
Top Tier Relic Combinations
The gold standard combines Iron Cavalry 4-piece with Forge of the Kalpagni Lantern 2-piece planar ornament:
Body: ATK% main stat (Break damage scales from ATK)
Feet: Speed main stat (145-160 target)
Sphere: Fire DMG% or ATK% (Fire DMG preferred for 24% boost)
Rope: Break Effect main stat (mandatory)
Forge of the Kalpagni Lantern provides +6% Speed and +40% Break Effect against Fire-weak enemies. Since Dahlia's Ultimate applies Fire Weakness to enemies lacking it, this conditional bonus activates consistently. The Speed component helps reach 145+ breakpoints where Talia: Kingdom of Banditry's alternative +36% Break Effect activates, though Forge's Fire-specific bonus typically outperforms.
Talia: Kingdom of Banditry serves as the primary alternative, offering +16% Break Effect baseline scaling to +36% at 145+ Speed. This benefits Speed-focused builds aiming for 160+ Speed to maximize turn frequency and Zone uptime. But Forge's higher peak bonus (40% vs 36%) and Speed stat make it superior for sustained encounters.
Substat Priority Guide
Break Effect substats take absolute priority. Each 5.8% Break Effect roll contributes more damage than equivalent ATK% or CRIT stats. Target 8-12 Break Effect substat rolls across 6 relic pieces to reach 360%+ total Break Effect.
Speed substats rank second, aiming for 145-160 total Speed. The 145 threshold activates Talia's maximum Break Effect bonus and ensures Dahlia moves before slower DPS units like Firefly (typically 134-145 Speed). Higher Speed values (155-160) enable additional turns within Zone duration, but excessive Speed (170+) causes Skill Point starvation and premature Zone expiration.
ATK% substats provide tertiary value since Break damage calculations incorporate base ATK × (1 + ATK%). Each 10% ATK increase translates to approximately 10% more Super Break damage. Effect Hit Rate, CRIT Rate, and CRIT DMG provide zero value for Break-focused builds.
Farming Locations
Iron Cavalry Against the Scourge drops from Cavern of Corrosion: Path of Cavalier domain in Penacony's Scorchsand Vacation Spot. Each 40 Trailblaze Power run yields 2-3 relic pieces with guaranteed 5-star drops at Equilibrium Level 6. Statistical analysis shows approximately 22-33 runs required to complete a 4-piece set with acceptable main stats, translating to 880-1320 Trailblaze Power investment.
Forge of the Kalpagni Lantern planar ornaments farm from Simulated Universe World 9's Divergent Universe mode. Each completion grants 2-3 planar ornament pieces, with targeted farming through Immersion Reward selection improving acquisition rates. Prioritize Rope pieces with Break Effect main stats first.
Optimal farming schedules allocate weeks 5-6 of pre-farming timeline exclusively to relic domains after securing character Ascension materials and Trace resources. Daily Trailblaze Power regeneration (240 base) supports 6 domain runs daily, with weekly caps allowing approximately 42 runs per week.
The Omni-Synthesizer enables 2:1 conversions of unwanted relics into Self-Modeling Resin, which guarantees main stat selection on crafted pieces. Convert off-set pieces to craft Iron Cavalry Body pieces with ATK% main stats and Ropes with Break Effect main stats—the two most critical and statistically rare combinations.
Optimal Planar Ornament Selection and Stats
Forge of the Kalpagni Lantern dominates planar ornament selection, providing +6% Speed and +40% Break Effect against Fire-weak enemies. The conditional activation becomes trivial with Dahlia's Ultimate applying Fire Weakness to all enemies, ensuring consistent uptime. This set's dual scaling benefits both damage output and action economy simultaneously.
The Speed component deserves particular emphasis. At 96 base Speed, Dahlia requires +49 Speed from relics and substats to reach 145—the critical threshold for Talia synergy and optimal turn ordering. Forge's +6% Speed (approximately 5.76 Speed at base 96) reduces the substat requirement burden, allowing more substat rolls to target Break Effect. This efficiency gain translates to approximately 15-20% higher Break Effect totals.
Talia: Kingdom of Banditry offers competitive performance for Speed-focused builds, granting +16% Break Effect baseline scaling to +36% at 145+ Speed. The math favors Talia in teams where Dahlia frequently acts before applying Fire Weakness, but Forge's higher peak bonus and Speed stat create superior sustained damage in boss encounters.
Damage-Focused Ornaments
Forge of the Kalpagni Lantern's +40% Break Effect represents approximately 92.8 flat Break Effect at 232% base. This bonus scales multiplicatively with Iron Cavalry's DEF ignore mechanics. Against enemies with 1000 DEF and Fire Weakness:
Base Super Break Damage × (1 + 0.40 BE bonus) × (1 ÷ (1 - 0.25 DEF ignore)) = 1.867× damage multiplier
This 86.7% damage increase from ornament selection alone exceeds any alternative set's contribution. The Speed bonus further amplifies total damage output by enabling additional actions.
Talia: Kingdom of Banditry's +36% Break Effect at 145+ Speed provides slightly lower peak damage (approximately 1.813× multiplier) but activates unconditionally regardless of enemy Weakness types. The 0.054× damage difference (approximately 3% total damage) rarely justifies Talia over Forge in optimized scenarios.
Stat Thresholds
The 360% Break Effect threshold represents the optimization target where diminishing returns begin. At this breakpoint, Iron Cavalry provides maximum 25% DEF ignore, and Super Break damage formulas reach efficient scaling ratios. Exceeding 400% Break Effect offers minimal returns (approximately 2-3% damage per additional 20% Break Effect).
Speed thresholds create distinct breakpoints:
134 Speed: Moves before standard Firefly builds (134-145 Speed range)
145 Speed: Activates Talia maximum Break Effect bonus, optimal for most teams
160 Speed: Enables 4 actions within 3-turn Zone duration in specific scenarios
170+ Speed: Causes Skill Point starvation and premature Zone expiration—avoid this
ATK% scaling lacks hard thresholds but follows linear progression. Each 10% ATK increase provides approximately 10% more Break damage. Realistic builds achieve 1100-1300 total ATK (679 base × 1.62-1.91 multiplier).
Light Cone Tier List and Recommendations
Never Forget Her Flame stands as Constance Dahlia's signature 5-star Light Cone, providing +60-120% Break Effect scaling with Superimposition levels alongside unique Skill Point recovery mechanics. At Superimposition 1, the Light Cone grants 1 Skill Point when Dahlia applies Weakness implant to enemies, with Toughness Reduction converting to Super Break damage. This SP recovery partially offsets Dahlia's Skill-intensive rotation.
The Light Cone's base stats contribute 1164 HP and 529 ATK at Level 80. At S1, the +60% Break Effect bonus translates to approximately 139.2 flat Break Effect, representing nearly 40% of the 360% target threshold. Superimposition 5 doubles this to +120% Break Effect (approximately 278.4 flat), enabling extreme Break Effect stacking exceeding 450% total.
Investment priority follows E0S0 → E0S1 → E2S1 progression. The E0 to E0S1 upgrade provides the largest relative power increase (approximately 35-40% damage improvement), while Eidolon investments offer diminishing returns until E2's All-Type RES penetration. Secure signature Light Cone before pursuing Eidolons. For those planning their pull strategy, recharge Honkai Star Rail compensation jades fast via BitTopup's secure platform ensures sufficient resources for both character and Light Cone banners.
F2P Alternatives
Good Night and Sleep Well (4-star Nihility) provides the strongest F2P option, granting +24-48% Break Effect based on Superimposition with additional debuff-related damage bonuses. The Light Cone's passive increases damage dealt to debuffed enemies by 12-24%, which activates consistently since Dahlia's Ultimate applies Wilt debuff. At S5, this Light Cone provides 48% Break Effect and 24% damage increase, approaching 70-75% of signature Light Cone performance at zero Stellar Jade cost.
Fermata (4-star Nihility) offers Break Effect scaling with Shock or Wind Shear application mechanics. The +16-32% Break Effect bonus (S1-S5) provides adequate scaling, but the conditional damage bonus requires specific team compositions with DoT appliers. Base stats grant 952 HP and 423 ATK at Level 80. This suits transitional builds while farming for Good Night and Sleep Well.
Solitary Healing (4-star Nihility) grants Break Effect main stat scaling and Energy regeneration on DoT damage dealt. The Break Effect bonus ranges from +24% at S1 to +48% at S5. However, Dahlia's kit lacks inherent DoT application, requiring team composition adjustments to activate Energy regeneration mechanics.
Skill Trace Priority and Talent Leveling Guide
Skill and Talent traces demand maximum priority investment, as these abilities directly enable Dahlia's Zone deployment and Dance Partner mechanics. The Skill Lick... Enkindled Betrayal scales from 160% ATK damage at Level 1 to 200% ATK at Level 10, with Zone duration remaining constant at 3 turns but Weakness Break Efficiency bonus fixed at +50% regardless of level. Despite static buff values, the damage scaling justifies maximum investment.
Talent Who's Afraid of Constance? receives equal priority due to Follow-Up Attack damage scaling from 30% ATK at base level to higher multipliers at maximum investment. Each Talent level increases Follow-Up Attack damage by approximately 3-4%, compounding across the 1-5 bounce instances to create 15-20% total damage variance between Level 1 and Level 10.
Ultimate Wallow... Entombed Ash ranks third in priority, scaling from 300% ATK damage and 18% DEF reduction at Level 1 to 360% ATK and 23% DEF reduction at Level 10. The 5% DEF reduction improvement translates to approximately 6-7% damage increase for the entire team.
Essential Trace Unlocks
Bonus traces require unlocking before level investment. Outgrow the Old (unlocked at A4 Ascension) grants +30% Speed to allies receiving Weakness implants for 2 turns, with Fire allies gaining additional +20 Fire Toughness Reduction and +10% Max Energy regeneration capped at 50%. This transforms Firefly's energy economy, enabling consistent 3-turn Ultimate rotations instead of 4-turn cycles.
Yet Another Funeral (unlocked at A6 Ascension) provides 24% Break Effect to Dahlia with 50% of that value (12% Break Effect) granted to all allies for 1-3 turns on combat entry or healing received. This creates approximately 27.8-55.6 flat Break Effect for allies, representing 8-15% damage increase. The healing trigger enables sustain characters like Lingsha or Gallagher to refresh the buff mid-combat.
Lament Lost Soul (unlocked at A2 Ascension) recovers 1 Skill Point every 2 Follow-Up Attacks, addressing SP economy in Skill-intensive rotations. With optimized teams triggering Dahlia's Follow-Up Attack once per turn, this trace generates 1 SP every 2 turns, offsetting 50% of her Skill SP consumption.
Resource Allocation Strategy
Total Trace investment requires 3,000,000 Credits, 8 Tracks of Destiny, 18 Fiery Spirit, 69 Starfire Essence, 139 Heaven Incinerator, 41/56 Tatters of Thought, 56/71 Fragments of Impression, 58/73 Shards of Desires, and 12 Vanquished Flow's Reticence from weekly Echo of War bosses. This material investment spans approximately 4-5 weeks of daily farming with 240 Trailblaze Power regeneration.
Prioritize Skill and Talent to Level 8 first (approximately 60% of total resource cost) before investing in Ultimate. This allocation maximizes damage output during the critical first 3 turns of combat when Zone enables peak Super Break damage. Level 8 to 10 upgrades provide diminishing returns (approximately 8-10% damage increase for 40% resource cost).
Ascension traces follow A2 → A4 → A6 priority, unlocking Lament Lost Soul, Outgrow the Old, and Yet Another Funeral respectively. Each Ascension requires 65 Radiant Prominence from Stagnant Shadow: Shape of Ashes (22-33 runs at 30 Trailblaze Power each), alongside universal materials.
Breakpoint Analysis
Skill Level 8 represents the efficiency breakpoint where resource cost per damage increase begins exceeding relic farming returns. At this level, Skill damage reaches 188% ATK (94% of maximum 200% ATK at Level 10), while material costs total approximately 1,800,000 Credits and 60% of Trace materials.
Talent Level 6 creates a critical breakpoint for Follow-Up Attack bounce count, increasing from 3 bounces to 4 bounces and significantly improving AoE damage output. This breakpoint justifies rushing Talent to Level 6 immediately after unlocking. The bounce count increase provides approximately 25% damage improvement in multi-target scenarios.
Ultimate Level 4 unlocks the second DEF reduction tier, increasing from 18% to 20% DEF reduction. This 2% improvement translates to approximately 2.4% team damage increase—a minor gain justifying delayed investment.
Crushing Trailblaze Continuance Bosses: Strategy Guide
The Swarm SAM and Calamity dual boss encounter introduced in HSR 3.8 Trailblaze Continuance features 2,190,498 HP Corrupted SAM (AR-26710) alongside Calamity, a Propagation-infected Glamoth unit with 718 ATK, 115 DEF, 190 Speed, and 200 Toughness. These bosses employ Front Row/Back Row battlefield mechanics where Back Row enemies gain immunity to single-target and blast attacks, requiring AoE abilities.
Constance Dahlia's kit directly counters these mechanics through her Ultimate's AoE Wilt application and Zone's universal Super Break conversion. The strategy revolves around deploying Zone turn 1, applying Wilt via Ultimate turn 2-3, then cycling Dance Partner Follow-Up Attacks to trigger continuous Super Break damage regardless of enemy positioning. Player-tested teams achieve 52-68 second clear times using Firefly + Fugue + Dahlia + Lingsha compositions.
The HP Count mechanic represents the encounter's primary challenge—enemies reaching 0 HP enter downed state ignoring all healing effects until HP Count expires. Dahlia teams bypass this through concentrated burst damage windows, eliminating bosses during Weakness Broken states before HP Count activation.
Boss Mechanics Breakdown
Calamity summons Sting adds dealing AoE Fire damage scaling with active Sting count. Each Sting increases party-wide damage taken by 15%, stacking up to 10 times for 150% increased damage taken. Dahlia's AoE Follow-Up Attacks efficiently clear Stings before stack accumulation, preventing the damage amplification spiral.
Corrupted SAM employs a 2000% damage boost mechanic when players target Front Row while SAM occupies Back Row, punishing improper target selection. Dahlia's Ultimate and Follow-Up Attacks automatically target all enemies regardless of positioning, eliminating targeting errors.
The dual battlefield system requires AoE damage sources for efficient clearing. Dahlia's Follow-Up Attack bounces 1-5 times across all enemies, with each bounce applying Super Break damage independently. At 360% Break Effect with Iron Cavalry DEF ignore, each bounce deals approximately 8,000-12,000 damage, totaling 40,000-60,000 damage per Follow-Up Attack trigger.
Dahlia-Specific Tactics
Turn 1 Zone deployment establishes the foundation for all subsequent damage. Use Skill immediately to activate +50% Weakness Break Efficiency and Super Break conversion, ensuring Dance Partner status applies to your highest Break Effect DPS (typically Firefly at 360%+ Break Effect). The Zone's 3-turn duration aligns perfectly with typical boss phase transitions.
Turn 2-3 Ultimate timing depends on enemy Weakness types. Against Fire-weak enemies, delay Ultimate until after initial Weakness Break to maximize Wilt's DEF reduction uptime during recovery phases. Against non-Fire-weak enemies, deploy Ultimate immediately to apply Fire Weakness, enabling Firefly and other Fire allies to trigger Weakness Break.
Follow-Up Attack optimization requires coordinating Dance Partner actions. Firefly's Complete Combustion state attacks 6 times per turn (3 enhanced Basic Attacks with 2 hits each), triggering Dahlia's Follow-Up Attack once per turn due to the once-per-turn limitation. Position Firefly's turns immediately before Dahlia's to maximize Follow-Up Attack frequency.
Rotation Optimization
The optimal 3-turn rotation follows:
Turn 1: Dahlia Skill → Firefly Ultimate → Fugue Skill → Lingsha Skill (heal triggers Yet Another Funeral)
Turn 2: Firefly Enhanced Basic (6 hits trigger Dahlia Follow-Up) → Dahlia Ultimate (apply Wilt, DEF reduction, Fire Weakness) → Fugue Ultimate → Lingsha Basic
Turn 3: Firefly Enhanced Basic (second Follow-Up trigger) → Dahlia Basic (conserve SP, Zone expires) → Fugue Skill → Lingsha Skill
This rotation achieves approximately 450,000-600,000 total damage across 3 turns against 1000 DEF enemies, sufficient to eliminate Calamity and reduce Corrupted SAM to 40-50% HP. The second rotation repeats with Zone redeployment, completing the encounter within 52-68 seconds.
Team Compositions and Synergy Analysis
Firefly + Fugue + Dahlia + Lingsha represents the premium team composition, combining Fire resonance, Break Effect stacking, and sustain. Firefly serves as primary DPS with Complete Combustion state enabling 6 attacks per turn, Fugue provides additional Break Effect buffs and Weakness implants, Dahlia enables pre-break Super Break damage, and Lingsha offers healing while triggering Yet Another Funeral Break Effect refreshes.
This composition achieves approximately 520% effective Break Effect on Firefly through multiplicative stacking: 360% base Firefly Break Effect × 1.24 (Dahlia Yet Another Funeral) × 1.20 (Fugue buffs) = 536% effective Break Effect. The Zone's +50% Weakness Break Efficiency further amplifies Toughness Reduction, enabling Weakness Break in 2-3 Firefly turns instead of 4-5 turns.
F2P alternatives replace Fugue and Lingsha with Harmony Trailblazer and Gallagher, maintaining Fire resonance while sacrificing approximately 25-30% total damage output. Harmony Trailblazer provides +40% Break Effect and +20% Super Break damage, while Gallagher offers healing and Fire Weakness implant via Ultimate. This composition clears endgame content with 80-90 second clear times compared to premium team's 52-68 seconds.
Core Team Setups
Boothill + Dahlia + Bronya + Aventurine creates a Physical Break composition leveraging Boothill's Standoff mechanic. Dahlia's Zone enables Super Break damage during Standoff's enhanced state, while her Ultimate applies Physical Weakness to non-Physical-weak enemies. Bronya provides action advance, while Aventurine offers shields and debuff application.
This team achieves 68-85 second boss clear times, slightly slower than Firefly compositions due to Boothill's single-target focus. However, the team excels in Apocalyptic Shadow content where single-target damage receives bonuses, outperforming AoE-focused teams by 15-20%.
Rappa + Dahlia + Ruan Mei + Gallagher forms an Imaginary Break team converting Rappa's Imaginary damage to Break damage through Dahlia's Zone. Rappa's Sealform state attacks 10 times per Ultimate, triggering Dahlia's Follow-Up Attack once per turn while applying massive Toughness Reduction. But here's the thing—Ruan Mei's Weakness Break delay synergizes poorly with Dahlia's pre-break Super Break, creating anti-synergy that reduces this team's effectiveness by approximately 20%.
Support Character Pairings
Lingsha provides optimal sustain for Dahlia teams through Fire resonance, AoE healing triggering Yet Another Funeral refreshes, and personal Break Effect scaling enabling meaningful damage contribution. Her Ultimate's Fire Weakness implant stacks with Dahlia's, ensuring consistent Fire Weakness uptime. The healing frequency (every 2-3 turns) aligns perfectly with Yet Another Funeral's 1-3 turn duration, maintaining permanent Break Effect buff uptime.
Gallagher serves as the F2P sustain alternative, offering Fire Weakness implant via Ultimate and healing through Enhanced Basic Attacks. His Break Effect scaling enables personal damage contribution, though significantly lower than Lingsha's output. The primary disadvantage involves healing frequency—Gallagher's single-target healing pattern triggers Yet Another Funeral less consistently, creating 30-40% Break Effect buff downtime.
Fugue (releasing Phase 2, January 6-27) provides specialized Break Effect support with +60% Break Effect buffs, Weakness implants, and Exo-Toughness mechanics enabling repeated Weakness Breaks. Her kit synergizes perfectly with Dahlia's Zone, creating scenarios where enemies experience Weakness Break every 2-3 turns. This synergy increases total damage output by approximately 35-45%.
Elemental Considerations
Fire-focused teams maximize Dahlia's Outgrow the Old bonus trace, granting Fire allies +20 Fire Toughness Reduction and +10% Max Energy regeneration. In Firefly teams, this bonus enables 3-turn Ultimate rotations (130 Energy ÷ 43.33 Energy per turn = 3 turns) instead of 4-turn rotations, increasing Ultimate frequency by 33%.
Mixed-element teams sacrifice Fire-specific bonuses but gain flexibility against varied enemy Weakness profiles. Boothill (Physical) + Firefly (Fire) + Dahlia + sustain compositions cover Physical and Fire Weaknesses, ensuring at least one DPS operates at peak efficiency. Dahlia's Ultimate Weakness implant mitigates this concern by converting enemies to vulnerable states.
Mono-Fire teams (Firefly + Dahlia + Lingsha + Fire support) achieve maximum synergy with Forge of the Kalpagni Lantern's +40% Break Effect bonus, Dahlia's Fire-specific traces, and Fire resonance mechanics. These teams demonstrate 15-20% higher damage output against Fire-weak enemies compared to mixed-element alternatives.
Combat Rotation and Damage Optimization

The foundational rotation prioritizes Zone deployment turn 1 through Dahlia's Skill, establishing +50% Weakness Break Efficiency and Super Break conversion for all allies. This opening enables immediate damage contribution from Dance Partner attacks, eliminating the traditional ramp-up phase where Break teams deal minimal damage before first Weakness Break.
Turn 2-3 focuses on Ultimate deployment timing based on enemy Weakness profiles. Against Fire-weak enemies, delay Ultimate until after first Weakness Break to maximize Wilt's DEF reduction during enemy recovery phases. Against non-Fire-weak enemies, deploy Ultimate turn 2 to apply Fire Weakness immediately.
Follow-Up Attack triggers require careful Dance Partner coordination. Position your highest Break Effect DPS (Firefly, Boothill, or Rappa) to act immediately before Dahlia's turns, ensuring their attacks trigger Dahlia's Follow-Up Attack once per turn.
Skill Sequence Guide
Opening Sequence (Turns 1-3):
Dahlia Skill → Deploy Zone, establish Dance Partner
Primary DPS Ultimate → Enter enhanced state
Support Skill → Apply buffs
Sustain Skill → Heal to trigger Yet Another Funeral
Primary DPS Enhanced Attack → Trigger Dahlia Follow-Up Attack
Dahlia Ultimate → Apply Wilt, reduce DEF, implant Weaknesses
Support Ultimate → Maximize buffs during burst window
Sustain Basic → Conserve SP
Primary DPS Enhanced Attack → Second Follow-Up Attack trigger
Dahlia Basic → Conserve SP, Zone expires
Sustained Sequence (Turns 4+):
Dahlia Skill → Redeploy Zone for second burst window
Primary DPS continue enhanced attacks → Maintain Follow-Up Attack triggers
Support Skills → Refresh buffs as needed
Sustain Skills → Heal to maintain Yet Another Funeral uptime
This sequence achieves approximately 150,000-200,000 damage per turn across 3-turn burst windows, totaling 450,000-600,000 damage per Zone cycle. Two complete cycles eliminate most boss encounters within 52-90 seconds.
Energy Management
Dahlia's 130 Energy capacity requires 26 Energy per turn for 5-turn Ultimate rotations or 32.5 Energy per turn for 4-turn rotations. Her Skill generates 30 Energy, Basic Attack generates 20 Energy, and Follow-Up Attacks generate 0 Energy, creating natural 4-turn Ultimate cycles when alternating Skill and Basic Attack.
Outgrow the Old trace grants Fire allies +10% Max Energy regeneration (13 Energy for Dahlia's 130 capacity) when receiving Weakness implants, activating once per Ultimate deployment. This bonus enables 3-turn Ultimate rotations when combined with Skill spam.
Energy Regeneration Rope main stat provides +19.4% Energy regeneration at +15, translating to approximately 25.2 Energy per turn. But this investment sacrifices Break Effect Rope's damage scaling (approximately 15-18% damage loss) for marginal Ultimate frequency improvement, creating poor return on investment.
Burst Window Timing
The 3-turn Zone duration defines burst windows where team damage peaks. Coordinate all major buffs and debuffs within this window: Fugue Ultimate, sustain healing for Yet Another Funeral refresh, and primary DPS enhanced states. Delaying buffs until turn 2 of Zone wastes 33% of buff uptime, reducing total damage by 15-20%.
Weakness Break timing within Zone duration maximizes Super Break damage. Ideally, trigger first Weakness Break turn 2 of Zone, allowing turn 3 to deal Super Break damage against Weakness Broken enemies while Zone remains active.
Ultimate Wilt duration (4 turns) extends beyond Zone duration (3 turns), creating a 1-turn overlap where Wilt's DEF reduction persists without Zone's Super Break conversion. This overlap enables sustained damage during Zone downtime, maintaining 70-80% of peak damage output during turns 4-5 before Zone redeployment.
Common Mistakes and Build Misconceptions
Building Energy Regeneration Rope instead of Break Effect Rope represents the most frequent optimization error, sacrificing 64.8% Break Effect (approximately 15-18% total damage) for marginal Ultimate frequency improvement. The 4-turn to 3-turn Ultimate cycle improvement provides approximately 8-10% damage increase, creating negative return on investment.
Pairing Dahlia with Ruan Mei creates anti-synergy through Weakness Break delay mechanics. Ruan Mei's Ultimate delays enemy Weakness Break recovery by 1 turn, extending Weakness Broken duration but preventing Toughness regeneration. Dahlia's Zone converts Toughness Reduction to Super Break damage specifically against non-broken enemies, making Ruan Mei's delay counterproductive. This pairing reduces Dahlia's effectiveness by approximately 20-25%.
Excessive Speed investment (170+ Speed) causes premature Zone expiration and Skill Point starvation. At 170 Speed, Dahlia takes 4 turns within Zone's 3-turn duration (Zone duration decreases by 1 each time Dahlia acts), causing Zone to expire before allies complete burst rotations. The optimal Speed range (145-160) balances turn frequency with Zone uptime.
Stat Priority Errors
Investing in CRIT Rate or CRIT DMG substats provides zero value for Break-focused builds, as Break damage calculations ignore CRIT mechanics entirely. Each CRIT Rate or CRIT DMG substat roll represents approximately 5.8% Break Effect or 2 Speed lost, translating to 3-5% damage reduction per wasted roll.
Neglecting ATK% substats after satisfying Break Effect requirements limits damage scaling. While Break Effect takes priority, ATK% provides linear damage scaling since Break damage formulas incorporate base ATK × (1 + ATK%) calculations. At 360% Break Effect with remaining substat rolls, prioritizing ATK% over DEF% or HP% increases damage output by approximately 8-12%.
Undervaluing Speed substats below 145 threshold sacrifices Talia: Kingdom of Banditry's maximum Break Effect bonus and creates turn order issues where Dahlia acts after primary DPS, missing Follow-Up Attack triggers. Builds below 134 Speed experience 15-20% damage loss from mistimed rotations.
Team Comp Pitfalls
Using single-target sustain characters like Luocha or Bailu in AoE-heavy content reduces Yet Another Funeral trigger frequency, creating 40-50% Break Effect buff downtime. These sustain characters heal one ally per turn, requiring 4 turns to heal full team compared to Lingsha's instant AoE healing. The reduced trigger frequency translates to approximately 12% average Break Effect loss, reducing team damage by 8-10%.
Fielding multiple Nihility characters (Dahlia + Silver Wolf + Pela) creates Skill Point starvation where team SP consumption exceeds generation. Dahlia requires 1 SP every 2 turns, Silver Wolf requires 1 SP per turn, and Pela requires 1 SP every 2-3 turns. This 2.5-3 SP consumption per turn exceeds the 1.5 SP generation from 4-character teams, causing rotation collapse after 4-5 turns.
Ignoring elemental coverage in mixed-enemy content reduces damage output during pre-Ultimate turns before Weakness implant application. Pure Fire teams deal 50% reduced damage against Fire-resistant enemies during turns 1-2, losing approximately 100,000-150,000 total damage before Ultimate deployment.
Resource Waste Prevention
Leveling Basic Attack traces beyond Level 4 wastes resources on minimal damage improvement. Basic Attack sees usage primarily for SP conservation during Zone downtime, contributing less than 5% of total damage output. The resource investment (approximately 400,000 Credits and 20% of Trace materials) for Levels 5-10 provides 0.5-1% total damage increase.
Crafting Iron Cavalry pieces with incorrect main stats (DEF% Body, ATK% Feet, HP% Rope) through Omni-Synthesizer wastes Self-Modeling Resin. Each Self-Modeling Resin requires converting 3 unwanted 5-star relics, representing approximately 120 Trailblaze Power investment.
Pulling for Eidolons before securing signature Light Cone reduces account power more than reverse investment order. E1 provides approximately 15% damage increase for 90 pulls (14,400 Stellar Jade), while signature Light Cone provides 35-40% damage increase for identical 90 pulls. The E0S1 state outperforms E1S0 by approximately 20-25% total damage.
Performance Benchmarks and Testing Results
Player-tested Firefly + Fugue + Dahlia + Lingsha teams achieve 52-68 second clear times against Trailblaze Continuance's Swarm SAM and Calamity dual boss encounter (combined 2,190,498+ HP). These clear times represent top 5% performance requiring E0S1 Dahlia with optimized Iron Cavalry relics (360%+ Break Effect, 145+ Speed) and similar investment levels on Firefly. F2P variants using Harmony Trailblazer and Gallagher achieve 80-95 second clears.
Memory of Chaos Floor 12 testing demonstrates E0 Dahlia teams achieving full 3-star clears with 68-85 second average clear times per chamber. The HP Count mechanic introduced in 3.8 favors burst damage compositions, where Dahlia's Zone-enabled Super Break damage eliminates enemies before HP Count expiration.
Apocalyptic Shadow performance varies based on blessing selection, with Break Effect-focused blessings enabling 90,000-120,000 point scores using Dahlia teams. The mode's single-target damage bonuses favor Boothill + Dahlia compositions over Firefly + Dahlia, creating approximately 15% score improvement when blessings align with Physical damage.
DPS Comparisons
E0S1 Dahlia with optimized relics contributes approximately 80,000-120,000 personal damage per 3-turn rotation through Follow-Up Attacks and Zone deployment damage. This personal contribution represents 15-20% of total team damage in Firefly compositions, with remaining 80-85% coming from Firefly's Super Break damage amplified by Dahlia's Zone.
Comparative testing against Ruan Mei in identical team compositions shows Dahlia teams dealing 35-45% more total damage in Break-focused scenarios. The advantage stems from eliminating Firefly's downtime between Weakness Break cycles—Ruan Mei teams experience 2-3 turns of minimal damage while waiting for Toughness regeneration, while Dahlia teams maintain consistent Super Break damage throughout all combat phases.
Against traditional CRIT-focused DPS teams (Acheron, Jingliu, Seele), Dahlia Break teams demonstrate 20-30% faster clear times in current 3.8 endgame content optimized for Break mechanics. However, this advantage reverses in content favoring CRIT damage, where CRIT teams outperform by 15-25%.
Clear Time Analysis
The 52-68 second clear time range for premium Dahlia teams breaks down into distinct phases:
Turns 1-3 (18-24 seconds): Zone deployment, buff application, first Weakness Break cycle dealing 450,000-600,000 damage
Turns 4-6 (18-24 seconds): Zone redeployment, second Weakness Break cycle dealing 500,000-700,000 damage
Turns 7-9 (16-20 seconds): Cleanup phase, residual Super Break damage eliminating remaining HP
The acceleration in turns 7-9 stems from accumulated debuffs (Wilt DEF reduction, Fugue Break Effect buffs) reaching maximum stacks, increasing damage per turn by approximately 25-30% compared to opening turns.
F2P team clear times (80-95 seconds) extend primarily during turns 1-3 where missing Fugue's Break Effect buffs reduces initial burst damage by 30-35%. The gap narrows in turns 4-6 as Harmony Trailblazer's buffs accumulate, reducing damage differential to 20-25%.
Investment ROI
E0S0 Dahlia (free-to-play acquisition through saved Stellar Jades) provides baseline functionality enabling Break team compositions, representing 100% baseline performance. E0S1 (signature Light Cone acquisition) increases performance to approximately 135-140% baseline for 14,400 Stellar Jade investment (90 pulls at 160 Jade per pull), creating 0.24-0.28% performance increase per 100 Stellar Jade spent—the highest ROI upgrade path.
E2S1 (Eidolon 2 + signature Light Cone) reaches approximately 165-175% baseline performance for 28,800 Stellar Jade total investment (180 pulls), creating 0.23-0.26% performance per 100 Jade—slightly lower ROI than E0S1 but still efficient. The E2 Eidolon adds +20% All-Type RES penetration on Wilt, translating to approximately 18-22% team damage increase.
E6S5 (maximum investment) achieves approximately 240-260% baseline performance for 100,800+ Stellar Jade investment (630+ pulls), creating 0.14-0.16% performance per 100 Jade—significantly diminished returns.
Frequently Asked Questions
What are the best relic sets for Constance Dahlia E0 in HSR 3.8?
Iron Cavalry Against the Scourge 4-piece with Forge of the Kalpagni Lantern 2-piece planar ornament. Target ATK% Body, Speed Feet, Fire DMG% Sphere, and Break Effect Rope with Break Effect and Speed substats prioritized. This achieves 360%+ Break Effect with 145+ Speed.
How do you beat Trailblaze Continuance bosses with Constance Dahlia?
Deploy Zone turn 1 via Skill, apply Wilt and Weakness implants turn 2-3 via Ultimate, then cycle Dance Partner attacks to trigger Follow-Up Attacks. Use AoE abilities to damage Back Row enemies. Coordinate burst windows within Zone's 3-turn duration, achieving 52-68 second clears with optimized Firefly teams or 80-95 seconds with F2P alternatives.
Is Constance Dahlia good at E0 without eidolons?
Yes, E0 Dahlia provides full core functionality including Zone deployment, Super Break conversion, and Dance Partner mechanics. E0S1 (with signature Light Cone) achieves 90-95% of maximum potential performance, making Eidolons optional luxury upgrades. F2P players achieve endgame content clears using E0S0 builds with 4-star Light Cones.
What light cone should I use for Constance Dahlia E0?
Never Forget Her Flame (signature 5-star) provides optimal performance with +60-120% Break Effect and SP recovery mechanics. F2P alternatives include Good Night and Sleep Well (4-star) offering +24-48% Break Effect and debuff damage bonuses at S1-S5, achieving approximately 70-75% of signature Light Cone performance at zero Stellar Jade cost.
What team compositions work best with Constance Dahlia?
Firefly + Fugue + Dahlia + Lingsha represents the premium composition, achieving 52-68 second boss clears. F2P alternatives use Firefly + Harmony Trailblazer + Dahlia + Gallagher, extending clear times to 80-95 seconds while maintaining full endgame viability. Boothill-focused teams substitute Firefly for Physical Break damage.
How do you use Constance Dahlia's combat rotation effectively?
Turn 1 deploy Zone via Skill, turns 2-3 apply Ultimate for Wilt and Weakness implants, then alternate Skills and Basic Attacks to maintain Zone uptime while conserving SP. Position highest Break Effect DPS to act before Dahlia each turn, triggering Follow-Up Attacks once per turn. Coordinate team buffs within Zone's 3-turn duration for maximum burst damage, achieving 450,000-600,000 damage per rotation cycle.
Power up your Constance Dahlia with stellar jades from BitTopup - get instant delivery, secure transactions, and the best rates for HSR top-ups! Our platform offers 24/7 customer service, competitive pricing, and fast delivery to ensure you never miss limited banners.