

Quick Answer: Taser teams aren't going anywhere in 2025 – they're still delivering consistent AoE damage through Electro-Charged reactions. Your bread-and-butter compositions include Fischl-Beidou-Xingqiu-Sucrose for budget players, Kokomi variants when you need that extra comfort, and the exciting new Lunar-Charged teams featuring characters like Ineffa and Ororon. Build-wise? Focus on 500-1000 EM for your drivers and stack Energy Recharge on burst-dependent units.
Understanding Electro-Charged Teams in 2025 Meta
Reaction Mechanics Overview
Here's what makes Electro-Charged special: it applies both Hydro and Electro simultaneously, dealing Electro damage over time while keeping both auras active. This creates those satisfying Double Swirl moments that make Anemo supports shine. The reaction damage? It scales purely off your trigger character's level and Elemental Mastery – no exceptions.
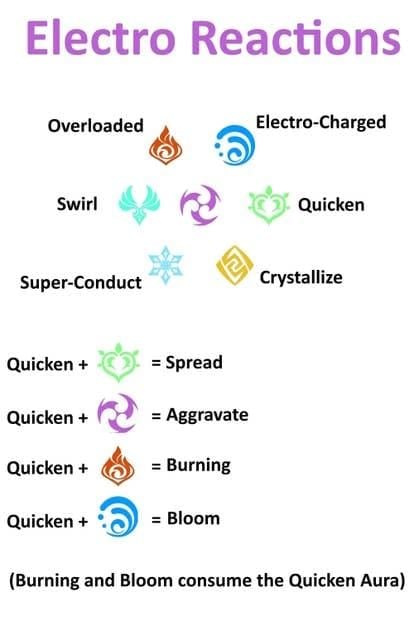
But here's where it gets interesting. EC actually arcs between Hydro-affected enemies, creating secondary damage and those crucial stagger effects for crowd control. Pretty neat, right?
The 2025 meta throws us a curveball with the new Lunar-Charged reaction. This triggers when standard Electro-Charged occurs with Ineffa in your party. Unlike traditional EC, Lunar-Charged can actually crit and scales with combined stats from your entire team rather than just the trigger character. Game-changer? Absolutely.
Why Taser Teams Still Hit Different
Look, I've been covering team compositions for years, and Taser teams just work. They deliver consistent damage regardless of enemy resistances, plus they pack serious defensive utility. Beidou and Xingqiu together? You're looking at up to 73% damage reduction at Talent Level 9. That's not just good – that's facetank everything territory.
The beauty of classic teams lies in their accessibility. We're talking primarily 4-star characters here, folks. Minimal constellation investment, competitive damage output. What's not to love?
Energy management becomes this beautiful dance where Fischl batteries your energy-hungry Beidou while Xingqiu keeps those burst rotations smooth across multiple cycles.
Current Meta Position
Taser teams sit comfortably in A-tier territory, absolutely dominating multi-target scenarios with 35,000-45,000 DPS under optimal conditions. The main weakness? Cryo-shielded enemies, since you're typically running without Pyro characters. But that's where flexible Soup adaptations come in – you can always incorporate Pyro when the situation demands it.
Top Taser Team Cores and Compositions
Fischl-Beidou Core
Fischl's Oz is your reliable workhorse – consistent single-target Electro application with excellent energy generation. Her A4 passive triggers additional damage on every Electro-related reaction, and with C6? Oz's extended field time becomes absolutely ridiculous.
Beidou shines in those sweet 2-3 enemy scenarios where Stormbreaker chains between targets. C2 constellation adds two additional chain targets, which translates to roughly 50% more damage. Not bad for a 4-star constellation.
Build-wise, you're looking at 4-piece Golden Troupe for Fischl (ATK%/Electro DMG/Crit) and 4-piece Emblem for Beidou. Energy requirements range from 140% ER with battery support up to 200% if you're running solo Electro.
Kokomi Taser Variants
Kokomi's the ultimate multitasker – driver and healer rolled into one elegant package. Her Elemental Skill provides consistent AoE Hydro application plus healing, while her Burst transforms her into an on-field driver with enhanced Normal Attack damage.
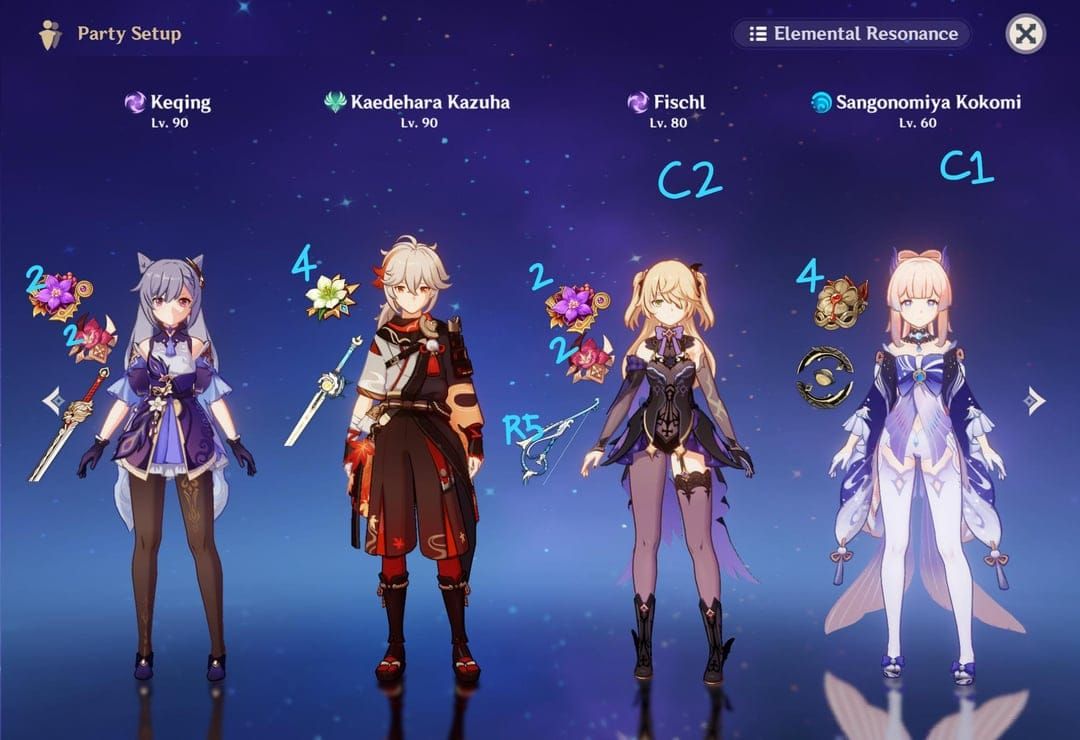
The Kokomi-Fischl-Beidou-Kazuha composition? Chef's kiss – premium gameplay with Double Swirl capabilities and serious damage amplification.
Build priorities focus on HP% scaling with Ocean-Hued Clam artifacts or Tenacity for team ATK buffs. That negative Crit Rate passive actually works in your favor here – no need to worry about Crit substats at all.
Childe International Taser
Tartaglia brings rapid Hydro application and substantial personal damage to the table. His melee stance Normal Attacks apply Hydro faster than any alternative, enabling those consistent EC triggers. Those 6-second melee rotations align perfectly with support ability durations.
Fair warning: this requires practice due to stance cooldown mechanics. But master it? The damage output is exceptional.
Budget F2P Options
Sucrose-Fischl-Beidou-Xingqiu remains the gold standard for accessible gameplay. Entirely 4-star team delivering competitive performance with minimal investment. Sucrose serves as your on-field driver with full EM builds on 4-piece VV. Master the N2 Walk Cancel technique and you'll achieve 12 Beidou lightning strikes per rotation.

Investment priorities are straightforward: character levels (90 for Sucrose), essential talents (Burst levels), and basic artifact sets with correct main stats.
For players managing their Genesis Crystal pull budget, BitTopup provides cost-effective top-up solutions with instant delivery and secure transactions, helping maximize primogem efficiency through competitive exchange rates. (Editor's note: resource management becomes crucial when you're building multiple characters simultaneously.)
Optimal Rotations and Combos
Standard Rotation Patterns
Effective rotations follow a simple pattern: setup → buff application → driver phase → energy regeneration. For classic Sucrose Taser, that's Fischl E → Beidou Q → Xingqiu Q+E → Sucrose driving phase.
Timing precision matters here. Beidou's 15s Burst aligns with Xingqiu's 18s Rain Swords, while Fischl's Oz provides 10-12s of Electro application. Everything clicks together when you nail the timing.
The N2 Walk Cancel technique involves two Normal Attacks plus brief movement to cancel animation recovery. This achieves 12 Beidou procs versus 10 from standard combos – that's a 20% damage increase right there.
Energy Management
ER requirements break down like this: Beidou needs 140-160% with Fischl battery (180-200% solo), Xingqiu wants 180-200% (reducible with Sacrificial Sword). Fischl's Oz generates 0.6 Electro particles per second, while Beidou's perfect counter generates 4 particles.
Funnel techniques involve switching to energy-hungry characters during particle windows. It's all about timing.
Common Rotation Mistakes
Premature driver switching cuts your damage windows before buff expiration. Energy waste from using Bursts at full energy without considering particle timing. Buff desynchronization wastes those precious resistance reduction effects.
Trust me, I've seen these mistakes countless times in gameplay footage.
Elemental Mastery Optimization Guide
EM Distribution Strategy
The EM scaling formula: ((6 EM) / (EM + 2000)) 100%. At 500 EM, you're getting 96% damage bonus. Push to 1000 EM and you reach 162%. Efficiency flattens beyond 1000 EM, so don't go overboard.
Character level scaling provides 34% damage increase from 80 to 90, making level 90 high priority for reaction-focused characters. No shortcuts here.
Stat Priority by Character
Sucrose: 800-1000 EM, 120-140% ER, EM/EM/EM main stats, 4pc VV
Fischl: ATK% > Crit > EM > ER, 4pc Golden Troupe, target 60-70% Crit Rate
Beidou: ER first (140-200%), then ATK%/Electro DMG/Crit, 4pc Emblem
Xingqiu: 180-200% ER priority, then ATK%/Hydro DMG/Crit
Character Builds and Artifacts
Electro DPS Builds
Fischl's optimal setup: 4pc Golden Troupe with ATK%/Electro DMG/Crit. Weapon-wise, Polar Star's premium choice, Stringless offers excellent 4-star value, and Alley Hunter works great for off-field duty.
Beidou runs 4pc Emblem with ER or ATK% Sands depending on substats. C2 Beidou should be your priority for that additional chain target.
Hydro Enabler Builds
Xingqiu wants 4pc Emblem, balancing 180-200% ER with personal damage. Sacrificial Sword remains best-in-slot for energy generation. Kokomi runs Ocean-Hued Clam for healing damage or Tenacity for team buffs, with HP%/HP%/Healing Bonus main stats.
Anemo Support Optimization
Sucrose needs 4pc VV with EM/EM/EM – and level 90 is crucial for reaction scaling. Weapons include Sacrificial Fragments (skill reset plus EM) or Thrilling Tales (team ATK buff). Talent priorities: Burst > Skill, with Normal Attacks staying low priority unless you're driving.
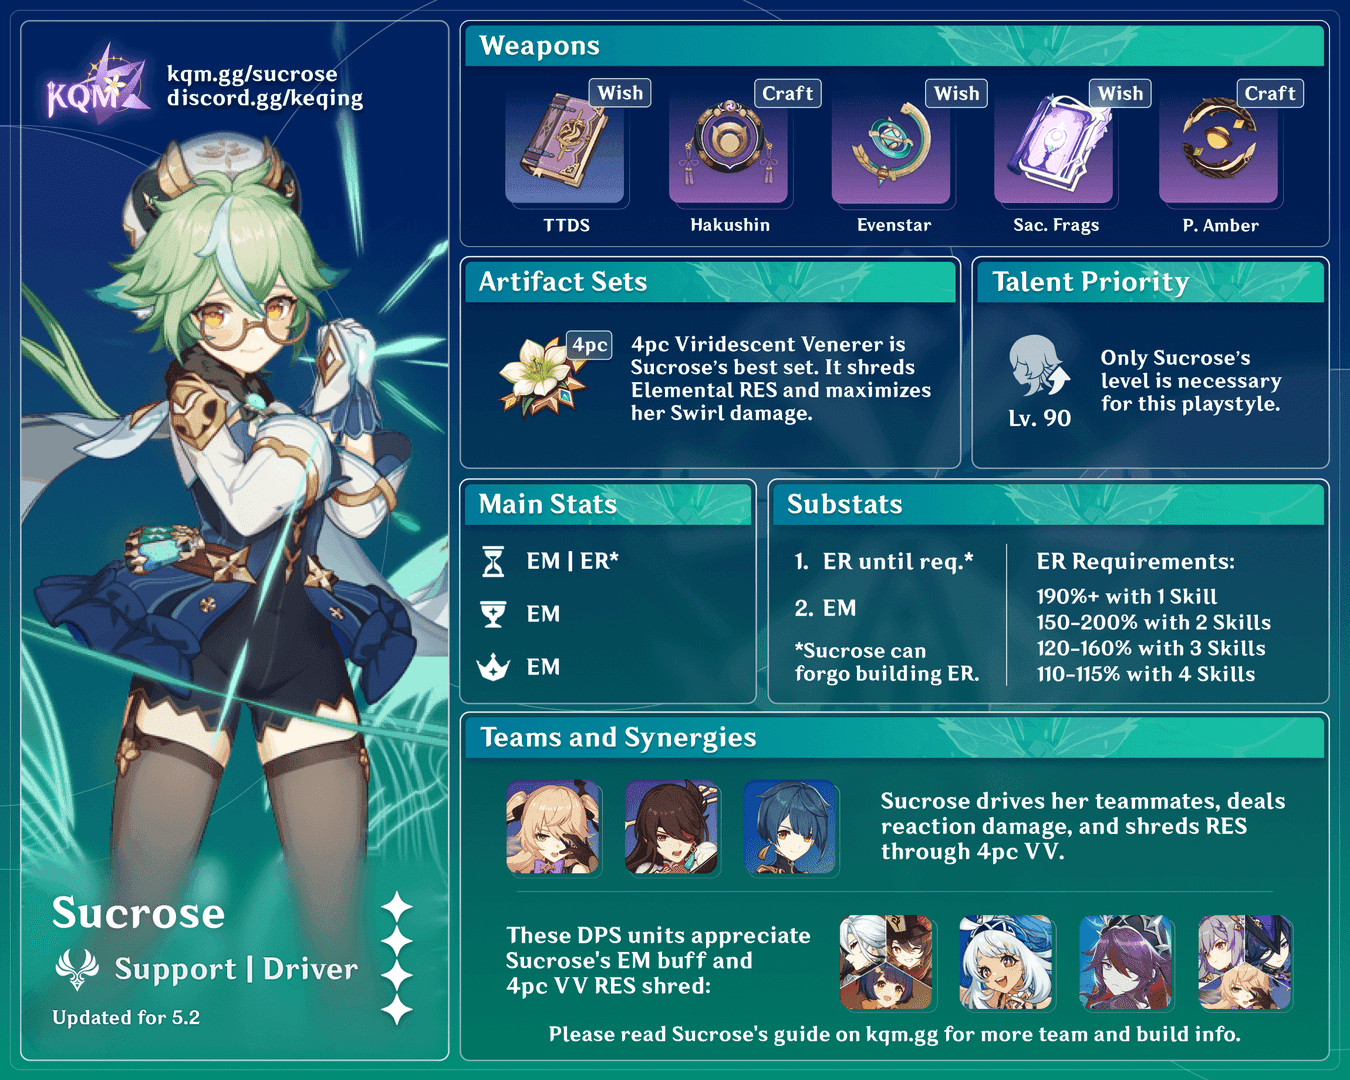
Investment Priority and Resource Planning
Character Leveling Order
Level 90 Sucrose first – that 34% reaction damage increase from 80→90 is massive
Fischl/Beidou to 80/90 for personal damage
Xingqiu starts at 70/80, eventually push to 80/90
Talent priorities follow Burst > Skill > Normal Attack. C2 Beidou offers the highest value constellation with roughly 50% damage increase in multi-target scenarios. C6 Fischl? That's a substantial upgrade worth pursuing.
Constellation Value Analysis
C2 Beidou: Highest priority, ~50% damage increase multi-target
C6 Fischl: Premium DPS transformation through extended Oz plus coordinated attacks
Xingqiu C2/C6: Incremental improvements, not essential
Sucrose: Utility improvements rather than raw damage
Spiral Abyss Strategies
Floor-Specific Adaptations
Floor 12's multi-enemy chambers absolutely favor Beidou chains and EC arcing. Single-target encounters might require modifications. Current DPS requirements sit around 35,000-40,000 team DPS for comfortable clears.
Electro-immune enemies? You'll need alternative strategies.
Enemy Matchups
Heavy enemies resist EC stagger effects, requiring careful positioning. Highly mobile enemies disrupt chain lightning effectiveness. Elemental shields – especially Cryo – present your primary weakness, requiring Pyro application or team swaps.
Advanced Optimization Techniques
Animation Canceling
N2 Walk Cancel: two Normal Attacks plus movement cancel, achieving 12 Beidou procs versus 10 standard. Jump canceling offers an alternative with different timing. Dash canceling's fastest but consumes stamina.
Energy Funneling
Particle timing optimization means switching to energy-hungry characters during generation windows. Catching Fischl particles on Beidou maximizes same-element transfer efficiency. Pre-funneling generates particles before expensive abilities.
Future Updates and Team Evolution
Upcoming Character Synergies
Ineffa (Version 5.8, August 2025) introduces that Lunar-Charged reaction dealing Critical Damage, scaling with combined party stats. The damage formula: A1 + (A2/2) + (A3/12) + (A4/12) where A1-A4 represent ranked character damage potentials.
Ororon (4-star Electro bow) provides dedicated AoE support for EC teams. Ifa represents next-generation Anemo driver with specialized EC synergies.
Honestly? I'm excited to see how these shake up the meta.
Adaptation Strategies
Your current investments remain valuable as foundations. EM builds become more valuable with Lunar-Charged scaling. Energy management skills transfer to future compositions. Flexible team building enables integration of new characters.
FAQ
What are minimum investment requirements for competitive Taser teams? Level 80/90 characters, level 6-8 key talents, 4-piece artifact sets with correct main stats. You're looking at approximately 2-3 months resin investment, with C2 Beidou being the most impactful upgrade.
How do Taser teams compare to Vaporize/Melt damage output? 35,000-45,000 DPS versus 50,000+ for premium Vaporize teams, but you get superior survivability and easier execution. They absolutely excel in multi-target scenarios.
Which Anemo character provides best Taser driver performance? Sucrose remains the optimal F2P choice thanks to EM sharing and catalyst Normal Attacks. Kazuha delivers higher personal damage but lacks EM sharing. Upcoming Ifa might surpass both – we'll see.
How does Lunar-Charged change building strategies? It requires building offensive stats across all Hydro/Electro members rather than EM focus on a single trigger character. Balanced team investment becomes more valuable.
What Energy Recharge targets for each member? Beidou: 140-160% with battery (180-200% solo). Xingqiu: 180-200% (reducible with Sacrificial Sword). Sucrose: 120-140%. Fischl: 100-120%.
Are Taser teams viable for current Spiral Abyss? Highly viable, especially in multi-enemy chambers. Primary weakness remains Cryo shields, but that's addressable through modifications. Lunar-Charged mechanics suggest continued viability throughout 2025.