

Master November 2025 Spiral Abyss with Bloom and Lunar-Bloom strategies. Covers team compositions, builds, floor tactics, and rotations for 36 stars using 200% Bloom damage buffs and Nod-Krai advantages.
November 2025 Spiral Abyss Overview & Meta Analysis
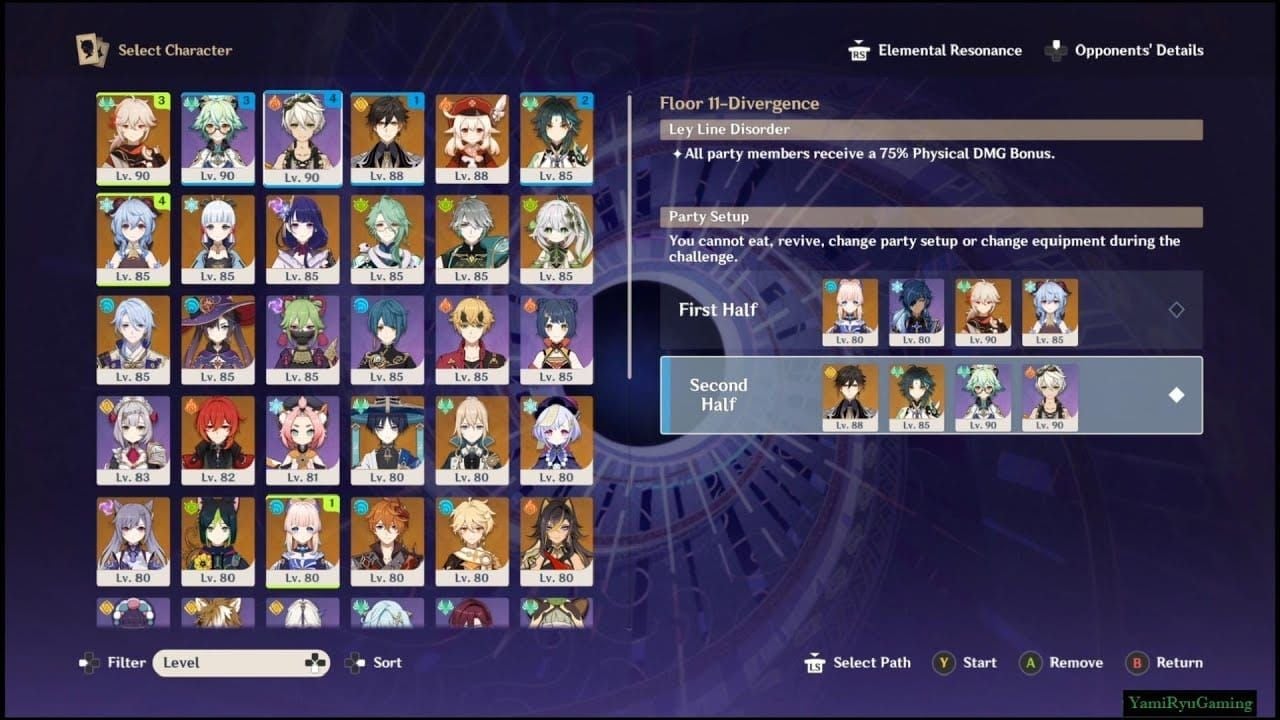
Alright, let's talk about November 2025's rotation (went live 2025/11/16 04:00) – and honestly? It's a Bloom player's dream come true. The Ley Line Disorders and Lunar-Bloom mechanics are basically handing us free damage on a silver platter.
Enemy Lineup Breakdown
Floor 11 throws Level 88-92 enemies at you with some pretty generous 60% Electro/Dendro damage bonuses. The Radiant Lunapod in Chamber 1 really wants those Lunar-Charged teams for optimal clears – trust me on this one. Then there's the Thundering Wayob Manifestation in Chamber 2, which is... well, it's annoying. Constantly draining your party's energy through Bond of Life effects while absorbing elements like it's going out of style.
Floor 12 is where things get serious. Level 95-100 enemies with absolutely massive HP pools that'll make you question your life choices. That Battle-Scarred Rock Crab in Chamber 3? 4,409,072 HP. Yeah, you read that right. But here's the kicker – it spawns Hermit Seeds that you can convert through Bloom for 500% damage per seed (capped at 1,500,000 damage, but still). The Primordial Bathysmal Vishap is equally obnoxious, gaining +80% Hydro RES after 30 seconds while draining 10 Energy every half second.
Buy Genshin Impact Crystal top up through BitTopup's secure platform for competitive rates and instant delivery to enhance character builds for these encounters.
Bloom Buff Mechanics
Floor 12's First Half is where the magic happens: 200% Bloom damage and 75% Lunar-Bloom damage bonuses. The Blessing of Abyssal Moon triggers True DMG shockwaves on Dendro reactions every 3 seconds – and yes, this applies to all Bloom variants including Hyperbloom and Nilou's Bountiful Cores.
Lunar-Bloom Advantages
You'll need Lauma in your party for this, but the payoff is incredible. Enhanced cores ignore DEF scaling entirely, use CRIT Rate/DMG multipliers, detonate faster (1.2s vs the usual 2s), and have expanded AoE (3.5m vs 2m).
The real game-changer? Moonsign: Ascendant Gleam – triggered by Nod-Krai characters – provides a whopping 90% HP reduction against Grief-Stricken enemies. Those Wilderness Hunters go from an intimidating 4,788,717 HP to something actually manageable.
Essential Bloom Team Compositions for 36-Star Clear
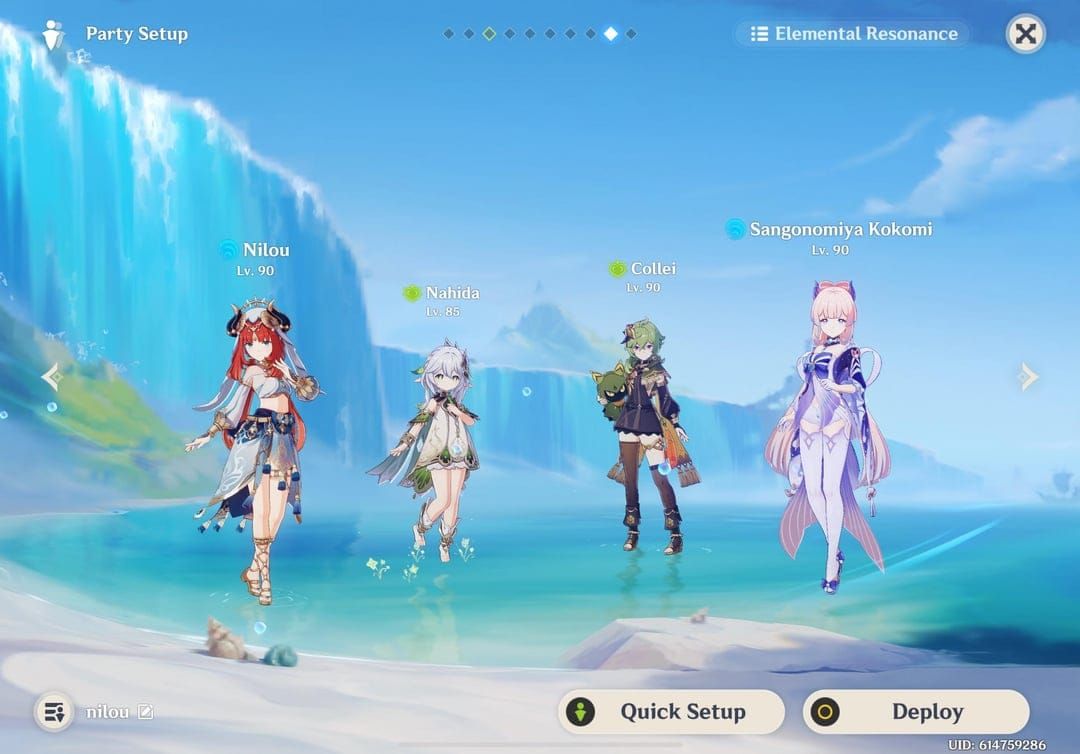
Nilou Bloom Teams
The gold standard here is Nilou + Nahida + Kokomi + Collei. Nilou's triple Skill activation creates multiple cores while Nahida provides that sweet 25-second Dendro application. Kokomi's your Hydro driver and healer – absolutely essential for surviving the Vishap's energy drain. Collei's talent extends reaction zones by +1 second per reaction (maxing out at 3 seconds).
Budget alternative that actually works? Nilou + Yaoyao + Barbara + Dendro Traveler. I've seen this achieve consistent 3-star clears on Floors 9-11 with proper 180%+ Energy Recharge and 200+ Elemental Mastery investment.
Hyperbloom Alternatives
For optimal performance: Nahida + Yelan + Kuki Shinobu + Kazuha. Kuki triggers Hyperbloom at 800+ Elemental Mastery while keeping everyone alive. The rotation's pretty straightforward: Nahida Skill → Yelan Burst → Kuki Skill for those satisfying 3-second core detonation cycles. Kazuha provides EM sharing and crowd control – what's not to love?
F2P players, don't despair. Dendro Traveler + Xingqiu + Kuki Shinobu + Fischl can achieve 8:30+ clears with that 200% Bloom bonus. You'll need level 90 characters with 1/8/8 supports, 8/8/8 DPS, and Emblem artifacts, but it's absolutely doable.
Budget-Friendly Options
Collei + Yaoyao + Kuki Shinobu + Barbara uses entirely free or early-game characters. Yaoyao provides +30 EM through Dendro Resonance plus healing. Requires 180%+ ER on Burst units, 200+ EM on triggers, and Flower of Paradise Lost sets. Achieves consistent 3-star Floors 9-11 with tight 20-second rotations.
Character Builds & Artifact Optimization
DPS Build Requirements
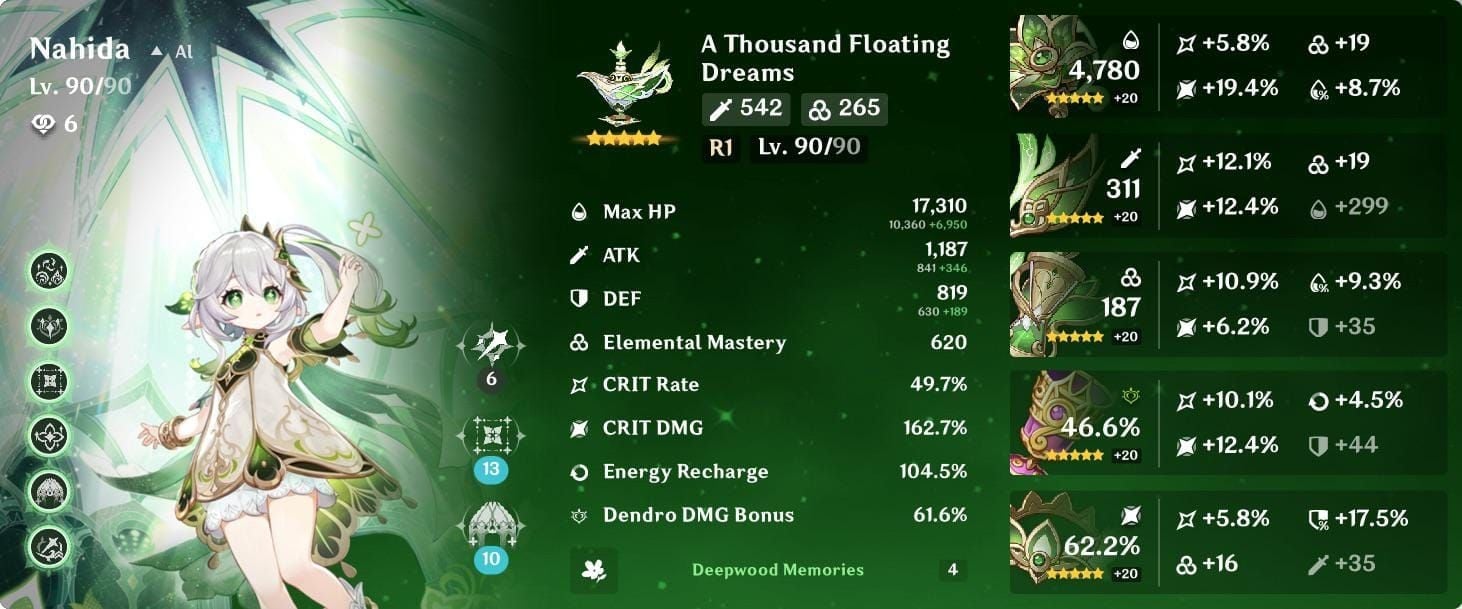
Nahida needs 60-80% CRIT Rate, 160-200% CRIT DMG, and 180%+ ER. Her signature weapon's obviously ideal, but high-refinement Sacrificial Fragments works for extended Skill duration.
Nilou wants 40,000+ HP with EM substats and 150-180% ER. Key of Khaj-Nisut's optimal, Iron Sting's your budget alternative.
Kuki Shinobu for Hyperbloom? 800+ EM with Flower of Paradise Lost 4-piece (+80 EM, +60% Bloom DMG). Freedom-Sworn amplifies team EM if you've got it.
Support Character Builds
Kokomi needs 180% ER with Ocean-Hued Clam 4-piece. HP% main stats maximize healing, though you can run Hydro DMG Goblet if you want some damage.
Kazuha's all about that Viridescent Venerer 4-piece for -40% Elemental RES reduction. 800+ EM with Iron Sting or Freedom-Sworn, prioritizing EM main stats over CRIT.
Baizhu's interesting – HP scaling adds 0.7% Lunar-Bloom DMG per 1,000 Max HP (capped at 50%). His Hold Skill provides Dendro RES shred too.
Elemental Mastery Thresholds
Bloom scaling has clear breakpoints at 200, 400, 600, and 800 EM with diminishing returns beyond 1,000. Dendro Resonance gives +50 EM party-wide. Flower of Paradise Lost and Gilded Dreams 4-piece effects significantly outweigh any 2-piece combinations.
Floor 9-10 Clearing Strategies
Floor 9 Chamber Analysis
This is your entry-level Bloom optimization with manageable HP pools. Chamber 1 requires AoE damage for grouped enemies – and Bloom's area damage absolutely excels through Bountiful Core chains. Position for maximum core overlap using Anemo grouping before detonation. Maintain 180%+ ER with Favonius weapons for those crucial 20-second rotation cycles.
Floor 10 Optimization
Here's where things get interesting with elemental shields and increased aggression. Hydro shields require Dendro damage – Bloom teams are naturally advantaged here. Chamber 2's Electro Hypostasis needs sustained single-target during vulnerability phases – Hyperbloom excels with Kuki's rapid Skill cooldown. Use dash/jump cancels for positioning while maintaining your rotations.
Star Requirement Breakdown
Three-star thresholds: Chamber 1 >300s, Chamber 2 >180s, Chamber 3 >60s.
Here's the 80/20 rule I live by: 80% of your success comes from proper rotations and energy management, 20% from raw investment. Prioritize Talents 8/8/8 for DPS, 1/8/8 for supports. Practice those 20-second loops before attempting optimization.
Floor 11 Advanced Tactics
Chamber 1 Strategy
The Radiant Lunapod demands immediate aggression with those 60% Electro/Dendro bonuses. Lunar-Charged teams (Neuvillette + Ineffa + Furina + Xilonen) achieve the fastest clears. Budget option? Fischl + Ororon + Xingqiu + Sucrose works surprisingly well.
Second Half strategy: prioritize Hailstorm Canoneers first, then systematically take down Vanguard and Trooper units.
Chamber 2 Approach
That Thundering Wayob drains energy through Bond of Life while absorbing elements – it's as frustrating as it sounds. Burst before absorption phases in those 30-second windows. Healing's essential for Bond of Life clearing, making Kokomi or Baizhu mandatory. Break infusions with Normal/Charged Attacks.
Second Half tip: Nod-Krai characters trigger that beautiful 90% HP reduction during Grief-Stricken windows.
Time Management Tips
Getting >300s requires optimized 20-second loops: Dendro application → Hydro setup → triggers → Burst coordination. Don't over-swap – it bleeds ER efficiency. Purchase Primogems for Spiral Abyss runs via BitTopup for character constellations and weapon refinements. Emergency recovery through Favonius funneling and strategic healing timing can save runs.
Floor 12 Mastery Guide
Chamber 1 Boss Strategy
Sequential bosses require sustained damage output. The Tainted Water-Splitting Phantasm (851,787 HP) needs immediate burst damage. The Radiant Antelope (1,873,932 HP) has this interesting mechanic where fully healing triggers Entwined State: +15% CRIT Rate and +50% DMG for 15 seconds – it actually rewards aggressive healing strategies.
Sigurd (1,609,878 HP) requires aerial juggling with Electro-Charged during airborne phases. Timing's everything here.
Chamber 2 DPS Check
The Primordial Bathysmal Vishap (2,085,774 HP) gains +80% Hydro RES after 30 seconds and drains 10 Energy every 0.5 seconds. Breaking its armor requires 16U Dendro through Bloom reactions – position cores near the boss before detonation.
Those Wilderness Hunters (2,008,523 HP each) absolutely require Ascendant Gleam for manageable damage requirements.
Perfect Rotation Timing
Stick to 20-second cycles: Dendro application → Hydro setup → core generation → triggers → Burst coordination. 180%+ ER with Favonius weapons is essential. Raiden provides 20% party energy restoration if you're running her. Always snapshot buffs before DPS swaps for maximum scaling.
Skill Rotations & Energy Management
Optimal Skill Sequences
Foundation rotation: Nahida Skill (25s Dendro) → Kokomi Burst (10s) or Yelan Burst (15s) → core maintenance → detonation.
Premium Lunar-Bloom: Lauma Hold Skill → Nilou triple Skill → Aino Hydro → Baizhu Burst.
Hyperbloom: Nahida Skill → Yelan Burst → Kuki Skill → Kazuha EM sharing.
Energy Funneling Techniques
Target thresholds: 180% ER for Burst-dependent DPS, 160% for supports with particle generation, 200% without abilities. Raiden integration provides 20% party restoration plus Hyperbloom triggers.
Battery pairings that work: Dendro Traveler for Nahida, Prototype Amber Kokomi, Favonius Kazuha.
Burst Timing Optimization
Coordinate with vulnerability windows and buff durations. Nilou's Burst enhances Bountiful Cores for 12 seconds – snapshot before detonation. Nahida's Burst provides EM enhancement – activate before damage phases.
Emergency usage during energy drain: prioritize armor breaking before complete depletion.
Common Mistakes & Troubleshooting
Positioning Errors
Cores detonate in 2s intervals (1.2s for Lunar-Bloom) – maintain 2m distance while ensuring enemy contact. For the Rock Crab: convert 6+ Hermit Seeds or you'll trigger +70% RES bombardment. With the Vishap: lateral movement avoids the aura field, dodge projectiles sideways for optimal distance.
Rotation Mistakes
Over-swapping bleeds ER efficiency and disrupts cooldowns. Maintain field time for complete durations: Nahida's 25s, Kokomi's 10s Burst. Energy failures usually stem from insufficient ER or poor particle collection – requires line-of-sight contact.
Practice burst coordination for vulnerability alignment. It makes all the difference.
Build Optimization Issues
Reaction triggers need 800+ EM, DPS characters should maintain CRIT optimization. Flower of Paradise Lost 4-piece (+60% Bloom DMG) significantly outweighs mixed sets. Always test ER requirements in domains before Abyss attempts – trust me on this one.
Alternative Strategies & Team Variations
Non-Bloom Backup Teams
Neuvillette Hypercarry: Neuvillette + Furina + Kazuha + Xilonen achieves sub-300s Floor 12 clears. Rotation: Furina Skill → Xilonen Skill + 2 NA → Kazuha Skill/Burst → Furina Burst → Neuvillette sequence. You get 75% damage bonus through Fanfare stacks.
Aggravate alternatives like Fischl/Yae + Nahida + Kazuha benefit from those 60% Electro/Dendro bonuses with consistent single-target damage.
Hybrid Compositions
Varesa Electro-Charged: Varesa + Iansan + Furina + Xianyun for plunging DPS with reaction support. Excels against shields while maintaining Bloom capability.
National variants: Xiangling + Xingqiu + Bennett + Sucrose maintains 40,000+ DPS potential – sometimes the classics just work.
F2P Friendly Alternatives
Dendro Traveler + Xingqiu + Kuki + Fischl uses guaranteed characters and can achieve 36-star potential with level 90 investment.
Budget Bloom: Collei + Yaoyao + Barbara + Aino requires 400+ EM triggers and 180% ER Burst units, but it's absolutely viable.
Kaveh provides unique F2P Bloom DPS through enhanced core damage – he's criminally underrated in my opinion.
FAQ
Q: How much Elemental Mastery for optimal Bloom damage? 800+ EM for reaction triggers, CRIT optimization for DPS. That 200% Bloom bonus makes EM extremely valuable, with diminishing returns beyond 1,000 EM.
Q: Can I get 36 stars without limited 5-stars? Absolutely. F2P Hyperbloom (Dendro Traveler + Xingqiu + Kuki + Fischl) achieves 36 stars with level 90, optimized artifacts, and precise rotations.
Q: What's the difference between Bloom and Lunar-Bloom? Lunar-Bloom requires Lauma, ignores DEF, scales with CRIT, faster detonation (1.2s vs 2s), and larger AoE (3.5m vs 2m). It's basically Bloom on steroids.
Q: How do I manage the Vishap's energy drain? 180%+ ER, Favonius weapons, and break that Hydro armor quickly through Bloom. Position laterally to avoid the aura field – it's a lifesaver.
Q: Which floors favor Bloom teams most? Floor 12 First Half with that 200% Bloom bonus is optimal. Floor 11's 60% Dendro bonus supports generation. Use Floors 9-10 for practice.
Q: What's the minimum investment for 36 stars? Level 90, 8/8/8 DPS talents, 1/8/8 supports. 60-80% CRIT Rate, 160-200% CRIT DMG for DPS. 800+ EM triggers, 180%+ ER Burst units, and optimized 4-piece sets. It's not cheap, but it's achievable.