

This guide covers optimal Spiral Abyss pathing for the 11/16 reset, including enemy wave analysis, bloom timing optimization, and floor-specific positioning for consistent 36-star clears.
Understanding Spiral Abyss Pathing Fundamentals
What is Optimal Pathing
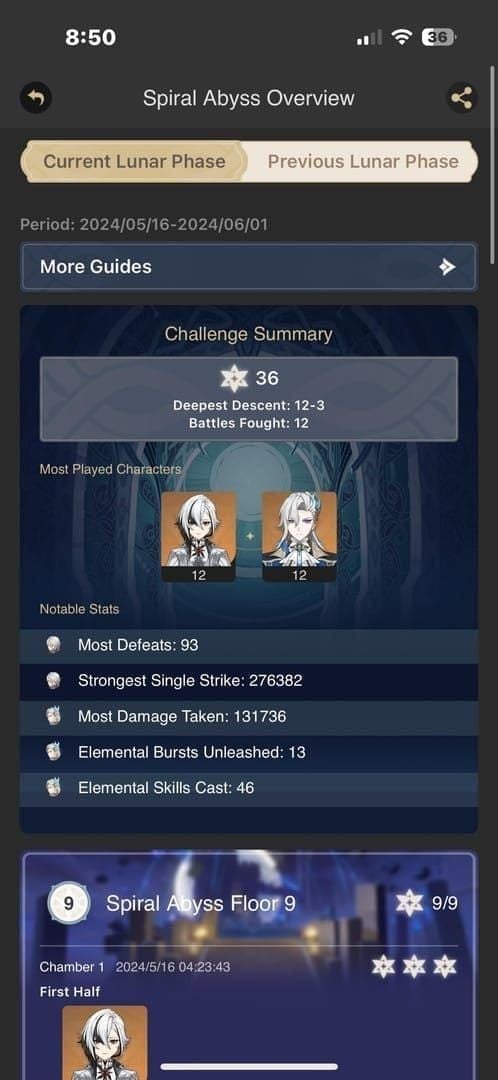
Here's the thing about optimal pathing—it's not just about running around efficiently. You're maximizing damage output while minimizing time loss through strategic movement, positioning, and timing coordination. The 11/16 reset is particularly unforgiving, requiring precise execution to hit those star goals of >180s/300s/420s remaining time for 1/2/3 stars per chamber.
What makes this rotation special? The current blessing system enhances Dendro-related reactions with shockwave True DMG every 3 seconds, which fundamentally changes how we approach positioning. And that Floor 12 Chamber 1 First Half Tainted Water-Splitting Phantasm? It's packing 851,787 HP and becomes permanently Hydro-imbued with Freeze immunity after full enrage. Fun times.
For players looking to maximize their Abyss performance, having sufficient resources is crucial. You can buy Genesis Crystals for Genshin refills through BitTopup, which offers competitive pricing and instant delivery to ensure you never miss an Abyss rotation due to resin constraints.
Key Pathing Components
Floor 12 Chamber 1 First Half demands positioning that lets you avoid those nasty AoE sprays while maintaining Pyro/Electro/Dendro reaction uptime before the enrage threshold hits. The Radiant Antelope in Wave 2? It applies this Cocoon debuff that's actually a blessing in disguise—sure, you get -10% damage/healing/CRIT Rate plus HP drain, but healing to full HP triggers Entwined State (+15% CRIT Rate, +50% damage for 15 seconds). Worth it.
Camera positioning is where I see most players mess up. You need wide-angle views capturing multiple enemies while providing clear targeting for priority threats. Those precious seconds lost to target switching? They add up fast.
11/16 Reset Changes Overview
The November 16, 2025 reset introduces the Abundant Moon blessing—basically, you get shockwave True DMG at opponent positions once every 3 seconds following Dendro-related reactions. Floor 11 provides 60% Electro DMG Bonus and 60% Dendro DMG Bonus, which heavily favors Electro-Charged, Overload, and Bloom reactions.
But here's where it gets interesting: Floor 12 First Half offers +200% Bloom DMG and +75% Lunar-Bloom DMG. That's some serious synergy potential with Dendro-Hydro core generation strategies.
Enemy level scaling increased to Lv. 88-92 for Floor 11 and Lv. 95-100 for Floor 12. Translation? You need more precise execution and optimized rotations than ever before.
Enemy Wave Analysis and Patterns
Wave Spawn Mechanics

Floor 12 Chamber 1 First Half follows a predictable three-wave pattern: Tainted Water-Splitting Phantasm (Wave 1), Radiant Antelope (Wave 2), and Assault Specialist Mek - Pneuma (Wave 3). The Battle-Hardened Lightkeeper in Chamber 1 Second Half? That's a two-phase nightmare with 1,609,878 HP in human form before entering Wild Hunt Grief-Stricken state.
Here's a pro tip: Ascendant Gleam reduces total effective HP to 3,219,756, compared to 5,448,306 without Moonsign activation. Do the math—that's a massive difference.
The Assault Specialist Mek loses its Pyro element for 25 seconds after two Ousia hits. That's your damage vulnerability window, and positioning during this phase determines whether you can capitalize on the full 25-second window or waste it.
Enemy AI Behavior Patterns
The Tainted Water-Splitting Phantasm has predictable enrage behavior—it increases AoE attack frequency after taking damage while gaining Freeze immunity. Meanwhile, that Battle-Hardened Primordial Bathysmal Vishap in Chamber 2 First Half activates 16U Hydro Armor after 30 seconds, giving it +80% all RES and draining 10 Energy per 0.5 seconds or 10% Max HP.
Optimal pathing requires burst timing within the first 30 seconds using Bloom reactions to break the armor. Miss this window? You're in for a long fight.
The Battle-Scarred Rock Crab spawns airborne with shield protection and generates 6 Hermit Seeds that explode if not converted via Bloom reactions. Each converted seed deals 500% Bloom DMG to the boss (cap 1,500,000 total) and reduces RES by 40%. That's not just damage—that's strategy.
Aggro Management Strategies
Floor 11 Chamber 2 First Half features a Thundering Wayob Manifestation that absorbs elements and drains energy. The trick? Unload bursts before absorption while maintaining distance to avoid the universal shield's energy sapping effect.
Multi-enemy waves like Floor 11 Chamber 3 First Half (4 Wilderness Exiles + 3 Landcruisers) require strategic positioning to group enemies while avoiding overlapping attack patterns. Camera management becomes crucial here.
Bloom Timing Optimization Techniques
Understanding Bloom Windows
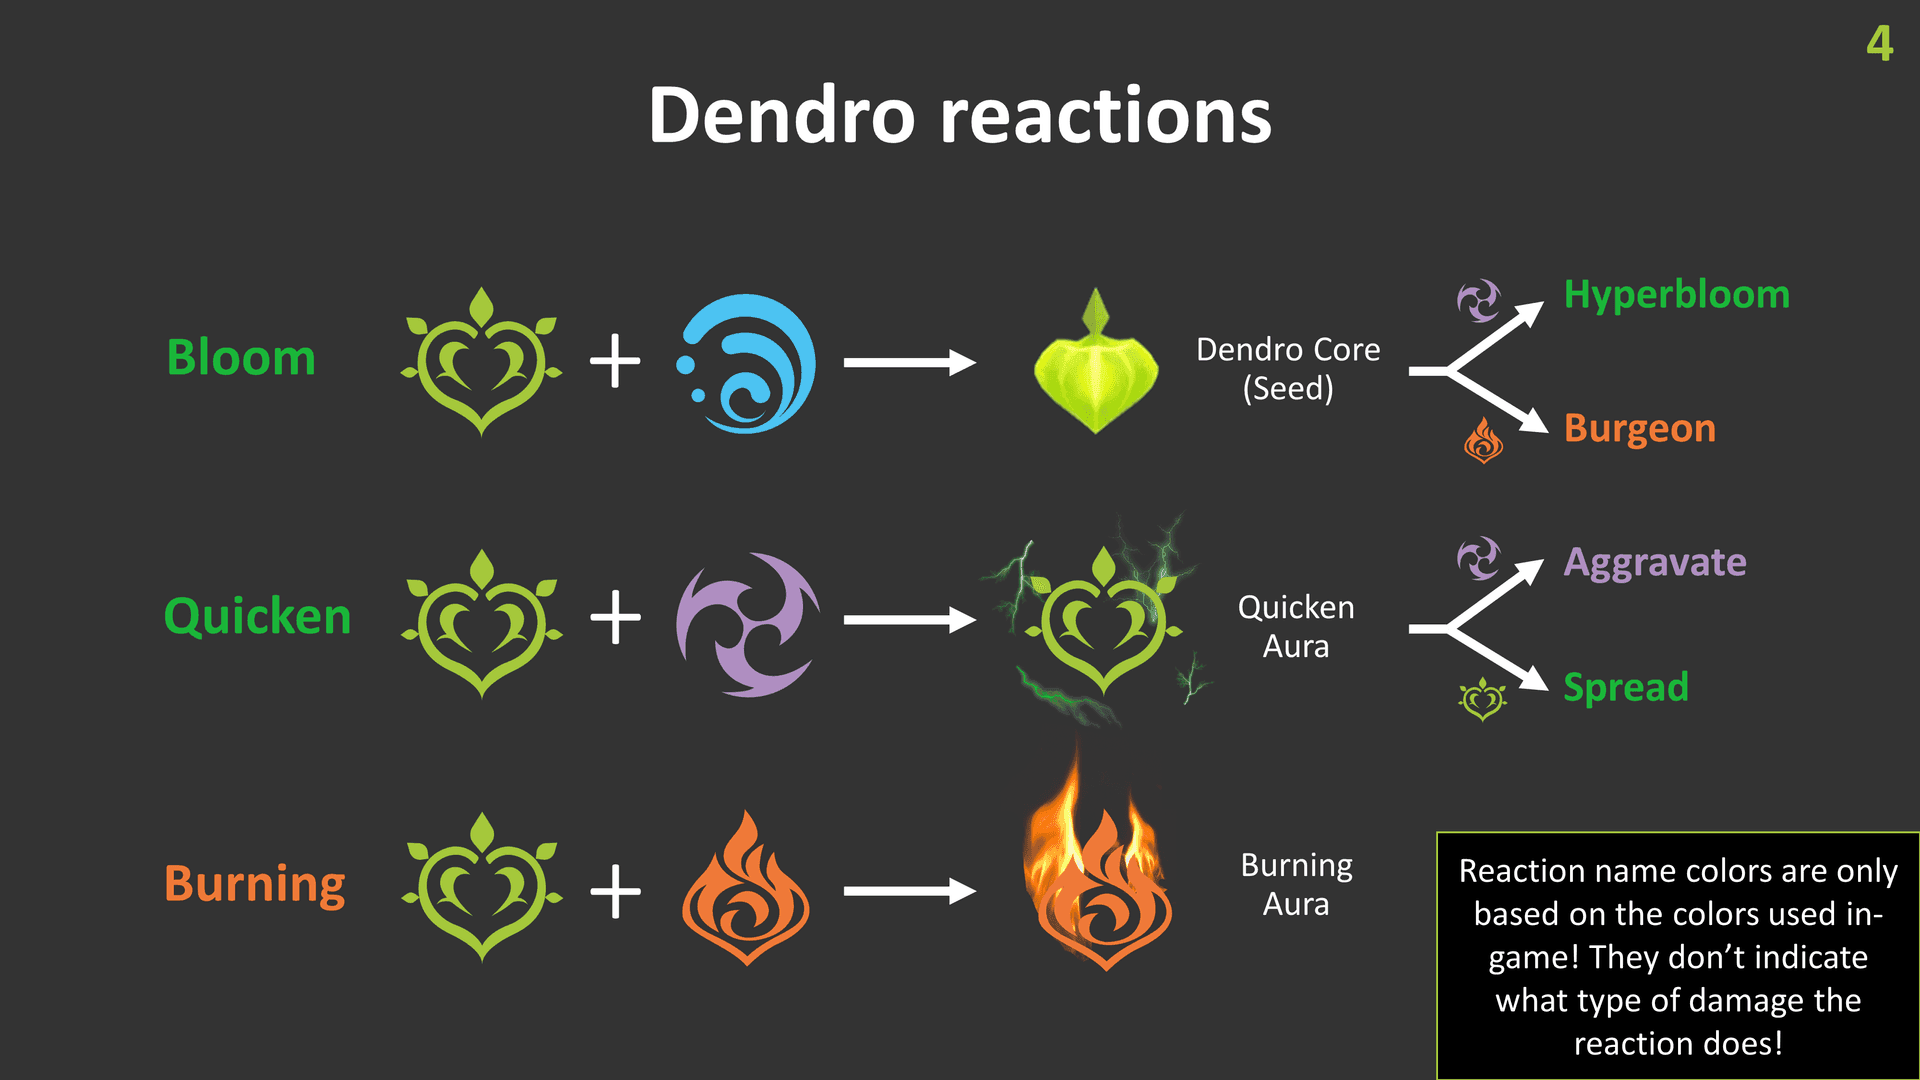
Bloom timing optimization centers on coordinating Dendro-Hydro application with enemy vulnerability windows and Ley Line disorder bonuses. Floor 12 First Half provides +200% Bloom DMG and +75% Lunar-Bloom DMG—numbers that make Bloom teams absolutely devastating when executed correctly.
For the Battle-Scarred Rock Crab encounter, optimal Bloom timing requires triggering reactions on 6 Hermit Seeds before they explode naturally. The sequence: Apply Dendro and Hydro near seeds quickly, use high EM characters (200+ EM) to trigger Bloom, then burst during the shield break window when RES drops by 40%.
Teams like Lauma + Nilou + Aino + Baizhu excel at maintaining consistent core generation for seed conversion strategies. The Abundant Moon blessing adds shockwave True DMG every 3 seconds on Dendro reactions, making these teams even more potent.
DPS Timing Coordination
The Entwined State buff from healing Cocoon debuff provides +15% CRIT Rate and +50% damage for 15 seconds—that's your optimal window for Bloom-enhanced burst rotations. When facing the Battle-Hardened Fireblade Shock Trooper in Chamber 3 Second Half, you need to break 3 shield layers (each 285,959 HP with +200% all RES) using Electro-Charged reactions within 30 seconds.
Each shield break deals 6% boss Max HP damage and generates 18 Electro Energy plus 6 other element energy. That's substantial energy generation if you time it right.
For players seeking consistent Abyss performance, maintaining adequate resources for multiple attempts is essential. You can recharge Genshin crystals for Abyss reset through BitTopup's secure platform, ensuring you have the flexibility to practice optimal timing without resource constraints.
Neuvillette rotation timing looks like this: Furina Skill → Xilonen Skill + 2 NAs → Kazuha Skill/Burst → Furina Burst → Neuvillette Skill + Charged Attacks + Burst + 2 Charged Attacks. This sequence aligns with burst cooldowns while maximizing Fanfare stacks for 75% universal damage bonus.
Energy Burst Synchronization
The shield breaking mechanics in Floor 12 Chamber 3 Second Half provide consistent energy generation (18 Electro + 6 other per break) that can be synchronized with 20-second rotation cycles. Hyperbloom timing in Floor 11 Second Half involves applying Dendro + Hydro then Electro trigger while maintaining the 3-second Blessing shockwave timing.
Teams like Nahida + Yelan + Kuki + Kazuha require 180%+ ER on burst units. Don't skimp on this—energy deficits will ruin your timing.
Identifying and Avoiding Rotation Traps
Common Rotation Trap Types
The most brutal trap? That Battle-Hardened Primordial Bathysmal Vishap's Aura Field, which activates after 30 seconds and drains 10 Energy per 0.5 seconds or 10% Max HP. I've seen too many runs die to this mechanic.
The Wilderness Hunter in Floor 12 Chamber 2 Second Half presents another critical trap through its Grief-Stricken recovery mechanism. You need coordinated team bursts post-Ascendant Gleam activation for single-phase elimination of 2,008,523 HP.
The Thundering Wayob Manifestation absorbs elements and saps energy if not interrupted quickly. The trap lies in allowing full absorption, which requires Normal/Charged Attack interruption followed by energy recharging.
Early Warning Signs
Energy drain effects provide the clearest early warning—when characters begin losing energy rapidly (10 per 0.5s), immediate reaction is required. Shield respawn patterns indicate potential rotation extension traps.
Grief-Stricken phase transitions provide critical warning indicators. When Wild Hunt enemies reach 0 HP and pause with grey health bars, you have limited time to activate Moonsign effects before recovery.
Recovery Strategies
When caught in energy drain situations, switch to Normal/Charged Attack patterns while positioning for particle collection. Healers like Kokomi or Baizhu can counter HP drain effects while energy regenerates.
Shield break failures require immediate rotation adjustment to Electro-Charged or Bloom-focused strategies. Using high EM characters (200+ EM) for reaction triggers while maintaining 180%+ ER on support units enables recovery from timing failures.
Floor-by-Floor Pathing Strategies
Floor 9-10 Optimal Routes
Floor 9-10 strategies focus on establishing fundamental pathing patterns that scale to higher difficulties. Think of these as your training wheels—optimal routes emphasize grouping efficiency and elemental reaction consistency.
Using Anemo characters for crowd control creates predictable enemy positioning that reduces movement time between waves. Energy management on these floors establishes patterns for higher difficulties.
Floor 11-12 Advanced Techniques
Floor 11 leverages the 60% Electro and Dendro DMG bonuses through specialized team compositions. The Radiant Lunapod in Chamber 1 First Half (852,422 HP) benefits from Lunar-Charged teams using Ineffa or Flins for efficiency.
Chamber 2 First Half requires specific sequencing: recharge energy during Wind Operative engagement, then unload bursts on Thundering Wayob before elemental absorption.
Floor 12 demands frame-perfect execution. Chamber 1 First Half requires managing three distinct enemy types with different vulnerability windows within star time limits. No pressure, right?
Boss Floor Positioning
The Battle-Hardened Lightkeeper demands aerial control maintenance during human phase while preparing for Wild Hunt transition. The Battle-Scarred Rock Crab encounter requires dynamic positioning that adapts to airborne and grounded phases.
Multi-boss chambers like Floor 12 Chamber 2 Second Half (dual Wilderness Hunters) require positioning that prevents boss separation while enabling Grief-Stricken coordination. The 2,008,523 HP per boss in Ascendant Mode demands positioning that maximizes AoE coverage without sacrificing single-target focus.
Movement and Positioning Optimization
Character Movement Mechanics

Optimal movement requires understanding character-specific mobility options and their integration with combat rotations. Dash canceling, jump canceling, and animation canceling create movement efficiency that directly impacts clear times.
The Battle-Hardened Primordial Bathysmal Vishap's charging attacks require sideways dodging to avoid energy drain, demanding precise stamina allocation between dodging and positioning for Bloom reactions.
Stamina Management
During multi-wave chambers like Floor 11 Chamber 3 First Half, stamina allocation must account for dodging Landcruiser attacks while maintaining positioning for Wilderness Exile elimination. Charged attack characters like Neuvillette require specialized stamina management that coordinates movement with attack sequences.
The 15-second Entwined State buff duration provides stamina recovery time while maintaining DPS through off-field character abilities.
Dodge Timing Integration
The Tainted Water-Splitting Phantasm's AoE spray patterns have predictable timing that can be i-framed through burst animations or dash timing. The Battle-Hardened Lightkeeper's Demonsbane Strike provides clear telegraphing that enables dodge timing coordination with aerial control maintenance.
Energy Management During Waves
Particle Collection Timing
Shield break mechanics provide the most reliable energy generation, with each Fireblade Shock Trooper shield break generating 18 Electro Energy plus 6 other element energy. Off-field character abilities create consistent particle generation that can be timed with wave transitions.
Fischl's Oz and Xingqiu's Rain Swords provide steady energy generation that bridges gaps between burst cycles. Favonius weapon procs create additional particle generation opportunities.
Burst Rotation Planning
The 20-second rotation cycle matching longest cooldowns creates predictable burst availability that can be coordinated with shield break timing and weakness state windows. Neuvillette teams exemplify optimal burst rotation planning through coordinated buff application and energy generation.
Energy Funneling Strategies
Using same-element characters for particle generation creates 3x energy efficiency for the target character. Battery character positioning requires balancing energy generation with combat contribution.
Maintaining 180%+ ER on burst-dependent characters while using battery characters for additional generation creates sustainable rotation cycles.
Common Pathing Mistakes and Solutions
Positioning Errors
The most frequent positioning error? Poor grouping during multi-enemy waves, particularly in Floor 11 Chamber 3 First Half with 4 Wilderness Exiles and 3 Landcruisers. Players often chase individual enemies rather than using Anemo crowd control to cluster targets.
Camera positioning errors create targeting inefficiencies that compound throughout chambers. Reaction positioning errors occur when players fail to account for elemental application ranges and enemy movement patterns.
Timing Mistakes
The most common mistake involves allowing the Battle-Hardened Primordial Bathysmal Vishap's Aura Field to activate by failing to break the Hydro Armor within 30 seconds. Burst timing mistakes during vulnerability windows waste critical DPS opportunities.
The Battle-Hardened Fireblade Shock Trooper's 3 shield layers (each 285,959 HP) must be broken within specific windows to access the weakness state. Delayed shield breaking allows respawn cycles that significantly extend clear times.
Recovery Techniques
When caught in poor positioning during enemy wave transitions, use character swap i-frames to reposition while maintaining elemental application through off-field abilities. Energy deficit recovery requires switching to alternative damage sources that don't rely on burst availability.
When Bloom timing fails during seed conversion sequences, switching to brute force approaches with sustained DPS prevents complete clear failure. The key lies in maintaining flexibility rather than persisting with failed timing attempts.
FAQ
Q: What are the most important changes in the 11/16 Spiral Abyss reset? The 11/16 reset introduces Abundant Moon blessing (Dendro reaction shockwaves every 3s), 60% Electro/Dendro DMG bonus on Floor 11, +200% Bloom DMG on Floor 12 First Half, and enhanced Grief-Stricken mechanics requiring Moonsign activation for efficient boss elimination.
Q: How do I optimize Bloom timing for the Battle-Scarred Rock Crab? Apply Dendro and Hydro near 6 Hermit Seeds quickly, use high EM characters (200+) to trigger Bloom conversion before explosion, then burst during the shield break window when RES drops by 40%. Each converted seed deals 500% Bloom DMG with a 1,500,000 total cap.
Q: What's the best way to avoid energy drain traps? Break the Bathysmal Vishap's Hydro Armor within 30 seconds using Bloom reactions, interrupt Wayob elemental absorption with Normal/Charged Attacks, and maintain 180%+ ER on burst units while using healers to counter HP drain effects.
Q: How should I handle Grief-Stricken enemies effectively? Use Moonsign: Ascendant Gleam to reduce Max HP by 90% (e.g., Wilderness Hunter from 5,448,306 to 2,008,523 HP), coordinate team bursts post-Gleam activation, and eliminate adds quickly to prevent boss healing via absorption.
Q: What rotation works best for Neuvillette teams in Floor 12? Execute Furina Skill → Xilonen Skill + 2 NAs → Kazuha Skill/Burst → Furina Burst → Neuvillette Skill + Charged Attacks + Burst + 2 Charged Attacks. This aligns with burst cooldowns while maximizing Fanfare stacks for 75% universal damage bonus.
Q: How do I position correctly during multi-wave chambers? Use Anemo crowd control to cluster enemies, maintain wide camera angles for targeting efficiency, focus priority threats first (Hailstorm Canoneer, then Fireblade Shock Troopers), and position near energy generation sources while avoiding AoE patterns.