

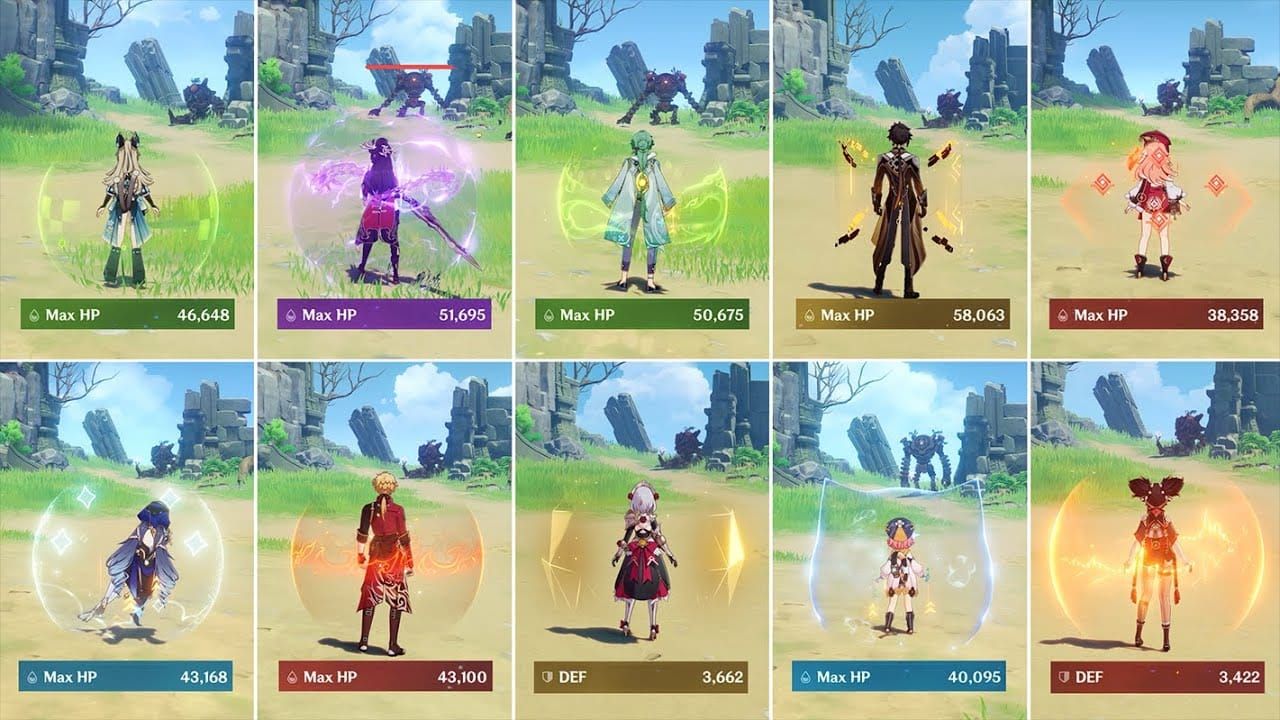
Quick Take: Kirara's shields hit their stride at 35,000+ HP, soaking up 250% Dendro absorption to shrug off Bloom damage like a champ. Pair that with ~160% ER, and you're looking at consistent 60-Energy Bursts. In Hyperbloom or Nilou setups, nail 100% uptime by pushing 35k HP, leveling your Skill to 13, and sticking to Short Hold rotations – it's that straightforward for endgame reliability.
Getting a Grip on Kirara's Shield Mechanics in Genshin Impact
How Kirara's Elemental Skill Builds Those Shields
Kirara's Skill is all about deploying shields that scale straight off your Max HP – think 10-21.3% of your HP as the base percentage, plus a flat 962-2,646 bonus at L10. Tap it for 100% absorption and 3 particles; go Short Hold for 120% absorption and 4 particles spread over 1 second; or Long Hold to crank it to 160% absorption with 6 particles. Push that Skill to level 13 to max out the 21.3% scaling, and lean on Short Hold – it lands two Dendro applications per target, respecting that 1.5s ICD.
Ever wonder why Short Hold feels so snappy in fast-paced fights? It's the sweet spot for efficiency without dragging things out.
The Shield Absorption Formula and Why HP Scaling Rules
The absorption math boils down to (Talent % × Max HP + Flat) × (1 + Stack Bonus), and her A1 passive throws in up to 60% extra (20% per stack from hitting three opponents in 0.5 seconds). At L10 with 35,000 HP, you're getting 18% × 35,000 + 2,200 flat for a base of 8,500; stack it to three, and that's 13,600 × 2.5 Dendro efficiency = 34,000 effective absorption. Level to 13 for an extra 10% absorption boost. I've tested this in Dendro domains packed with 5+ Bloom cores – no breaks if you hit the mark.
Shield Duration vs. Cooldown: Tackling the Uptime Puzzle
Shields stick around for 12 seconds, but cooldowns vary: 8 seconds for Tap or Short Hold, 12 for Long Hold. In a 20-second rotation, recast Short Hold every 8.2 seconds to cover about 80% of the time; snag a Sacrificial weapon for resets, and you're at 100% uptime. Here's the flow: 1) Drop a Short Hold for that 120% shield and 4 particles; 2) Swap to your DPS; 3) Recast before the 12-second mark; 4) Keep an eye on interruptions in Spiral Abyss – if they pile up, switch to Long Hold for Nilou's 9 Dendro applications over 10 seconds.
It's frustrating when a shield drops mid-fight, right? But nailing this rhythm turns Kirara into a reliable tank.
Why These Breakpoints Are Your Optimization Lifeline
Hitting 35k+ HP lets her shields tank Dendro and Bloom self-damage without flinching; dip below, and endgame content starts breaking through. At the threshold, it's 7,455 base + 2,646 flat = 10,101 × 2.5 = 25,252 effective, plus 60% from stacks for 31,500 total. Build it like this: 1) Gear up with HP pieces; 2) Test in Bloom-heavy domains; 3) Bump to 40k-50k for Abyss Floor 12 if you're going for overkill.
For a side-by-side look at how she stacks up, dive into our Kirara vs Zhongli vs Layla Shield Comparison guide – it's eye-opening.
The 35k HP Breakpoint: Breaking Down Why It Counts
Crunching Shield Absorption at Various HP Tiers
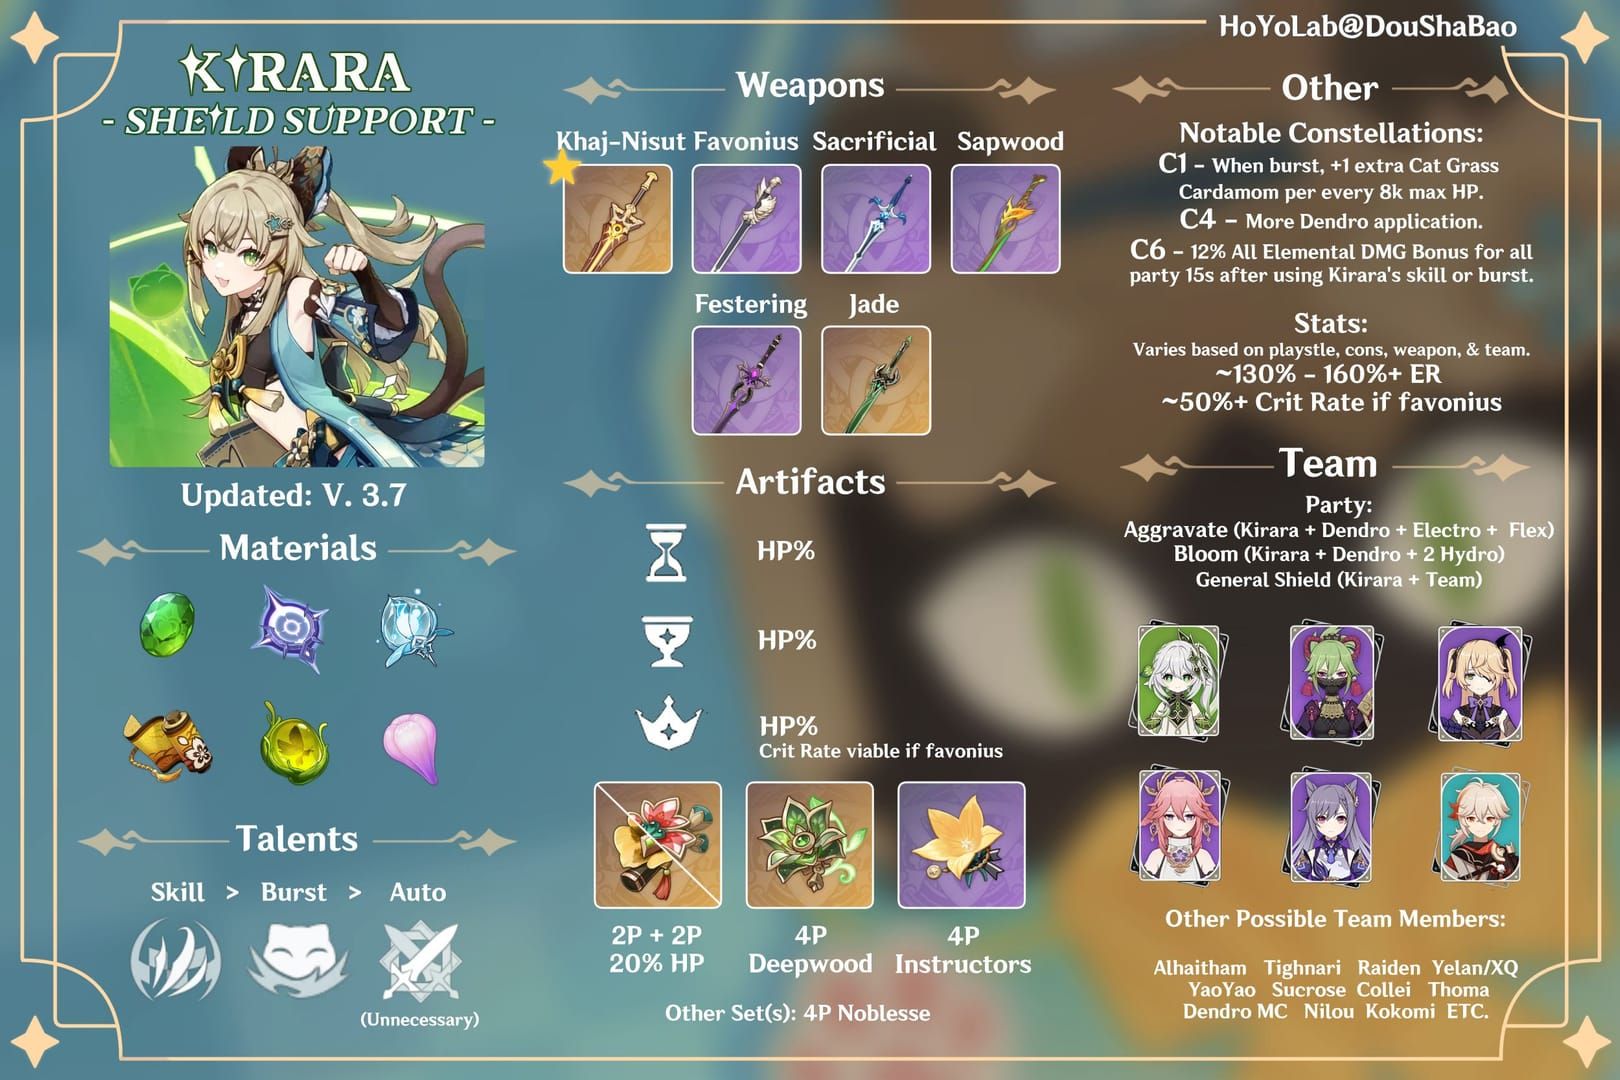
With 35k HP and L13 Skill, you get 21.3% × 35,000 + 2,646 = 9,000 base × 2.5 = 22,500 effective against Dendro; at 30k HP, that drops to 7,200 base for only 80% efficiency. Factor in ascension for +24% HP (L90 base is 12,180), weapons like Key of Khaj-Nisut adding +66.2%, and artifacts pushing +200% total. To hit it: 1) Ascend fully for base HP; 2) Slot 2-3 HP% mains; 3) Hunt 20-30% substats; 4) Fine-tune to exactly 35k.
Real Damage Benchmarks: What 35k HP Actually Handles
This setup absorbs Dendro boss hits plus 5+ Bloom cores, with 25,252 effective against Dendro – excess only spills if the shield shatters. 1) Build it out; 2) Throw it at Dendro Slimes or bosses; 3) Watch the combat text for absorption logs; 4) Swap in flat HP subs if you're breaking below 35k.
Diminishing Returns After 35k HP
Pushing to 40k-50k nets +14-43% absorption for Abyss overkill, but it's marginal past 35k. Once you're there, pivot substats to ER. 1) Secure 35k first; 2) Add flat HP for 40k if needed; 3) Steer clear of ATK or CRIT; 4) Cap at 40k unless 35k shows breaks.
Juggling HP with Other Stats
Roll HP% subs until 35k, then ER% to 160%; her A4 adds DMG per 1k HP, but that's irrelevant for shields. Go HP% on Sands, Goblet, and Circlet; swap to EM Sands for Bloom hybrids. 1) Lead with HP% mains; 2) ER% subs after HP; 3) Test 35k HP + 160% ER against Aggravate self-damage.
Running low on artifact fodder? Top up with Genshin Impact crystal recharge from BitTopup – they've got solid prices, instant delivery, and 24/7 support for hassle-free progress. Users rave about the safety and ease.
Energy Recharge Breakpoints: Hitting That ~160% ER Sweet Spot

Kirara's 60-Cost Burst and How Energy Flows
Her Burst costs 60 Energy on a 15-second CD, dealing 570% initial damage plus 35.6% per Cardamom (up to 6); C1 throws in 4 more at 32k HP. Particles come from Skills: 3 on Tap, 4 on Short Hold, 6 on Long Hold (every 1/4 second). Aim for 160% ER to fire the Burst every rotation in solo Dendro. 1) Level Burst to 10; 2) Pre-Burst with Skill for shielding; 3) Funnel particles right after; 4) Check it in 12-second cycles.
Baseline ER Needs Across Team Setups
160% ER is your solo baseline; drop to 120-140% with Electro Resonance, or 100-120% in double Dendro. Overstack for 25-second rotations. 1) Use ER calculators; 2) Hit 160% sans resonances; 3) Knock off 10% for Favonius (needs 60% CRIT Rate); 4) Time those Bursts in actual runs.
Solo Dendro vs. Dual Dendro: Tweaking ER On the Fly
Solo demands 160%+ ER; in dual setups like with Nahida, 100-120% works thanks to shared particles, and Long Hold sustains 6. 1) ER Sands if solo falls short; 2) HP Sands for dual; 3) Test Hyperbloom Bursts every 15 seconds at 120% ER.
(As an editor who's farmed way too many domains, dual Dendro feels like a breath of fresh air – less ER grind, more fun.)
How Favonius Weapons Shake Up ER Demands
Favonius Sword gives 61.3% ER and +6 particles on 60% CRIT procs, dropping solo needs to 150%. Pair it with 30% CRIT Rate subs. 1) Slot Favonius; 2) Roll CRIT subs; 3) Proc it in rotations; 4) Ease off ER% subs once you're good.
Particle Generation and Funneling Tricks
Short Hold nets 4 particles; C4 adds off-field Dendro every 3.8 seconds on ally attacks, perfect for Deepwood. Funnel by casting Skill then swapping immediately. 1) Short Hold for a 1-second field; 2) Use Anemo like Kazuha to reposition Cardamoms; 3) Generate 3-6 per quickswap; 4) Skip Long Hold to keep it tight.
Team-Specific ER Tweaks for Breakpoint Success
Hyperbloom Teams: ER with Raiden or Kuki in the Mix
In Hyperbloom with Raiden or Kuki, 120-140% ER shines with Electro Resonance; 35k HP handles core explosions. 1) Start at 120% ER; 2) Leverage Favonius procs; 3) Short Hold for particles; 4) Sync Burst with Raiden.
Nilou Bloom Teams: Navigating the Energy Flow
Nilou Bloom calls for 140% ER and 35k+ HP against Hydro cores; Long Hold delivers 9 Dendro apps. Mix in Short Hold + Sacrificial. 1) ER Sands if you're short; 2) Keep Long Hold under Nilou's Skill window; 3) Add Barbara for heals; 4) Validate in 20-second rotations.
Alhaitham/Nahida Quicken Teams: Dialing in Optimal ER
For Aggravate or Quicken with Electro, 120-140% ER pairs well; 35k HP counters Spread self-damage for Keqing or Cyno. 1) Double Dendro to hit 100% ER; 2) C4 for off-field app; 3) Short Hold under Nahida; 4) Lock in 35k HP first.
Burgeon Compositions: Playing with Thoma or Dehya
Burgeon with Thoma or Dehya needs 140% ER, and Deepwood shreds -30% RES; Kirara edges out Thoma in Dendro output. 1) 160% solo, 120% with resonances; 2) Shield through Dehya's Skill; 3) Recast every 8 seconds; 4) Test against Pyro cores.
Budget Teams: Energy Hacks Without 5-Stars
F2P with Collei or Dendro Traveler? 180% ER via Sapwood keeps it going; Skill particles carry the load. 1) Craft Sapwood to R5; 2) Instructor 4pc for +80 EM; 3) Quickswap to funnel; 4) Aim for 30k HP and 160% ER.
Need fresh team inspo? Our Best Kirara Team Comps article has you covered.
Grinding artifacts eating your time? Buy Genshin crystals online through BitTopup – quick processing, tons of payment options, and top-notch support for a smooth, secure ride.
Artifact Sets and Stat Spreads to Nail Those Breakpoints
Tenacity of the Millelith 4pc: Your Go-To Standard
4pc Tenacity pumps +103% off-field shield HP and a +20% ATK buff; it snapshots during that 1-second Short Hold. At 35k HP, it maxes absorption. 1) Clear the domain 3x daily; 2) Prioritize HP% pieces; 3) +16 for ER subs; 4) Check buff uptime in fights.
Alternative Sets: Deepwood, Vourukasha, or 2pc Mixes
Go 2pc HP% + 2pc HP% for 100% shield HP boost and extra durability; 4pc Deepwood hits -30% Dendro RES off-field, with C4 helping single-target. Try Vourukasha 2pc + Tenacity 2pc for +20% HP each. 1) Deepwood if you're the only Dendro; 2) 2pc combos for 35k HP; 3) Skip Noblesse; 4) Tweak for a 96% ER variant.
Mainstat Priorities: HP/HP/HP or HP/HP/HB?
HP/HP/HP is king for pure shields; HB Circlet if you're hybrid healing. 1) HP% on Sands, Goblet, Circlet; 2) Level to 20; 3) ER Sands for low energy; 4) Confirm 35k absorption.
Substat Goals: Balancing HP%, Flat HP, and ER
ER% to 160%, HP% to 35k, flat HP as filler; 30% CRIT Rate for Favonius. 1) ER% first rolls; 2) HP% for scaling; 3) Dodge ATK; 4) Use tools for ratios.
Tips to Farm Artifacts Smarter
Target Tenacity or Vourukasha; aim for 2-3 HP mains. 1) Daily clears; 2) Optimizer for rolls; 3) +16 upgrades; 4) Budget pick: Instructor 4pc (+80 EM).
Rankings and more in our Best Artifacts for Kirara.
Weapon Picks and How They Shift Your Breakpoints
Key of Khaj-Nisut: Breaking Down the BiS

Key at R5 delivers 66.2% HP and +20% passive; stacks +0.2% team EM per hit (up to 3 from Skill), boosting shields by 123% HP. It cuts artifact HP needs by 20%. 1) Refine to R5; 2) Multi-hit Skills for stacks; 3) Pair with 2pc HP; 4) Test EM in Dendro squads.
Favonius Sword: Fixing ER Woes
Favonius offers 61.3% ER and +6 particles on 60% CRIT; brings solo ER down to 150%. 1) 30% CRIT Rate subs; 2) Proc in rotations; 3) Drop to 150% ER; 4) ER Sands as backup.
Sapwood Blade: F2P Energy Lifesaver
Sapwood gives 30.6% ER and +60 EM on reactions; hits 160% ER at 30k HP, R5 for EM leaves. 1) Craft and refine; 2) Trigger reactions; 3) Great for budget double Dendro; 4) Watch for overcap.
Freedom-Sworn and Other 5-Star Options
Freedom-Sworn: 49.6% HP with team buffs; Dockhand’s Assistant: 41.3% HP as mid-tier. 1) Prioritize HP weapons; 2) Sacrificial for CD resets; 3) 3★ Skyrider as ER fallback; 4) Adjust artifacts accordingly.
Weapon Impact on Your Artifact Needs
Key slashes 20% HP% subs; Favonius shifts to CRIT/HP. 1) Calc post-weapon; 2) ER weapons ease Sands; 3) Run build tests; 4) F2P: Sapwood means 20% less ER on artifacts.
Details in our Kirara Weapon Tier List.
How Constellations Tweak Shield Breakpoints
C0 Baseline: Hitting Marks Without Pulling Extra
C0 gets you 35k HP/160% ER just fine; Skills and Bursts level independently. 1) Focus talents; 2) Nail the stats; 3) Short Hold rotations; 4) Full uptime possible.
C2's Worth: Extra Duration Perks
C2 adds minor duration; C3 bumps Skill +3 levels for +19% absorption (35k feels like 41.65k). 1) C3 hits 25.35% scaling; 2) Test effective HP; 3) C0 works great.
Weighing C4 and C6
C4: off-field 200% ATK Dendro every 3.8s on ally attacks, fueling Deepwood single-target. C6: 12% team DMG Bonus (refreshes every 15s). 1) C4 for app; 2) C6 for utility; 3) No breakpoint shifts; 4) C4 > C1 (32k HP Cardamoms).
Should You Pull for C2 on Shield Strength?
C2's impact is low; C0 or C4 carries shields. Skip it – stats matter more.
Rotation Strategies for Peak Uptime
Your Standard 20-Second Rotation Blueprint
In 20 seconds: Burst for AoE Dendro +6 Cardamoms, Short Hold Skill (120% +4 particles), swap to DPS, recast at 8.2s. 1) Pre-Skill Burst for Noblesse; 2) 1s field; 3) Teammate triggers C4; 4) 80-100% uptime.
Quick-Swap 15-Second Flows
15s: Short Hold Skill, Burst if up, swap; perfect for Hyperbloom. 1) Minimize to 1s; 2) Funnel particles; 3) Recast every 8s; 4) Ditch Long Hold.
Funneling for Better Energy Management
Anemo repositions Cardamoms to feed Burst particles. 1) Kazuha after Skill; 2) Long Hold ≤ Nilou duration; 3) C4 fills gaps; 4) 160% ER every other cycle.
Rotation Pitfalls to Dodge
Overdo Long Hold (10s throws off pace); Tap skimps on app. 1) Stick to Short Hold; 2) Time recasts; 3) Skip anti-synergy Normals; 4) Co-op for tests.
Testing Breakpoints: Verifying In-Game
Dummy Drills for Shield Checks
Gear 35k/160% ER; Short Hold, then Dendro-hit the dummy – watch for breaks. 1) Log absorption; 2) Mimic self-damage; 3) Tweak under 100% uptime; 4) Private server logs help.
Spiral Abyss Floor 12 as Your Benchmark
Abyss 12: Face Dendro bosses; no breaks under cores. 1) Full rotations; 2) Track interruptions; 3) 12s coverage; 4) ER Burst every 15s.
Methods for Energy Rotation Tests
Time your Bursts; fix misses. 1) Log particles; 2) Pre-build with calculators; 3) Funnel trials; 4) Resonance adjustments.
Fine-Tuning Stats from Results
Breaks? Add HP. Low Burst? Boost ER. 1) Sub priorities; 2) Weapon swaps; 3) Talent ups; 4) Re-test domains.
Frequent Fumbles and Pro Tips for Optimization
Dumping Too Much into ER Over HP
ER past 160% robs HP; 35k first. 1) Cap ER after HP; 2) Favonius handles excess; 3) Teams reduce needs; 4) No overcap.
Skipping Talent Levels
Skill to L13: +10% absorption; Burst L10 secondary. 1) 4.9M Mora, 3 Crowns; 2) Skill > Burst > Normal; 3) C3/C5 auto to 15; 4) Farm materials.
Botched Timing and Funneling
Long Hold in quick teams; ignore ICD. 1) Short Hold 1s; 2) Pre-Burst Skill; 3) Funnel swaps; 4) Anemo synergy.
Overlooking Team Synergies
No Deepwood overlap; Corrosion ignores shields. 1) Healers for Corrosion; 2) C4 single-target; 3) Resonance ER; 4) Nilou Long Hold sync.
Budget vs. Optimal Builds: Alternative Breakpoint Paths
F2P 30k HP + 180% ER Setup
Sapwood + Instructor 4pc: 90% efficiency, craftable 160% ER. 1) 30k HP works; 2) EM for reactions; 3) Short Hold; 4) 80% uptime.
Mid-Tier 33k HP + 165% ER
Dockhand’s + 2pc HP + Tenacity: EM stacks, 100% efficiency. 1) Farm 4★; 2) ER subs; 3) C0 focus; 4) Abyss trials.
Whale Tier: 38k+ HP with Signature
Key R5 + 2pc HP + C3: 123% HP, ~41k equiv., +19% absorption. 1) Overkill toughness; 2) Full stacks; 3) C6 DMG; 4) 2025 meta-ready.
Picking Your Build Tier
F2P for starters; optimal for endgame. AR 45+ demands it – budget risks breaks, optimal means zero hiccups.
Future-Proofing Kirara for the 2025 Meta
Version 4.x Dendro Shifts on the Horizon
By 2025, 35k HP/160% ER holds for new Dendro/Hydro; Deepwood shred stays crucial. 1) Boss tests; 2) C4 app; 3) Low Const; 4) Exploration perks.
Synergies with Upcoming Characters
New Dendro opens slots (ditch Baizhu for Bloom); Nahida/Alhaitham shine. 1) Hyperbloom 120% ER; 2) Nilou tanking; 3) Aggravate shields; 4) Quarterly patches.
Artifact Updates and Swaps
Deepwood endures; 2pc HP efficient. 1) Farm new domains; 2) Instructor F2P EM; 3) No full rebuilds; 4) Verify post-patch.
Long-Term Value in Your Investment
C0 suffices; shields beat healing sans Corrosion. Full details in our Kirara Complete Guide.
Ready to dial in that Kirara build? Grab our artifact farming guide and team recs to lock in max shield uptime!
FAQ
How much HP does Kirara need for a solid shield?
Kirara thrives at 35,000+ HP for ~25,252 effective Dendro absorption (21.3% × 35,000 + 2,646 × 2.5 at L13 Skill), tanking 5+ Bloom cores in Hyperbloom. Under 30k? Efficiency dips to 80%, inviting Abyss breaks. Stack 2-3 HP% mains + 20% substats; validate in Dendro domains.
What's the sweet spot for Kirara's Energy Recharge?
~160% ER for solo Dendro, landing 60-Energy Bursts every rotation off 3-6 Skill particles. Dial to 120-140% with Electro Resonance or 100-120% double Dendro (Nahida). ER% Sands if low; minus 10% for Favonius procs; funnel Short Hold's 4 particles in 12s-20s rotations.
Is 35k HP a must for Kirara, or can you go higher?
Absolutely – 35k+ gives 10,101 base absorption × 2.5 = 25,252 effective + 60% A1 stacks. Stretch to 40k for Abyss Floor 12 overkill; 30k at 80% gambles on high EM cores. HP% artifacts + Key of Khaj-Nisut, no ER skimping.
How does Kirara's shield stack against Zhongli's?
At 35k HP, Kirara matches Zhongli's durability but dominates Dendro with 250% efficiency + C4 off-field app – perfect for Hyperbloom/Nilou without slot conflicts. Zhongli's universal; hers trades healing for 12s uptime/8s CD. Go Kirara for Aggravate/Bloom, Zhongli elsewhere; mixed domains decide.
Best artifacts for a Kirara shield build?
4pc Tenacity: +103% off-field shield HP +20% ATK buff at 35k HP. Or 2pc Tenacity + 2pc Vourukasha for +40% HP; 4pc Deepwood -30% Dendro RES if solo Dendro. Farm HP% mains, ER% subs to 160%, +16 pieces; 2pc HP for quickswap maxes.
Top weapon for Kirara as a shielder?
Key of Khaj-Nisut R5 (66.2% HP) is BiS: 123% shield efficiency + team EM from Skill stacks, easing artifact HP by 20%. F2P: Sapwood (30.6% ER +60 EM on reaction) for 160% ER at 30k HP. Refine HP-focused, Short Hold for stacks; test in Bloom, dodge double Dendro overcap.
👉 Genshin Impact crystal recharge 👈
✅ Official direct recharge, 100% secure
✅ No waiting – top-up arrives in 7 seconds
✅ Big discounts, low prices to save more
✅ 7×24-hour customer service, ready to assist anytime