

Quick Answer: Amplifying reactions (Vaporize/Melt) need 100-300 EM for optimal balance with CRIT stats. Transformative reactions (Overloaded/Swirl/Bloom) require 800-1000+ EM with Level 90 priority. Quicken reactions (Aggravate/Spread) benefit from both EM and CRIT, with 400-600 EM being ideal for additive damage scaling.
Look, I've been testing reaction builds for months now, and here's what I've learned the hard way: each reaction type scales completely differently with Elemental Mastery. You can't just slap 800 EM on everyone and call it a day.
Amplifying reactions multiply your attack's base damage – which means they actually love both EM and traditional DPS stats. For players looking to enhance their Genesis Crystals efficiently, fast checkout Genshin top up services like BitTopup provide instant access to premium currency for artifact farming and character upgrades with competitive pricing and instant delivery.
Breaking Down the Three Reaction Categories
Amplifying Reactions: Where Math Gets Interesting
Vaporize and Melt work by multiplying your triggering attack's damage. The formula's pretty straightforward:OriginalDamage×(ReactionMultiplier+EMBonus). But here's where it gets tricky – Forward reactions give you 2x damage, while Reverse reactions only give 1.5x.

The Forward vs Reverse Dance:
Melt Forward: Pyro hitting Cryo aura (2x multiplier)
Reverse Melt: Cryo hitting Pyro aura (1.5x multiplier)
Vaporize Forward: Hydro hitting Pyro aura (2x multiplier)
Reverse Vaporize: Pyro hitting Hydro aura (1.5x multiplier)
Here's something most guides don't mention: Reverse reactions are actually more efficient with elemental gauge consumption. A 1U Pyro attack on Hydro aura only eats 0.5U of that Hydro, but flip it around and 1U Hydro on Pyro devours 2U of Pyro. This matters more than you'd think for sustained reaction uptime.
Transformative Reactions: The Level 90 Gang
These reactions – Overload, Swirl, Bloom, and friends – completely ignore your ATK stats. They don't care about your talent levels. CRIT stats? Irrelevant. They scale purely off the triggering character's level and EM.
At Level 90, you're working with a base multiplier of 1446.85. But the damage differences between reaction types are wild:
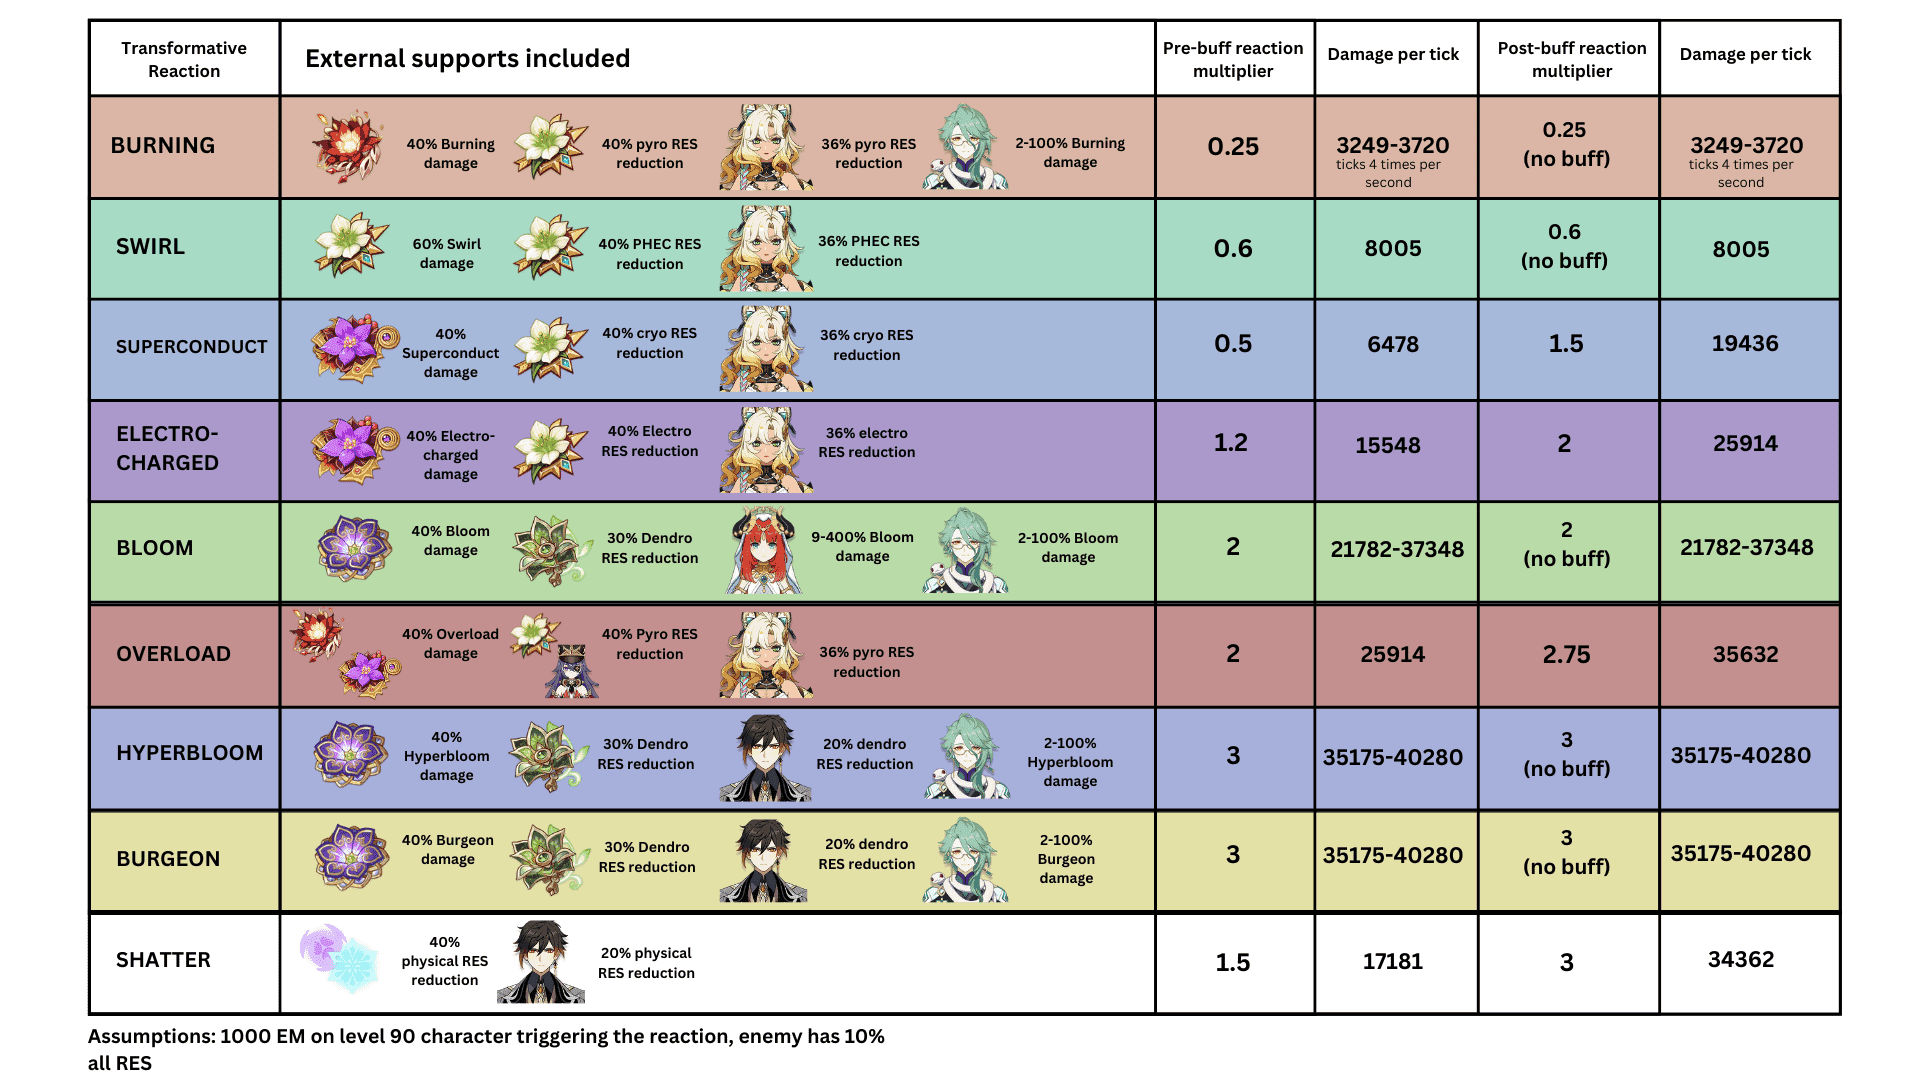
Damage Multiplier Reality Check:
Hyperbloom: 3.0x (4,340 base damage)
Burgeon: 3.0x
Overload: 2.0x
Bloom Explosion: 2.0x
Electro-Charged: 1.2x per tick
Swirl: 0.6x
Yeah, Hyperbloom hits five times harder than Swirl. That's not a typo.
Quicken Reactions: The Hybrid Approach
Quicken's weird. Electro + Dendro creates this 7-second aura that enables Aggravate and Spread – and these reactions add flat damage that then gets multiplied by your CRIT stats. It's additive damage that benefits from both EM and traditional DPS investment.
The formula looks like this:AdditiveBaseDMG=LevelMultiplier×ReactionMultiplier×(1+EMBonus+ReactionDMGBonus). Aggravate uses a 1.15 multiplier, Spread gets 1.25.
Level 90 Base Values:
Aggravate Base Damage Bonus: 1,663.88
Spread Base Damage Bonus: 1,808.57
Amplifying Reaction EM Sweet Spots
The Diminishing Returns Reality
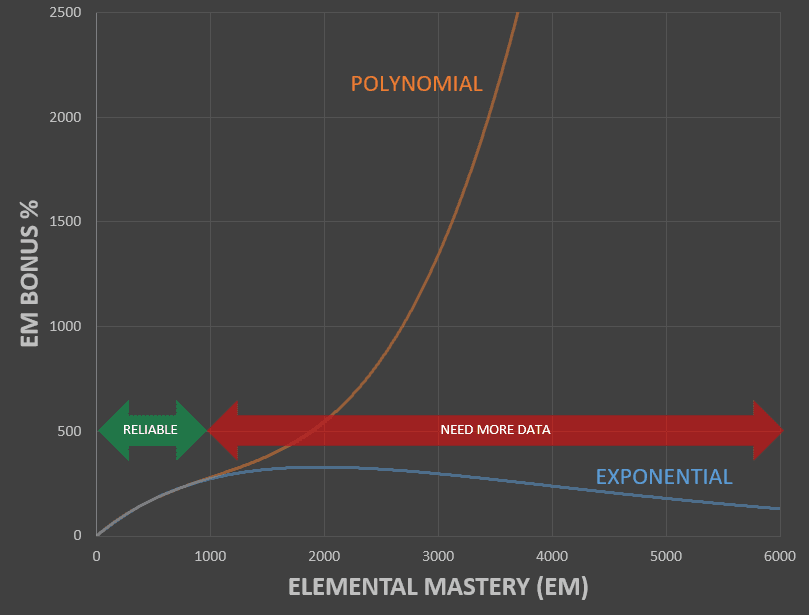
The EM bonus formula(2.78×EM)/(EM+1400) creates this curve where you get decent returns up to 300 EM, then it starts falling off hard. At 100 EM, you're getting a 15% damage bonus. Push to 300 EM and you hit 37%. But doubling that to 600 EM? You only reach 54%.
My Recommended Ranges (based on actual testing):
Main DPS characters like Hu Tao: 100-200 EM – prioritize CRIT first
Sub-DPS like Xiangling: 150-300 EM depending on team buffs
Hybrid builds: 200-400 EM if you can maintain good CRIT ratios
Real Team Examples:
Reverse Vape setup: Hu Tao with 150-200 EM + Xingqiu can trigger 8-10 reactions per rotation
Reverse Melt comp: Rosaria with 200-300 EM + Xiangling – timing's crucial for those 4-6 reactions
Transformative Reactions: Go Big or Go Home
Level 90 Isn't Optional
I cannot stress this enough – get your Transformative reaction triggers to Level 90. The damage jump from 80 to 90 is 34.3%. That's bigger than most artifact upgrades you'll ever see.
Level 90 gives you that 1,446.85 base multiplier versus Level 80's measly 1,077.44.
EM Targets That Actually Work:
Solo performance: 800-1000 EM minimum
With Sucrose A4 support: 600-800 personal EM (she shares 20%)
With Kazuha C2: 500-700 personal EM (200 EM buff)
With Nahida Burst active: 400-600 personal EM (up to 250 EM boost)
At 1000 EM, you're looking at 139% damage bonus using the formula(5×EM)/(EM+1200). That translates to a 2.39x damage multiplier.
Swirl's Secret Sauce
Anemo characters have this beautiful double-dipping mechanic with Swirl. When you Swirl Electro onto a Quickened enemy, both the Swirl damage AND the resulting Aggravate scale with your Anemo character's EM. It's honestly broken.
Real Numbers:
800 EM Kazuha Swirl: ~8,500 damage per element
1000 EM Sucrose Swirl: ~9,200 damage per element
Aggravated Swirl bonus: Additional 3,000-4,000 damage per target
Quicken: The Balanced Approach
Why Aggravate and Spread Love Both Stats
Here's where it gets interesting. At 500 EM, Aggravate gives you 1,663.88 × 1.15 × 1.68 = 3,215 flat damage bonus before CRIT even touches it. Factor in 70% CRIT Rate and 140% CRIT DMG, and you're averaging 5,566 additional damage per trigger.
The Sweet Spot Build:
EM Range: 400-600 for balanced performance
CRIT Ratio: Keep that 1:2 CRIT Rate:CRIT DMG ratio
DMG% Bonus: Electro/Dendro DMG% actually affects the additive bonus
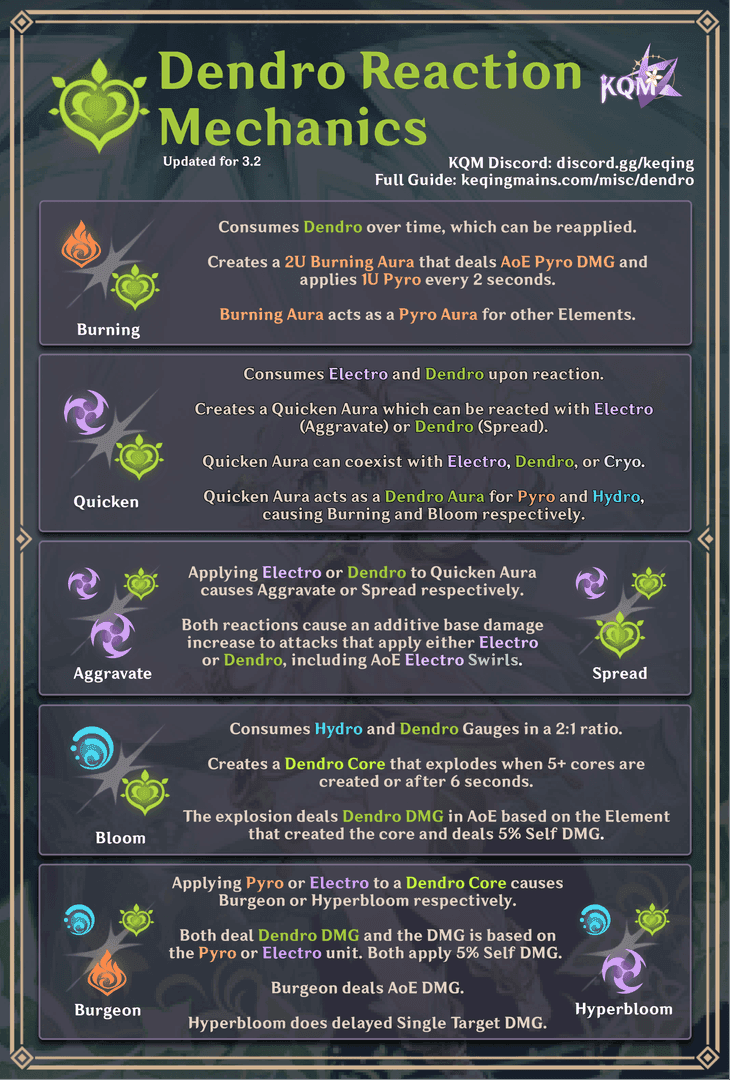
The Quicken aura sticks around for 7 seconds and doesn't get consumed by Aggravate or Spread. But throw Pyro or Hydro into the mix? Poof – Burning or Bloom reactions will eat that aura.
Bloom Family: Core Management 101
Understanding Dendro Core Limits
Bloom creates these Dendro Cores, but here's the catch – only 5 can exist at once. Create a 6th? The oldest one explodes immediately. Otherwise, they naturally detonate after 6 seconds.
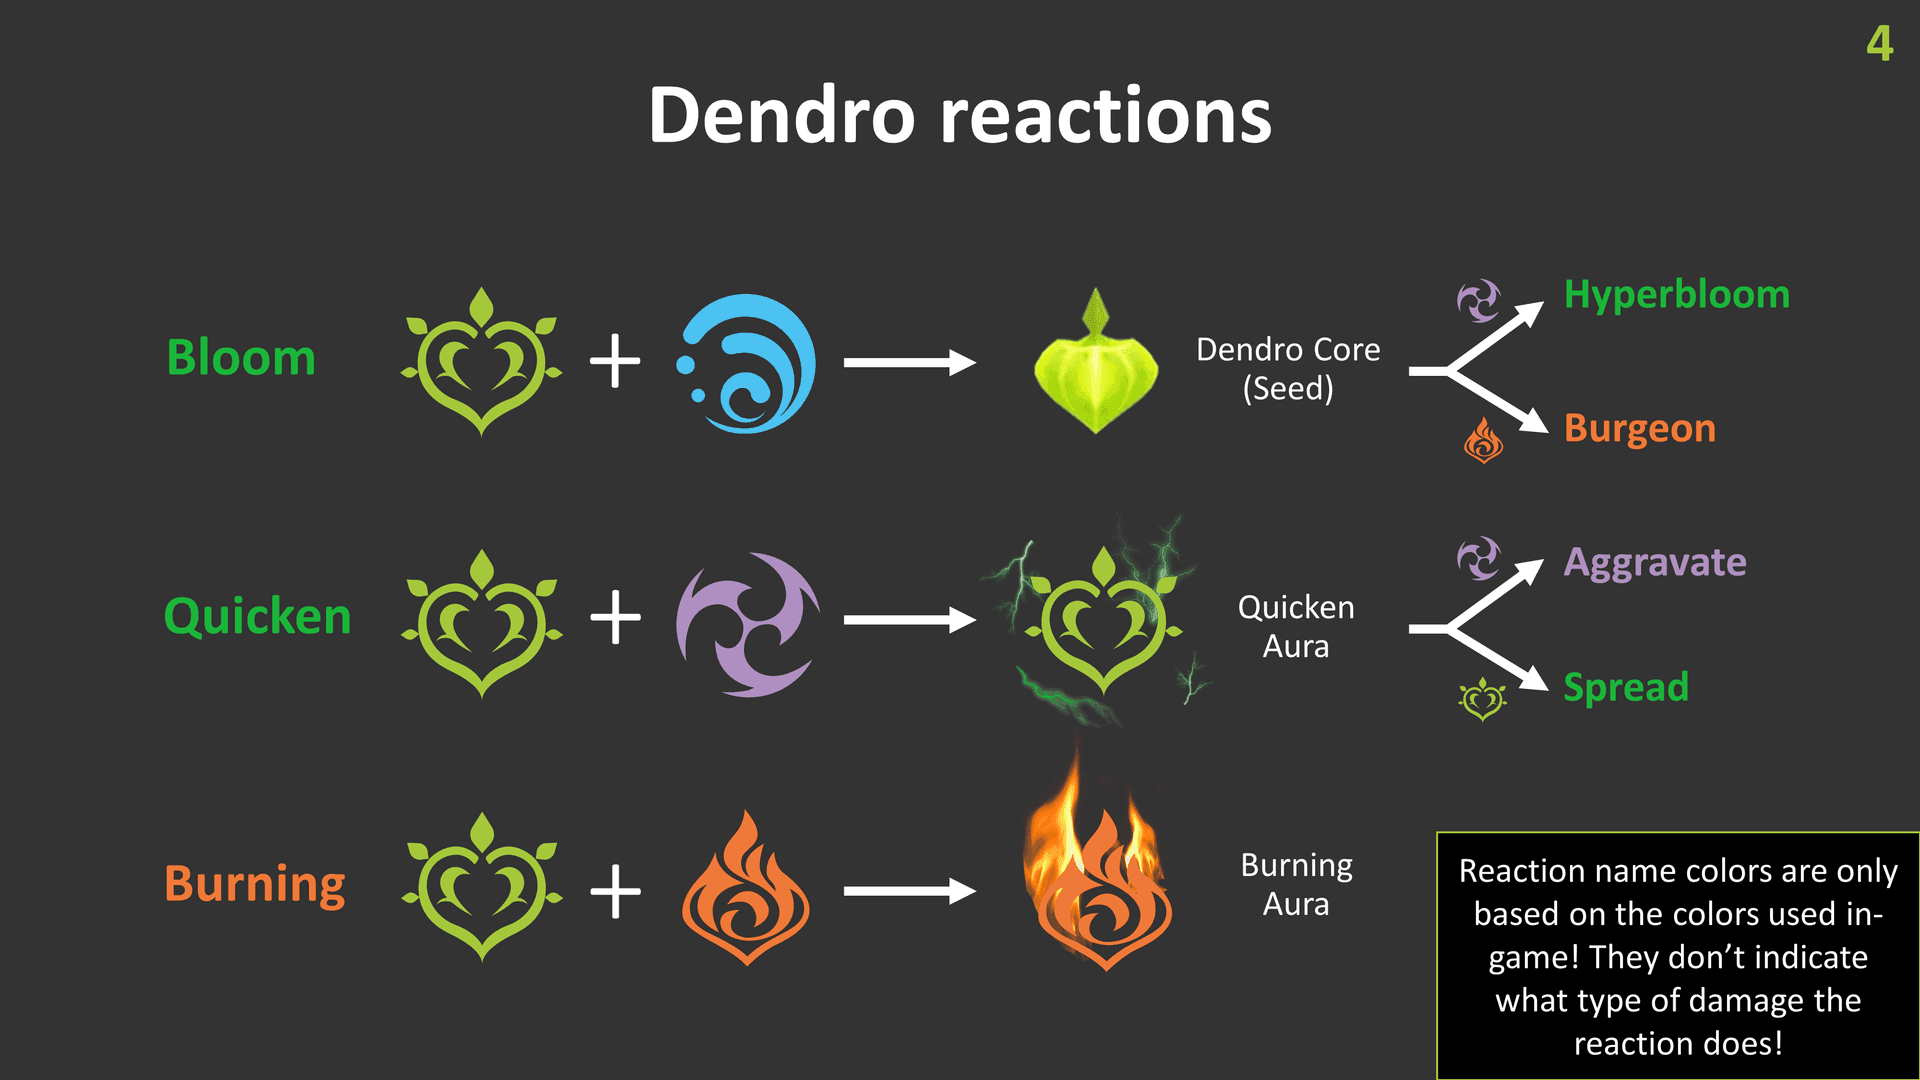
Core Interaction Damage:
Hyperbloom (Electro + Core): 3.0x multiplier, single-target homing
Burgeon (Pyro + Core): 3.0x multiplier, larger AoE
Natural Bloom: 2.0x multiplier, moderate AoE
Both Hyperbloom and Burgeon have this 2-instance-per-0.5-seconds ICD per enemy. And here's something crucial – the damage scales with whoever triggers the core detonation, not who created the core.
Team EM Strategy:
Core Generators (Kokomi, Nahida): Focus on Energy Recharge and staying alive
Core Triggers (Kuki Shinobu, Thoma): 800-1000+ EM with Level 90 priority
Support Buffers (Sucrose, Kazuha): 600-800 EM for team utility
For convenient resource management during those marathon artifact farming sessions, Genesis Crystal code instant pay options through BitTopup keep you going without interruption.
Character-Specific Breakdowns
Anemo Supports: The EM Sharers
Kazuha's EM Needs:
C0 builds: 800-1000 EM for personal Swirl damage
C2 builds: 600-800 EM (that 200 EM party buff reduces personal requirements)
Sucrose Distribution:
A4 Passive: Shares 20% of her EM (she doesn't get her own buff though)
Target Range: 800-1200 EM for maximum team benefit
Dendro DPS Considerations
Nahida Optimization:
On-field DPS: 600-800 EM with Dendro DMG% Goblet
Off-field Support: 400-600 EM, focus on Skill uptime
Burst Synergy: Benefits from highest EM party member (caps at 250 EM bonus)
Tighnari Builds:
Spread Focus: 400-600 EM with CRIT prioritization
Charged Attack Scaling: Balance EM with ATK% and CRIT stats
Making It Work: Practical Implementation
Artifact Set Reality Check
Reaction-Specific Sets:
Gilded Dreams: 2pc +80 EM, 4pc gives ATK/EM based on party composition
Flower of Paradise Lost: 2pc +80 EM, 4pc +40% Bloom damage (+25% per stack, max 4)
Thundering Fury: 4pc +40% Overloaded/Electro-Charged/Superconduct/Hyperbloom, +20% Aggravate
Viridescent Venerer: 4pc +60% Swirl damage, -40% enemy RES to swirled element
EM Main Stat Values (5-star Level 20):
EM Sands/Goblet/Circlet: 186.5 EM each
Triple EM artifacts: 559.5 EM before substats
Max EM substat roll: 23.31 per roll
Team Buff Stacking
EM Buff Sources:
Sucrose A4: 20% EM share (excluding herself)
Kazuha C2: 200 EM within Burst field
Nahida Burst: 25% of highest party EM (250 max) to active character
Albedo Burst: 125 EM for 10 seconds
Dendro Resonance: 50 EM base + conditional bonuses
Common Mistakes I See Everywhere
Red Flags:
Transformative trigger below Level 90 with perfect EM artifacts (level first!)
Amplifying DPS with 400+ EM but terrible CRIT ratios
Support characters with high EM but can't get their Burst up
Ignoring team EM buffs when calculating personal needs
Abyss-Specific Benchmarks:
Single-Target floors: Amplifying reactions with 200-400 EM
Multi-Target chaos: Transformative reactions with 800+ EM
Mixed scenarios: Quicken reactions with 400-600 EM balance
FAQ: The Questions Everyone Asks
What's the most important EM breakpoint for new players? Start with 200-300 EM on Amplifying reaction DPS like Diluc or Yanfei. You'll see substantial damage increases without tanking your CRIT stats.
Should I level Transformative characters to 90 before farming artifacts? Absolutely. That 30-34% damage increase from leveling beats any artifact upgrade you'll get on a Level 80 character.
How do I know when EM investment hits diminishing returns? For Amplifying reactions, if adding 100 EM gives less damage than equivalent CRIT investment, you've hit the wall. For Transformative reactions, keep stacking until 800-1000.
Can I share EM artifacts between characters? EM artifacts are super transferable. Triple EM Viridescent works on any Anemo support, Gilded Dreams fits most Transformative triggers.
How do team buffs change my EM requirements? Dramatically. With Sucrose's 20% share and Dendro Resonance's 50 EM, you can reduce personal EM targets by 200-300.
What's the build difference between Aggravate and Hyperbloom? Aggravate wants both EM and CRIT (400-600 EM with balanced ratios). Hyperbloom only cares about EM and character level – CRIT stats do literally nothing.