

Elemental Gauge Theory (GU) quantifies elemental applications using 1U, 2U, 4U values, explaining aura duration and reaction mechanics. Understanding the 20% aura tax and Internal Cooldown systems optimizes elemental reactions and prevents aura disappearing problems.
Understanding Elemental Gauge Theory Fundamentals
What is Elemental Gauge Theory (GU)
Here's something that'll blow your mind: every elemental attack in Genshin carries invisible numbers that determine whether your reactions work or fail spectacularly. Elemental Gauge Theory quantifies these applications using Gauge Units (GU), where 1 Gauge Unit equals 25 units of Element Durability buried in the game's code.
Every elemental attack carries specific GU values—1U, 2U, or 4U—determining application strength. But here's the kicker: the system immediately slaps a 20% Aura Tax on everything. So that 1U attack? Creates a 0.8U aura. 2U becomes 1.6U. 4U drops to 3.2U. It's like Teyvat's version of income tax, but for elements.
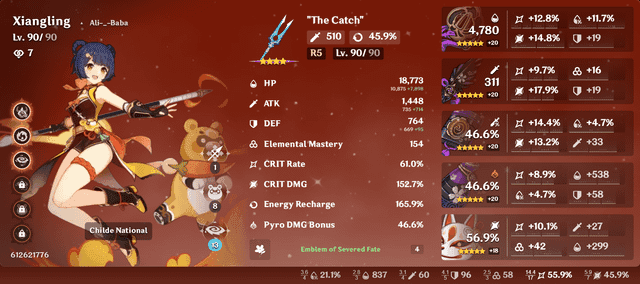
Take Xiangling's Pyronado—it applies 1U Pyro with no Internal Cooldown, which makes it absolutely broken for reverse Vaporize setups. Understanding these mechanics isn't just theory crafting; it's essential for Spiral Abyss optimization where every reaction counts. Genshin Impact top up with PayPal through BitTopup offers secure Primogem acquisition for those character pulls you'll need to implement these advanced strategies.
The Science Behind Elemental Applications
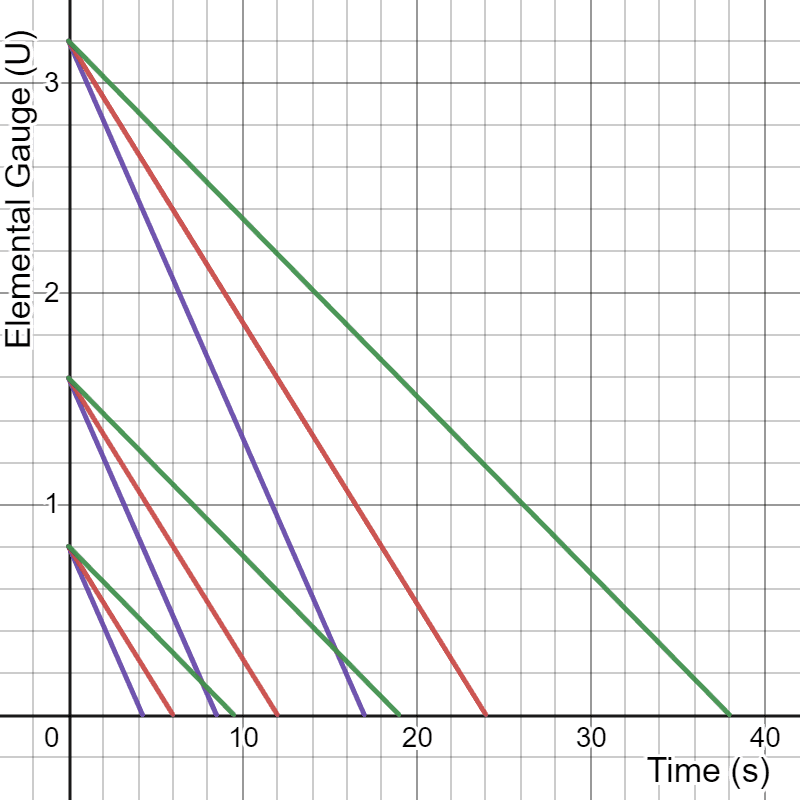
The math behind aura duration follows this formula: (2.5 × GU + 7) seconds, applied to those post-tax values I mentioned.
1U applications create 0.8U auras lasting 9.5 seconds with slow decay rates. 2U applications bump that up to 1.6U auras lasting 12 seconds—but they decay faster. 4U applications? They create 3.2U auras lasting 17 seconds with very fast decay rates. It's a trade-off between duration and stability.
Now here's where it gets interesting: Decay Rate Inheritance. You can reapply elements to inherit slower decay rates from initial applications—except Pyro since Version 3.0 (thanks, HoYoverse). A 1U application followed by 2U results in a 1.6U aura decaying at the slower 1U rate. That potentially lasts 19 seconds instead of 12.
Elemental Gauge Units (GU) Classification System
Character-Specific GU Values and Applications
Most normal attacks and elemental skills stick to 1U, while elemental bursts and charged attacks often pack 2U punches. But the devil's in the details—and the exceptions.
Xiangling's Guoba and Pyronado both apply 1U Pyro with no ICD. Childe's melee stance applies 2U Hydro, making him excellent for forward Vaporize setups that need stronger applications. Kokomi's elemental skill applies Hydro without ICD restrictions, which is why she's become the go-to for Electro-Charged teams.
Yelan's burst operates on a 2-second timer with 3-hit counting. Raiden's skill uses a 0.9-second timer, enabling rapid Electro application for Quicken reactions. These aren't random numbers—they're carefully tuned for specific team compositions.
Strategic Application Patterns
1U applications excel at reverse reactions due to that 0.5x consumption coefficient. A 2U Hydro aura can sustain four 1U Pyro applications before disappearing.
2U applications establish stronger foundations for forward reactions but require careful timing due to faster decay. 4U applications provide extended duration for sustained combat—but you need proper maintenance to prevent premature disappearance. Nothing's more frustrating than watching your perfectly timed rotation fall apart because your aura vanished.
Internal Cooldown (ICD) and GU Interaction
Standard ICD Mechanics
ICD operates through dual conditions: a 2.5-second timer and a 3-hit counter. Elements apply on the first hit, then when either 2.5 seconds pass or the fourth hit lands. Timer expiration resets the hit counter to zero, but reaching the 3-hit threshold doesn't reset the timer.
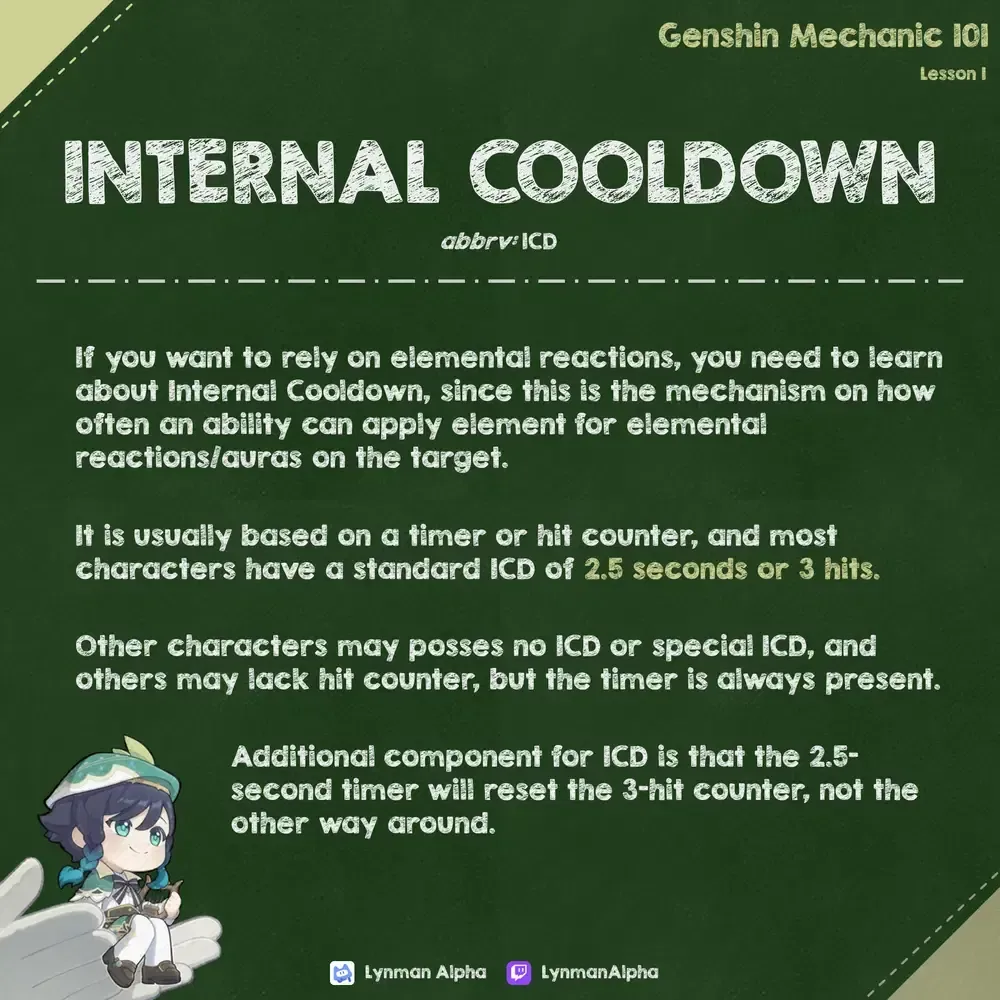
This is why some characters feel inconsistent—they're fighting against ICD restrictions.
Notable no-ICD characters include Xiangling (Pyronado), Kokomi (Elemental Skill), Ganyu (Frostflake bloom), and Kazuha (Elemental Burst). These enable consistent elemental application regardless of hit frequency, dramatically increasing reaction potential. It's why Xiangling remains meta after three years.
Non-Standard ICD Patterns
Nahida's skill implements a 1.9-second timer after 1U applications from Tri-Karma Purification. Yelan uses that 2-second timer with 3-hit counting I mentioned earlier. These patterns create unique application rhythms requiring specific rotation timing for optimal reaction frequency.
Learning these patterns separates good players from great ones.
Elemental Reaction Priority and Consumption
Gauge Consumption Rates
Forward reactions use a 2.0x consumption modifier—1U trigger consumes 2U aura. Reverse reactions use 0.5x modifier—1U trigger consumes 0.5U aura. Transformative reactions like Overloaded use 1.0x, while Swirl and Crystallize use 0.5x modifiers.
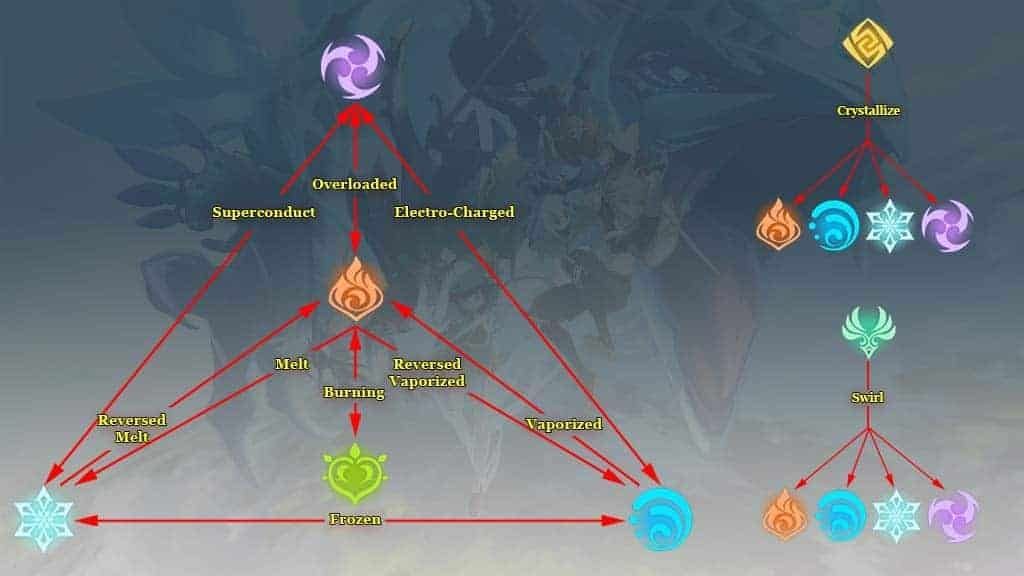
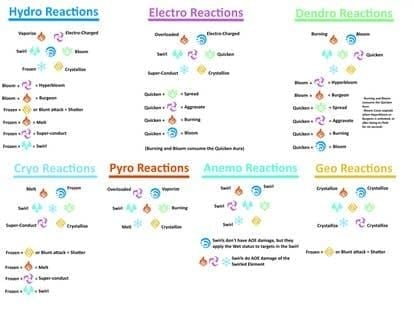
Here's something that trips up newer players: Electro-Charged maintains both Hydro and Electro auras simultaneously. When you apply Pyro to Electro-Charged enemies, Overloaded takes priority over Vaporize, consuming the Electro gauge first. Understanding these priorities enables predictable soup team strategies.
Multi-Element Scenarios
Quicken reactions create non-decaying auras where subsequent Electro/Dendro applications trigger Aggravate/Spread without consuming the base aura. It's broken in the best way possible.
Burning maintains both Dendro and Pyro while consuming 0.4U Dendro per second and reapplying 1U Pyro every 2 seconds. This creates interesting interactions with other elements—though Burning teams remain niche due to self-damage concerns.
Common Aura Disappearing Problems
Over-Application and Timing Issues
Excessive elemental application consumes auras faster than intended through unplanned reactions. I've seen players run Xingqiu and Yelan simultaneously, creating Hydro overflow and inconsistent timing. The solution involves spacing applications and staggering burst timings.
Rotation timing errors create gaps allowing natural decay before refresh attempts. Those high-decay-rate auras from 2U/4U applications disappear faster than expected without proper maintenance. Correcting this requires understanding ability durations, animation frames, and effective application windows.
Trust me—practice makes perfect here.
Practical Applications in Team Building
Optimal Gauge Ratios
Reverse Vaporize teams require 2:1 Hydro to Pyro ratios accounting for that 0.5x consumption coefficient. Forward Melt teams need 3:1 or 4:1 Cryo to Pyro ratios due to 2.0x consumption rates. The National team demonstrates optimal implementation through Xiangling's 1U Pyro with Xingqiu's strong Hydro application.
Freeze teams utilize coexisting Cryo and Hydro auras. Quicken teams leverage non-consuming Catalyze reactions, pairing rapid Electro applicators with consistent Dendro supports. Genshin Impact top up with credit card via BitTopup provides reliable Primogem access for obtaining optimal character combinations. BitTopup offers competitive pricing, fast delivery, and secure payment processing—essential when you're chasing specific characters for team synergy.
Character Synergy Analysis
Xingqiu and Yelan create excellent synergy through different application timings. Xingqiu's consistent 1U applications complement Yelan's stronger but less frequent applications. For reaction teams, prioritize application consistency over raw damage when selecting supports.
Advanced GU Optimization Strategies
Rotation and Energy Management
Advanced optimization requires precise ability timing to maximize gauge efficiency and reaction frequency. Snapshot timing coordination with buff applications while maintaining elemental sequences demands detailed mechanical knowledge—but the damage increase is substantial.
Energy Recharge balancing with reaction stats creates sustainable rotations maintaining both damage and consistency. Spiral Abyss scenarios favor front-loaded damage and efficient gauge usage due to time constraints. Flexible compositions that adjust application patterns based on enemy behavior perform better across diverse scenarios.
Frequently Asked Questions
What causes elemental auras to disappear faster than expected? High decay rates from strong applications (2U/4U), excessive consumption through unplanned reactions, or ICD gaps in reapplication. Use 1U applications first, then stronger ones to inherit slower decay rates—except Pyro since Version 3.0.
How do I calculate optimal gauge ratios for teams? Reverse reactions need 2:1 ratios (0.5x consumption), forward reactions need 3:1 or 4:1 ratios (2.0x consumption). Factor in that 20% aura tax, ICD patterns, and natural decay rates when calculating application frequencies.
Which characters maintain consistent elemental auras best? No-ICD characters: Xiangling (Pyronado), Kokomi (Elemental Skill), Kazuha (Elemental Burst). Non-standard ICD: Yelan (2s timer), Raiden (0.9s timer). Prioritize longer durations and consistent patterns over burst damage.
How does the Pyro decay rate exception affect team building since Version 3.0? Pyro no longer inherits slower decay rates, making sustained Pyro presence harder to maintain. Compensate with more frequent applications or stronger initial applications, adjusting rotation timing for faster natural decay.
What's the difference between reaction priority and gauge consumption? Priority determines which reaction occurs first with multiple elements—it's a fixed hierarchy. Consumption determines aura removal amount (0.5x Swirl, 1.0x Overloaded, 2.0x forward Vaporize). Both concepts enable multi-element scenario control.
How do I troubleshoot inconsistent reaction triggers? Check timing against ICD patterns, verify gauge ratios match consumption rates, identify unintended reactions consuming auras prematurely, ensure proper positioning, and practice rotations in controlled environments. The training domain is your friend here.