

Quick Answer: DPS characters use ATK%/Elemental DMG%/CRIT, supports prioritize Energy Recharge/HP%/utility stats, healers focus on HP%/Healing Bonus. Elemental DMG% goblets outperform ATK% by 15-25% for damage dealers. Maintain 1:2 CRIT Rate to CRIT DMG ratio.
Understanding Artifact Main Stats
Let's be honest—artifact farming is where dreams go to die. But understanding main stats? That's where you can actually take control.
Main Stat Drop Rates and Values
Here's the brutal truth about RNG: Sands drop rates favor HP% (26.68%), ATK% (26.66%), and DEF% (26.66%), while the actually useful Energy Recharge and Elemental Mastery sit at a measly 10% each. Goblets are even worse—those coveted Elemental and Physical DMG% pieces? 5% drop rate each. Meanwhile, HP% and ATK% mock you at 19.25% each.
Circlets offer slightly better odds. HP%, ATK%, and DEF% dominate at 22% each, but at least CRIT Rate, CRIT DMG, and Healing Bonus get a respectable 10% each.
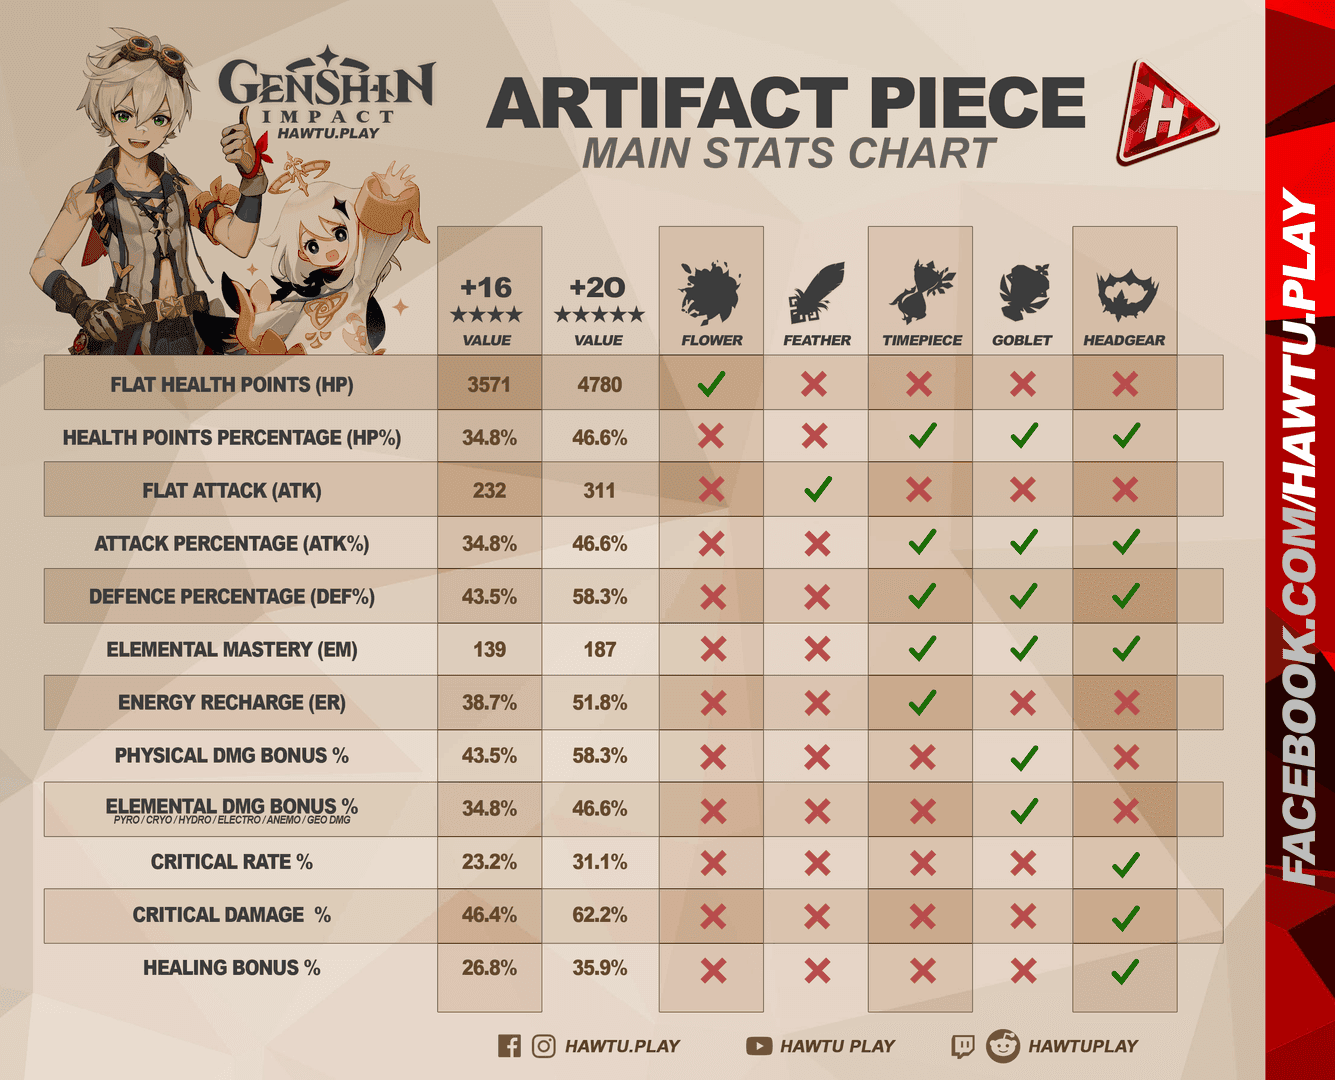
Why does this matter? A level 20 five-star artifact gives you 46.6% ATK, 31.1% CRIT Rate, or 62.2% CRIT DMG as main stats. Compare that to substat caps—5.83% ATK, 3.89% CRIT Rate, or 7.77% CRIT DMG per roll. The difference is staggering.
Damage Formula Impact
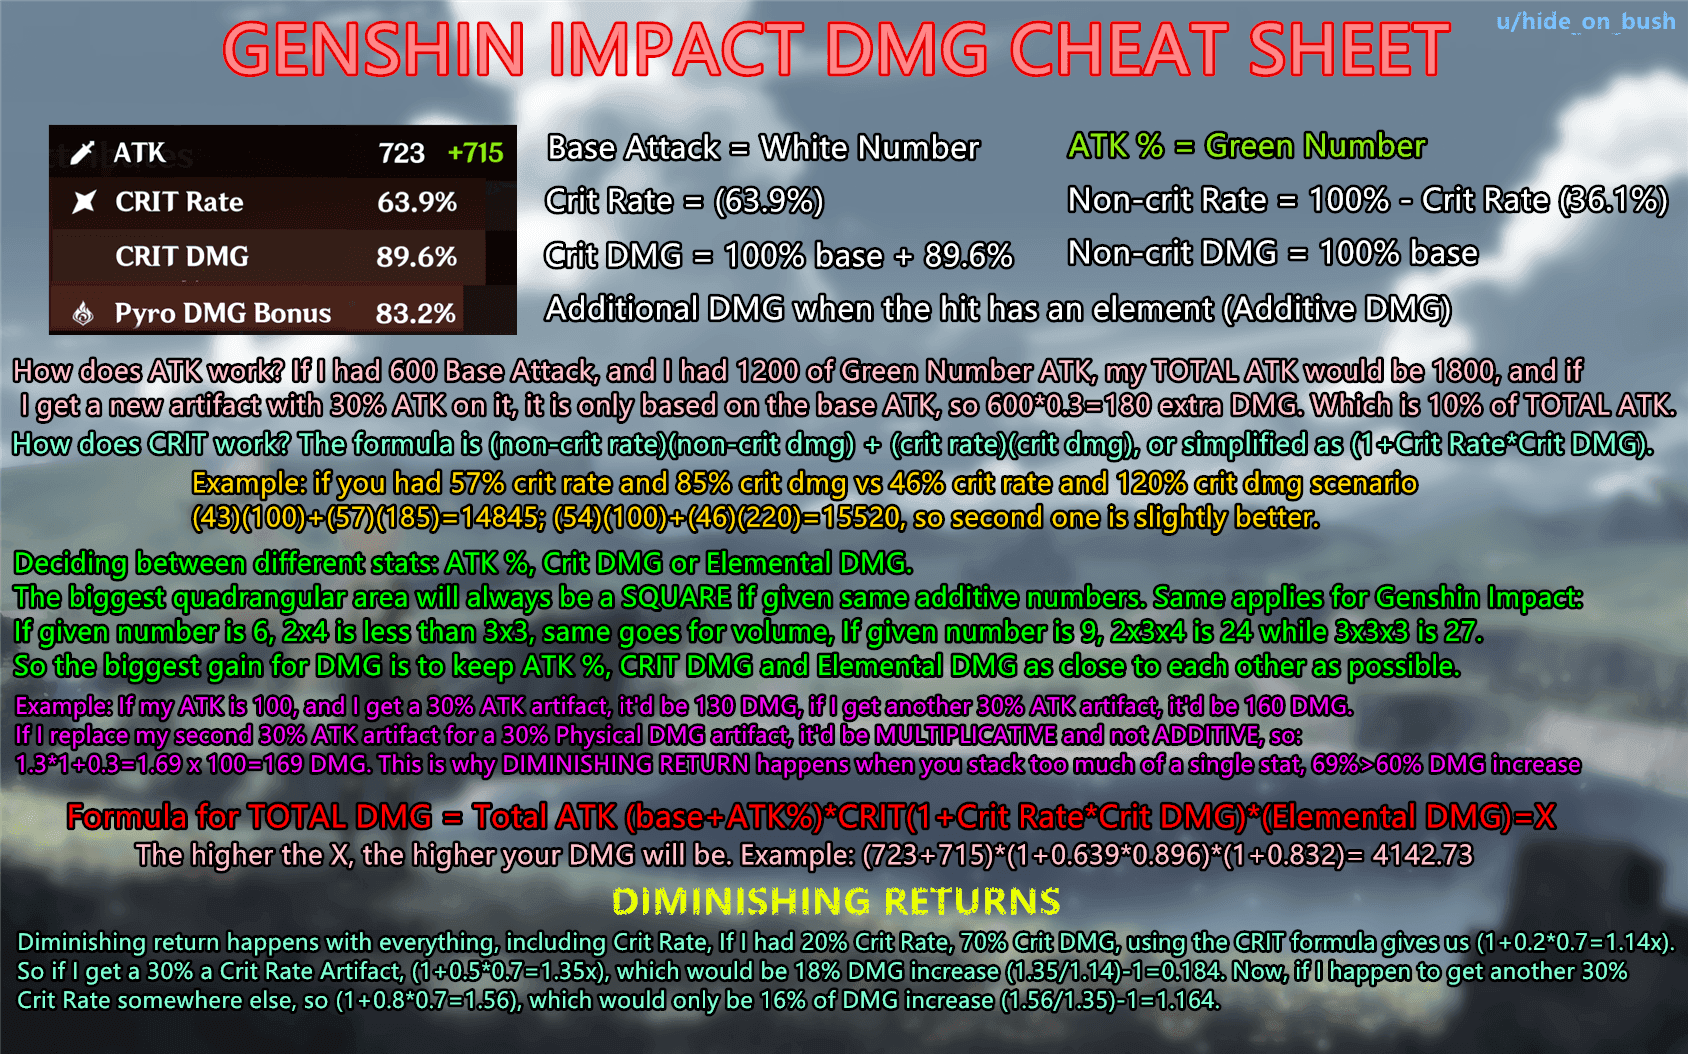
Here's where math becomes your best friend (trust me on this): Total damage = Base ATK × ATK% × DMG% × CRIT multipliers.
These operate as separate multiplicative categories. Think of it like compound interest—balanced investment across different multiplier types yields exponentially higher returns than dumping everything into one category. I've seen players increase their character effectiveness by 200-400% just by fixing their main stat allocation. No joke.
Main Stat Cheat Sheet by Slot
Sands (Timepiece) Priorities
Most of the time, you're looking at ATK% for standard DPS characters. Simple, consistent damage scaling.
But here's where it gets interesting:
DEF-Scaling DPS like Itto completely flip the script—DEF% replaces ATK% in their damage calculations
Reaction DPS builds (looking at you, Hyperbloom Kuki) want Elemental Mastery for those transformative reactions
Burst Supports need Energy Recharge to keep rotations smooth
Utility Supports often want HP% or DEF% when their kit scales with defensive stats
Goblet Selection
This is where I see the most mistakes. Let me be crystal clear: Elemental/Physical DMG% vs ATK% isn't even a contest.
DMG% goblets provide a multiplicative 46.6% damage bonus that applies to your entire damage calculation. I've run the numbers countless times—a character with 2000 ATK using an Elemental DMG% goblet consistently outdamages the same character with 2466 ATK using an ATK% goblet.
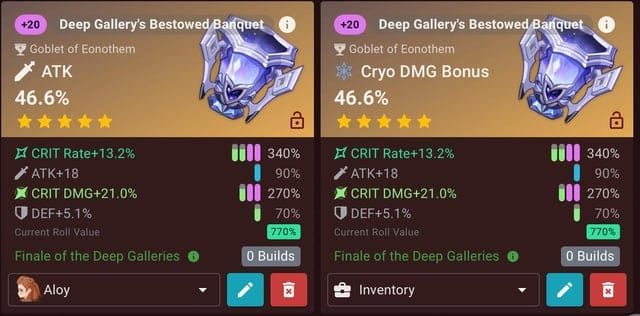
The math doesn't lie.
Specialized options exist, of course. HP% or DEF% for supports whose utility scales with these stats. EM goblets for Anemo supports focused on Swirl damage and transformative reaction characters. But for damage dealers? Elemental DMG% every single time.
Circlet Optimization
The 1:2 CRIT Rate to CRIT DMG ratio isn't arbitrary—it stems from artifact value distribution (31.1% CRIT Rate vs 62.2% CRIT DMG).
Healing Bonus gives you 35.9% healing effectiveness for dedicated healers like Kokomi. Utility consideration: CRIT Rate becomes crucial for Favonius weapon users who need reliable energy generation for the team.
Character-Specific Builds
DPS Character Optimization
Physical DPS follows a straightforward path: ATK% sands, Physical DMG% goblet, CRIT circlet. Physical DMG% shares that brutal 5% drop rate with Elemental variants but serves way fewer characters—farming efficiency nightmare, honestly.
Elemental DPS characters want ATK% sands, matching Elemental DMG% goblet, and CRIT circlet based on your existing ratios. Pro tip: factor in external buffs like Bennett's ATK bonus when prioritizing stats.
Hybrid damage dealers complicate things. Energy Recharge becomes crucial for burst-dependent characters, sometimes requiring ER sands despite the damage loss. But here's the thing—team DPS benefits more from consistent uptime than marginal individual damage increases.
Support Character Stats
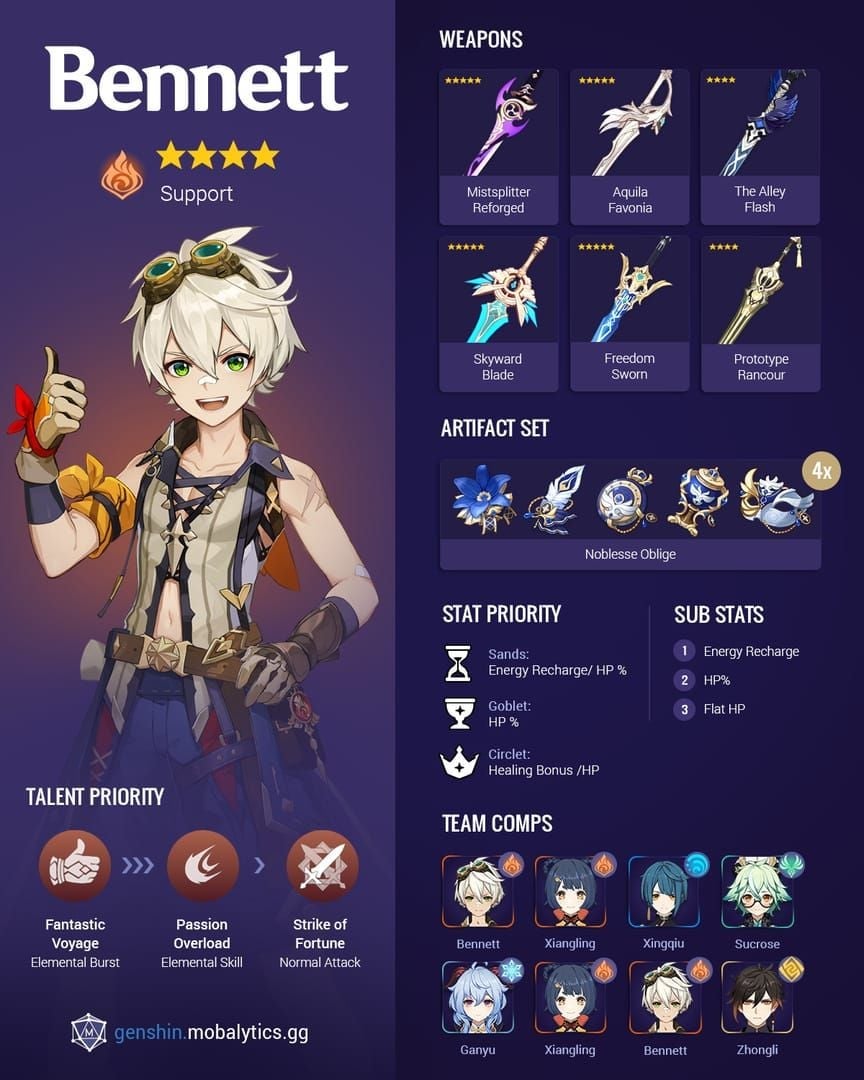
Bennett's a perfect example of why you need to understand scaling. His ATK buff scales only from Base ATK, making artifact ATK% completely irrelevant for his support role. Use ER sands, HP% goblet, Healing Bonus circlet instead.
Anemo supports? Full EM builds shine here—EM sands/goblet/circlet for Swirl damage and team buffs.
Shield supports like Zhongli require HP% main stats across multiple pieces for maximum shield absorption scaling.
Healer Builds
Kokomi's -100% CRIT Rate passive eliminates CRIT consideration entirely. Use HP%/ER sands, HP% goblet, Healing Bonus circlet for maximum healing output.
Combat healers need to balance ER for burst uptime with HP scaling for healing effectiveness.
Advanced Strategies
Elemental Mastery Scaling
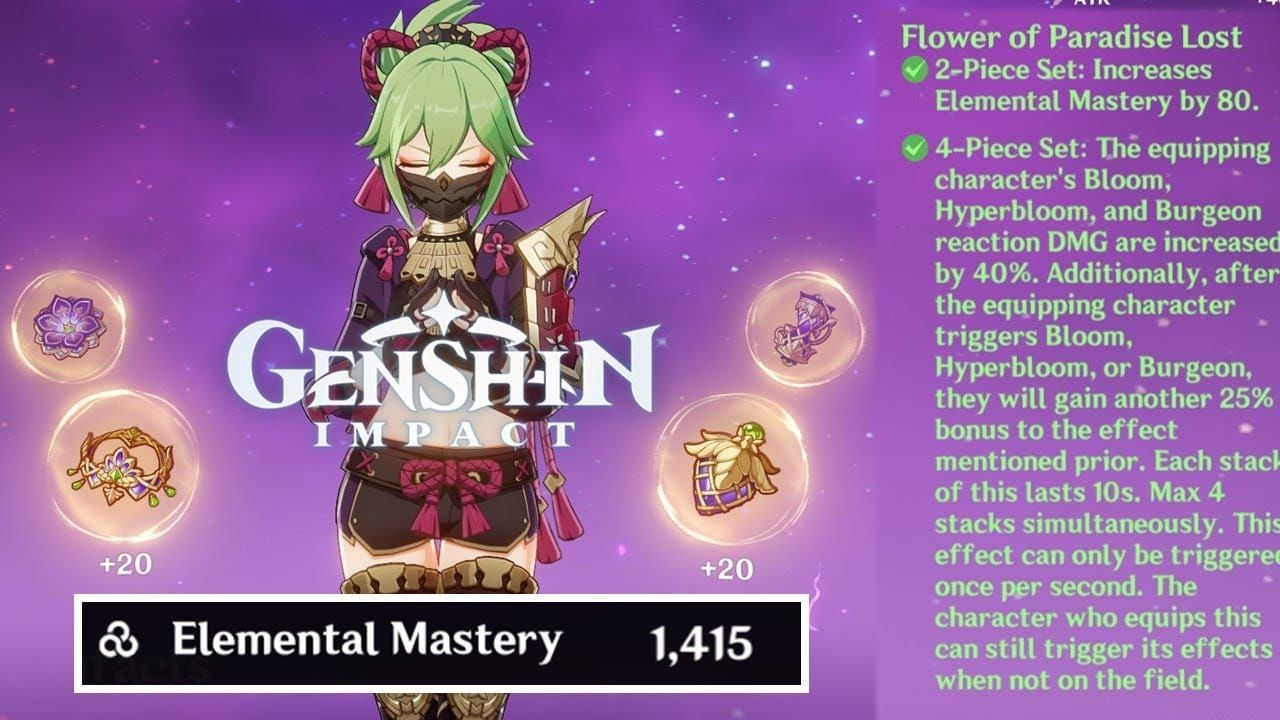
Hyperbloom Kuki completely abandons traditional DPS stats for pure EM stacking. Why? Hyperbloom damage scales exclusively with EM and character level. Optimal builds use EM main stats on all three randomized pieces with Flower of Paradise Lost or Gilded Dreams sets.
Energy Recharge Requirements
This is where theory meets reality. Burst-dependent characters require specific ER thresholds for consistent rotation. 80-cost burst characters like Xiangling need 180-220% ER depending on team support—sometimes necessitating ER sands over damage stats.
DEF-Scaling Characters
Itto substitutes DEF% for ATK% in damage calculations. Use DEF% sands, Geo DMG% goblet, CRIT circlet with Husk of Opulent Dreams for maximum damage.
For efficient artifact farming, Buy Genesis Crystals Online through BitTopup provides competitive pricing, instant delivery, and secure transactions for resin refreshes and extended farming sessions.
Common Mistakes
Wrong Stat Scaling
Building ATK% on DEF-scaling characters like Itto provides zero benefit. Literally zero. Support Bennett gains no team utility from artifact ATK% since his buff scales only with Base ATK.
Ignoring Multiplicative Scaling
ATK% goblets on DPS characters waste 15-25% damage potential versus Elemental DMG% alternatives. The multiplicative formula structure makes this non-negotiable.
Unbalanced Builds
Those 40 CRIT Value artifacts look amazing on paper, but insufficient Energy Recharge creates DPS loss through inconsistent burst uptime. Stat balance trumps individual stat maximization every time.
Implementation Tips
New Player Priorities
Prioritize correct main stats over set bonuses or substats. Period. A 4-star artifact with optimal main stats outperforms a 5-star piece with wrong stats. Start serious farming at AR45 for guaranteed 5-star drops.
Farming Efficiency
Level artifacts to +16 initially—the cost from +16 to +20 equals +0 to +16. Use Artifact Strongbox for resin-efficient access to older sets.
Establish minimum standards: correct main stats, 2-3 useful substats, meeting ER requirements. Don't chase perfection early on.
For cost-effective progression, Genshin Impact Top Up through BitTopup offers excellent value with 24/7 customer support, multiple payment methods, and instant delivery for optimal artifact farming efficiency.
FAQ
What are the best main stats for DPS characters? ATK% Sands, Elemental/Physical DMG% Goblet, CRIT Rate/DMG Circlet. DEF-scaling DPS like Itto use DEF% Sands instead.
Should I use ATK% or Elemental DMG% on Goblet? Elemental DMG% provides 15-25% damage increase over ATK% due to multiplicative scaling. Not even close.
When should I prioritize Energy Recharge? When characters can't maintain burst uptime. Burst-dependent supports often need 180-220% ER depending on team composition.
How do I choose between CRIT Rate and CRIT DMG Circlet? Maintain that 1:2 ratio. Use CRIT Rate if you have excess CRIT DMG, CRIT DMG if you have excess CRIT Rate. Aim for 50% CRIT Rate minimum—consistency matters.
What main stats for support characters? Energy Recharge for burst uptime, HP%/DEF% for scaling utility, Elemental Mastery for reaction supports. Avoid ATK% on non-damage supports—it's wasted potential.
Are Elemental Mastery main stats worth using? Essential for reaction specialists like Hyperbloom builds. Transformative reactions scale exclusively with EM and character level, making EM main stats optimal for these builds.