

Quick Overview: The Spiral Abyss in 5.4 kicks off its reset on February 16, 2025, for Cycle 1—think Swirl and Cryo amps that play right into the hands of F2P squads like National or Taser, making those 36-star clears feel within reach. Watch out for beasts like the Solitary Suanni packing 3,452,386 HP; hit 'em hard with Vaporize setups and ER builds pushing 160-200%. You can snag 600 Primogems each cycle by leaning on 4-star lineups, smart grouping, and tight rotations—proving low-spenders can thrive.
Getting the Lay of the Land in Spiral Abyss 5.4: Fresh Twists for F2P Folks
Look, Spiral Abyss 5.4 flips the script every two weeks on the 16th—Cycle 1 runs February 16 to March 16, 2025, then Cycle 2 picks up March 16 to April 16. Enemies crank up to levels 95-100, throwing Ruin Guards with 728,407 HP your way, and those blessings? They unleash True DMG shockwaves whenever you heal or plunge. In Phase 1, Floor 12's first half cranks Swirl DMG by 600%, while the second half juices Hydro Skill DMG by 75%. Floor 11 in Phase 1 tosses in +200 EM, letting Hyperbloom cores pop for over 30,000 DMG each. F2P rigs can match 70-80% of what whales pump out, and get this—17% of players are nailing full 36 stars.
Ever wonder why resets sneak up on you? (1) Peek at in-game alerts on the 16th to stay ahead. (2) Grind that Emblem domain for Xiangling's 160% ER before the Swirl-heavy Cycle 1 hits. (3) Time your heals mid-battle to blast shockwave AoE through Hilichurl packs. (4) Lean Pyro hard against those Cryo Mages (208,116 HP) lurking at level 95 on Floor 12-1.
Shifts in the Enemy Roster and Cracking Those Elemental Shields
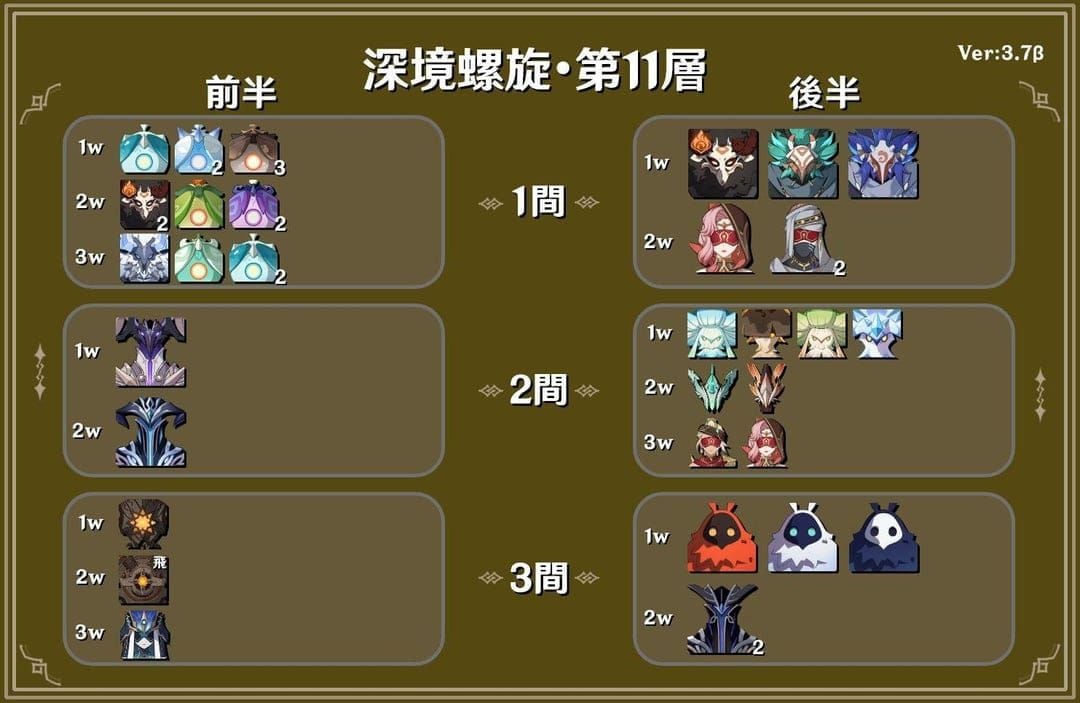
Cycle 1 on Floor 12-1 starts with Cryo and Pyro Abyss Mages (208,116 HP apiece)—shatter 'em using Geo or their opposites. Then the second half rolls in a Ruin Guard (728,407 HP) and Ruin Grader (936,523 HP), where Geo resonance shines. Switch to Cycle 2, and you're facing Abyss Lectors (665,972 HP) plus Maguu Kenki (1,331,944 HP) behind Electro shields—Xiangling's Pyro cuts through nicely. Floor 12-2 in Cycle 1 pits you against Pyro and Cryo Hilichurl Shooters (91,975 HP) and that Experimental Field Generator (3,032,097 HP), screaming for National Vaporize to crank out 40,000+ DPS. Cycle 2's Perpetual Mechanical Array (2,472,028 HP) demands you hold Nightsoul State for 12 seconds with a F2P Geo Traveler.
A few quick plays: (1) Bring Xingqiu's Hydro to melt those Pyro Lectors. (2) Herd the shooters using Sucrose's Skill before her burst drops. (3) Layer Cryo (hello, Kaeya) with Pyro and Hydro to stun the Cycle 1-3 Suanni (3,452,386 HP) even in its invuln phase. (4) Flip to Noelle's Geo for Cycle 2 Ruin brawls, keeping shields at 100% uptime.
Blessing of the Abyssal Moon: Squeezing Every Drop from Those Damage Boosts
Cycle 1's Stirring Moon? It fires off True DMG shockwaves on heals every 3 seconds—perfect for Bennett in those drawn-out, multi-wave scraps. Cycle 2 shifts to plunging attacks sparking shockwaves, bumping DMG by 75% against Primal Constructs (525,306 HP each). Team up Barbara with Cycle 1 for wide AoE against the 20 foes swarming Floor 12-1. And those plunging buffs? They land 30% harder.
Here's how to make it count: (1) Slot in Bennett with 200%+ ER for Cycle 1 dominance. (2) Hit clustered Eremites (748,710 HP) with a heal right after your Skill for that shockwave payoff. (3) Weave in plunge normals post-Xingqiu Burst during Cycle 2. (4) Always position for packs—refresh every 3 seconds, and you're looking at 20-30% faster clears.
Ley Line Disorders: Shaping Your Squad Around the Chaos
Phase 1 Floor 12's opener gives +600% Swirl DMG—Sucrose, you're the star here. The back half? +75% Charged Attack Cryo DMG, so Kaeya or Rosaria step up. Phase 2 flips to +75% Hydro Skill DMG upfront, then +75% Plunging DMG. Sucrose's VV rips 40% resist in Taser comps against Hilichurl Berserkers (114,968 HP). Xingqiu's Rain Swords? They scale beautifully to 180-200% ER for Vaporize on the Eremite Stone Enchanter (831,900 HP).
Pro tips to lock it in: (1) Pump Sucrose to 200+ EM for Phase 1 glory. (2) Buddy Cryo spreaders with 4-piece Blizzard Strayer (+15% crit rate) for the second half push. (3) Keep off-field Xingqiu cycling in Phase 2. (4) Dial in that 160% ER during overworld runs before diving in.
How Rewards Stack Up: Primogems, Mora, and Artifact XP Unpacked
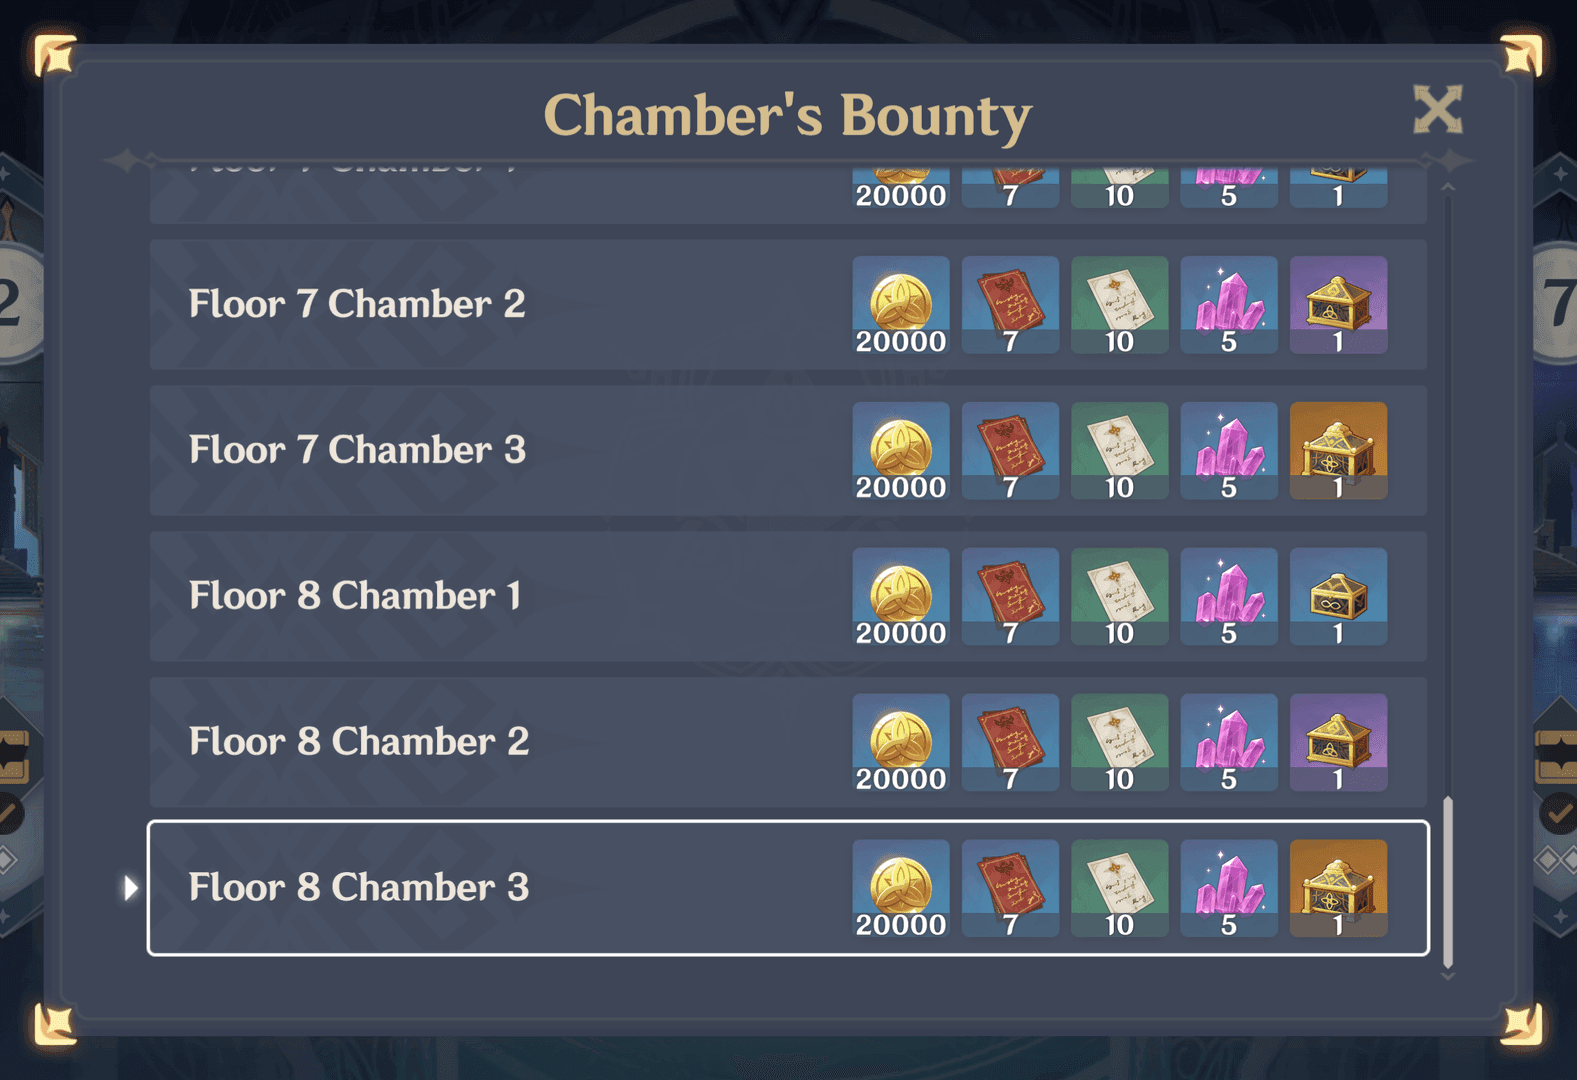
Nail a 36-star clear, and you're walking away with 600 Primogems per cycle—plus 60,000 Mora from Floor 12 alone, and Domain Reliquaries to fuel your artifact hunt. Chambers 1-2 dish out 25,000 Mora, 3 Hero's Wit, and Tier II Reliquaries; Chamber 3 gets Tier I. Floor 12 alone nets 200 Primogems and 2 Tier II Reliquaries, backing 418 Hero's Wit per character to hit level 90 talents and 70-80% DPS spikes.
Chase these wins: (1) Shoot for over 420 seconds left per chamber to grab those 3 stars. (2) Hammer Floor 12 first for the Primogem haul to bankroll your pulls. (3) Burn Reliquaries daily in the Emblem domain (80 resin). (4) Eye those biweekly resets—they add up to 1,200 Primogems yearly for us F2P grinders.
Building F2P Teams from the Ground Up for Spiral Abyss
F2P means eight characters at level 80/90, talents at 6/8/8, zeroing in on Vaporize (that sweet 2x Pyro amp). Break it down: Xiangling as main DPS, Xingqiu sub-DPS, Sucrose support, Bennett sustain. You'll sink about 7 million Mora and 418 Hero's Wit per character for 36-star potential. The National setup snapshots Bennett's 1,200+ ATK into Xiangling's Pyronado, dishing 40,000+ DPS against the Emperor of Fire and Iron (1,996,561 HP). Hyperbloom? It blasts 30,000+ per core, juiced by Floor 11's +200 EM.
Core moves: (1) Pick a Pyro resonance DPS for that +25% ATK with two Pyro on board. (2) Toss in Xingqiu to fire up Vaporize. (3) Hunt The Catch (32% Burst DMG, 32% ER). (4) Nail 160-200% ER through Emblem pieces (25% Burst DMG, 75% ER bonus).
The Four Key Roles: DPS, Sub-DPS, Support, and Sustain Demystified
Main DPS like Xiangling handles 60% off-field output. Sub-DPS? Fischl's Skill for steady Electro app. Support is Sucrose with VV's 40% shred. Sustain falls to Bennett at C1, dishing full ATK buffs sans HP limits. Taser's Beidou chains lightning (160-180% ER) alongside Fischl for AoE on 22 enemies in Floor 12-2.
Assign wisely: (1) Xiangling on DPS duty with 140-160% ER. (2) Xingqiu as sub-DPS (180-200% ER, Hydro DMG Goblet). (3) Sucrose support (pure EM, 4-piece VV). (4) Bennett sustain (HP% Goblet, 200% ER circlet).
Why Reactions Trump Raw Stats Every Time
Swirl slashes 40% resist and explodes with 600% DMG in Phase 1; Hyperbloom hits 30,000+ via EM triggers. F2P Vaporize (2x multiplier) pulls 70-80% of premium power over straight ATK builds, based on player data. National Vaporizes the Crackling Axe Mitachurl (344,905 HP) for a solid 40k DPS edge.
Dial it right: (1) Stack 200+ EM on Kuki for triggers. (2) Steer clear of Electro in Freeze comps. (3) Snapshot Sucrose's VV into Xiangling's Burst. (4) Run reaction tests in domains over 20-second loops.
Where to Pour Your Resources First: Character Priorities
Zero in on Bennett, Xiangling, Xingqiu, Sucrose—they're free from story and events. That's 7M Mora and 418 Wit per, plus crafted weapons. Xiangling's C4 stretches Pyronado; Bennett at 90 cranks 1,200 ATK buffs.
Start here: (1) Max the holy trio to 90. (2) Layer in Sucrose for VV. (3) Farm 80 resin daily in Emblem. (4) Settle for 2pc sets if 4pc feels out of reach.
Constellations or Talents? Resource Smarts
Talents first to 8/8 for 20-30% DPS bumps; Bennett's C1 ditches the HP cap, Xiangling's C4 piles on Pyronado hits. Sucrose A4 spreads 20% EM; Kuki C2 amps sustain.
Smart spends: (1) Cap core four at 6/8/8 minimum. (2) Snag C1 supports from events. (3) Bypass C6 unless it's free. (4) ER weapons beat constellations hands down.
Top F2P Team #1: The National Team
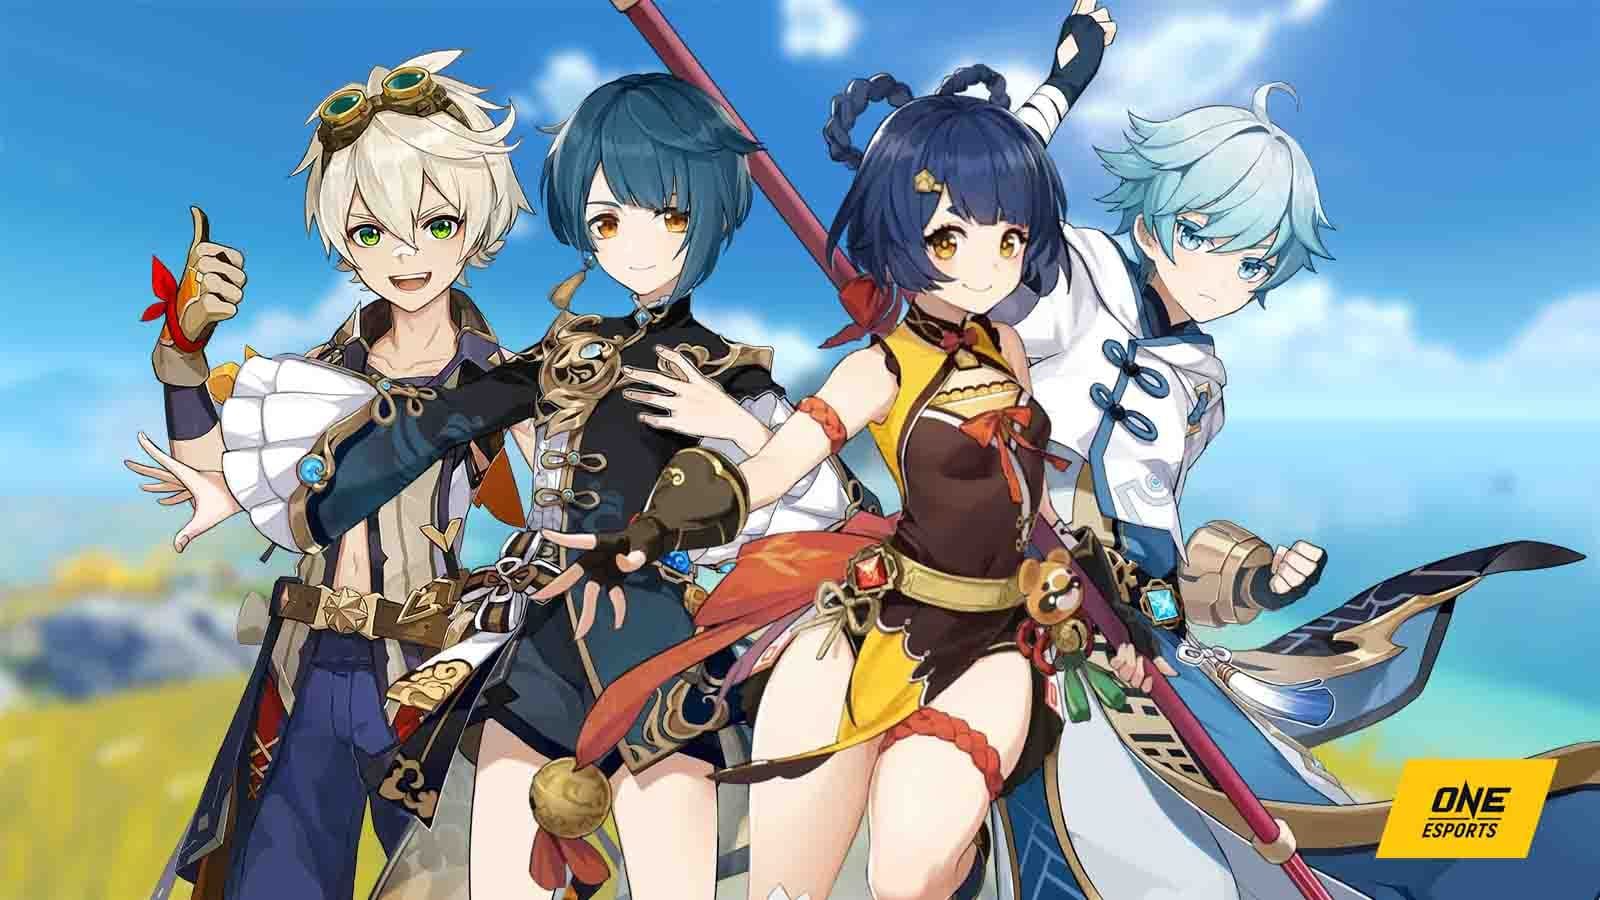
National's your classic: Xiangling DPS, Xingqiu sub-DPS, Bennett sustain, Sucrose support—pumping 40,000+ single-target DPS through Vaporize and Pyro resonance's +25% ATK since Version 1.0. ER targets: Xiangling 160-180%, Xingqiu 180-200%, Bennett 200%+. It shreds the Solitary Suanni (3,452,386 HP) by snapshotting Bennett's ATK and Sucrose's VV into Pyronado with Xingqiu's Rain Swords.
Run it like this: (1) Bennett Burst for the ATK circle. (2) Sucrose Skill/Burst for 40% shred. (3) Xingqiu Burst for Hydro app. (4) Xiangling Burst/Skill—20s cycle, animation cancels key.
Unpacking the Core Trio: Bennett, Xiangling, and Xingqiu's Magic
Bennett's C1 fuels 1,200+ ATK buffs; Xiangling snapshots it in her 10s Pyronado; Xingqiu locks in 2x Vaporize and cuts interruptions. This trio chews 40k per rotation against the Blazing Axe Mitachurl (344,905 HP).
Flow: (1) Stay planted in Bennett's circle. (2) Hydro before Pyronado. (3) Refresh every 20s. (4) Ideal for Cycle 1 Ruin machines.
Flex Slots: Sucrose, Chongyun, or Raiden Swaps
Sucrose for VV shred; Chongyun infuses Cryo for Melt (+15% Crit resonance). Fischl slots in for Electro-Charged on the Thunderhelm Lawachurl.
Options: (1) Sucrose as default grouper. (2) Chongyun for Cryo boosts. (3) Fischl's off-field Skill. (4) ER test in practice mode.
Rotation Breakdown: Amping Vaporize and Overload
20s cycles sync Burst CDs; funnel particles to Xiangling. Bennett → Sucrose → Xingqiu → Xiangling wraps Floor 12-2 in 90 seconds.
Nail it: (1) Burst supports upfront. (2) Xiangling last for snapshots. (3) Dodge Overload knockback on ranged foes. (4) Tweak for 600% Swirl.
Gear and Weapons Tailored for Each
Xiangling: 4-piece Emblem (ER% Sands, Pyro Goblet, Crit DMG Circlet); The Catch (16% Crit, 32% ER/Burst). Bennett: Noblesse (ER Sands, HP Goblet, Healing Circlet); Prototype Rancour. Emblem's 25% Burst DMG +75% ER seals the deal.
Gear up: (1) Farm Emblem subs (ER > Crit 1:2). (2) Craft The Catch fishing-style. (3) Weapons to 90. (4) Base 140% ER minimum.
For players looking to enhance their Genshin Impact experience without grinding endlessly, Genshin Impact currency top up on BitTopup offers a seamless way to acquire resources. With competitive pricing, instant delivery, and robust security measures, BitTopup ensures safe, compliant transactions supporting a wide range of currencies, backed by high user satisfaction scores for quick support.
Top F2P Team #2: Hyperbloom/Bloom Setups
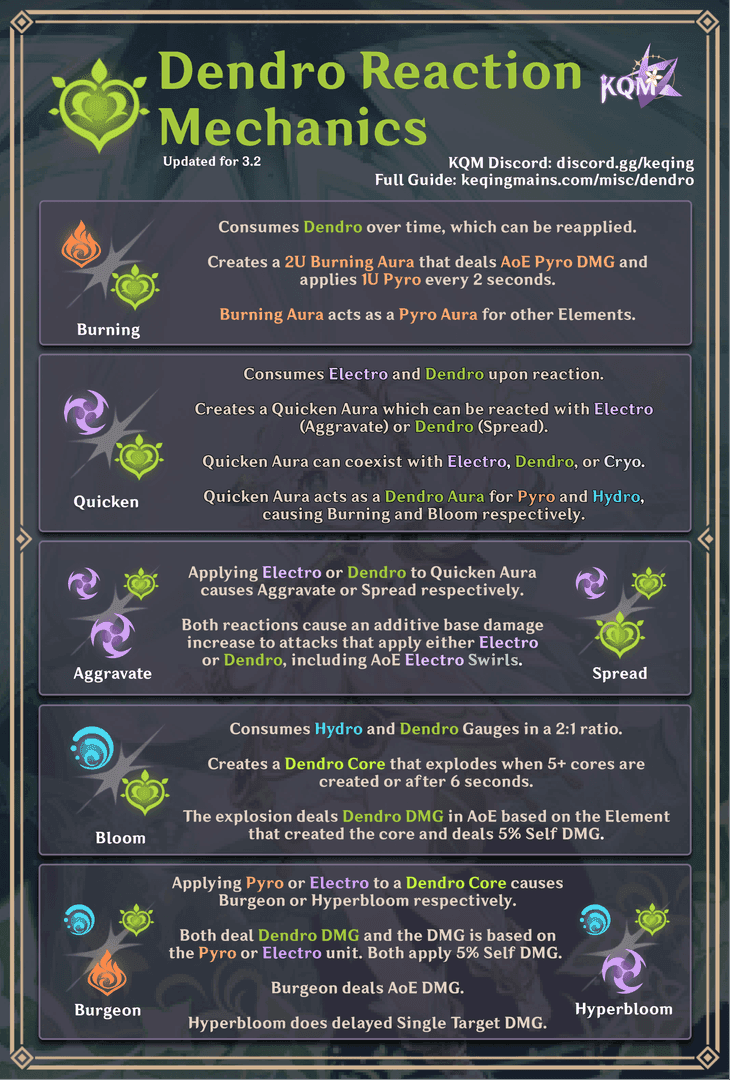
Hyperbloom thrives with Kuki as trigger, Xingqiu Hydro, Dendro Traveler or Collei Dendro—200+ EM on the trigger detonates cores for 30,000+ DMG over 6 seconds. Yaoyao variant adds healing; it fits Phase 2's Hydro buffs like a glove. It pierces Eremite shields (748,710 HP) with Electro; Floor 11's +200 EM ramps cores to 30k on waves.
Execute: (1) Dendro via Collei's boomerang Skill (two apps). (2) Xingqiu Burst for Hydro cores. (3) Kuki Skill to trigger. (4) Rotate for Phase 2's 75% Hydro Skill DMG.
Centering Dendro Cores: What Your Characters Need
Cores demand Dendro + Hydro; Kuki goes full EM (4-piece Gilded Dreams) for triggers. Collei + Dendro Traveler off-field Dendro on the Thundercraven Rifthound (499,140 HP).
Build smart: (1) Dendro units to 80. (2) Xingqiu at 180% ER. (3) Yaoyao for self-damage control. (4) Multi-wave Floor 12-3 ready.
Sucrose as Hyperbloom Driver: A Budget EM Blueprint
Sucrose leads with EM Sands/Goblet/Circlet, 4-piece VV; her A4 shares 20% EM. She herds Eremites for core pops in Cycle 2.
Tune it: (1) 200+ EM target. (2) Sacrificial Fragments for resets. (3) Pair with Kuki. (4) VV's 40% resist shred.
Fischl + Dendro Traveler/Collei Teamwork
Fischl's off-field Electro Skill (Oz summon) triggers with Traveler's Dendro. It slams 30k on Rifthound Whelps under Phase 1's EM buff.
Sequence: (1) Fischl Skill opener. (2) Dendro app. (3) Hydro chase. (4) Trigger for AoE blasts.
Hyperbloom or Classic Bloom? Picking Your Poison
Hyperbloom shreds shields (Electro pierces through); Bloom sustains self-damage with Barbara. Pros: 30k+ per core, scales with Floor 11's +200 EM. Cons: 6s core timer, grouping essential. Go Hyperbloom vs Eremites; Bloom for scattered enemies.
Decide: (1) Hyperbloom for Phase 2. (2) Bloom sans Kuki. (3) Test on Hilichurls.
Top F2P Team #3: Taser/Electro-Charged Comps
Taser rolls with Sucrose driver, Fischl or Beidou Electro sub-DPS, Xingqiu Hydro—AoE VV Swirl with 40% shred over 10 seconds. ER: Beidou 160-180%, Xingqiu 180-200%; multi-target heaven for 600% Swirl. It clears 18 enemies in Floor 12-3 Cycle 1, proccing Rain Swords on normals for Electro-Charged.
Kickoff: (1) Fischl Skill. (2) Beidou Burst. (3) Xingqiu Burst/Skill. (4) Sucrose field for Swirl on shooters.
Beidou and Fischl: Your Electro Power Pair
Fischl's Oz apps consistent; Beidou chains on hits (4-piece Emblem). Lightning chains ravage Hilichurl Rogues (965,636 HP).
Pair up: (1) Fischl before Sucrose. (2) Beidou in burst phases. (3) 160% ER funnel. (4) Favonius for particle gen.
Hydro Picks: Xingqiu, Barbara, or Candace?
Xingqiu wins for reduction and heals; Barbara taps Cycle 1's healing blessing. Xingqiu hybrids Vaporize; Barbara sparks shockwaves.
Choices: (1) Xingqiu default (Hydro DMG Goblet). (2) Barbara for extra sustain. (3) Candace for normal infusions.
Driver Choices: Sucrose, Heizou, or Anemo Traveler
Sucrose full EM for VV; Traveler trades 20% less EM share. Sucrose groups for Floor 12's first half.
Select: (1) Sucrose Skill for crowd control. (2) Heizou if plunging. (3) Traveler for early game. (4) Anemo resonance cuts stamina 15%.
Keeping Energy Flowing in Taser Builds
Hit 180% on Hydro/Electro; Favonius generates on crits. Skill particles fuel 20s cycles in multi-wave.
Manage: (1) ER Sands on mains. (2) Overworld tests. (3) Funnel to Beidou. (4) Phase 1 Swirl adjustments.
To keep your account progressing smoothly in Genshin Impact, especially for timely Abyss clears, buy Genesis Crystals mobile through BitTopup provides fast, affordable top-ups with immediate account crediting and full compliance to game terms. Users praise its reliable service, broad device support, and excellent after-sales assistance for a hassle-free experience.
Floor-by-Floor Breakdown for Spiral Abyss 5.4
Floors 9-10: Level 90 with basic shields. Floor 11 dishes +200 EM or 75% Electro buff; Floor 12 at 95-100 needs >180s for 1 star, >420s for 3. National for single-target, Taser for AoE. Floor 11 Phase 1 boosts Hyperbloom on Monoliths; Cycle 1 Floor 12 Swirl wipes Pyro Fungus (170,357 HP) when grouped.
Basics: (1) Unlock at AR 20 via Cape Oath (guide 3 Seelies). (2) Full heals before entry. (3) No mid-run swaps. (4) Ranged threats first.
Floor 9-10: Easing In with Shield Breakers
Standard fare—crack with opposites (Pyro on Cryo). Hilichurls fall to Taser AoE.
Handle: (1) Anemo grouping. (2) Burst the shields. (3) Aim 300s+ left. (4) National variant.
Floor 11: Rolling with Disorders and the Clock
Phase 1's +200 EM fuels reactions; Phase 2's 75% Electro spotlights Fischl flex. National breaks Thunderhelm with Pyro; Hyperbloom on waves.
Adapt: (1) EM builds for Phase 1. (2) Electro squads Phase 2. (3) 90s clears. (4) Skip bursts in invuln.
Floor 12 First Half: Patterns and Team Picks
Cycle 1 Swirl buff—Taser on Abyss Mages and Fungus. Group Hilichurls, prioritize shooters (91,975 HP).
Tactics: (1) Sucrose crowd control. (2) Electro/Hydro triggers. (3) One DPS enough. (4) National on the Generator (3M HP).
Floor 12 Second Half: DPS Walls and Staying Alive
Cycle 1 Cryo buff—Melt via Xiangling/Rosaria. Cycle 2 plunges Constructs. Stun Suanni with elements; Geo for Ruin (936k HP).
Survive: (1) Noelle shields. (2) 20s rotations. (3) Aggro draw. (4) Blessing heals for sustain.
Artifact Stats and Weapon Picks for F2P Abyss Rigs
ER at 140-160% tops the list, then Crit 1:2, EM for reactions. Emblem for DPS, VV for Anemo, Noblesse for Bennett. Xiangling's Emblem gives 25% Burst + ER bonus; Sucrose VV full EM shreds 40%.
Priorities: (1) ER% Sands lead. (2) Elem DMG Goblet. (3) Crit Circlet. (4) Subs: ER > ATK%.
Main Stats Showdown: ATK%, EM, or ER?
ER Sands 160-200%; 200+ EM for Hyperbloom; ATK% on Bennett. Kuki's Gilded Dreams full EM for 30k triggers.
Focus: (1) ER on supports. (2) EM on triggers. (3) ATK on healers. (4) Targeted farming.
Substat Goals: Crit Rate/DMG Balances per Role
30%+ Crit Rate for Favonius; 1:2 Crit DMG. Xiangling at 50/200 Crit for 40k DPS.
Hit: (1) ER subs priority. (2) Crit balance. (3) Food buffs for luck. (4) 2pc fillers.
Prime 4-Star Weapons: Favonius, Sacrificial, Craftables
The Catch for Xiangling (32% ER); Favonius Sword for Bennett (crit particles); Sacrificial Fragments resets Sucrose. Prototype Starglitter as ER backup.
Grab: (1) Craft at blacksmith/fishing. (2) Refine to 5. (3) Skip banners. (4) Level 90.
Bonus Sets That Deliver: Noblesse, Emblem, Viridescent Venerer
Noblesse's 20% team ATK post-Burst; Emblem ER synergy; VV 40% shred. Bennett's Noblesse boosts National 25%.
Leverage: (1) 4-piece first. (2) 2pc mixes early. (3) Domain farms. (4) Tuned for 5.4 buffs.
F2P Pitfalls in Spiral Abyss—and Dodging Them
Skimp on ER, and Bursts fizzle in 3M+ HP marathons; bad matchups botch shields, wasting 10-15s windows. Particle droughts drag 20s on Mitachurls; Electro on Pyro kills Vaporize. Farm Emblem for 160% ER, drill rotations, Sucrose groups.
Avoid: (1) ER weapons top. (2) Element match (Hydro vs Pyro). (3) 20s cycles. (4) Chamber practice.
Energy Fumbles: Why Bursts Ghost You
Multi-wave craves Favonius' 30%+ crit gen; funnel to Xiangling. Floor 12 stretches energy—Skills pre-Burst.
Fix: (1) 200% ER Bennett. (2) Particle rotations. (3) Overworld tests. (4) Wave tweaks.
Mismatched Elements: Reading Enemy Weaknesses
Pyro cracks Cryo shields; Geo owns Ruin. Xingqiu on Pyro Lector; Xiangling vs Cryo Mage.
Scout: (1) Enemy preview. (2) Team switches. (3) Resonance +25% ATK. (4) No Dendro on Electro.
Rotation Blunders: Buffs and Reactions on Point
Snapshot in 10s Bursts; cancel animations. Bennett before Xiangling for 1,200 ATK.
Time it: (1) Supports lead. (2) 20s loops. (3) Group AoE. (4) 1:45 Chamber 3 benchmark.
Missing Card Perks: Picking Abyssal Moon Wisely
EM/Swirl for Phase 1; Hydro Phase 2. +200 EM cards supercharge Hyperbloom.
Choose: (1) Pre-run select. (2) Disorder match. (3) Reaction max. (4) Refresh as needed.
Pro Tips: Fine-Tuning F2P Abyss Runs
Snapshots linger 10s+; Anemo CC shaves 20% off clear times. I-frames dodge AoE; juggle DPS and survival for >420s. Xiangling Pyronado snapshots VV on Suanni; Sucrose herds Eremites.
Elevate: (1) Normal cancels. (2) Energy funnel. (3) Dodge invuln. (4) 90s full clears at 80/90.
Reset Plays: When to Restart for Speed
Reset under 180s in Chamber 3; no co-op. Tight 10s windows—practice pays.
When: (1) Post-mistake reset. (2) Full heals. (3) No mid-changes. (4) 3-star aim.
Herding Foes: Anemo CC for Quick Wins
Sucrose Skill pulls for AoE; -15% stamina resonance. Group 22 Hilichurls for Taser.
Group: (1) Skill pre-burst. (2) Active positioning. (3) Stagger targets. (4) 30% speed boost.
I-Frame Evasion: Damage-Free Without Tanks
Dodge in animations; Noelle shields. Vs Suanni AoE—safe spots.
Master: (1) Pattern learn. (2) 100% shield uptime. (3) Blessing heals. (4) F2P sustain.
Clockwork: DPS vs Survival Balance
Ranged first; 1:45 fine. Floor 12-2 shooters priority.
Balance: (1) Threat clears. (2) Burst windows. (3) 420s goal. (4) No curveballs.
Tools and Resources to Plan Your Abyss Assault
In-game Training Guide levels up; Weapon Refinement auto-adds, team filters. Calc ER needs.
Use: (1) Menu stats access. (2) Rotation sims. (3) Progress track. (4) No outside tools.
Damage Crunches: Genshin Optimizer and Kin
Plug builds for 40k National benchmarks. Check 30k Hyperbloom.
Run: (1) Stat inputs. (2) Reaction tests. (3) Sub opts. (4) 5.4 buff tweaks.
Team Databases: Usage Stats from Abyss
Meta track—National SS-tier for 5.4. 70% boss usage.
Dive: (1) In-game review. (2) Enemy adapts. (3) Flex swaps. (4) 36-star path.
Rotation and ER Planners
20s cycle maps; ER thresholds. Funnel for Xiangling.
Plan: (1) Sequence lists. (2) Particle calcs. (3) Weapon adjusts. (4) Pre-Abyss trials.
Community Hubs: Reddit, Discord, Creator Guides
Share clears; F2P tips. Rotation screenshots.
Engage: (1) Discussion joins. (2) Build posts. (3) Pattern learns. (4) Post-reset updates.
Gearing Up for Upcoming Abyss Cycles
Resets monthly on the 16th; 5.4's F2P-friendly with reaction focus. Build 8-10 characters; dual DPS per team. Prep Swirl for Cycle 1, Hydro for 2.
Forward: (1) Pattern studies. (2) Blessing opts. (3) National flex. (4) 80/day resin artifacts.
Reset Rhythm: 1st and 16th Monthly
Biweekly 600 Primogems; 5.4's two cycles. February 16 Phase 1 drop.
Track: (1) Calendar marks. (2) Pre-reset clears. (3) Change watches. (4) 600/cycle.
Roster Flexibility: Long-Haul Investments
Holy trio + Sucrose/Fischl/Beidou; element coverage. 8 units rotate.
Invest: (1) Meta 4-stars level. (2) Weapon crafts. (3) Event consts. (4) 36-star ready.
Meta Evolves: New Faces and F2P Shifts
5.4 loves Anemo/Hydro; F2P holds steady. Sucrose trumps new 5-stars. (Editor's take: New chars dazzle, but these staples keep it real for us non-whales.)
Watch: (1) Patch monitors. (2) Team adapts. (3) Reaction focus. (4) Holy long-term.
Resin Smarts: Abyss vs Broader Goals
80 resin/day Emblem; 7M Mora total. Rewards fuel pulls.
Efficient: (1) Domain priors. (2) Dailies. (3) Event Wits. (4) Content balance.
Ready to maximize your primogem rewards? Bookmark this guide and check back after each Spiral Abyss reset for updated team recommendations.
FAQ
What are the best F2P teams for Spiral Abyss 5.4?
National (Xiangling, Xingqiu, Bennett, Sucrose) for 40,000+ single-target DPS via Vaporize; Hyperbloom (Kuki, Xingqiu, Dendro Traveler, Collei) for 30,000+ core explosions on waves; Taser (Sucrose, Fischl, Beidou, Xingqiu) for AoE Swirl 40% shred. All hit 36 stars at level 80/90 with 160-200% ER, suiting Cycle 1 Swirl and Solitary Suanni (3,452,386 HP).
How many primogems can you get from Spiral Abyss?
36-star clears yield 600 Primogems per biweekly cycle, 1,200 in 5.4 (February 16-April 16, 2025). Floor 12 adds 200 Primogems plus Mora/Reliquaries for F2P pulls like Bennett from events.
When does Spiral Abyss reset in Genshin Impact?
Biweekly on 16th: 5.4 Cycle 1 February 16, 2025 (Swirl buffs); Cycle 2 March 16, 2025 (Hydro/Plunging). Farm ER artifacts pre-reset for clears.
What is the National Team in Genshin Impact?
Xiangling (Pyronado DPS), Xingqiu (Hydro/Vaporize Sub-DPS), Bennett (1,200+ ATK/heal Support), Sucrose (VV shred Anemo). Snapshots buffs for 40,000+ DPS, clears 5.4 Floor 12 Generator via 20s rotations, Pyro +25% ATK.
Can you 36-star Spiral Abyss without 5-star characters?
Yes, F2P 4-stars like National/Hyperbloom hit 36 stars in 5.4 at 70-80% premium (160-200% ER, level 90 talents). Taser for AoE, Noelle Geo for Ruin; invest 8 characters (7M Mora) vs level 100 enemies; 17% overall success.
What artifacts should F2P players prioritize for Abyss?
4-piece Emblem for Xiangling (ER% Sands, Pyro Goblet, Crit DMG Circlet; 25% Burst +75% ER); VV for Sucrose (full EM, 40% shred). Farm Emblem daily (80 resin), ER subs first then 1:2 Crit for 600% Swirl and 3M+ bosses.
👉 Genshin Impact currency top up 👈
✅ Official direct recharge, 100% secure
✅ No waiting – top-up arrives in 7 seconds
✅ Big discounts, low prices to save more
✅ 7×24-hour customer service, ready to assist anytime