

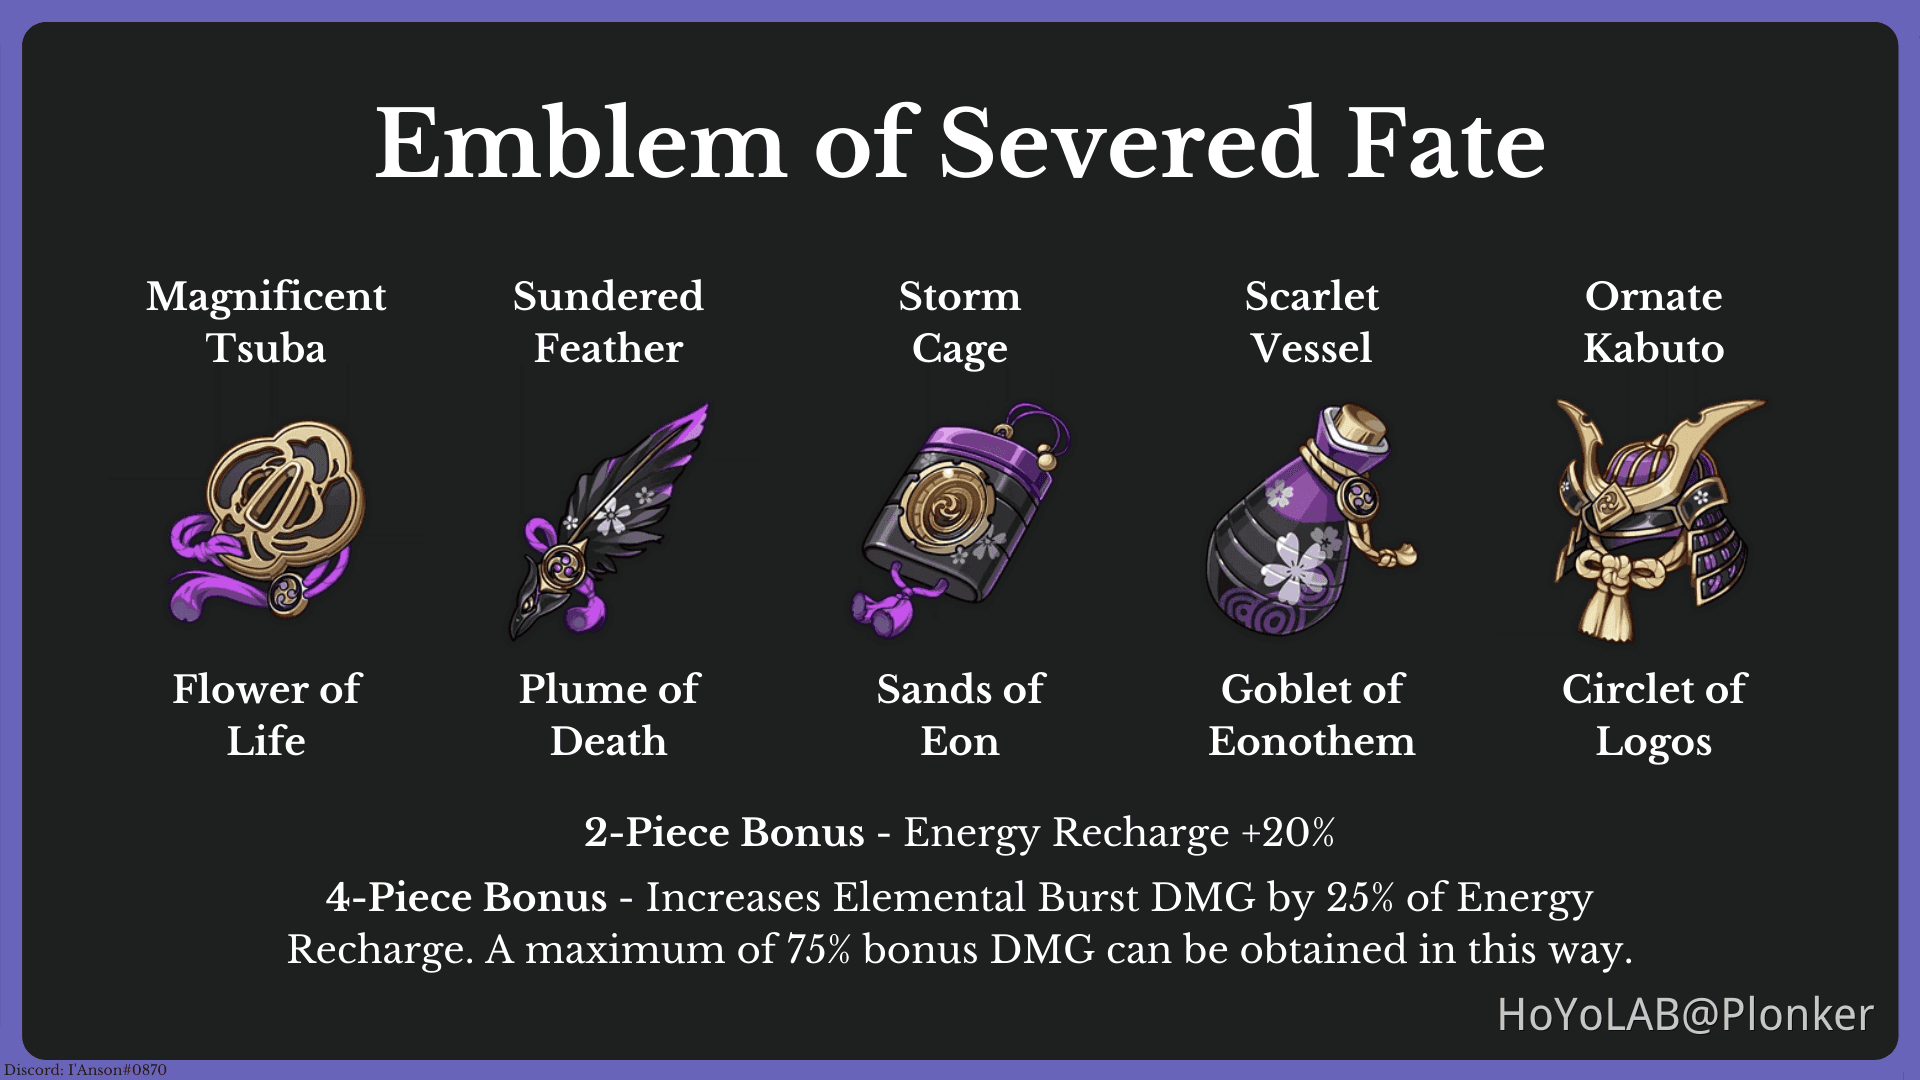
Quick Overview: The Emblem of Severed Fate set gives you a solid +20% Energy Recharge from the 2-piece bonus, and the 4-piece ramps up your Burst DMG by up to 75% based on your total ER—perfect for Burst-heavy hitters like Raiden Shogun, Xiangling, or Yelan. Head to Momiji-Dyed Court once you're AR 45 or higher, pop in some Condensed Resin for those sweet double rewards, and aim for ER Sands plus CRIT pieces. Pyro or Cryo teams can melt through in 30-45 seconds; stick to the 80/20 Resin split for your 180 daily cap; and yeah, use the Strongbox for trading extras. You're looking at about 1.07 5-stars every 20 Resin run—shoot for 200-250% ER on your builds.
Why Bother Grinding Emblem of Severed Fate? Let's Break It Down
Ever wonder why this set feels like a game-changer for so many teams? It's all about turning that Energy Recharge into raw power.
The Set Bonuses Unpacked (2-Piece vs. 4-Piece Perks)
That 2-piece bonus? Straight-up +20% Energy Recharge. It stacks nicely with your artifacts, weapons, and those team particles, keeping your Sub-DPS and Supports Burst-ready without a hitch. Then the 4-piece kicks in: it adds 25% of your total ER straight to Burst DMG, but caps at 75%. Hit 200% ER, and you're getting a 50% bonus; push to 300%, and you max it out (total ER × 0.25). For Raiden Shogun at 250% ER, that's a whopping 62.5% Burst DMG boost—handling about 70% of her damage right there. Slap a full 4-piece on your Burst units, and tweak your rotations to keep things cycling smoothly.
Who Really Shines with Emblem? The Top Picks
This set's got universal appeal, but it clicks hardest with certain characters. Take Raiden Shogun—it's basically her BiS at 200-250% ER, supercharging her Burst DMG. Xiangling thrives too, especially at 250% ER for those Pyronado snapshots in Vaporize teams, plus an extra +15% Pyro DMG if you've got her at C4. Yelan? 200% ER nets her +50% Burst DMG, paired with 35k+ HP and a 70/200 Crit ratio. Beidou dodges cooldown issues as an off-field Sub-DPS; Xingqiu cranks out 7k Vaporize hits at 160-200% ER; and Mona amps up her Omen with ER from her ascension stat for +20% Hydro DMG. In the meta, it's rocking 42.57% usage and holds S-Tier status in Version 6.0 for Hyperbloom or Vaporize setups. I'd prioritize Raiden and Xiangling first—build ER Sands across the board, then chase CRIT substats for that ideal 1:2 ratio. (Editor's take: It's a lifesaver for energy-starved teams; I've seen it flip struggling rotations overnight.)
Stacking Up Against Other Sets (Like Noblesse or Niche Ones)
Based on the data I've crunched, Emblem pulls ahead of Noblesse for personal output on Xingqiu or Yelan—think 7k hits versus 5k at 35k HP, 40/140 Crit, and 180 ER—by flipping ER into straight DMG. Against Thundering Fury, Emblem edges out for Burst scaling on Raiden or Fischl, while Thundering Fury helps with reaction cooldowns on Yae Miko (+15% Electro DMG on Skills). Shimenawa's Reminiscence offers +18% ATK and +50% Normal/Charged DMG after Skills, which fits Yoimiya great but dings your ER for high-Burst costs.
Emblem: Your go-to for Sub-DPS at 200-250% ER targets.
Noblesse: More of a team ATK buffer, weaker on solo scaling.
Thundering Fury: Better for EM/Aggravate, like Keqing shrugging off 50% Dendro RES.
Fire up Genshin Optimizer to test it out; sometimes mixing 2 Emblem with 2 ATK% pieces beats a full 4-piece if your subs are popping.
Getting Started: Unlocks and Domain Basics
Before you dive in, make sure you're set up right—rushing this can burn Resin for nothing.
Hitting the AR Requirements (AR 45 for the Win)
You unlock Emblem farming at AR 30 through Inazuma's quests, but don't waste time there—wait for AR 45 to guarantee a 5-star every run (versus just 37% before). Momiji-Dyed Court dishes out 1.07 5-stars per 20 Original Resin at AR 45 and up. Resin caps at 200 since June 5, 2024 (Version 4.7 onward), with 180 coming in daily from one unit every 8 minutes. If you're pre-AR 45, pour your Resin into ascensions and talents instead; once you're there, dedicate 80% to artifacts. Grind quests and dailies to hit AR 45, and stash 15-20 Fragile Resins (60 Original each) for later.
Finding Momiji-Dyed Court in Inazuma
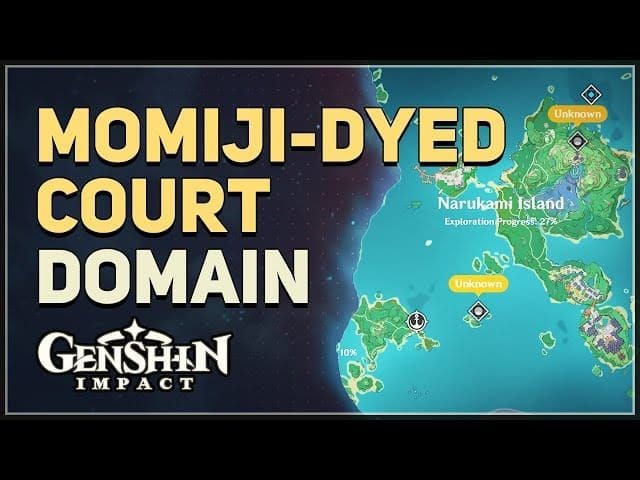
Nestled on Yashiori Island, east of Higi Village—tucked between Musoujin Gorge and Serpent’s Head. Climb that hill overlooking the ruins, hop across the water with a Waverider. It opens at AR 30 and runs you 20 Original or 1 Condensed Resin. Levels go from Autumn Hunt I (I'd stick to 59) up to IV (90). Drops include Emblem, Shimenawa, Resolution of Sojourner, and Tiny Miracle. Fast-travel to Higi Village, glide east—easy peasy. For max 5-stars, crank it to Level IV.
How the Domain Works and What You're Fighting
Flip the switch on those alternating platforms for Flame Boon (+60% Pyro DMG) or Frost Boon (+60% Cryo DMG). Enemies? Electro Slimes, Hilichurls, Abyss Mages, and a Lawachurl—no straight Pyro or Cryo weak spots, but you can work around it. At Autumn Hunt I (Level 59), you've got 13 enemies in 6 minutes—like 3 Electro Slimes and 3 Hilichurl Berserkers; Sucrose's Burst crowds them out nicely. Level 90's Autumn Hunt IV? Just 4 tough ones—shatter shields with Cryo or Pyro for 2x Melt DMG, and sidestep the Lawachurl's jumps using those purple tells. Rewards at Level IV: 100 AR EXP, 2525 Mora, 20 Friendship EXP, and 5★ artifacts at Levels 3-4. Quick steps: 1. Enter and pick your boon. 2. Group 'em with Geo Traveler. 3. Melt fast with Xiangling on Flame Boon—30-second clears aren't a dream.
Speedy Team Setups for Farming Runs
Picking the right squad can shave minutes off your clears. Let's talk options.
Budget F2P Teams That Actually Work
No wallet needed here: Kaeya as DPS (4pc Blizzard Strayer), Xiangling Sub-DPS (4pc Emblem or Crimson Witch), Noelle for shields (4pc Maiden’s), and Barbara healing. Superconduct or Melt vibes—Cryo Resonance gives +15% CRIT against frozen foes, shields block projectiles. It handles Autumn Hunt III in 90 seconds by picking off slimes and shields first. Melt doubles DMG on Electro; Noelle's Crystallize adds +35% Elemental DMG via Archaic Petra. 1. Kaeya's Skill to freeze. 2. Xiangling Burst on the boon. 3. Noelle shields up, Barbara heals.
High-End Whale Teams for Sub-30 Second Blasts
If you've splurged, try this Melt squad: Ganyu DPS (4pc Blizzard), Xiangling Sub-DPS (4pc Emblem), Albedo Sub-DPS (4pc Husk), Zhongli Support (4pc Archaic). Geo Resonance boosts shields and DMG by +15%, double Melt reactions, and Albedo snapshots on Flame Boon for 30-45 second wipes. Or go Reverse-Vaporize: Hu Tao DPS (4pc Crimson), Xingqiu Sub-DPS (4pc Emblem), Chongyun Support (4pc Noblesse), Zhongli. Xiangling's C4 adds +15% Pyro; Sucrose at C6 pumps +20% Elemental DMG. 1. Zhongli's shield first. 2. Ganyu's Burst for Cryo application. 3. Xiangling's Pyronado on boon. 4. Albedo for Geo control.
Tailoring Elements to the Domain's Quirks
Pyro and Cryo cut through Electro resistance like butter. For Overload on Autumn Hunt II against slimes, roll Yanfei DPS (4pc Shimenawa), Xiangling Sub-DPS, Kazuha Support (4pc Viridescent for -40% RES), and Bennett (Pyro Resonance +25% ATK). Skip the exploding crystals; mix melee and ranged to handle Abyss Mage fields. Kazuha's C2 gives +200 EM for Swirl Overload. 1. Bennett's Burst for that ATK spike. 2. Kazuha groups and Swirls. 3. Yanfei and Xiangling Vaporize on the boon.
To level up your Genshin Impact grind without the grind, check out BitTopup for hassle-free top-ups. top up Genesis Crystals online via their site—competitive prices, instant delivery, and total compliance with game rules, so you snag those Primogems seamlessly.
Resin Smarts: Getting the Most Bang for Your Cap
Resin management isn't glamorous, but mess it up, and you'll regret it. Here's the real math.
Original vs. Condensed: Crunching the Numbers
You get 180 Original Resin daily (7.5 per hour, caps at 200 after 26 hours 40 minutes), and any 20-unit overflow crafts into 5 Condensed. Whip up Condensed at Liyue Rep 3: 1 Crystal Core + 60 Original + 100 Mora (holds 5, worth 40 Resin for double rewards)—Version 6.0 bumps some yields by triple. At AR 45+, a 20 Original run scores 1.07 5-stars; Condensed doubles that to 2.14 per 40. Weekly, 17 Condensed means about 36 5-stars. 1. Craft right after daily refresh. 2. Batch your Momiji runs. 3. Watch notifications to dodge overflow.
Smart Daily Budget Breakdown
Follow the 80/20 rule: 144 Resin (80%) on Momiji-Dyed Court, 36 (20%) for Ley Lines or bosses. For AR 45-55, hit talents Monday-Wednesday (books), weapons Thursday-Saturday, and Sunday's weekly bosses (90 Resin for the first three at 30 each), with the rest on artifacts. Pump 120+ daily into Emblem ER Sands or CRIT Circlets. Tuesdays and Thursdays: 5 Condensed (100 Resin) plus a boss. 1. Knock out dailies (60 Resin). 2. Drop 144 into domains. 3. Use Sundays for catch-up.
Timing Fragile Resin for Artifact Dives
After AR 45, deploy Fragile Resin (guaranteed 5-stars for 60 Original) on Momiji once you're capped daily—hoard 15-20 for prime runs. Skip it pre-AR 45; focus weekly bosses (1.24 5-stars via Gladiator). Low-spenders do 1-2 weekly; F2P folks aim for 100 spots a day. Domains give an extra 5-star every 14-15 Condensed. 1. Stock from Battle Pass or events. 2. Use on Level IV Momiji. 3. Track it in-game.
Sorting the Wheat from the Chaff: Artifact Keepers
Not every shiny drop is a winner. Let's evaluate like pros.
Main Stat Priorities by Slot (Flower, Plume, Sands, Goblet, Circlet)
Flower's always Flat HP. Plume? Flat ATK. Sands: Go ER% (★★★★★ for Burst DPS) or EM (for reactions); backups like HP%, ATK%, or DEF%. Goblet: Elemental DMG% (Electro for Raiden, beating ATK% if you've got over 100% bonuses); alternatives Physical or EM. Circlet: CRIT Rate or DMG (★★★★) over Healing or EM. For Raiden, ER% Sands, Electro Goblet, CRIT Circlet. 1. Lock in the right mains. 2. Level to +12 for substat reveals. 3. Chase ER to hit 200%+ total.
Substat Rankings: CRIT > ER > ATK%
Top tier: CRIT Rate and DMG (aim for 1:2 ratio), then ER% (crucial for Emblem), ATK% or flat, followed by EM, DEF, HP. You start with 3-4 subs; they upgrade every 4 levels (up to 4-5 at +20). Percentage subs shine at higher levels—ditch DEF. For Emblem, ER > CRIT = CD > ATK%. CRIT Rate rolls +5.1-6.8%; ER +5.2-6.4%. 1. Use the formula: (CRIT Rate × 2) + CRIT DMG. 2. Shoot for 60-70% Rate, 120-140% DMG. 3. Fodder +0 pieces with junk subs.
Calculating Crit Value (The CV Trick)
CV boils down to (CRIT Rate × 2) + CRIT DMG for that 1:2 sweet spot; Raiden needs ≥65% Rate for her multi-hits. Check at +16 before committing to +20 (you get 80% EXP back). Sub quality can outpace a full 4-piece by 15-25% DMG; an Electro Goblet trumps ATK% on Raiden with C2 or Engulfing's 1.15x. Say 40% Rate + 140% DMG = 220 CV. 1. Plug into Genshin Optimizer. 2. Lock anything ≥50 CV. 3. Recycle low-CV stuff at +12.
Cutoff Points for Hoarding Artifacts
Hold onto pieces with matching mains (like ER Sands) and at least 3 solid subs (CRIT/ER); baseline: 200% ER, 50+ CV. For Yelan, 160% ER works with double Hydro—toss anything under 40% CRIT or heavy DEF. Even basic Emblem clears 36-star Abyss with 5★ weapons. Strongbox ups 4-sub chances to 34% versus 20% from domains. 1. Sort by set and slot. 2. Fodder junk to Strongbox. 3. Track weekly progress.
For steady Genshin Impact progress without risks, BitTopup's a solid pick. Players love buy Genshin crystals safely for transactions under 5 minutes, top-notch security, tons of payment options, and 4.9/5 after-sales support—perfect for fast Primogem injections.
Leveling Up with the Artifact Strongbox
The Strongbox? It's your mid-game savior for turning trash into treasure.
Mystic Offering Basics for Emblem
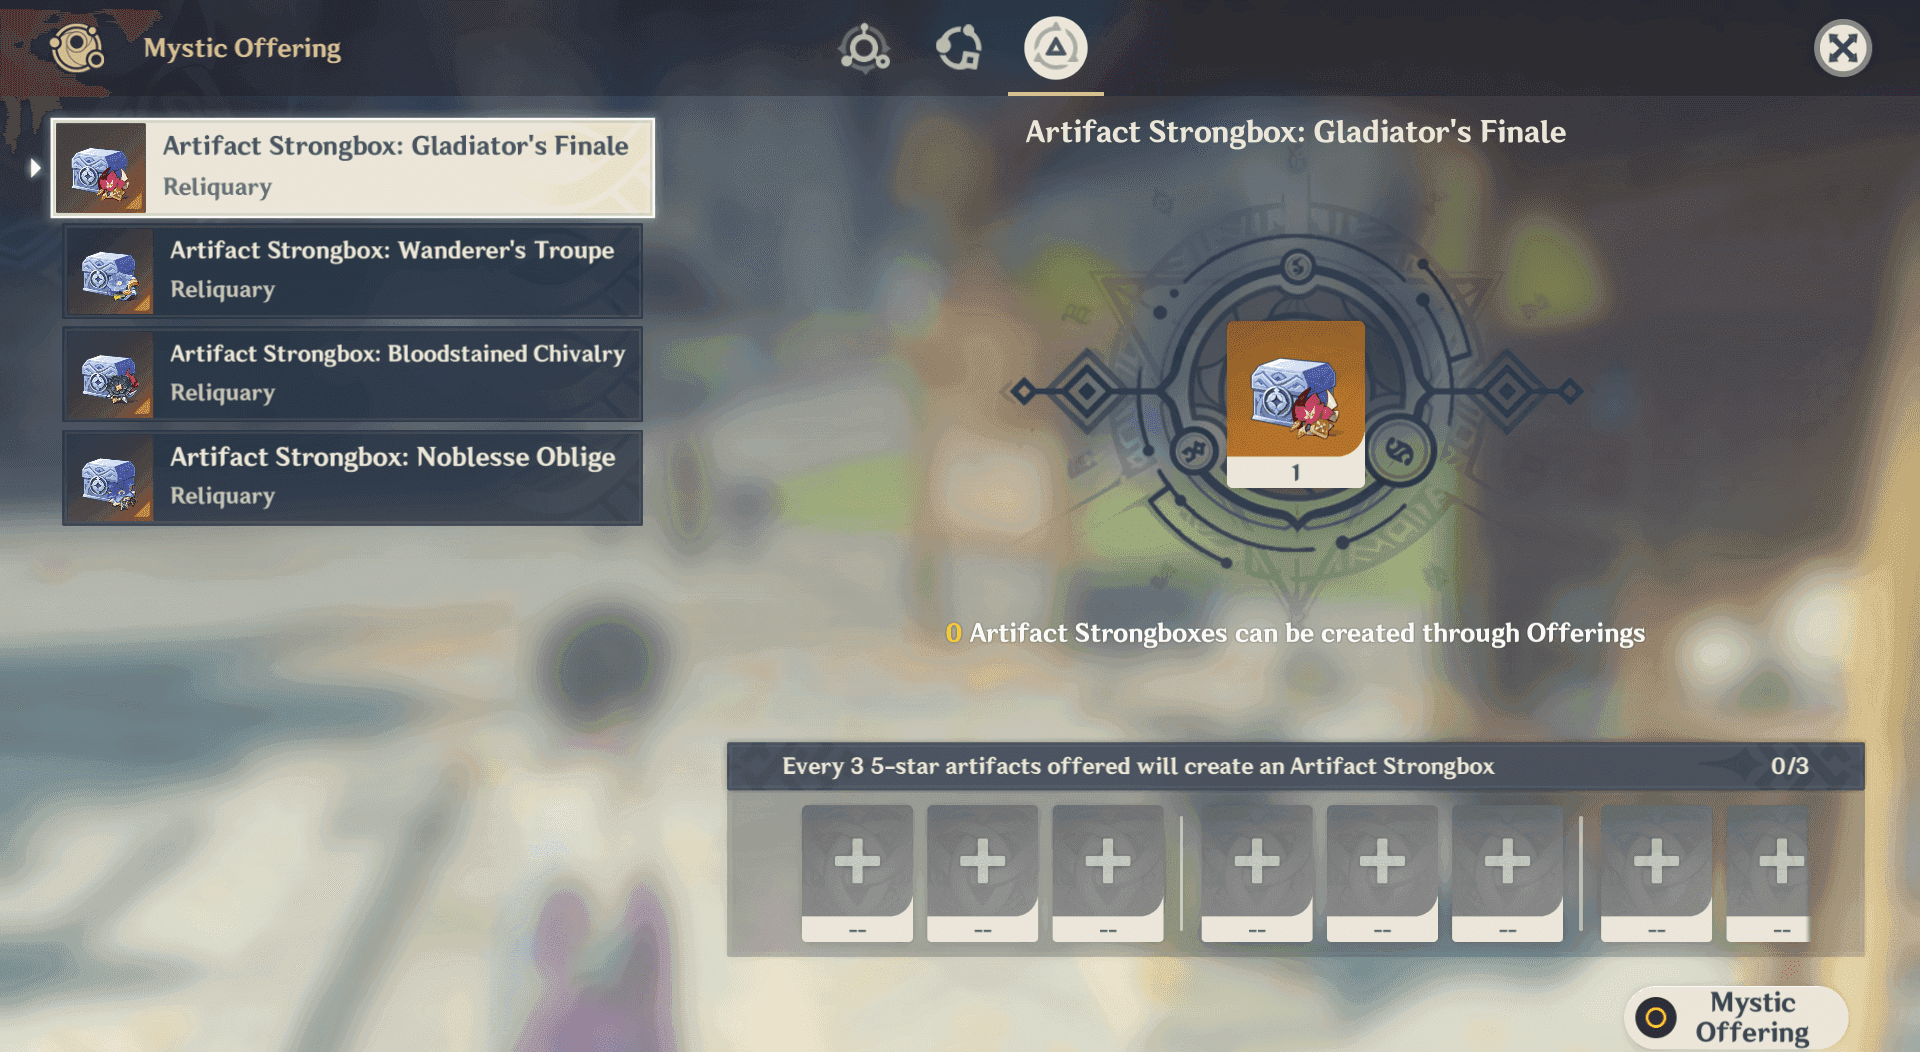
At AR 45, craft an Emblem Strongbox using 3 5-star fodder (wrong mains or lousy subs) for one random 5-star Emblem—34% shot at 4 subs. Recycle rejects at 2:1; 40+ fodder nets you 13 pieces. It's huge since Emblem sees 42.57% meta use, and it saves those precious Elemental DMG Goblets. Convert Shimenawa rejects too. 1. Unlock the crafting bench. 2. Pick Emblem and your 3 fodder. 3. Recycle what comes out.
Fodder or Convert? Deciding on the Spot
Fodder's for +0 with bad mains/subs (like DEF Sands); convert extras that have value. Keep CRIT Circlets and ER Sands safe; use 3★ for leveling (270k EXP to +20). NPC vendors give 70.99% more EXP than domains. It targets single sets without dual RNG headaches. 1. Boost fodder to +16 for 80% recovery. 2. Skip if EXP's tight. 3. Focus on ER/CRIT priorities.
Strongbox Efficiency vs. Straight Domain Grinds
Strongbox gives a 3:1 Emblem ratio but eats fodder; domains double the Emblem/Shimenawa odds (50% waste otherwise). Early on, direct farming wins; mid-game, Strongbox turns 39 fodder into 13 pieces. Weekly: 90 Resin on bosses, rest on 17+ domain runs. Domains still edge ROI for dual-sets. 1. Farm domains to build fodder stock. 2. Flip to Strongbox after 40+ extras. 3. Recycle on the spot.
Juggling Emblem and Shimenawa in This Dual Domain
Momiji drops both, so why not play them off each other?
Prioritizing Drops: Emblem First?
Go Emblem for Burst Sub-DPS (that ER-to-DMG conversion); Shimenawa's for Normal attackers like Yoimiya (+50% post-Skill, but ER hit). Dual-farm Momiji—keep Emblem's ER pieces, Shimenawa's ATK% for 2+2 mixes (+36% ATK). Emblem's more versatile; Shimenawa's niche. 2 Emblem + 2 Shimenawa balances ER and ATK nicely. 1. Sort by your build needs. 2. Fodder Shimenawa into Strongbox. 3. Gear up meta with Emblem.
Standout Shimenawa Users Worth a Look
Yoimiya loves it for BiS Charged DMG; Keqing pairs it with EM Sands for Aggravate over Emblem. Mix 2pc Shimenawa + Gladiator for +36% ATK; skip full 4pc on high-Burst Xiangling. It's for skill-spammers in specific niches. 1. Test Yoimiya's rotations. 2. Blend if ER dips below 200%. 3. Fodder extras to Emblem.
Managing Inventory for Dual Sets
Cap at 1000 artifacts; daily fodder clears 75k EXP (East Mt. Aozang's 21 pieces in 5 min, 24h respawn). Use Anemo for mobility (Sayu or Rosaria); level to +16 before judging. Rainbow strong subs beat a weak 4-piece. 123 spots daily levels +0 to +4. 1. Clear 100 spots each day. 2. Fodder straight to Strongbox. 3. Lock 5-10 potentials per slot.
Fine-Tuning Emblem for Your Favorites
Tailor it per character—generic builds won't cut it.
Raiden Shogun: Nailing ER, Electro, and Crit

For Raiden, ATK% Sands (or ER if under 220% without Engulfing), Electro Goblet (tops ATK% with over 100% bonuses via C2/Engulfing 1.15x), and CR/CD Circlet. Subs: ER to 250-300% for the 75% cap > CR=CD > ATK%. Weapons like Engulfing (BiS), Homa, or Catch (+32% ER). At 250% ER, snag 62.5% Burst DMG. 1. Farm those ER Sands hard. 2. Balance to 65%+ CRIT Rate. 3. Funnel with Electro resonance.
Xingqiu and Yelan: ER vs. Damage Dance
Xingqiu's 4pc Emblem beats Noblesse at 160-200% ER for Vaporize (C2 cuts Hydro RES by 15%); Yelan's 200% ER adds +50% Burst, with HP Sands as alt, hitting 70/200 Crit via Aqua Simulacra (ER Sands +51%). Team with Pyro like Hu Tao; double Hydro for particles. Yelan pulls 35k+ HP and 7k+ hits. 1. Hunt ER subs and weapons. 2. Mix 2 Noblesse if you need the buffer. 3. Test those 60-cost Burst snapshots.
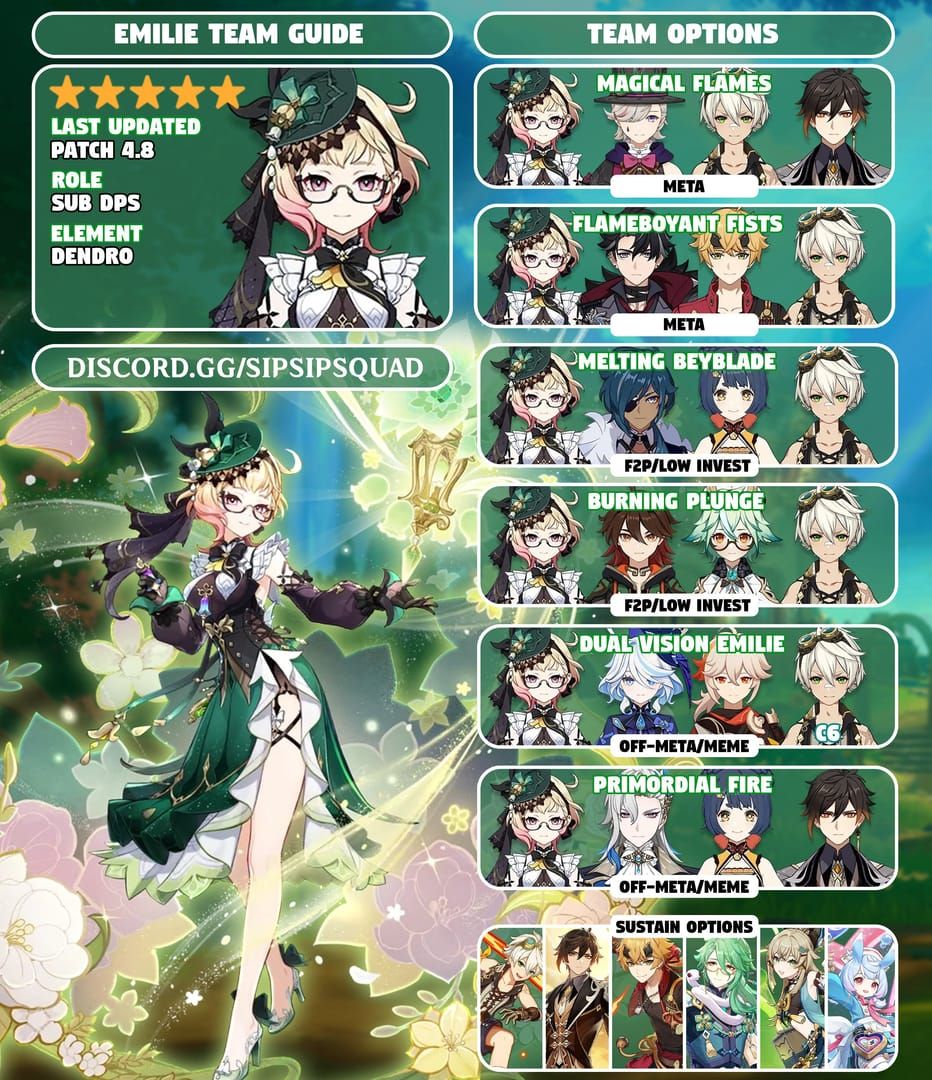
Xiangling: Off-Field Pyro Powerhouse
Xiangling demands 4pc Emblem at 250% ER for the full 75% bonus, mixed with Crimson Witch for Vaporize/Overload; drop Pyronado after Bennett. C4's +15% Pyro; snapshot on Flame Boon. She's top Sub-DPS in Melt. 1. ER Sands first. 2. CRIT/ATK subs next. 3. Baseline 200%+ ER.
Other Emblem Stars (Mona, Beidou, Kujou Sara)
Mona rocks 4pc at 180-220% ER for Burst (+20% Hydro from ascension), C1 adds +15% Frozen; Venti uses 2pc as battery (180% ER over Viridescent); Beidou for off-field Electro resonance; Sara as ER support. Mona's Omen shines in Vaporize. 1. ER focus across all. 2. Mix 2+2 with VV for shred. 3. Keep Burst uptime priority.
Pitfalls to Dodge in Your Farm
We've all been there—learn from the mistakes.
Grinding Pre-AR 45 (Total Waste)
Before AR 45, you're at 37% 5-star odds, torching 180 daily Resin for scraps—shift to talents and ascensions. Post-45, it's 100% guaranteed; stockpile for weeks of gold. The rate gap's night and day. 1. Push to AR 45. 2. Use time on bosses. 3. Hoard Fragile.
Hoarding 'Maybe' Pieces
Don't cling to <50 CV or wrong-main junk; fodder to Strongbox (skip locked valuables). 2+2 often tops poor 4pc. DEF rolls just clog space. 1. Eval at +12. 2. Fodder +0 trash. 3. Limit to 5-10 per slot.
Skimping on Energy Recharge
Under 200% ER? Rotations crumble—funnel same-element or Favonius effects. Yelan manages 160% with double Hydro; test for every-Burst consistency. Mains hit 110-130%, supports 180-220%. 1. Calc total ER. 2. Add a battery like Raiden. 3. ER Sands if subs lag.
Pouring EXP into Meh Artifacts
+20 on low-sub pieces? Just +3 DMG—crown talents instead (Xiangling's Burst jumps 10-13) for way less RNG pain. Basic sets floor Abyss. Eval at +16 to save EXP. 1. Prioritize levels and weapons. 2. Fodder the mediocre. 3. Pivot to talents after basics.
Pro Tips for the Long Haul
Farming's a marathon—pace it right.
Weaving in Daily Artifact EXP Routes
Daily grind: 14 minutes for 123 spots and 75k EXP (Tatarasuna adds 23 extras; pack 2 Anemo and night-time Rosaria). Levels +0 to +4 or +12 to +16; +20 takes 270k. Fold in Momiji fodder. 24h respawns, 100-spot cap. 1. Stick to proven routes. 2. Strongbox the fodder. 3. Upgrade every 4 levels.
Realistic Goals (RNG Reality Check)
RNG means weeks or months for god-rolls; 17 weekly runs yield ~36 5-stars—talents often trump endless farming. Version 6.0 keeps Emblem S-Tier with Nightsoul Bursts. 5.5 guarantees improve subs. 1. Track with a spreadsheet. 2. Rotate domains. 3. Co-op for 30s clears (beats 90s solo). (My two cents: Patience pays; I've quit chasing perfection and focused on fun teams instead.)
Knowing When to Bail on This Domain
Call it at 200% ER and 1:2 Crit; switch to Crimson Witch or Blizzard farms. Emblem future-proofs your roster; eye Golden Troupe for off-field in 6.0. Meta loves ER in Vaporize/Hyperbloom Floor 12. 1. Build 3-4 chars solid. 2. Gauge your Abyss clears. 3. Pre-farm upcoming releases.
Monitoring Your Progress
Use in-game sorting; compare weekly drops to needs. Co-op early on; nail routes after 2-3 runs. Daily fodder plus domains keeps it sustainable. Oz from Fischl aids Superconduct in co-op. 1. Log ER and CRIT values. 2. Level up co-op shares. 3. Tweak for meta shifts quarterly.
FAQs: Your Burning Questions Answered
What's the deal with Emblem of Severed Fate's bonuses?
2-piece: +20% Energy Recharge to keep Bursts flowing. 4-piece: Adds 25% of your total ER to Burst DMG (caps at 75%, like 62.5% at 250% ER). It scales beautifully for Sub-DPS like Xiangling in Vaporize, swapping ER for damage.
Who gets the most out of Emblem?
Raiden Shogun maxes at 250-300% ER for Burst power, Xiangling at 250% for Pyronado Melt (C4 +15% Pyro), Yelan at 200% for +50% Burst with 35k HP, Xingqiu at 160-200% for 7k Vaporize (beats Noblesse). Beidou and Mona love the off-field ER too.
How much Resin for decent Emblem pieces?
AR 45+: 1.07 5-stars per 20 Original in Momiji; Condensed hits 2.14 per 40. Weekly 17 Condensed (680 equivalent) ~36 pieces; daily 120+ via 80/20 (144 on priority).
Condensed Resin in artifact domains—worth it?
Absolutely—craft with 60 Original + Crystal Core + 100 Mora (stores 5) for double rewards, cutting Level IV time in half. Version 6.0 triples some yields; make 'em daily after refresh to beat 180 overflow.
Ideal main stats for Emblem?
Sands: ER% (★★★★★ for Burst) or EM (reactions). Goblet: Elemental DMG% (Electro for Raiden over 100% ATK). Circlet: CRIT Rate/DMG (★★★★). Flower/Plume fixed HP/ATK; aim 200-250% ER on Yelan.
Emblem over specialized sets?
For Burst, yeah—Xingqiu outdamages Noblesse personally; Raiden scales better than Thundering Fury on ER. Thundering Fury wins for Aggravate like Keqing's EM; mix 2+2 if subs deliver—S-Tier universal in 6.0.