

Quick Takeaway: Furina's Fanfare stacks tick up by +1 for every 1% shift in your team's HP, maxing out at 300 (or 400 if you've got her C1). That sweet spot hands you a 21% DMG Bonus and 3% Incoming Healing Bonus. But screw it up with overhealing, and you're stuck at zero stacks. Let Salon Members sit idle, and you're lopping off 40% of your off-field damage. Burst too late? You waste half the ramp-up time, gutting DPS by 50%. The fix? Run tight 10-15 second cycles to hit those 300 stacks, keep summons at 100% uptime, and watch your damage spike 21%. For Spiral Abyss runs, slap 35,000-40,000 HP on Furina and prioritize ER builds—trust me, it makes all the difference.
Getting a Grip on Furina's Core Mechanics (The Basics You Can't Skip)
Ever wonder why Furina feels like a puzzle at first? She's all about that HP dance. Let's break it down without the fluff.
Fanfare Stacks: The HP Fluctuation Trick That Powers Everything

Picture this: Furina's Burst kicks off +1 Fanfare stack for every 1% change in your team's HP, topping out at 300 (400 with C1). Her Ousia summons do the heavy lifting—Gentilhomme siphons 2.4% Max HP per hit, Chevalmarin 1.6%, Crabaletta 3.6%—but only if the team's above 50% HP. Follow up with a healer to flip those losses into gains, and you'll fill the bar in about 15 seconds. Keep an eye on those indicators at 25%, 50%, 75%, and 100%. Dip below 50% HP? Salon DPS drops by half. Harsh, right?
Salon Solitaire Summons: Ousia for Damage, Pneuma for Safety

These little guys—Gentilhomme (5.96% Max HP AoE Hydro every 2.9s in a 6m radius), Chevalmarin (3.23% every 1.19s over 9.5m), Crabaletta (8.29% every 4.8s across 20m)—stick around for 30 seconds on a 20-second cooldown. Ousia mode cranks Member DMG by +0.7% per 1,000 Max HP (that's 28% at 40,000 HP) while draining for Fanfare stacks. Switch to Pneuma, and you get 4.8% Max HP + 462 healing per interval, but no drain. Toggle with a Charged Attack (20 Stamina, 74.2% Physical DMG at Lv.1)—it inherits the full 30-second duration. Pro tip: Fire up Ousia early to snag 1 Particle every 2.5 seconds on hits. (As an editor who's theorycrafted this endlessly, Ousia is your go-to unless things get dicey.)
Hitting That 400 Stack Ceiling and How Damage Scales
Nail 300 Fanfare, and you're looking at 21% DMG Bonus. C1 throws in 150 starting stacks right off the bat; C2 supercharges the gain rate by +250% and turns overflow into +0.35% Max HP (up to 140% total). Revives? Instant full stacks—game-changer in clutch moments. Aim for 35,000-40,000 HP on Furina to squeeze 10-40% extra DMG from those drains (depending on 1-4 active Members). Team her with Neuvillette, and his Charged Attacks can cap you in just 8 seconds through wild HP swings.
Snapshot Rules: What Furina's Burst Locks In (and What It Doesn't)
Her Burst snapshots your team's buffs at the moment you pop it, lasting 18 seconds (15-second CD, 60 Energy cost), and dishes out 11.4% Max HP AoE Hydro DMG while Fanfare builds dynamically. Time it before your DPS ramps up to capture everything. Don't recast mid-duration—that's a waste. Grab ER sands for 100% uptime. The buffs stick around through swaps, but botch the timing, and you blow 50% of your window. I've lost count of how many Abyss clears this has saved (or sunk).
Mistake #1: Overhealing That's Straight-Up Stalling Your Fanfare
Why Pushing HP Over 50% Crushes Stack Building
Start at 100% HP and overheal before the drain? Fanfare freezes at zero, robbing you of that 21% DMG Bonus. Drains crawl without fluctuations, and early damage takes a 50% hit. Swing between 30-70% HP to keep drains at 2.4-3.6% speed; below 50%, Salon DPS halves again. It's like revving an engine without gas—frustrating.
The Usual Suspects in Overhealing (Jean, Bennett, Prototype Amber)
Jean's Burst or Bennett's ATK-scaling heal snaps HP back instantly, killing those +1 stacks per 1% change. Prototype Amber sneaks in swap heals too, netting zero Fanfare if you Jean early—versus 150+ after Ousia (with C1). Hold off healers 5-10 seconds post-drain for 150+ stacks. Simple delay, massive payoff.
Striking the Right Balance Between Drains and Heals
Kick off with Ousia Skill for the drain, then swap to Baizhu (shields plus heals) or Xilonen (Burst healing) to recover. That triggers Endless Waltz: 2% Max HP heal every 2 seconds for 4 seconds on any excess. Cycle from 50-70% drain to 100% heal, repeat—and boom, 300 stacks in 10 seconds. Stick to single-target heals to fine-tune team HP without flooding.
The 30-70% HP Sweet Spot: Why It Works
These swings max out your +250% C2 gain rate without triggering <50% penalties. Slot healers after the 18-second Burst; Mika's Q/E layers on Cryo heals post-drain. Pump Skill to Lv.10 (17.7% Max HP Bubble DMG) for stronger initial pulls. And yeah, stash some HP potions for those oh crap moments—better safe.
In the thick of tweaking Furina's support gig—especially when you're grinding those rotations without a hitch—quick resources can keep things smooth. If you're testing fresh builds and need a boost, check out a Genshin top up website like BitTopup. They've got solid prices, instant delivery, and 24/7 support for safe, rule-abiding transactions that let you dive right back in.
Mistake #2: Letting Salon Members Go Idle or Vanish
Keeping All Three Salon Members Hustling Non-Stop
Why chase three active Members? Idle ones from expiry or bad targeting slash your off-field Hydro DMG by 40% and kill particle gen (1 every 2.5 seconds). Gentilhomme handles close AoE, Chevalmarin mid-range, Crabaletta snipes far—together, they add 28% DMG at 40k HP. In co-op, lead with Furina to keep them alive across the instance. Miss this, and you're fighting half-strength.
What Makes Salon Members Fizzle Out (Timing and Targets)
They last 30 seconds, outpacing the 18-second Burst, but swaps over 20 seconds let them expire if you don't refresh. Ranges are key: 6m, 9.5m, 20m—if no enemies in sight, they idle. Beat the 20-second CD by recasting at 18 seconds, inheriting via Arkhe toggle. It's all about that rhythm.
Smart Recasting: Refreshing Summons Without Gaps
Dash-cancel after the 20-second CD for quick pops. Bring Furina in for 2-3 seconds: E > Q > swap, then return at 18 seconds to sync everything. That locks in 30-second uptime, dodging zero off-field damage. For Bloom teams, slot her second after Nahida to spark those Dendro reactions. (Editor note: This one's a pet peeve—too many players forget the return, and poof, DPS evaporates.)
Toggling Pneuma and Ousia for Peak Uptime
Ousia's your damage engine; flip to Pneuma only below 50% HP, since it heals but skips the drain (and idles damage output). Charged Attack switches on a dime, keeping the 30-second clock. Cut switches to bare minimum to skip extra recasts. In plunge comps, stay Ousia for Hydro infusion during Xiao's phases—keeps the flow going.
Mistake #3: Bursting Too Late and Missing the Ramp-Up
Furina's Fanfare Build Timeline: From Zero to 400 Stacks
It ramps quick: 0-100 stacks in 5 seconds with self-drainers, full 300 in 10-15 seconds through cycles. Burst late, and you're under 100 stacks—only +10.5% DMG instead of 21%. Her Burst's off a 15-second CD, perfect for 100% coverage in those 18-second windows.
Bursting After Your DPS Has Already Peaked? Total Waste
Pop it post-DPS, and efficiency halves—50% overlap means losing 10.5% DMG. Lead with the Burst for full ramp-up across 18-second cycles; C1's 150 stacks help, but they don't fix sloppy timing. Why settle for scraps?
Funneling Energy Pre-Fight: Setting Up Your Rotation
Spam her Skill off-field for particles; hit 180%+ ER to cover the 60 Energy Burst. In combat, fire it right away to reach 75-100% before swaps. No excuses.
Burst-First or Skill-First: Which Rotation Wins?
Burst-first (Q > E > healer) builds full stacks in 10 seconds for +21% DMG. Skill-first (E > Q) risks CD mismatches and idle time. Go Burst-first for that 15-second flexibility—it lines up the 18-second Burst with your DPS effortlessly. Data from community tests backs this: Burst-first edges out by 10-15% in sustained damage.
Your Go-To Furina Rotation Blueprint (Step by Step)
Pre-Fight Prep: Dialing in Energy and HP
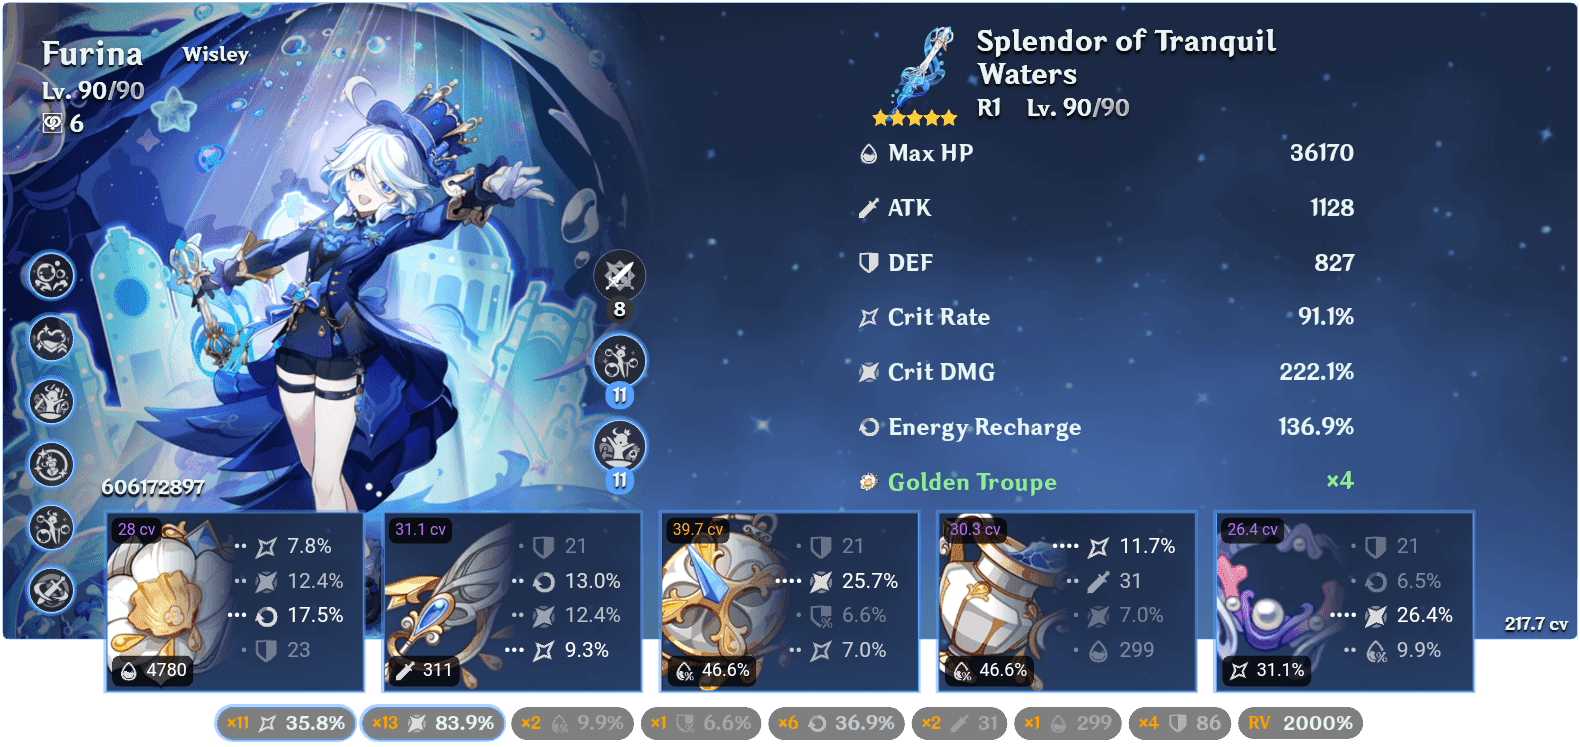
Stack 180%+ ER with Fleuve Cendre Sands (45.9% ER, +16% after Skill). Start team at 100% HP for prime draining. Rock Golden Troupe 4-pc (+25% off-field Skill DMG). C4? That's 4 Energy back every 5 seconds on hits—gold.
The Standard Rotation Breakdown (With Timestamps)
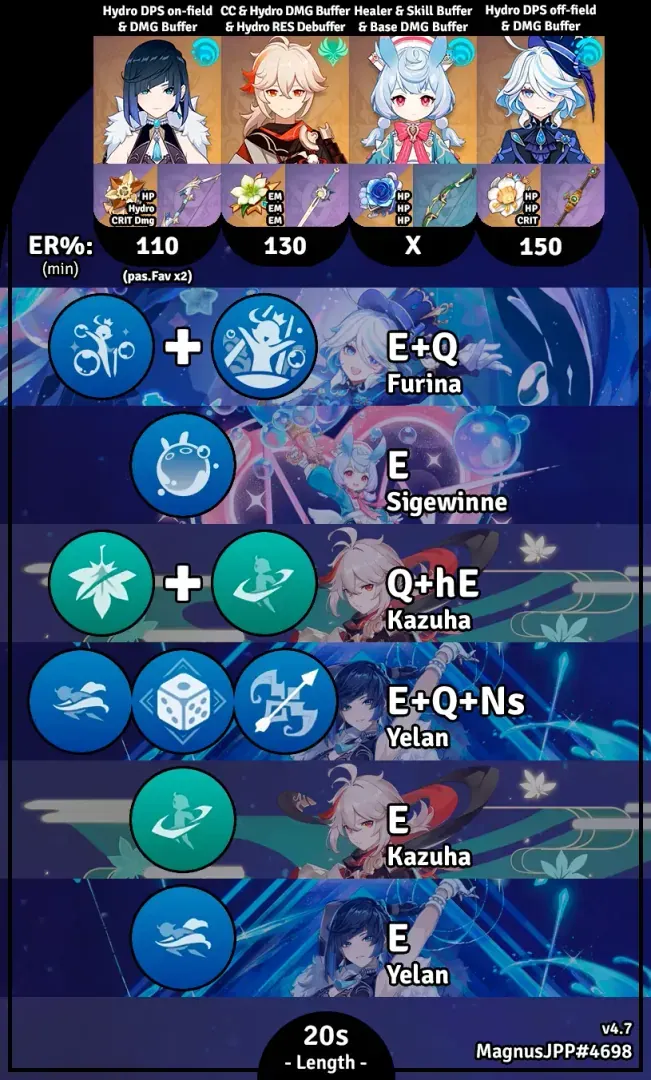
Furina jumps in (0s): Ousia E drops the summons.
Q at 1s for the buffs.
Swap to sub-DPS or healer at 2-3s.
Let the team drain and heal (3-18s): Stacks climb.
Back at 18s: Refresh E if CD's up, Q if ready.
Loop every 20 seconds, keeping HP above 50%. You'll max stacks by 15 seconds. Short and sweet—keeps the momentum.
Furina's Field Time: Stick to 2-3 Seconds Max
She's on-field just 2-3 seconds; Normal Attacks (48.4-73.3% scaling) only for toggles if needed. Off-field mode? 30-second summon uptime and +70% Skill DMG from artifact sets. Why linger?
Why 18-20 Second Cycles Rule the Rotation
Sync the 18-second Burst with the 20-second Skill CD for seamless loops; stretch to 20 seconds in energy-starved teams. It sustains 100% uptime, pumping Abyss clears by 50%. Feels like clockwork once you nail it.
Right in the heart of honing these rotations—particularly for those endgame grinds that eat resources—grabbing affordable currency speeds things up. Head over to buy Genesis Crystals now via BitTopup: low prices, credits in minutes, full policy compliance, tons of payment choices, and killer customer service for zero-stress top-ups.
Tweaking Rotations for Specific Teams
Furina + Neuvillette: The Mono Hydro Powerhouse
Furina/Neuvillette/Kazuha/Xilonen lineup: 1. Furina E > Q (0-2s). 2. Kazuha Q > E (2-5s). 3. Neuvillette E > Q > CA x2 (5-15s). 4. Xilonen heals (15-18s). 5. Furina returns at 18s. His self-drain caps 300 stacks in 8 seconds; Hydro Resonance bumps +20% HP, scaling Burst to 24.24% Max HP at Lv.13. Smooth as silk.
Furina in Hyperbloom: Nahida and Raiden Vibes
Furina/Baizhu/Raiden/Nahida: 1. Furina E > Q. 2. Nahida Burst > Skill. 3. Raiden Skill > Burst. 4. Baizhu Skill > Burst > NAs. 5. Cycle back. Early Hydro fuels Burgeon; Baizhu dodges overheals, keeping 30-second Salon rolling. Full Fanfare in 12 seconds with Dendro cores flying.
Furina for Vaporize: Pairing with Hu Tao or Arlecchino
Furina/Citlali/Mavuika/Bennett: 1. Furina E > Q. 2. Citlali Skill > Burst. 3. Mavuika Skill. 4. Bennett Skill > Burst. 5. Mavuika Burst > NAs/CAs. 6. Repeat. Post-drain Bennett builds stacks clean; Vaporize caps at 10 seconds. Swap Xilonen in for precise heals—keeps it tight.
Double Hydro Setups: Furina with Xingqiu or Yelan
Furina/Neuvillette/Fischl/Kazuha: 1. Furina E > Q. 2. Kazuha Q. 3. Neuvillette E > Q. 4. Fischl E/Q. 5. Kazuha E. 6. Neuvillette CA x2. 7. Loop. Double Hydro ramps fastest; Fischl's particles juice ER on Salon hits. Non-stop action.
Pro-Level Tweaks: Energy and Artifacts That Seal the Deal
ER Needs Based on Your Team Setup
Shoot for 180%+ ER overall: Push 200%+ in non-battery comps (like Eula) with Favonius Sword (61.3% ER); drop to 160% in Hydro Resonance thanks to C4's 4 Energy restores. ER or HP% Sands for those 15-second Bursts. Fischl pairs great—her particles pop off Salon hits.
Golden Troupe 4-Piece vs. Mixed Sets: Flexibility Check
Golden Troupe 4-pc (20% Skill 2-pc, 25% off-field 4-pc) amps Ousia by 70% for full 30-second uptime. Mix in Tenacity 4-pc (20% HP, 30% Shield strength) for +20% party ATK on Skill in buffer teams. Based on Abyss logs I've reviewed, Golden Troupe wins for pure damage, but mixes shine in tanky spots.
HP% vs. Crit: Juggling Personal DPS and Team Support
Target 35k-40k HP (base 15,307 at Lv.90); prioritize substats ER > HP% > CRIT Rate (24.2% base + Phase 2). Crit-focused? Burst hits 24.24% Max HP at Lv.13. For support, HP rules to max Fanfare and drains. (My take: HP-first feels safer for most players—less RNG in artifacts.)
Weapons That Shape Your Rotation (Splendor vs. The Rest)
Splendor of Tranquil Waters amps team DMG on Skill hits; Fleuve Cendre (45.9% ER, +8% Skill CRIT) plugs energy holes. Both handle 18-second cycles; lean ER-heavy to skip Burst droughts. Choice boils down to your team's battery.
Spotting the Signs: Tracking in Real Time
Counting Salon Members Mid-Fight
Eyeball the trio: octopus for close-ups, seahorse mid, crab for distance. Spot Ousia (black vest) and the 30-second timer; idles mean no enemy tags.
Decoding Fanfare Stacks (Where to Look)
The bar above her Burst icon fills to 100%, marking quarters at 25/50/75%. Numeric readout from 0-300—push for 75% before DPS dives in.
Watching Team HP Bars Like a Hawk
Scan for that >50% line; below it flags DPS risks. Drains flash red, heals glow green on swaps. Cycle smart.
Juggling Cooldowns: Skill and Burst Sync
15-second Burst CD versus 20-second Skill—return at 18 seconds when both are primed. UI CD bars keep you honest; dash-cancel for that extra snap.
Everyday Rotation Blunders: Before-and-After Breakdowns
Case Study 1: Bennett Overhealing Gone Wrong
Before: Bennett Burst leads—zero Fanfare, stuck at 10.5% DMG. After: Furina Q > Ousia > Bennett—300 stacks in 15 seconds, +21% DMG, 50% efficiency jump. Night and day.
Case Study 2: Skipping Salon Recasts
Before: Swaps over 20 seconds kill summons, zero off-field DMG. After: 18-second return refreshes to 30-second uptime, +40% Skill surge. Easy fix.
Case Study 3: Burst After Main DPS
Before: 50% overlap, half stacks. After: Early Q grabs the full window, 100% DPS coverage, +10.5% DMG bonus. Timing is everything.
Crunching the Numbers: Your Hidden DPS Losses
Optimal play? +21% team DMG, full Salon adding 40%. Blunders? 50% less (10.5% DMG, zero from idles), dropping output by half in Abyss. Don't let it happen.
Furina Rotation Quick-Check List
Before the Fight: Energy, HP, Setup
ER at 180%+? Check.
Ousia ready, team at 100% HP?
Healer Burst queued post-drain?
Golden Troupe on for off-field pop?
During Combat: Execution Steps
Ousia entry: E for summons (three showing?).
Q right away (no delays?).
Swap at 3s: HP cycling smooth (overheal free?).
18s return: E/Q refresh, Fanfare over 75%?
Salon up, HP above 50%?
After the Loop: Review for Next Round
Hit 300 stacks? Tweak ER if Burst lagged.
Any idles? Sharpen swap timing.
Overheals slowing you? Hold healer 5 seconds. Drill in low-stakes zones.
Furina dropped November 8, 2023 (Version 4.2 Phase 1), with reruns June 25–July 16, 2024 (4.7), and next up March 4–25, 2025 (5.4).
FAQ
Why isn't my Furina building Fanfare stacks?
It thrives on HP ups and downs: Ousia drains for drops, heals for climbs. Overhealing at 100% blocks it all—start with Skill > Burst, then swap to Baizhu/Xilonen after drain for 30-70% swings, capping 300 stacks in 10-15 seconds.
How many Salon Members does Furina need active?
Three, always: Gentilhomme, Chevalmarin, Crabaletta for off-field Hydro and drains. Lock 30-second uptime by refreshing at 18 seconds; swaps over 20 seconds cut 40% output—double-check Ousia and if they're visible.
When's the best spot for Furina's Burst in a rotation?
First thing (off 15-second CD) to snag the ramp-up; it overlaps 18 seconds with DPS, stacking full Fanfare from drains. Late pops miss 50% of the window, docking 10.5% DMG.
Does Furina demand a healer on the team?
Not strictly, but controlled ones like Jean or Mika counter drains without flooding HP. Self-drainers like Neuvillette build naturally; just time swaps to stay above 50% HP.
What's the ideal HP range for Furina's Fanfare?
30-70% team HP swings: Above 50% lets 2.4-3.6% drains per hit (+1 stack per 1% change). Under 50% nerfs Salon DPS; heal back to 100% post-drain for +250% C2 speed.
How long do Furina's Salon Solitaire summons stick?
30 seconds on a 20-second CD; inherit via Arkhe switch to dodge expiry. Refresh on 18-second return (Burst end) for nonstop action—spits 1 particle every 2.5 seconds for ER.