

Luna is SS-Tier. That's not hype — it's pick rate data, community testing, and the compounding math of her intel-plus-damage-marking kit playing out across thousands of matches. Thor (best represented by D-Wolf in Season 1, with Nox unlocking at Battle Pass Tier 80) brings frontline aggression and vehicle denial that no other assault operator matches right now.
This guide covers full ability breakdowns, mode-specific builds, the Battle Pass cost math, and a direct head-to-head comparison most guides skip.
Season 1 Battle Pass: What's Actually in It
The pass runs to 180 levels (content extends to 190) and resets at the March 2026 wipe. Key unlocks:
Luna is a base operator — no pass required. Nox at Tier 80 is the premium operator worth caring about. Her Deep Trauma trait delays enemy heals and revives, which is a real functional edge in Hazard Operations, not just a cosmetic unlock.
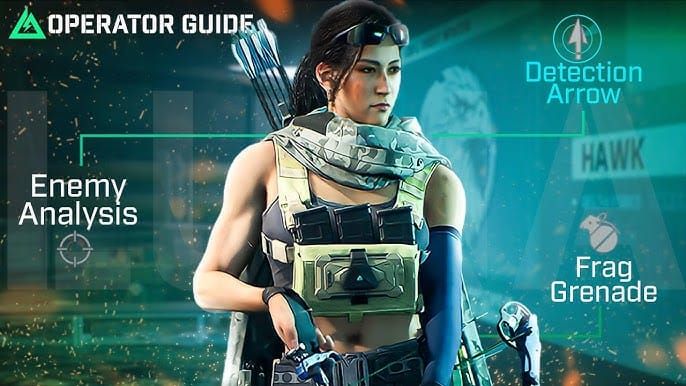
Luna: Full Ability Breakdown
Luna's kit creates compounding advantages. Understanding the mechanics is what separates an 8-12 Luna from a 24-6 one.
Detection Arrow
Scans twice for moving enemies in a 30–40m radius and leaves persistent sensor trails. The double-scan is widely misunderstood — enemies who move after the initial ping still get caught on the second pass. Sensor trails stay active, so you're getting ongoing positional data, not a one-time snapshot.
The counterplay: experienced opponents go prone immediately after hearing the arrow deploy. Work around this by timing your arrow when enemies are forced to move — objective captures, revive attempts, chokepoint pushes.
Common mistake: Firing flat on open maps. Aim high — above rooftops or terrain — to get the full scan radius. Ground-level shots lose you half the detection area.
Volt Arrow
Stuns, applies DoT, marks the target, and bounces up to five times. That bounce mechanic is what makes it exceptional for flushing chokepoints and indoor corridors. One Volt Arrow into a doorway can chain through multiple stacked enemies.
Use it aggressively before pushes, not as a reactive tool. The stun and DoT create windows your squad can exploit even when the mark doesn't land on a priority target.
Enemy Analysis Passive
Reveals hit enemies and amplifies damage dealt to marked targets. This is why Luna is a force multiplier for the entire squad — she's not just gathering intel, she's actively increasing everyone's effective damage output. In coordinated play, this passive alone justifies running Luna in every composition.
GE2 Frag Grenade
Straightforward. Hard-damage option for confirmed enemies in tight spaces. Don't overthink it.
Best Luna Builds
Warfare Build
Long sightlines and large player counts mean Detection Arrow covers more ground and the marked-damage passive affects more engagements per minute.
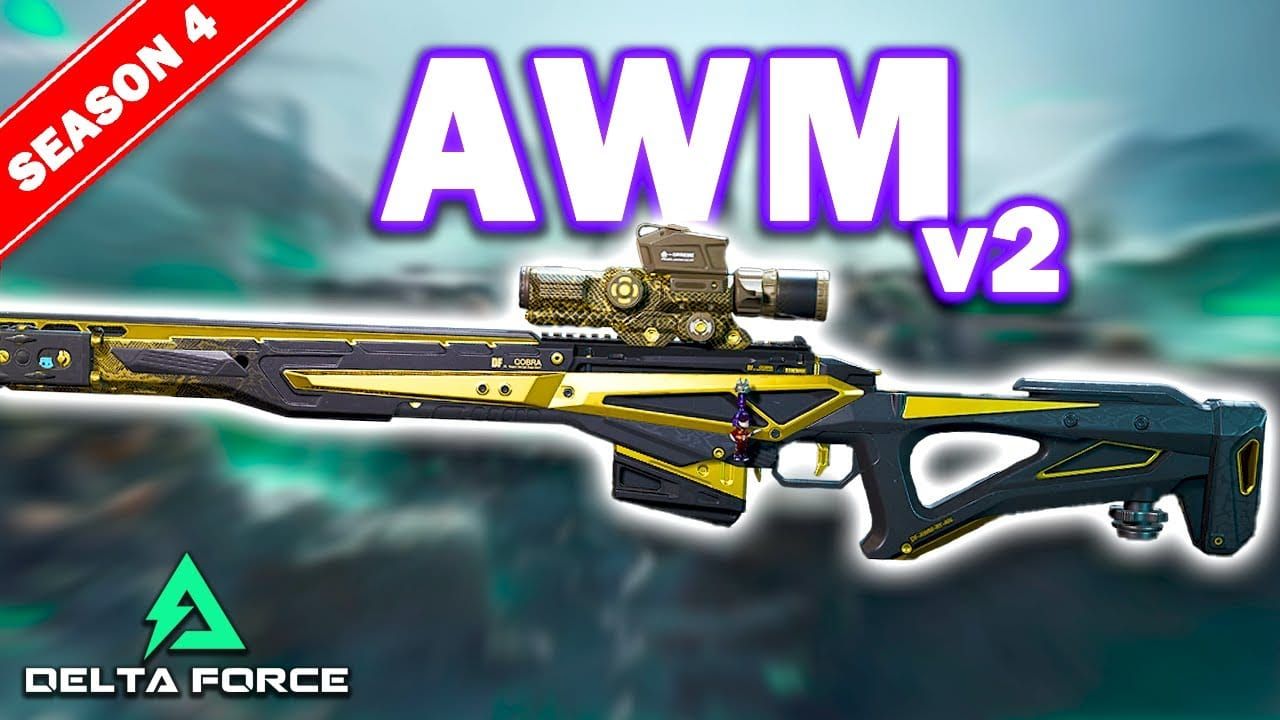
The AWM + Volt Arrow combo is the community's most-tested pairing. Mark with Volt Arrow, one-shot through cover while DoT prevents clean repositioning. The Resonant Suppressor keeps your position concealed — critical for a Recon operator who needs to stay alive to keep generating intel.
Hazard Operations Build
You're not playing for sustained team damage here. You're playing for survival, squad intel, and clean extraction. Detection Arrow becomes a pre-engagement tool.
The CI-19's 60-round drum means no reloading mid-fight. MK4 handles anything inside 15m. Luna's arrows give you the information advantage to avoid fights you'd lose — in extraction, that's often more valuable than winning fights you'd win anyway.
Best Squad Composition
Stinger is Luna's best partner. His Expertly Rescue trait enables faster revives with healing — when Luna's aggressive positioning gets her downed, Stinger recovers the situation faster than any other support. The intel-plus-sustain loop is hard to break.
D-Wolf (Thor): Full Ability Breakdown
D-Wolf is A/S-Tier Assault. His kit rewards aggressive, high-mobility play with built-in survivability — he punishes passive enemies and benefits players who know when to push.
Motorized Exoskeleton (Passive)
Boosts sprint speed and regenerates HP on knockdowns. The regen-on-knockdown is the sleeper mechanic. D-Wolf can survive engagements that eliminate other assault operators — push hard, take a knockdown, regen, re-engage. Particularly effective in Warfare's objective fights where multiple engagements happen in quick succession.
Triple Blaster
Three sticky grenades effective against both vehicles and infantry. This dual-purpose utility is what makes D-Wolf genuinely dangerous. In Warfare, vehicles are a constant threat — D-Wolf addresses them without switching to a dedicated anti-vehicle loadout. Against infantry in tight spaces, three sticky grenades in rapid succession create a denial zone that's extremely difficult to push through.
Save at least one charge for vehicles. Wasting all three on single infantry targets is the most common D-Wolf mistake.
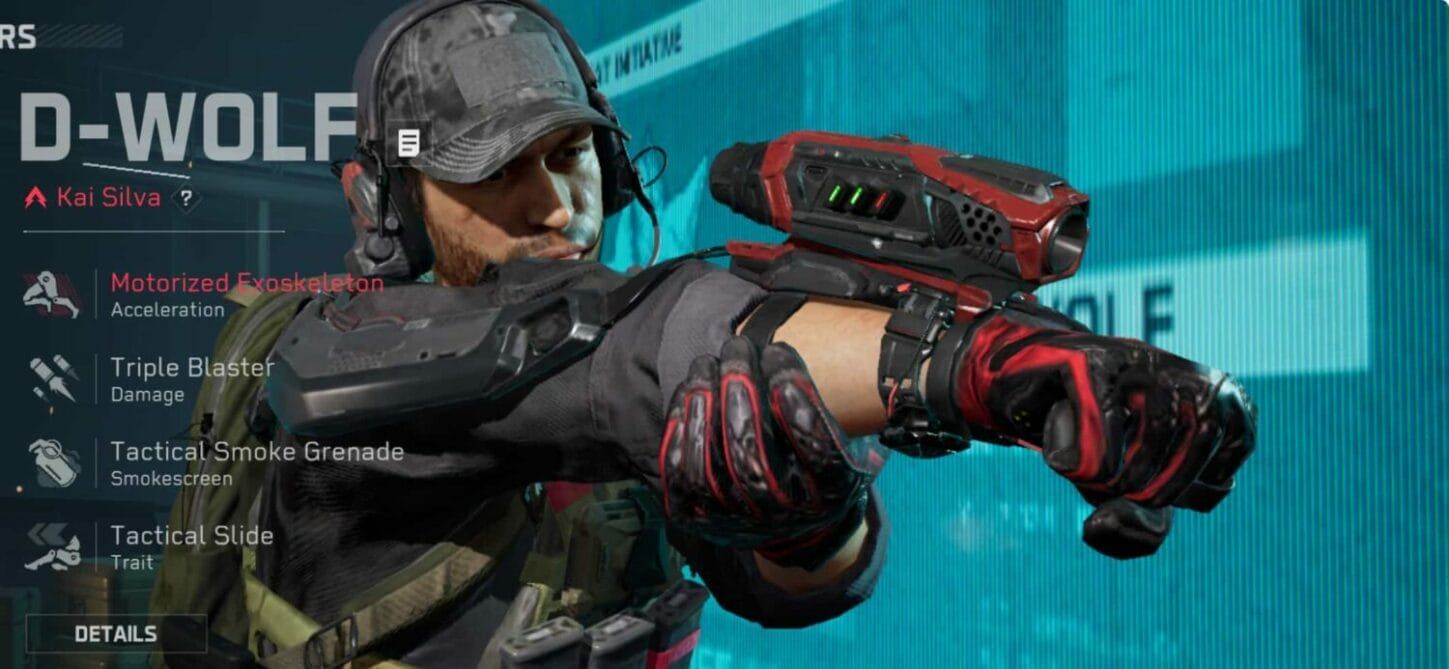
Tactical Slide + Smoke Grenade
The Tactical Slide enables sprint-into-slide movement. Combined with the Tactical Smoke Grenade, D-Wolf can close distance on entrenched enemies in ways other assault operators can't. Pop smoke before crossing open ground — it's a movement tool, not a panic button.
Best D-Wolf Builds
Warfare Frontline Build
Import Code: 6FINC4G0CQTV1IBVCBQVT
The M4A1 at 672 RPM with the Gabriel Long Barrel hits the sweet spot for D-Wolf's engagement range. 45-Round Mag means no reloading mid-push. Avoid high-recoil weapons — D-Wolf's value is in mobility and close-range aggression, not ADS-heavy firefights.
Hazard Operations Adjustment
D-Wolf is viable in extraction but needs adaptation. HP regen on knockdowns is less impactful when a single elimination ends your run. Pair with Stinger for the sustain safety net, and run the MK4 SMG secondary for 793 RPM close-quarters TTK.
Honest assessment: Stinger edges D-Wolf in pure extraction viability, but D-Wolf with Stinger support is a legitimate aggressive extraction composition.
Luna vs D-Wolf: Direct Comparison
Unlock Luna first if you play Warfare, run with a regular squad, or want higher long-term value. Her SS-Tier placement reflects the compounding intel and damage-marking advantage across an entire match.
Start D-Wolf if you're solo-queue and want immediate, intuitive impact. His kit is more self-contained, the learning curve is shorter, and the HP regen gives you a survivability buffer while you're learning the game's engagement rhythms.
For coordinated squads: run both. Luna/D-Wolf/Stinger/Shepherd is the community's most-recommended balanced composition for Season 1.
Battle Pass: Honest Cost Analysis
The Deluxe pass costs $2.70 more than Base. That's worth it only if you're buying the pass anyway — the XP tokens meaningfully accelerate progression toward Tier 80. Don't buy tier skips unless you're within striking distance of Nox with two weeks left in the season.
Realistic Tier 80 assessment:
Hardcore (4+ hrs/day): Deluxe pass, reach Tier 80 comfortably
Moderate (1–2 hrs/day): Base pass, prioritize daily missions + Warfare
Casual (<1 hr/day): Free track only — Toxik with Swift Healing is genuinely useful
The weekly 15-level cap was removed in January 2025, so there's no artificial ceiling on progression speed. Stack XP tokens with Warfare sessions at weekly reset for maximum efficiency.
Pre-wipe tip most guides miss: The March 2026 wipe has a 14-day opt-in window. Cosmetics and coins carry over; unclaimed tiers, Nox, and the AK-12 skin are lost if unclaimed. Liquidate your stash 12–14 days before the wipe for 30–40% returns on unneeded items.
If you need Delta Force coins before diving into Season 1, you can buy Delta Force battle pass top up at BitTopup for competitive pricing and fast delivery.
F2P reality check: Luna is accessible without spending. No core operator ability is locked behind premium. The free track Toxik with Swift Healing covers support needs adequately for Warfare. Premium unlocks real edges (Nox's Deep Trauma matters in Hazard Ops), but they're not the difference between winning and losing at moderate skill levels.
Season 1 Meta: Tier Snapshot & Patch Context
Luna received nerfs during Season 1 — scan mechanics shifted to movement-based detection, and Volt Arrow bounce behavior was adjusted. She's still SS-Tier. The nerfs made her harder to play optimally without reducing her ceiling for skilled players.
Raptor is worth knowing about. His Ultimate Trace Scanner delivers five pings, revealing footprints, containers, and operator intel in 30–40m fog. In heavy-fog Hazard Ops, Raptor can outperform Luna situationally. But in Warfare, Luna's damage-marking passive gives her an edge Raptor's kit can't replicate.
Watch Luna's scan radius and cooldown in upcoming patches — those are the balance levers developers have already used. D-Wolf's HP regen is similarly a target if assault-class survivability becomes a concern. The Delta Force meta moves fast.
To stay current when new operators drop mid-season, you can recharge Delta Force operator unlock credits quickly at BitTopup.
FAQ
Is Luna or D-Wolf better for new players? D-Wolf. His kit is intuitive — sprint, slide, throw grenades, regen HP. Luna's arrow placement has a steeper learning curve. That said, if you have a regular squad, start Luna — her passive generates value even with imperfect play.
Can I use both operators in Warfare and Hazard Ops? Yes. Luna is stronger in Warfare; D-Wolf is viable in Hazard Ops but needs Stinger support to compensate for reduced HP regen value in extraction contexts.
What happens to Nox and the AK-12 skin if I don't claim them before the March 2026 wipe? They're lost. Cosmetics and Delta Coins carry over, but unclaimed tier rewards — including Nox at Tier 80 and the AK-12 skin at Tier 75 — do not transfer. Claim everything at least 14 days before the wipe.
How do I import the build codes? Gun Customization → Preset → Import. Luna AWM: 6HLOCT009MFFCME3G7LT2. D-Wolf M4A1: 6FINC4G0CQTV1IBVCBQVT.
Is the free track worth playing without premium? Yes. Toxik with Swift Healing is a legitimate support operator in both modes. The game is designed to be F2P playable — premium unlocks functional edges, but they're not decisive at moderate skill levels.
Biggest Luna Detection Arrow mistake? Firing flat on open maps. Aim high — above terrain and rooftops — to maximize the 30–40m scan radius. Ground-level shots lose you significant detection coverage. One adjustment, noticeably better intel per match.