

Season 4 introduces Airport Hunt map with 35-minute raids supporting 12 players, unlocking at Level 25. This guide reveals proven scav routes across Farm and Northridge, budget loadouts under 120k Koens, and safe extraction timing. Consistently earn 200-400k Koens per run using Grain Trade Center-Stables-Motel route, farm 60-150 rounds of Tier 4 ammo from Northridge bots, and optimize survival with data-driven extraction strategies.
Understanding T4 Farming in Season 4
T4 farming hits the sweet spot between risk and reward. Unlike lower-tier zones with minimal profits or high-tier areas requiring expensive gear, T4 zones offer consistent returns with manageable threats. Season 4's Airport Hunt update changed the meta with 35-minute raid duration on Guoyapos Airport, giving farmers more time for complex loot routes.
Farm map supports 12 players across 30-minute raids, creating predictable flow patterns. T4 loot zones contain safes, weapon crates, and high-value containers spawning ammunition, armor, and tradeable items worth 40-50k Koens per 100 rounds of Tier 4 ammo.
For uninterrupted farming momentum, Arena Breakout Bonds top up online through BitTopup ensures you always have Koens for optimal loadouts. Competitive pricing and instant delivery keep operations running smoothly.
Season 4 Airport Hunt Map Changes
Airport Hunt unlocks at Level 25 with 35-minute raids—five extra minutes vs Farm's 30-minute window. Extended timeframe allows thorough looting and safer extraction timing.
Key Extracts:
Airport Drainage Pipe: Activates 10 minutes post-start, no backpacks allowed
Northern Outpost: 10-20 minute window, requires enemy operator kill, max 2 players
Access Bridge: Auto-activates after 25 minutes
Risk vs Reward Analysis
T4 farming suits intermediate to advanced players who understand map flow and execute disciplined routes. Successful Farm runs hitting Grain Trade Center, Stables upstairs safe, and Motel's three locked safes generate 200-400k Koens with proper inventory management. Requires 2011 keys for Motel access.
Northridge Loot Density:
Northridge Hotel: 8 safes
Campus Services: 2 safes
Sewage Plant: 3 safes
Complete Northridge run farming Tier 4 ammo from bots yields 60-150 rounds per raid. At 40-50k Koens per 100 rounds, that's 24-75k Koens in ammo alone, plus armor drops like SEK Composite Body Armor worth 20k Koens.
Budget setups under 120k Koens maintain positive margins even with 40-50% survival rates. Expensive loadouts require 70%+ survival to stay profitable.
The Complete 120k Budget Loadout
Cost-effective loadouts enable sustainable farming by minimizing losses while maintaining combat effectiveness. The 120k threshold represents optimal balance between survivability and economic efficiency.
Primary Weapon Selection Under 50k
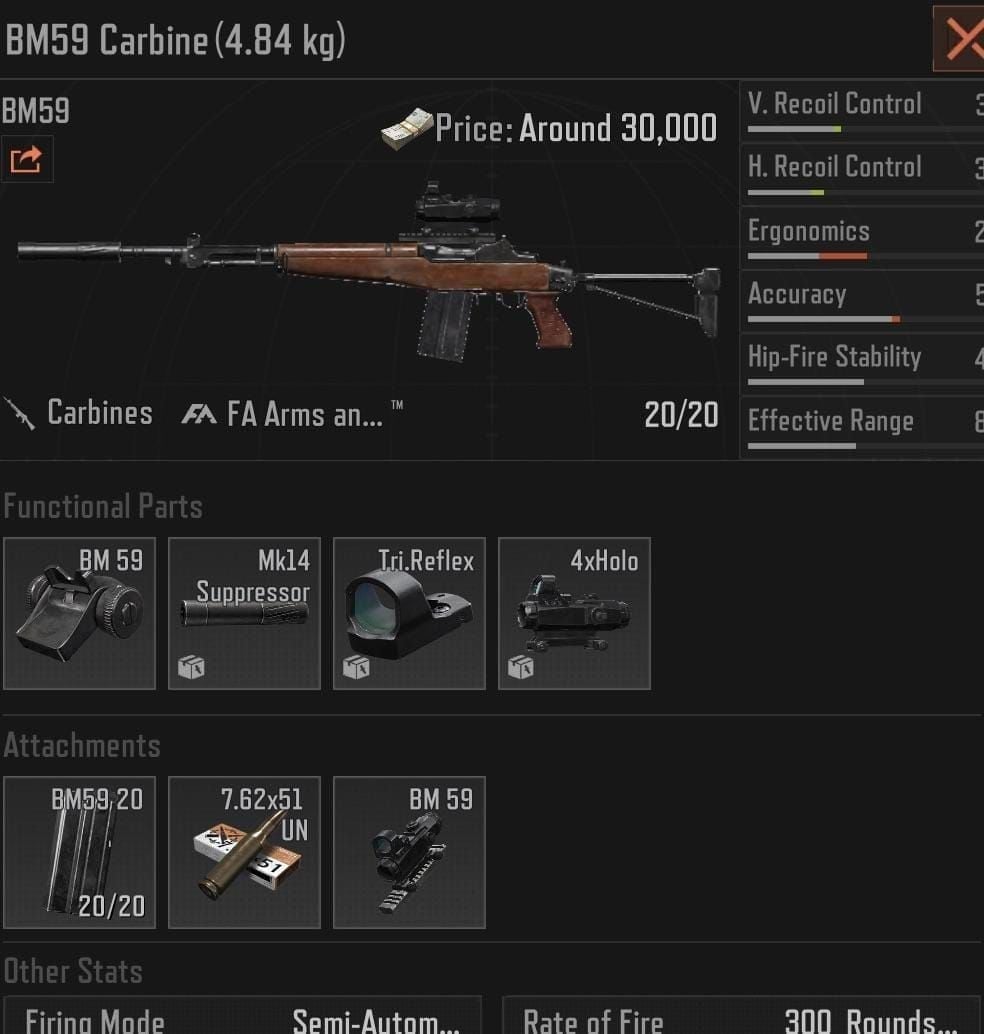
BM59 (24-28k Koens)
Fires 7.62x51mm NATO rounds
Excellent stopping power vs scavs and light PMCs
Pair with T4 M80 ammo: 441 penetration, 850.5 damage
MPX (70-80k Koens)
850 RPM using 9x19mm AP6.3 T3 ammo
679.68 damage, 424.8 penetration
Dominates close-quarters in Northridge Hotel
AK-102 (92-95k Koens)
Fires 5.56x45mm Tier 4 ammo at 630 RPM
60-round magazines, 3.5x optics
Handles varied engagement distances
Budget Alternatives:
Mosin sniper: 38-40k Koens, safe distance engagement
MP5 Leg Meta: 70-80k Koens, bypasses armor via limb targeting
Armor and Helmet Choices
SEK Composite Body Armor
70 durability, -5% movement penalty
Costs 15k Koens, sells for 20k Koens (profit opportunity)
Minimal movement penalty preserves repositioning ability
Sentry 308 Armored Rig
60 durability, 20 storage slots
-6% movement penalty
Dual-purpose: protection + inventory space
Budget helmets should prioritize ricochet chance over pure armor rating. Class 3-4 helmets under 15k Koens protect against scav headshots while keeping total costs manageable.
Essential Medical Supplies
Required Medical Loadout (8-12k Koens):
2x AI-2 medkits (light bleeding, health restoration)
1x tourniquet (heavy bleeds)
1x CMS kit (limb repairs)
2-3 painkillers (movement during firefights)
Lockpicks or keys for high-value safes dramatically increase profit. 2011 keys for Farm Motel pay for themselves in one successful run across three locked safes.
Backpack and Rig Optimization
Airport Drainage Pipe and Hunter's Path extracts prohibit backpacks, making rig capacity paramount for certain routes.
Backpack Strategy:
Medium backpacks: 30-40 slots, 5-10k Koens
Avoid oversized—they slow movement and increase visibility
Tactical Rigs:
15-20 slots sufficient for high-value compact items
Sentry 308's 20 slots ideal for dual-purpose role
Best Scav Routes: Three Proven Paths
Route 1: Farm Map Grain Trade Center → Stables → Motel
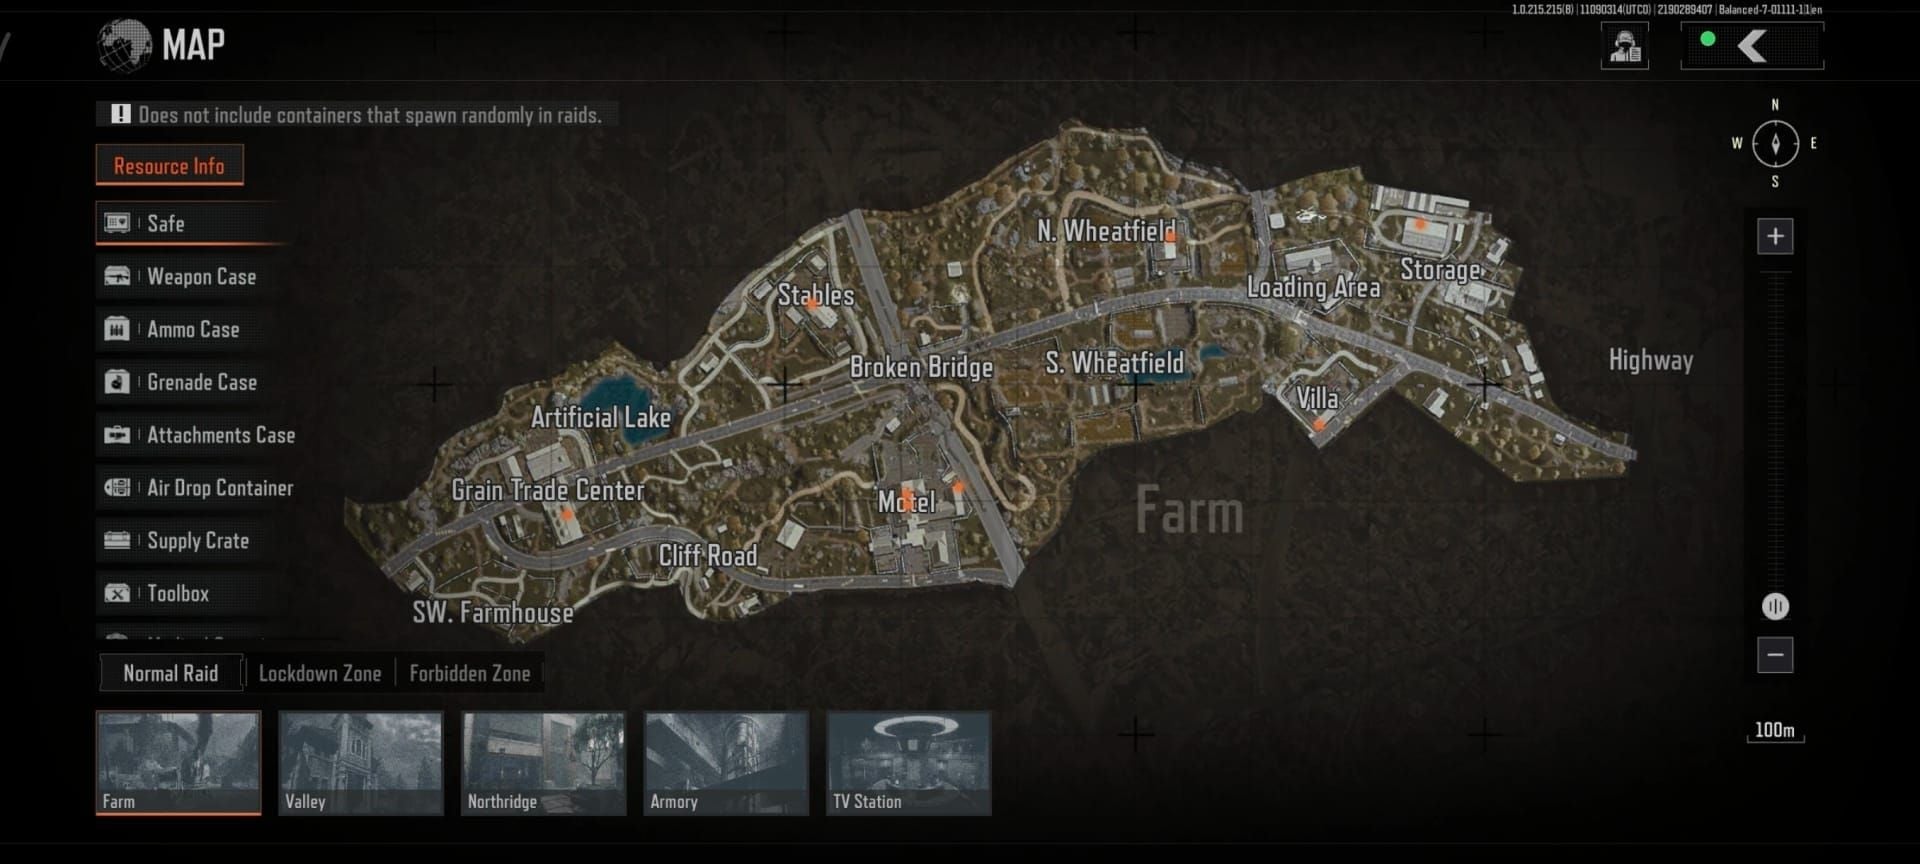
Low-risk, high-reward route generating 200-400k Koens
Execution (12-15 minutes):
Clear Grain Trade Center ground floor containers, weapon crates, loose loot
Move to Stables upstairs safe (spawns ammo, medical supplies, barter items)
Hit Motel's three locked safes (requires 2011 keys, 8-12 seconds each)
Extract via Southern Blockade (2000 Koens) or free extracts based on spawn. Leaves 15-18 minutes for safe extraction timing.
Route 2: Northridge Hotel Eight-Safe Floor Clear
Medium-risk route with highest safe density
Execution (15-20 minutes):
Clear floor-by-floor from ground up (prevents upper floor traps)
8 safes distributed across multiple floors
3-5 minutes per floor for thorough clearing
Boss Spawns:
Boss Fred: Drops valuable items, significant combat risk
Frade Lee: Spawns at Hotel, Campus Services, Cable Car Station; drops wedding ring token
Move to extraction with 8-10 minutes remaining to avoid late-raid concentrations.
Route 3: Valley Beach Villa & Port Weapon Crate Circuit
High-risk, maximum-profit route
Loot Density:
Valley Beach Villa: 2 safes, 10 weapon crates
Valley Port: 1 safe, 7 weapon boxes
Boss Doss spawns in Valley, drops SEK Composite Body Armor (70 durability). Costs 15k Koens, sells for 20k Koens.
Takes 18-22 minutes to complete thoroughly. Prioritize Tier 4 ammo, high-durability armor, compact high-value items. Valley Helipad extract requires 2 dogtags—plan alternative routes.
Route Selection by Playstyle
Conservative: Farm map Grain Trade Center-Stables-Motel for consistent returns, minimal combat
Aggressive: Northridge eight-safe route or Valley circuit for max profit/hour, accepting lower survival rates
Intermediate: Rotate routes based on spawn location and early-raid activity
High-Value Loot Spawn Locations
Priority Containers and Locked Rooms
Safe Locations:
Northridge Hotel: 8 safes
Campus Services: 2 safes
Sewage Plant: 3 safes
Farm Motel: 3 locked safes (requires 2011 keys)
Stables: 1 upstairs safe (no key required)
Each safe spawns ammo, medical supplies, weapon attachments, barter items worth 15-40k Koens individually. Looting takes 8-12 seconds—requires secure positioning.
Weapon Crate Spawn Points
Highest Density:
Valley Beach Villa: 10 weapon crates
Valley Port: 7 weapon boxes
Northridge Campus Services: Multiple crates + 2 safes
Crates spawn complete weapons, attachments, ammunition. Tier 4 ammo (5.56x45mm, 7.62x39mm, 5.45x39mm) appears regularly. Each crate takes 3-5 seconds to search.
AK-74N with Level 5 BP ammo, 60-round mags, 3.5x optics spawns in weapon crates—substantial sell value.
Medical and Tech Item Hotspots
Medical Supplies: Bathroom areas, medical offices, residential buildings (AI-2 medkits, tourniquets, CMS kits worth 3-8k Koens each)
Tech Items: Office areas, Northridge Campus Services, Airport terminals (graphics cards, CPUs: 20-50k Koens, 1-2 slots)
Barter Items: Wedding ring token from Frade Lee serves quest purposes beyond sell value
Scav AI Behavior and Patrol Patterns
Season 4 Scav Spawn Mechanics
Scavs spawn at predetermined locations at raid start, then patrol between points of interest. Additional waves spawn at 10-minute and 20-minute marks, increasing density as raids progress.
Boss Scavs:
Fred: Northridge Hotel, enhanced AI, superior equipment
Doss: Valley, patrols larger areas, aggressive response
Timing Routes to Avoid Scav Aggro
Aggro Ranges:
Open areas: 40-50 meters
Buildings: 20-30 meters
Sound Discipline:
Sprinting: Audible 50+ meters
Walk/crouch-walk through high-density areas
Door opening: Audible 30-40 meters
Observe scav patterns for 30-60 seconds before advancing.
When to Engage vs Avoid
Engage When:
Scavs block high-value loot access
Farming Tier 4 ammo (60-150 rounds per run worth 24-75k Koens)
Scavs threaten extraction route
Avoid When:
Preserving ammo, medical supplies, armor for PMC encounters
Safe loot value (200-400k Koens) exceeds scav loot value
Budget loadout scav combat requires controlled engagements: use cover, headshots, disengage if damaged. Successful kill costs 5-10 rounds; failed engagement costs entire loadout.
Safe Exfil Timing Windows
Early Extract (0-10 Minutes)
Suits speed-farming: hit 1-2 high-value locations, immediately extract. Maximizes raids/hour but reduces per-raid profit.
Airport Drainage Pipe: Activates 10 minutes post-start, no backpacks. Ideal for compact loot (Tier 4 ammo, medical supplies, tech items).
Guaranteed 100k Koens in 10 minutes often beats potential 300k Koens with 50% survival rate.
Mid-Raid Extract (10-20 Minutes): The Sweet Spot
Optimal timing for most T4 strategies. Completed primary routes, conditional extracts active, manageable player density.
Airport Northern Outpost: Operates this exact window, requires enemy operator kill, max 2 players
Southern Blockade: Costs 2000 Koens, guarantees availability
Move to extraction with 8-10 minutes remaining for buffer time. Extract once you've secured 150-250k Koens.
Late Extract (20-30 Minutes)
Access Bridge: Auto-activates after 25 minutes
Risks:
Peak player concentrations near extracts
Exfil campers establish positions 20-25 minutes in
Hunter's Path requires ditching backpacks
Only justified for exceptionally valuable loot (400-600k Koens).
Reading Raid Flow
Indicators:
Heavy gunfire toward extraction: Delay or choose alternative routes
3-5 minutes silence: Suggests player deaths/successful extractions
Scav behavior changes: Early warning of nearby players
Your combat encounters: Data about remaining player count
For uninterrupted farming, buy Arena Breakout Bonds instant recharge through BitTopup for optimal loadouts. Secure transactions and fast delivery support continuous T4 farming efficiency.
Advanced T4 Farming Tactics
Sound Management
Surface Types:
Metal: Amplifies footsteps
Carpet/grass: Muffles movement
Movement Noise:
Crouch-walking: 70% reduction vs normal walking
Sprinting: 200% increase
Door opening audible 30-40 meters. Open slowly, listen 5-10 seconds after.
Positioning Techniques
Before looting safes/containers, identify 2-3 escape paths. Northridge Campus Services room-by-room clearing ensures cleared space behind for retreat.
Verticality:
Upper floors: Visibility over approaches, limited escapes
Ground floors: Multiple exits, reduced awareness
Inventory Management
Prioritize value-per-slot ratio. 1-slot item worth 30k Koens beats 4-slot item worth 80k Koens.
High-Efficiency Items:
Tier 4 ammo: Compact, 40-50k Koens per 100 rounds
SEK Composite Body Armor: 20k Koen sell value
Drop low-value items immediately when finding superior loot. Organize inventory during safe moments, not while exposed.
Emergency Protocols
When route compromised, retreat to fallback positions with cover, sightlines, escape routes. Wait 2-3 minutes for situations to develop.
Know three extract options from any position. Southern Blockade's 2000 Koen cost beats losing 300k Koen inventory to exfil campers.
Common T4 Farming Mistakes
Always Going for Highest Value Loot First
Northridge Hotel's eight safes attract multiple farmers—combat hotspot during peak times. Sometimes medium-value locations with minimal competition generate more consistent profits.
Vary routes based on early-raid sounds and spawn locations. Flexibility beats rigid adherence to optimal routes.
Over-Looting
250k Koen inventory at 15 minutes should extract rather than risking everything for additional 50k Koens.
Set Triggers:
Extract at 200k Koens OR 15 minutes (whichever first)
Override just one more safe impulse
Survival rate correlates with long-term profitability more than per-raid loot maximization.
Ignoring Extract Timing
Conditional extracts activate 10 minutes post-raid. Plan routes completing primary objectives by 12-15 minutes, allowing buffer time.
Late extractions after 25 minutes face dramatically increased player concentrations and exfil camper probability.
Poor Loadout Choices
Weapons costing 90-100k Koens leave insufficient budget for medical supplies, armor, utility. BM59 (24-28k Koens) or MPX (70-80k Koens) provides combat effectiveness while preserving budget.
SEK Composite Body Armor's 70 durability and minimal movement penalty represents sweet spot for T4 requirements.
Measuring and Optimizing Efficiency
Key Performance Metrics
Profit Per Raid: Total loot value from successful extractions minus loadout costs for all raids ÷ total raid count. Target: 100-150k Koens
Survival Rate: Successful extractions ÷ total raids. Target: 60-70% with budget loadouts
Time Efficiency: Profit per hour. 15-minute raid generating 150k Koens (600k/hour theoretical) beats 28-minute raid generating 250k Koens (535k/hour theoretical)
Tracking Progress
Maintain spreadsheet tracking: raid date, map, route, survival outcome, loot value, loadout cost.
Note Death Causes:
PMC combat
Scav encounters
Extract camping
Positioning errors
If 60% of deaths occur during extraction, refine extract timing/approach methodology.
Adjusting Strategy Based on Data
Survival <50%: Shift to conservative routes, earlier extraction. Farm map Grain Trade Center-Stables-Motel with 15-minute extraction
Survival >75%, low profit/raid: Playing too conservatively. Extend routes, add loot locations, engage more scavs
Time efficiency <400k Koens/hour: Streamline processes, memorize container locations, organize inventory during raids
Maximizing Experience with BitTopup
How BitTopup Enhances Farming Efficiency
BitTopup provides reliable Arena Breakout Bonds top-up with competitive pricing, fast delivery, and secure transactions. Wide game coverage serves as single solution for multiple gaming needs.
When executing profitable T4 strategies generating 400-600k Koens/hour, every minute of downtime costs real profit. BitTopup's instant delivery ensures you spend time farming, not waiting.
Secure and Fast Koen Top-Up
Covert Ops missions unlock at level 5, yield 100k Koens per mission with weekly resets. Evita Quest rewards 60,000 Koens. Yet sustained T4 farming requires consistent loadout funding exceeding quest rewards.
Strategic Bonds purchases through BitTopup enable 5-10 backup loadouts, ensuring you never skip farming sessions due to insufficient Koens. Every hour in optimal T4 farming generates more profit than alternative Koen acquisition methods.
FAQ
What are the best T4 farming routes in Season 4?
Farm map Grain Trade Center-Stables-Motel generates 200-400k Koens with low risk in 12-15 minutes. Northridge Hotel eight-safe clear yields 60-150 rounds Tier 4 ammo worth 24-75k Koens. Valley Beach Villa and Port offers max profit with 2 safes, 10 weapon crates, 7 weapon boxes but requires advanced skills.
How much profit from T4 farming with 120k loadout?
Successful Farm runs generate 200-400k Koens gross, netting 80-280k Koens after loadout costs. Northridge runs yield 24-75k Koens in ammo plus armor drops worth 20k Koens. With 60-70% survival rate, expect 100-150k Koens average profit per raid.
When is safest time to extract?
10-20 minute window provides optimal timing—conditional extracts activated, player density manageable. Move to extraction with 8-10 minutes remaining. Early extraction at 10 minutes suits speed-farming; late extraction after 25 minutes increases exfil camper risk significantly.
What's in a budget T4 farming loadout?
BM59 (24-28k) or MPX (70-80k), SEK Composite Body Armor (15k), Sentry 308 Armored Rig, 2x AI-2 medkits, 1x tourniquet, 1x CMS kit, painkillers, medium backpack, 2011 keys. Total under 120k Koens with combat effectiveness.
Is T4 farming worth it in Season 4?
Yes. Provides consistent 100-150k Koens profit per raid with 60-70% survival using budget loadouts. Generates 400-600k Koens/hour with efficient routing. Risk-reward balance suits intermediate to advanced players seeking sustainable profit without expensive gear.
Which extraction points are safest?
Southern Blockade (2000 Koens) guarantees availability with moderate traffic. Hunter's Path requires ditching backpacks, deterring exfil campers. Access Bridge auto-activates after 25 minutes. Airport Drainage Pipe activates at 10 minutes, no backpacks, ideal for compact loot. Avoid Valley Helipad requiring 2 dogtags unless you've secured kills.
Ready to dominate T4 farming in Arena Breakout Season 4? Get Koens quickly and securely through BitTopup to maintain farming momentum with best loadouts. Fast delivery, trusted service, competitive rates—fuel your Airport Hunt success today!