

Season 11's reinforcement system allows one teammate respawn per raid at specific intervals, but calling revival in wrong scenarios multiplies gear loss. This guide identifies three critical situations where declining reinforcement preserves more value: extract-proximity deaths (0-100m), compromised positions with enemy superiority, and late-raid timing under 5 minutes remaining. Failed reinforcements create 30-40% economic loss while destroying squad survival rates.
Understanding S11 Reinforcement System
S11 changed squad dynamics with event-based revival spawning every 15 minutes at 15, 30, 45, and 60-minute marks. One teammate respawn per raid costs Koens, creating four potential reinforcement opportunities during max-length raids.
For optimal resource management, Arena Breakout Mobile bonds top up through BitTopup provides secure, instant currency access without interrupting gameplay.
How Reinforcement Works
Eight event types populate S11 maps: Timely Support, Easy Pickings, Field Hospital, Barn Repair Shop, Gas Station, Item Exchange, Shooting Range, Temporary Stash. Each features unique audio signatures 3 seconds before activation.
Timely Support: 5 minutes, 500-1000 bonus points, 30-40% faster travel
Easy Pickings: 8 minutes, 200-300 points
Field Hospital: 6 minutes, medical supply focus
Events contain 3-5 marked containers and 1-2 unmarked caches with 15-25% higher rare item rates. Tier-3/4 items appear at 40%+ rates.
Reinforcement lock activates with less than 5 minutes remaining, preventing new revival calls.
Cost Structure
Events contribute 30-40% of total raid points (1400-2600 per raid). Call-back window opens during first 60-90 seconds after event spawn. Item Exchange events offer 10-15 trader reputation per transaction, capped at 100.
Spawn Point Mechanics
Each map has 3-6 primary event zones with predictable patterns. Farm's southern barn offers elevated sightlines creating defensive advantages. Gas Station spawns in northeast quadrant with 40-60m engagement distances.
Audio cues: Timely Support helicopter sounds carry 100+ meters, Easy Pickings features container clanging, Field Hospital broadcasts medical beeping.
Cooldown and Limitations
15-minute intervals create predictable windows. Player eliminated at 16-minute mark faces 14-minute wait until 30-minute event. 60-second defend timers activate upon container interaction. One-respawn-per-raid limit forces squad leaders to choose which downed teammate receives reinforcement.
Scenario #1: Extract Proximity (0-100m)
Calling reinforcements within 100m of extraction creates highest squad wipe probability. Combines concentrated enemy presence, limited maneuvering space, and psychological pressure.
Why Extract-Area Revivals Fail
Extract zones attract 3-4 enemy squads in final phases. Reinforced teammate spawns into compromised environment with basic gear, facing upgraded enemies. Equipment disparity reduces survival 40-60%.
Extract camping remains most effective S11 strategy. Enemy presence exceeds 70% during final 10 minutes, increasing to 85%+ on limited-extract maps like Farm.
Enemy Camping Probability
Optimal ambush distance: 40-60m in elevated positions, matching reinforcement spawn radius. Enemies maintain visual control outside immediate threat range.
Timely Support helicopter sounds audible from 100+ meters alert every nearby squad, eliminating surprise. Campers pre-aim spawn points and coordinate crossfire before your teammate loads.
Gear Loss Multiplication
Failed extract-proximity reinforcements lose two full loadouts: original player's gear plus squad members' equipment during recovery. When revived player dies within 30-60 seconds, you've tripled economic loss.
Calculate exposure: downed teammate carried 150,000 Koen, two squadmates risk 200,000 each = 550,000 total exposure to recover 150,000. Risk ratio: 3.67:1.
Insurance return rates drop from typical 60-70% to below 30% in contested extract zones due to immediate looting.
Alternative: Insurance and Clean Extract
Accept single gear loss, maximize insurance returns, extract cleanly with survivors. Preserves 2-3 loadouts while maintaining insurance eligibility.
Disengage immediately, use 60-90 second window while enemies loot to establish distance. Route toward secondary extracts even if travel time increases 2-3 minutes.
Downed player provides death camera intel: enemy positions, squad sizes, equipment levels.
Farm Map Example
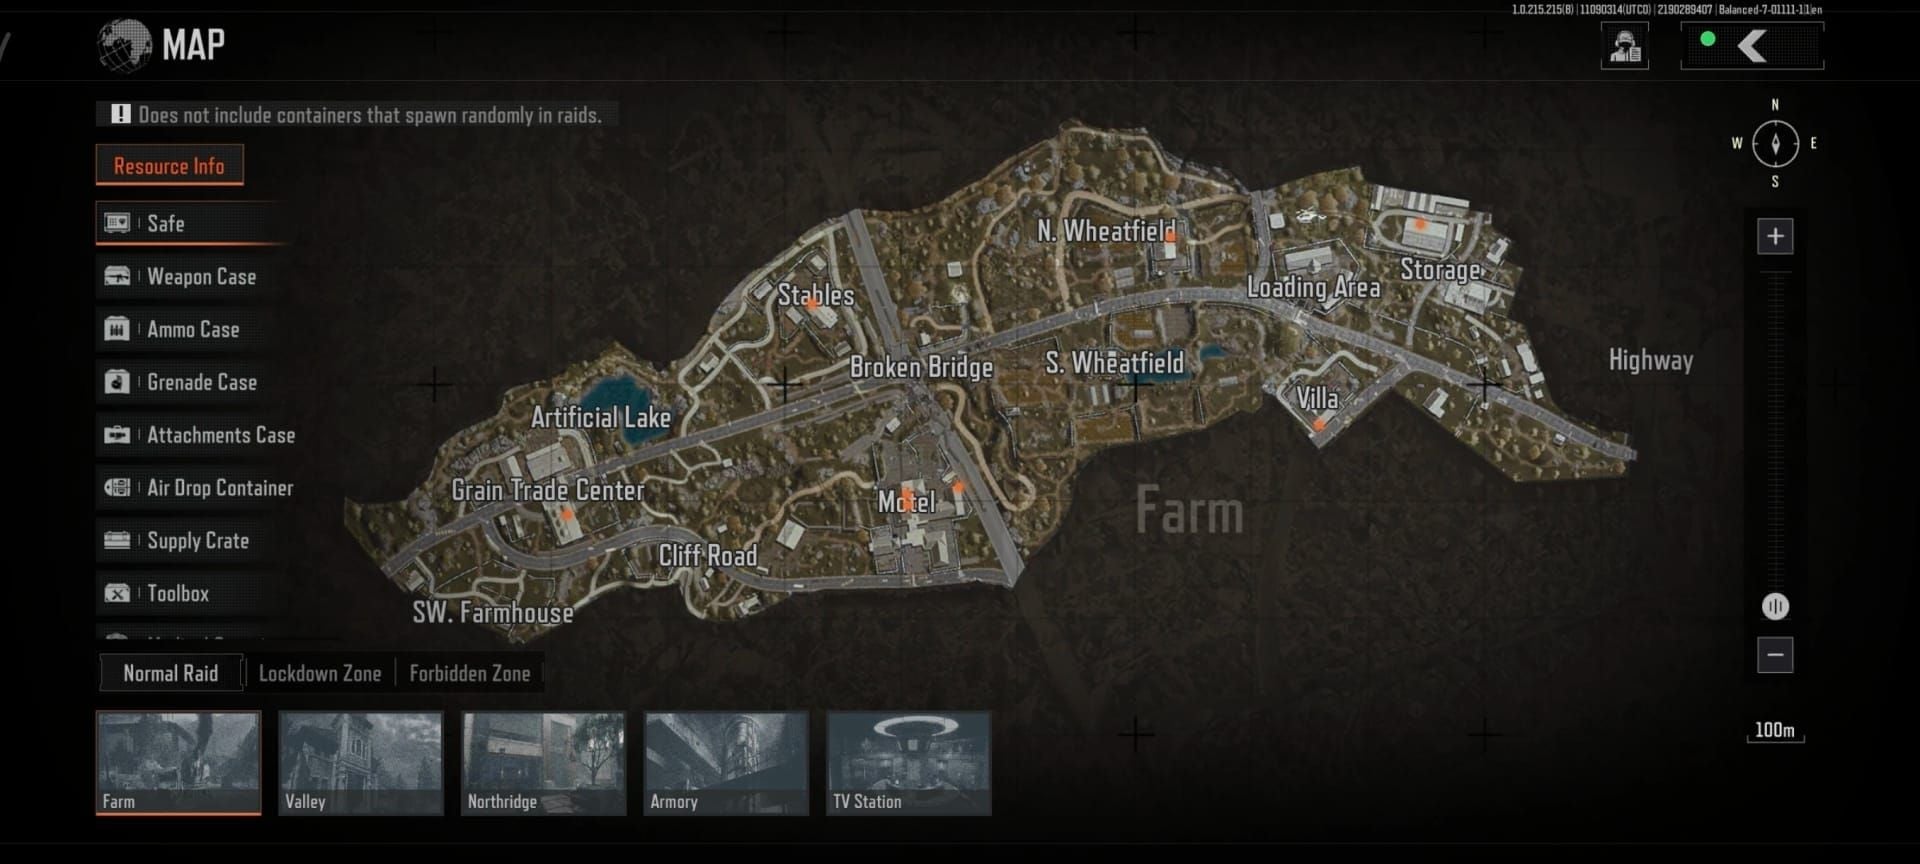
Southern extract sits 80m from Barn Repair Shop, creating perfect ambush geometry. Teammate dies at 8 minutes remaining approaching southern extract. Reinforcement at 15-minute event (5 minutes left) spawns teammate into kill zone with 360-degree enemy coverage.
Within 12 seconds, reinforced teammate dies again. Audio draws both enemy squads, resulting in total squad wipe 40m from extraction.
Correct decision: accept single loss, rotate northwest toward secondary extract, extract cleanly with 3-4 minutes remaining.
Scenario #2: Compromised Positions with Enemy Superiority
Reinforcing into tactically inferior positions against superior forces transforms single casualties into guaranteed wipes. Requires honest assessment: positional advantage, equipment disparity, enemy coordination.
Unwinnable Position Indicators
Limited cover, restricted movement, enemy high ground control, multiple hostile approach vectors. Position itself caused death—reinforcing produces identical results.
Elevation disadvantage exceeding 5m creates 40-50% accuracy penalties while providing elevated enemy full body exposure. TV Station's third floor exemplifies this: fourth-floor enemies maintain permanent advantage.
Restricted egress routes trap reinforcing players in predetermined kill zones. Enemies pre-aim chokepoints, eliminating reinforcements within 3-5 seconds.
3-Factor Enemy Advantage
Equipment disparity: Tier-4 armor, suppressed high-penetration weapons, advanced optics versus Tier-2 equipment = 60-70% enemy advantage independent of skill.
Squad size differential: Solo survivor versus 4-player enemy squad = 4:1 numerical disadvantage plus positional plus equipment = 95%+ failure rate.
Enemy coordination: Coordinated crossfire, systematic clearing, disciplined fire control demonstrates organization that overwhelms reinforcements.
High Ground and Cover Disadvantage
High ground provides expanded sight lines, cover from lower angles, gravitational assistance for throwables. Enemies positioned 40-60m away control engagement initiation and force predictable approach routes.
Cover quality matters more than quantity. Penetrable materials (wood, thin metal, vehicle doors) offer illusory protection against armor-piercing rounds.
Defensive perimeter concept: enemies establish 40-60m standoff, engaging reinforcements during vulnerable spawn while remaining outside effective range for basic weapons.
Gear Donation Scenarios
Occur when success probability falls below 20%. Expected value shows you'll lose 4-5 loadouts for every successful reinforcement.
Recognition triggers: enemies control all approaches, squad lacks suppressive fire capability, absence of tactical consumables, time pressure preventing methodical recovery.
Sunk cost fallacy drives gear donations—we've already lost one loadout, we must try to save it without recognizing reinforcement risks 2-3 additional loadouts.
TV Station Case Study
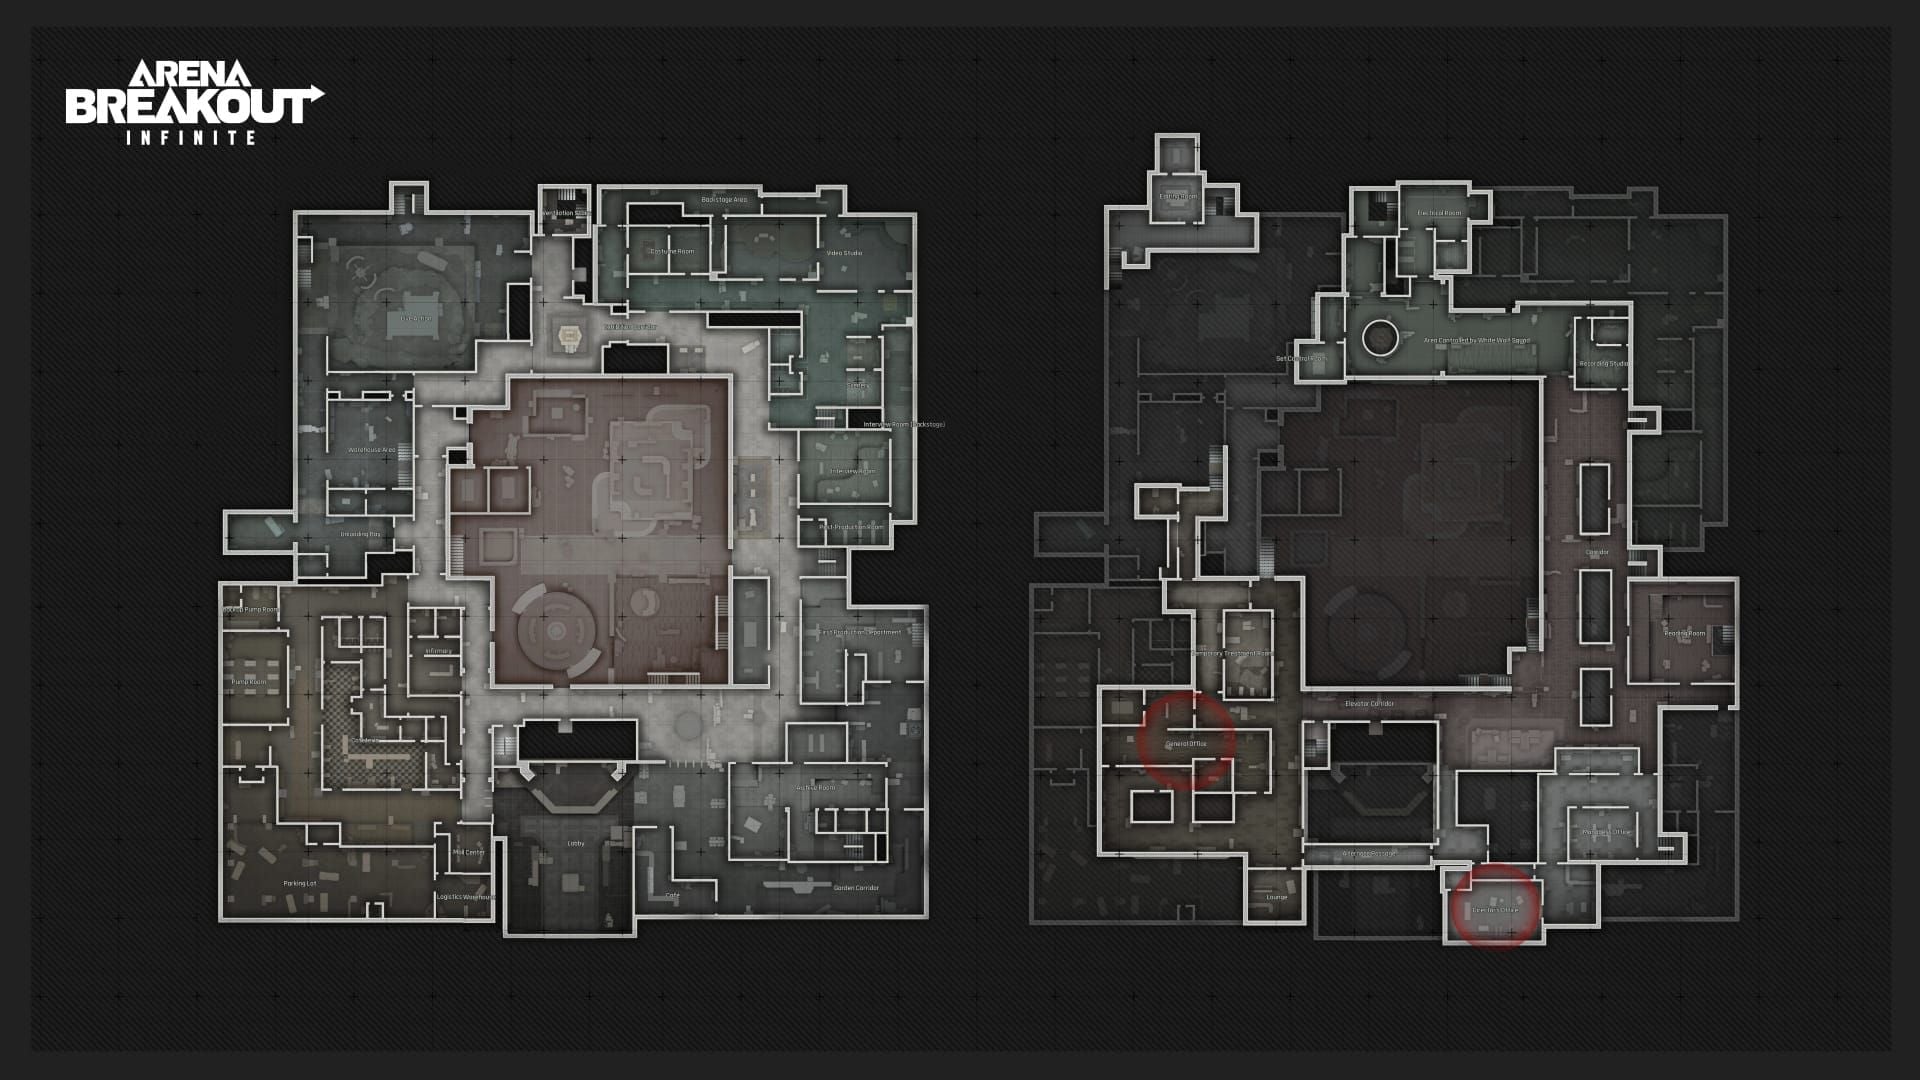
Third floor represents quintessential compromised position. Deaths to fourth-floor enemies spawn reinforcements into vertical kill zone with 6-8m elevation disadvantage.
Stairwell chokepoint creates fatal funnel. Enemies pre-aim single approach route. Reinforcing players expose themselves 3-4 seconds climbing stairs, receiving uncontested fire from covered positions. 90%+ failure rate.
Correct decision: acknowledge position loss, regroup at ground/second floor, extract immediately or establish new defensive positions away from enemy-controlled zones.
Scenario #3: Late Raid Timing (Under 5 Minutes)
Reinforcement lock at 5 minutes remaining exists because developers recognized mathematical impossibility of meaningful recovery. However, system allows calls until lock engages, creating 5-8 minute danger window where technically possible reinforcements remain tactically futile.
Time-to-Extract Math
Average spawn-to-extract travel: 2-4 minutes depending on map size. Reinforcement at 6-7 minutes remaining gives teammate 5-6 minutes to reach extract—theoretically sufficient, practically inadequate when accounting for enemy contact.
Call-back window consumes 60-90 seconds before teammate enters game. 7 minutes remaining becomes 5.5-6 minutes actual gameplay, with 2-4 minutes travel, leaving 1.5-3.5 minutes buffer.
Single 3-minute firefight with 6 minutes remaining guarantees reinforced teammate cannot reach extraction before timer expiration.
Spawn + Travel Calculations
Timely Support provides 30-40% faster travel, reducing 4-minute routes to 2.5-3 minutes. However, bonus applies only at sprint speed without combat—unrealistic during late-raid phases.
Armory's maximum spawn-to-extract: 3.5-4 minutes at full sprint. Reinforcement at 45-minute mark (15 remaining) with 90-second call-back leaves 13.5 minutes minus 4 minutes travel = 9.5 minutes buffer—manageable. Same reinforcement at 52-53 minutes (7-8 remaining) provides only 3-4 minutes after travel—insufficient.
60-second defend timer on containers sacrifices travel time, reducing extraction probability 20-30%.
Inevitable Squad Wipe
Late reinforcements create psychological trap where leaders feel obligated to give teammates a chance despite mathematical certainty of failure.
Enemy squads recognize late reinforcement audio as opportunities. They understand reinforced players face time pressure forcing predictable routing toward nearest extracts, allowing ambush positioning.
When reinforced teammate dies 100-200m from extraction with 1-2 minutes remaining, survivors face impossible choice: attempt recovery or abandon. Decision paralysis costs additional seconds, often resulting in survivors also failing extraction.
Economic Impact
Failed late reinforcements represent pure economic loss with zero return. Koen cost plus gear loss plus potential surviving members' loss = 300,000-500,000 Koen in single failed decision.
Insurance provides no mitigation for timer-expiration deaths. Raid clock hitting zero means all players automatically lose gear regardless of insurance status.
Three failed late reinforcements in 4-hour period = 900,000-1,500,000 Koen preventable losses. Forces budget loadouts for subsequent raids, reducing combat effectiveness.
Armory Time Crunch
Armory's complex layout and 3.5-4 minute traverse time punishes late reinforcements. Teammate dies at 9 minutes remaining in central vault. Next event at 60-minute mark (0 remaining)—impossible. Previous event at 45 minutes occurred 6 minutes ago—no opportunity exists.
Death at 12 minutes remaining: 45-minute event provides reinforcement with 10-11 minutes after call-back. Seems viable until accounting for vault-to-extract routing through enemy-dense corridors, high contact probability, 60-second defend timer. Actual extraction probability: 25-30%.
Optimal: survivors disengage from vault, route through western maintenance corridors (lower enemy density), extract with 8-9 minutes remaining.
Reinforcement Decision Framework
30-second assessment protocol prevents emotional responses.
Pre-Revival Checklist
Step 1: Time Assessment (5 sec) - Check raid timer. Under 8 minutes remaining → NO reinforcement unless extraction within 100m of spawn AND no enemy contact past 2 minutes.
Step 2: Position Evaluation (5 sec) - Death location relative to extracts and enemies. Within 100m of extract OR enemy-controlled territory → NO reinforcement.
Step 3: Enemy Assessment (10 sec) - Evaluate squad size, equipment tier, positioning. Enemies demonstrate 2+ advantages → 70%+ failure rate.
Step 4: Squad Capability (5 sec) - Assess survivors' ability to secure spawn. Require minimum 2 survivors with tactical consumables and sufficient ammo. Solo survivors never attempt reinforcement in contested areas.
Step 5: Economic Calculation (5 sec) - Compare loadout value against total exposure. Reinforcement risks 2x+ lost gear value → decline.
Loadout Value at Risk
Tier-1: 50,000-80,000 Koen
Tier-2: 120,000-180,000 Koen
Tier-3: 250,000-350,000 Koen
Tier-4: 400,000-600,000 Koen
Multiply downed player's tier by number of exposing squadmates. Example: Tier-3 down (300,000), two Tier-3 attempt reinforcement (600,000 exposure) = 900,000 total risk to recover 300,000. Risk ratio: 3:1—unjustifiable.
Insurance reduces effective loss 60-70% when bodies remain unlooted: 300,000 loadout with insurance = 90,000-120,000 actual loss.
Communication Protocol
Establish pre-raid agreements: downed players provide tactical intel, not emotional appeals. Death camera offers critical info: exact enemy count, equipment/armor status, positioning/movement patterns, looting behavior.
Downed players explicitly state reinforcement not recommended when recognizing three critical scenarios.
Specific callouts: Two enemies, Tier-4 gear, holding high ground 40m north—do not reinforce versus I'm down, can you get me?
30-Second Decision Matrix

Mental flowchart:
Timer under 8 minutes? → NO
Death within 100m extract? → NO
Enemies hold 2+ advantages? → NO
Solo survivor attempting? → NO
Risk ratio exceeds 2:1? → NO
Only when all five factors show GREEN proceed with reinforcement. Conservative approach prevents 80-90% of failed attempts while allowing 10-20% where revival genuinely improves outcomes.
Common Reinforcement Mistakes
Emotional Decision Making
Loyalty impulse drives 60-70% of failed reinforcements. Players prioritize social cohesion over economic optimization.
Reframe reinforcement as economic choice rather than loyalty test. Declining in unfavorable scenarios demonstrates tactical maturity.
Revenge motivation produces particularly destructive decisions. Impulse to get revenge overrides logical recognition that same tactical disadvantages produce same results. Revenge-driven reinforcements fail 85%+.
Sunk Cost Fallacy
We've already lost one loadout, we can't afford to lose it paradoxically increases total losses by justifying attempts that risk additional gear.
Gear lost when teammate died is already gone—reinforcement doesn't recover that gear, it risks additional gear for chance to return teammate.
Correct perspective: accept single loss, maximize insurance, preserve survivors' gear, maintain positive economic trajectory.
Overestimating Combat Ability
Confidence leads to underestimating enemy capabilities. We can outplay them ignores mathematical reality of position, equipment, numerical advantages.
Even professional players can't consistently overcome 2+ simultaneous disadvantages. Enemies holding high ground, superior equipment, numerical advantage = 70-80% enemy favor regardless of skill.
Enemies who killed your teammate demonstrated competence. Assuming you can defeat them while operating under worse conditions represents dangerous overconfidence.
Ignoring Enemy Intel
Death camera reveals critical intelligence many ignore. Kill-cam showing 4-player squad with Tier-4 equipment should immediately trigger NO reinforcement.
Squad size creates exponential disadvantage. 2v4 isn't twice as hard as 2v2—it's 4-5 times harder due to crossfire, suppressive fire, casualty trading.
Tier-4 armor withstands 2-3 additional shots versus Tier-2, while high-penetration weapons reduce your armor 40-50%. Compounding factors determine outcomes before first shot.
Alternative Strategies
Maximizing Insurance Returns
Insurance returns 60-70% gear value when bodies remain unlooted. Downed players maximize returns by dying in locations enemies unlikely to search: dense vegetation, interior rooms away from high-traffic, areas already looted.
Insurance timer: 8-12 minutes. Death with 15+ minutes remaining = 70%+ insurance probability if body location isn't near objectives/extracts. Transforms 300,000 loss into 90,000-120,000 actual cost.
Communicate body location: body northeast corner room, second floor, enemies moved south enables tactical routing preserving insurance and survivors.
Intel Sharing from Death Cameras
Death camera provides 30-60 seconds enemy observation. Systematically report: exact count/positions, equipment/armor tier, health status, tactical behavior, movement direction/objectives.
Intelligence allows survivors to avoid enemy positions entirely, routing toward uncontested extracts.
Advanced intel: enemy looting behavior indicates they're carrying significant loot and may be encumbered, affecting movement speed and combat effectiveness.
Tactical Retreat and Regrouping
Immediate disengagement prevents lingering near death location where enemies hold advantage. Execute 180-degree movement away, using 60-90 seconds while enemies loot to establish 100-150m separation.
Regrouping positions offer: cover from multiple angles, visibility of approaches, proximity to alternative extracts, distance from high-traffic areas.
Psychological benefit: breaks emotional momentum, allowing rational decision-making to replace adrenaline-driven impulses.
Solo Extract Optimization
When reduced to 1-2 survivors, shift to individual survival. Solo players immediately: reduce movement speed minimizing audio, avoid non-essential engagements, route through low-traffic areas, prioritize extraction over looting.
Your single loadout represents 100% recoverable squad value. Conservative play with 60-70% extraction success outperforms aggressive play with 20-30% success across multiple raids.
Solo routes avoid: main roads, areas near recent gunfire, single-approach extracts, locations where you previously encountered enemies.
Advanced Reinforcement Tactics
When assessment shows favorable conditions—sufficient time, tactical parity, adequate squad strength, positive economic ratio—these techniques maximize success.
Coordinated Reinforcement with Distraction
Split survivors into support and assault. Support positions 60-80m with long-range weapon providing overwatch. Assault moves to 20-30m with close-quarters loadout.
Support initiates contact 3-5 seconds before reinforcement spawn, drawing enemy attention. Creates window for reinforcing teammate to execute 180-degree scan and reach cover. Increases success 40-50%.
Works best with suppressed weapons creating directional confusion. Enemies struggle to pinpoint exact position, forcing defensive posture.
Smoke and Flashbang Cover
Deploy smoke 2-3 seconds before spawn, creating visual obstruction covering 10-15 second vulnerability. Optimal placement: 15-20m toward known enemy positions.
Flashbangs disrupt enemy pre-aim. Throw 1-2 seconds before spawn, timing detonation with teammate appearance. Creates 3-4 seconds disorientation.
Combine in sequence: flashbang first disrupting aim, smoke second maintaining obstruction as flash fades. Extends protection to 8-10 seconds.
Spawn Point Prediction
Each event type spawns players in predictable locations. Timely Support near helicopter landing (open ground, minimal cover), Easy Pickings near containers (moderate cover), Field Hospital near medical tents (good cover, predictable).
Pre-position in cover providing direct sight to spawn points, allowing immediate suppressive fire. Transforms reinforcement from defensive reaction to offensive opportunity.
Map knowledge reveals 3-6 primary event zones. Memorize locations and associated cover positions, reducing setup from 60-90 seconds to 20-30 seconds.
When Reinforcement IS Worth Risk
Positive scenarios: mid-raid timing (20-40 minutes remaining), death in tactically neutral location, equipment parity/advantage, 3+ survivors with consumables, downed player carrying 400,000+ Koen loot.
High-value loot justifies increased risk. Teammate dies holding 500,000 Koen—risking 200,000-300,000 to recover 500,000+ shows positive expected value at 50% success probability.
Event-based reinforcements during Timely Support provide 30-40% faster travel significantly improving extraction probability. Combined with favorable conditions, success rates exceed 60-70%.
Economic Impact and Koen Management
Break-Even Points
Formula: (Teammate Gear Value × Insurance Loss %) + Potential Loot Value versus (Reinforcement Koen Cost + Squad Gear at Risk × Failure Probability).
Example: Teammate carries 300,000 gear + 200,000 loot. Insurance returns 70%, creating 90,000 actual loss if skipping. Reinforcement costs 50,000, risks two squadmates with 250,000 each, at 40% failure. Expected cost: 50,000 + (500,000 × 0.40) = 250,000. Since 250,000 exceeds 90,000, skip reinforcement.
Mathematical approach removes emotion, providing objective assessment of positive/negative expected value.
Budget vs Premium Gear
Budget loadouts (Tier-1/2) justify more aggressive reinforcement. Total exposure remains manageable. Losing 2-3 budget loadouts (150,000-240,000) = 2-3 successful raids worth—recoverable within session.
Premium loadouts (Tier-3/4) demand conservative decisions. Single failures create catastrophic damage. Losing 2-3 premium loadouts (600,000-1,200,000) requires 8-12 successful raids to recover.
Gear tier paradox: expensive loadouts feel more important to recover, triggering emotional calls, but justify more conservative decisions due to higher replacement costs.
Long-Term Effects
Track reinforcement success across 20-30 raids. 60%+ success demonstrates sound judgment and maintains positive growth. Below 40% indicates systematically poor decisions creating stagnation/regression.
Compounding effect: three failed reinforcements per 10-raid session at 300,000 average loss = 900,000 deficit. Forces 5-6 subsequent raids with budget loadouts, decreasing combat effectiveness, creating higher casualties, further economic pressure. Downward spiral traps players in perpetual budget-gear cycles.
Conservative decisions with 70%+ success create economic surplus funding premium loadouts, improving combat effectiveness and survival. Upward spiral allows better equipment, increasing raid success, generating additional growth.
Optimize Resources with BitTopup
Managing Koen efficiently requires reliable currency access when setbacks occur. Buy Arena Breakout Mobile bonds recharge online through BitTopup provides competitive pricing and 24/7 support keeping you in the fight. Fast delivery and excellent customer service make it preferred choice for players understanding resource management extends beyond in-game decisions to smart purchasing strategies maximizing value per dollar.
FAQ
How does reinforcement work in Arena Breakout Mobile S11?
S11 allows one teammate respawn per raid through events spawning every 15 minutes at 15, 30, 45, 60-minute marks. Eight event types provide revival opportunities costing Koens. System locks when less than 5 minutes remain.
When should you NOT revive teammates?
Skip reinforcement in three scenarios: deaths within 100m of extraction (70%+ enemy presence), compromised positions where enemies hold 2+ advantages, late-raid timing under 8 minutes remaining. These create 2:1 to 4:1 negative risk ratios multiplying losses.
How much does reinforcement cost in S11?
Costs vary by event type, including Koen expenditure plus gear value risked during recovery. Total economic exposure typically ranges 200,000-600,000 Koen accounting for squad members' equipment at risk. Insurance provides 60-70% returns on unlooted gear.
What happens if reinforcement fails?
Failed reinforcements result in multiple loadout losses: original player's gear, reinforced player's second death, potentially surviving members during recovery. Total losses reach 2-4 full loadouts (300,000-1,200,000 Koen depending on tier). Unlooted bodies may qualify for 60-70% insurance returns.
Can enemies camp reinforcement spawns?
Yes, experienced players establish ambush positions 40-60m from known spawn zones 2-3 minutes before activation. Audio cues alert enemies to timing. First 10-15 seconds after spawn represent peak vulnerability with 70-85% kill probability for optimal campers.
Is it worth calling reinforcements near extracts?
No, extract-proximity reinforcements (0-100m) create highest squad wipe probability. Extract zones concentrate 3-4 enemy squads during final phases, with 70-85% enemy presence during last 10 minutes. Creates 3:1 to 4:1 negative risk ratios making reinforcement economically unjustifiable.