

Arena Breakout S11's Reinforcement Mechanism spawns random raid events every 15 minutes, letting teams call downed teammates back into active raids. Each raid features up to 4 event types—Timely Support, Easy Pickings, Field Hospital, and Item Exchange—offering 200-1000 bonus points. Mastering these mechanics transforms mid-raid strategy, maximizing loot efficiency while maintaining squad cohesion.
What Are Reinforcements in Arena Breakout Mobile S11?
S11's Reinforcement Mechanism enables tactical recovery of eliminated teammates through randomly spawning environmental events. Each raid generates up to 4 distinct events on a 15-minute cycle, creating unpredictable opportunities for competitive advantage.
Season 11 launched December 18, 2026 with the Dust to Gold update. Events spawn at 15-minute intervals with randomized types and locations. This timing rewards players who position strategically throughout extended raids.
Each event offers distinct bonus points: Timely Support awards 500-1000, Easy Pickings provides 200-300. These stack with standard loot, increasing hourly profits 35-50% for engaged players versus those who ignore events.
For consistent gear access during intensive farming, Arena Breakout Mobile bonds top up through BitTopup ensures fast, secure transactions with competitive pricing.
Definition and Role in Current Meta
Reinforcement events serve dual purposes: squad recovery and environmental loot multiplication. Timely Support provides temporary extractions with 30-40% reduced travel time and 60-second defend timers, creating high-intensity engagement zones.
Field Hospital events grant 10-15 trader reputation per transaction (100 cap), accelerating vendor access without traditional quest completion.
S11 Reinforcement System Overhaul Explained
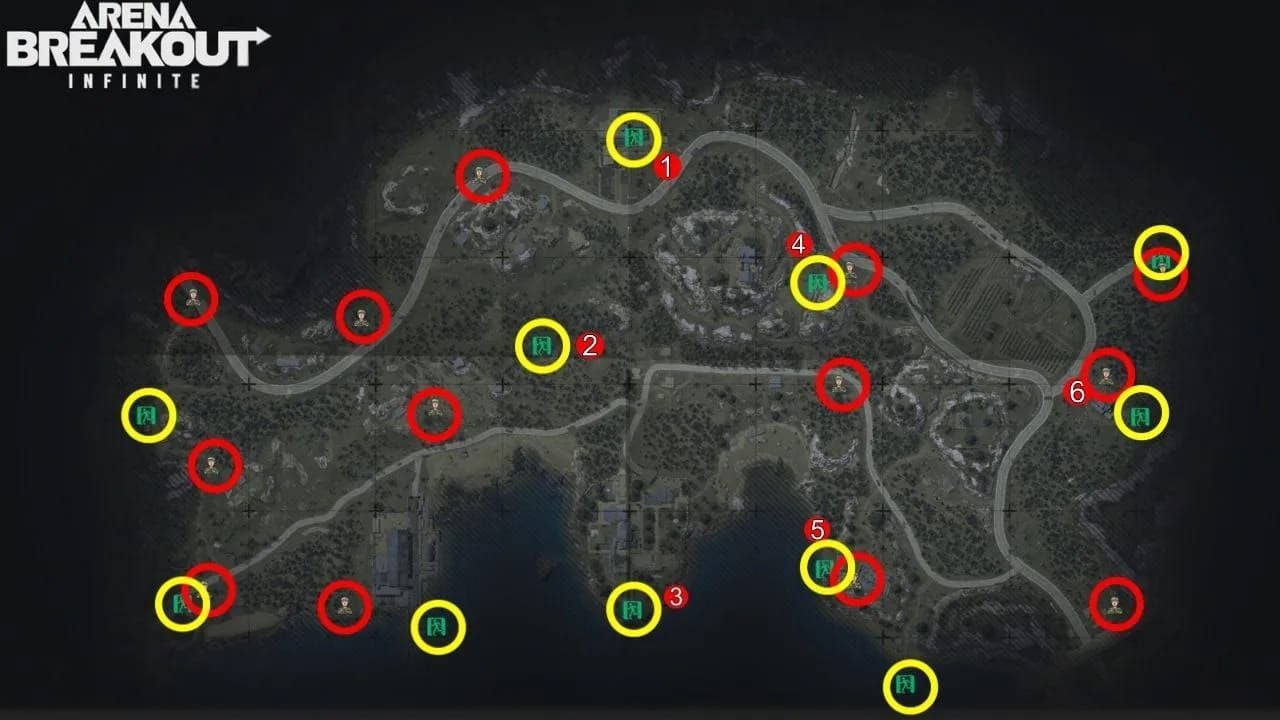
Location-specific events spawn at predetermined coordinates: Shooting Range, Gas Station, Field Hospital, Barn Repair Shop. Memorizing spawn points provides critical preparation seconds before activation.
Easy Pickings adds 3-5 marked containers plus 1-2 unmarked jackpot caches. Unmarked caches contain disproportionately valuable loot but require systematic searches, rewarding thorough exploration over rushed looting.
Why Understanding Reinforcements Matters for Profit
Event-based bonus points directly convert to currency. A single raid engaging all 4 events generates 1,400-2,600 bonus points before standard loot. Ignoring these mechanics leaves 40-60% potential profits unclaimed.
Temporary Stash events require advanced map knowledge to locate hidden caches within tight windows. Prepared players access these in under 90 seconds, while unprepared players waste entire event windows.
How the S11 Reinforcement Spawn Mechanism Works
Events operate on strict 15-minute cycles from raid start: first window at 15 minutes, subsequent at 30, 45, 60 minutes. Each window randomly selects one event type from available pools.
The system prioritizes diversity—if Timely Support spawns first, second window has reduced repeat probability. This weighted randomization ensures varied scenarios across raids.
Primary Trigger Conditions
Event activation requires no player action—15-minute timers trigger automatically. However, accessibility depends on squad composition. Timely Support only appears for squads with downed teammates, while Item Exchange spawns universally.
Field Hospital checks for injured status or depleted medical supplies. Players with partial health see increased spawn rates nearby, rewarding aggressive playstyles.
Timing Windows
Once 15-minute threshold passes, events materialize within 10-15 seconds. Audio cues precede visual markers by 3 seconds. Timely Support announces with helicopter audio, Easy Pickings with container sounds.
Event durations vary:
Timely Support: 5 minutes (60-second defend timer on interaction)
Easy Pickings: 8 minutes
Field Hospital: 6 minutes
Wave Progression System
Four-event maximum creates natural progression. Early-game (15-30 min) spawns lower-risk events like Item Exchange. Late-game (45-60 min) favors high-reward events like defended Timely Support extractions.
For uninterrupted premium loadouts, buy Arena Breakout bonds recharge online through BitTopup's secure platform with excellent customer service.
Each wave operates independently—failing first event doesn't prevent subsequent spawns. Active participation creates compounding advantages.
Location-Based Spawn Logic
Events spawn at fixed coordinates matching their type. Gas Station events only appear at gas stations, Barn Repair Shop exclusively at barns. Farm map generates more Barn events, urban maps favor Gas Station spawns.
Shooting Range requires open areas—parking lots, fields, warehouse districts. Pre-positioning near multiple spawn points reaches activated events 20-30 seconds faster.
Key Changes to Reinforcement Mechanics in Season 11
S11 introduced the entire random event framework—previous seasons lacked structured reinforcement mechanics. This represents the most significant mid-raid addition since launch.
The 15-minute cycle addresses mid-raid content droughts. Earlier seasons concentrated activity in first 10 minutes. Predictable event timing maintains engagement throughout 30-45 minute raids.
S10 vs S11 Comparison
S10 operated on extraction-only mechanics with no mid-raid recovery. Downed teammates remained eliminated until raid end. S11's system reduces penalties, enabling recovery through Timely Support.
Economic impact differs dramatically. S10 focused on high-value spawns and PMC elimination. S11 adds 1,400-2,600 potential bonus points, increasing average profitability 35-50%.
New AI Behavior Patterns
Events don't spawn additional AI, but existing patterns adapt. Field Hospital attracts nearby patrols, creating defensive challenges. AI repositioning creates temporary high-density zones for efficient farming.
Timely Support triggers aggressive AI convergence from multiple vectors, requiring 360-degree awareness and prepared positions.
Updated Loot Tables
Easy Pickings containers use modified tables with 15-25% higher rare item rates. Unmarked jackpot caches contain tier-3/4 items at 40%+ rates, making them priority targets.
Field Hospital inventories rotate by time-of-day and location. Morning raids increase medical supplies, evening favors ammunition/equipment.
Reinforcement Wave Timing & Prediction Methods
Track raid time using in-game clocks and external timers. Set 15-minute alerts for proactive positioning 60-90 seconds before activation.
Event notifications provide 3-second audio warnings before visual markers. Quality headphones provide directional cues for approximate spawn locations.
Audio Cues Signaling Reinforcements
Each event features distinct audio:
Timely Support: Helicopter rotors
Easy Pickings: Metallic container placement
Field Hospital: Medical equipment deployment
Audio directionality provides bearing to events. Central positioning determines north/south/east/west spawns, reducing search time 40-50%.
Visual Indicators and Map Markers
Event markers appear on HUD compass and full map. Timely Support uses helicopter icons, Easy Pickings shows containers, Field Hospital displays medical crosses.
Color coding indicates status:
Green: Available
Yellow: Partial completion
Red: Active player engagement
Calculating Next Wave Timing
Subtract current time from next 15-minute interval. At 23 minutes elapsed, next event spawns in 7 minutes (30-minute mark).
Event spawn probability increases if previous windows failed. If 15-minute window passes without event, 30-minute window has ~15% higher chance.
The 3 Most Effective Reinforcement Ambush Setups
Setup #1: Choke Point Crossfire (High Risk, High Reward)
Position squad at opposing angles covering Timely Support extractions. 60-second defend timer creates guaranteed engagements. Place one player elevated 40-60 meters out, second in ground-level cover on primary approach.
Maximizes 500-1000 bonus points while creating crossfire eliminating threats efficiently. Elevated player calls positions, ground player executes close-range kills.
Requirements: Medium-range rifles (50-100m effective) for overwatch, close-quarters weapons for ground. Bring ammo for 3-5 enemy waves during 60-second timer.
Setup #2: Elevated Sniper Overwatch (Safe Distance)
Identify elevated positions with sightlines to multiple Easy Pickings spawns. 3-5 containers cluster within 80-120 meter radius, enabling single positions to monitor entire zones.
Sniper positions 100+ meters provide reaction time to eliminate approaching players before they reach loot. Use suppressed weapons to avoid revealing position.
Works best solo or with spotter. Spotter monitors flanks while sniper controls event zone. After eliminating threats, spotter collects loot under overwatch.
Setup #3: Mobile Hit-and-Fade (Flexible Positioning)
Maintain mobile positioning near Field Hospital spawns. Use 6-minute duration to control engagement timing. Execute quick eliminations within 15-20 seconds, loot priority items, relocate 60-80 meters.
Constant movement prevents enemies fixing your location while maintaining pressure. Works best on maps with dense cover.
Close-quarters weapons essential—SMGs and shotguns enable fast eliminations. Avoid prolonged firefights beyond 30 seconds.
Common Reinforcement Farming Mistakes
Misconception: All Reinforcements Drop High-Value Loot
Event bonus points represent primary value, not enemy drops. Timely Support defense expecting premium gear often finds standard AI-tier equipment. 500-1000 point reward constitutes actual profit.
Field Hospital reputation (10-15 per transaction, 100 cap) provides long-term value exceeding immediate loot, unlocking vendor items worth 10,000+ points.
Timing Errors That Get You Killed
Arriving immediately upon spawn places you among first players—and first to engage others. Delay 60-90 seconds for initial conflicts to resolve, engaging weakened survivors.
Arriving with less than 2 minutes on 6-8 minute events forces rushed decisions. Extract with collected loot before despawn.
Poor Position Selection
Positioning in open areas near containers creates 360-degree exposure. Select positions with hard cover on two sides minimum, preferably elevated. 200-300 bonus points don't justify death risks.
Field Hospital spawns at predictable locations. Secure perimeter before transactions to avoid ambushes from players anticipating spawns.
Overcommitting vs Knowing When to Disengage
Sunk cost fallacy kills more players than superior opponents. If 3 minutes defending Timely Support faces overwhelming opposition, 500-1000 points don't justify guaranteed death. Disengage and pursue next event.
Event participation should enhance profitability, not become sole focus. Skip zones with excessive activity, focus on standard routes. Three successful standard raids outperform two event deaths and one marginal success.
Loadout Optimization for Reinforcement Farming
Event-focused loadouts prioritize versatility. You'll encounter 10-100 meter engagement ranges. Weapons effective across this spectrum prove most valuable.
Budget 2-3 full healing items per anticipated event engagement plus standard supplies. Field Hospital provides resupply but don't rely on finding when needed.
Budget-Friendly Setups
Basic assault rifles with 90-120 rounds handle most scenarios. Prioritize reliability over premium stats. Bring level-2 armor minimum.
Medical supplies: one full heal, 2-3 partial consumables. Enables recovery from single engagements while preserving extraction capability. Avoid expensive items—basic bandages and medkits suffice.
Mid-Tier Balanced Loadouts
Weapons with 50-80 meter effective range and manageable recoil. 2-4x optics enable precise shots at containers while remaining usable close-quarters. Bring 150-180 rounds.
Level-3 armor enables survival through 2-3 engagements versus single-fight durability. Extended raid times create more combat where armor investment pays.
Premium Gear for Maximum Efficiency
High-tier suppressed weapons enable event control without alerting distant players. Tactical advantage of undetected eliminations outweighs cost when extracting with full rewards plus eliminated player loot.
Advanced medical supplies with rapid healing (3-4 seconds vs 8-10) reduce vulnerability during event defense, preventing deaths during sustained engagements.
Essential Consumables
Bring water and food for 30-45 minute raids targeting three events. Stamina management critical when repositioning—depleted stamina during Timely Support approach leaves you vulnerable.
Pain medication enables continued effectiveness after damage, valuable during Timely Support where 60-second timer doesn't allow healing breaks.
Map-Specific Reinforcement Spawn Points
Each map features 4-6 predetermined locations based on existing structures. Farm has two barns for Barn Repair Shop, one gas station, open fields for Shooting Range. Learning fixed points enables predictive positioning.
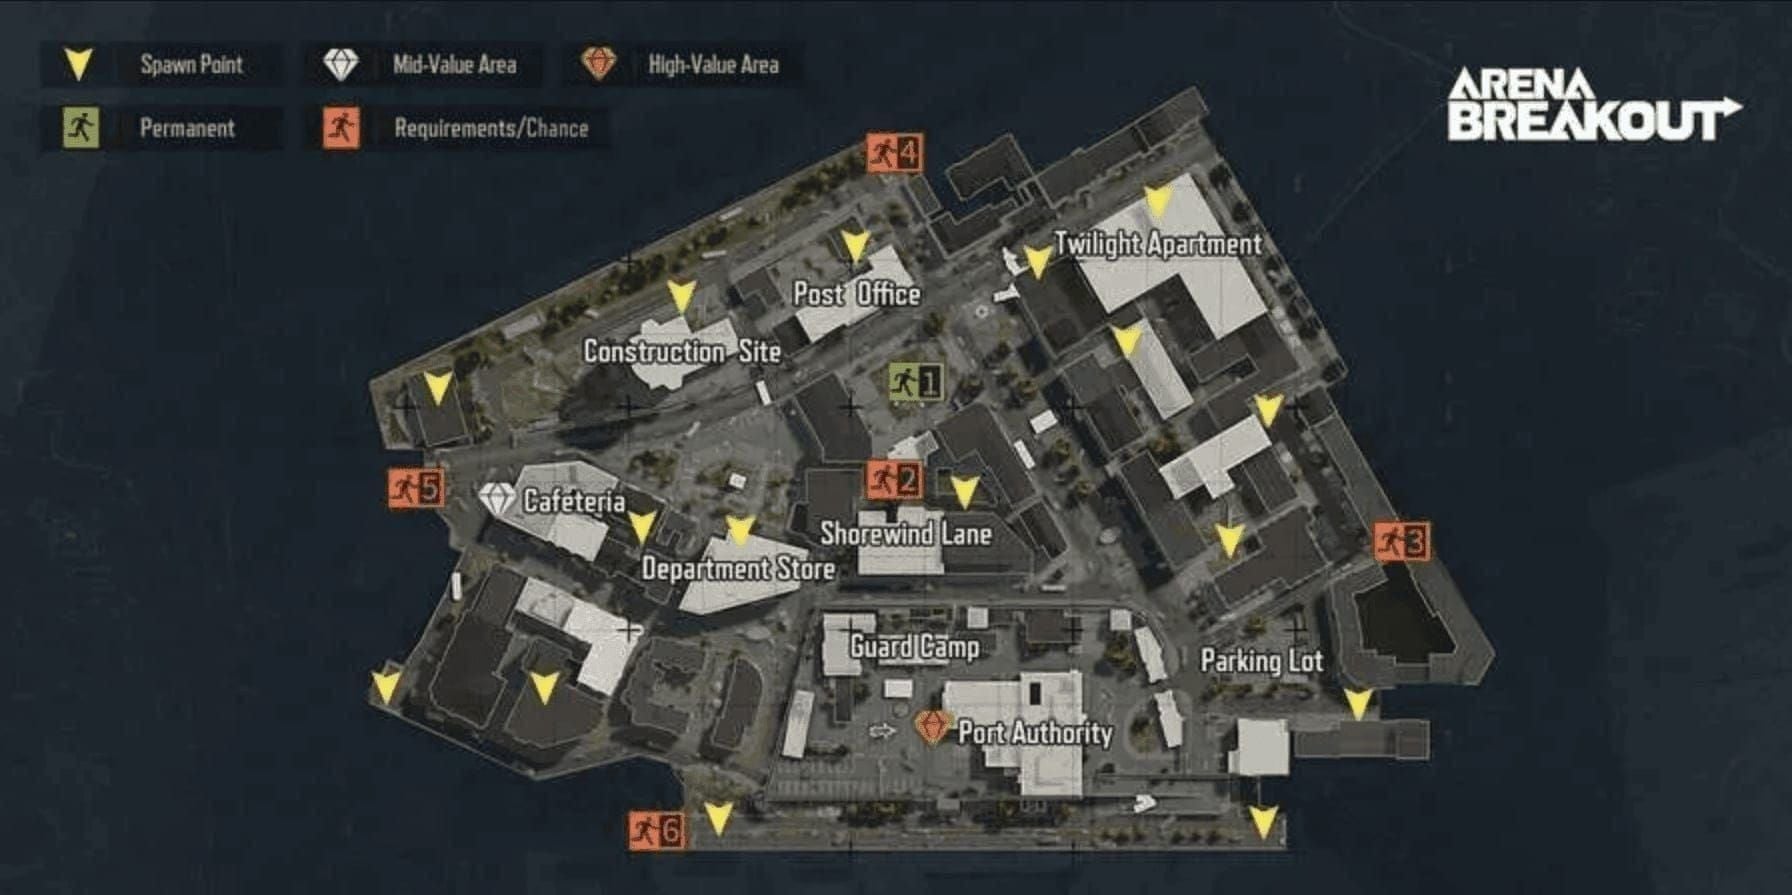
Urban maps like TV Station concentrate events in central commercial districts where spawns cluster within 200 meters.
Armory Reinforcement Zones
Field Hospital spawns near main medical building and secondary clinic. Heavy traffic due to central positioning and proximity to high-value loot. Treat as contested by default.
Shooting Range spawns in western training grounds. Exposed terrain favors long-range engagements, ideal for snipers but dangerous for close-quarters.
Farm Map Patterns
Two barn structures host Barn Repair Shop frequently. Southern barn provides better defensive positions with multiple cover points. Northern barn sits in open terrain. Prioritize southern events.
Easy Pickings clusters near central farmhouse and eastern storage buildings. Moderate cover with multiple approaches requires 180-degree awareness.
TV Station High-Traffic Areas
Gas Station spawns at northeast quadrant functional station. Extreme traffic due to proximity to main building's high-value loot. Only engage with full squad support.
Field Hospital near medical wing creates chokepoints in interior corridors. Confined spaces favor close-quarters weapons and coordinated pushes.
Northridge Reinforcement Locations
Distributed spawns across residential layout. Field Hospital appears near southern medical clinic, Shooting Range uses northern park. Distribution reduces clustering, lowering per-event density.
Easy Pickings in residential garages and storage sheds provide natural cover during looting. Semi-enclosed spaces enable safer collection.
Risk vs Reward: Calculating Profitability
Event participation adds 1,400-2,600 bonus points when engaging all four successfully. Standard raids average 2,000-3,500 points, meaning events increase value 40-75%.
However, events extend raid time from 15-20 minutes to 30-45 minutes. Three quick standard raids (60 min total) generating 7,500-10,500 points may exceed two event raids (90 min) producing 10,800-16,200 depending on success rates.
Average Loot Value
Event bonus points constitute primary value. Timely Support awards 500-1000 regardless of elimination count. Focus on successful completion over kill counts.
Easy Pickings jackpot caches average 300-600 points each, with 1-2 unmarked caches providing highest value. Prioritize unmarked over collecting all marked—one jackpot often exceeds three marked containers.
Gear Investment vs Returns
Budget loadouts (1,500-2,500 points) successfully complete most events, generating 1,400-2,600 bonus plus standard loot. Positive expected value even with 40-50% survival. Premium loadouts (5,000-8,000) require 70%+ survival for profitability.
Field Hospital reputation (100 cap) translates to 3,000-5,000 points in future purchasing power. Include long-term value when calculating profitability.
Death Risk Probability
Timely Support carries highest risk—expect 30-40% death rates. 500-1000 reward justifies risk only with budget-to-mid-tier loadouts where single success offsets multiple deaths.
Easy Pickings presents moderate risk—15-25% death rates with proper positioning. 200-300 bonus plus jackpot values create positive expected value.
Comparing to Other Methods
PMC hunting generates 800-2,000 per elimination but requires locating opponents and winning. Event farming provides guaranteed opportunities on predictable timers, reducing variance.
Standard loot routes offer lowest risk with consistent 2,000-3,500 per 15-20 minutes. Event farming increases returns 40-75% but extends time and increases risk. Optimal approach depends on risk tolerance and gear reserves.
Advanced Tips from Veterans
Audio Settings Optimization
Increase sound effects relative to music, enable directional audio enhancements. 3-second audio warning translates to 20-30 meter positioning advantages.
Configure presets emphasizing mid-range frequencies where notifications concentrate. Helicopter audio uses lower frequencies than container sounds, requiring balanced EQ.
Headphone users enable virtual surround—directional cues provide bearing information reducing search time 30-40%.
Psychological Warfare: Using Events as Bait
Position near spawns without immediately engaging. Wait for others to commit to looting/defense, then engage while they're distracted.
Works best at Easy Pickings where players focus on searches. Eliminate distracted looters, claim gear plus rewards, extract before reinforcements. Combined value often exceeds direct participation.
Squad Coordination
Designate event monitor tracking raid time and announcing upcoming windows. Ensures awareness during intense combat or complex looting.
Assign defensive roles before Timely Support—one player per cardinal direction during 60-second timer. Pre-planned coordination prevents overlapping coverage and missed vectors.
Seasonal Meta Shifts
Monitor community feedback and patch notes for spawn rate adjustments. Adapt farming strategy within 48-72 hours of announced changes.
Current 15-minute cycle may receive adjustments based on feedback. Prepare alternative strategies focusing on standard routes to maintain income if events receive significant nerfs.
FAQ
How do reinforcements spawn in Arena Breakout S11? Events spawn automatically every 15 minutes, up to 4 per raid. Types include Timely Support, Easy Pickings, Field Hospital, Item Exchange at predetermined map locations.
What triggers reinforcement waves? 15-minute timer triggers automatically regardless of player actions. Timely Support only appears for squads with downed teammates.
How many waves spawn per raid? Up to 4 at 15, 30, 45, 60-minute marks. Each window randomly selects one type with weighted randomization preventing excessive repetition.
Best way to farm reinforcements? Focus on Easy Pickings for consistent 200-300 bonus plus jackpot loot with moderate risk. Use elevated positions to monitor clusters, eliminate threats, search for 1-2 unmarked jackpot caches.
Do reinforcements spawn at same locations? Events spawn at fixed coordinates matching structures—Gas Stations at gas stations, Barns at barns. Which type spawns at each window varies randomly.
What loot do reinforcements drop? Value comes from bonus points (200-1000) not enemy drops. Easy Pickings jackpots contain tier-3/4 items at 40%+ rates. Field Hospital provides 10-15 reputation per transaction (100 cap).
Ready to dominate S11? Stock up at BitTopup—your trusted platform for fast, secure top-ups with competitive pricing and excellent service!