

Quick Answer: The Aeonblight Drake demands ranged characters who can nail those tricky weak points—head when it's grounded, wings when airborne. Yoimiya, Ganyu, or Tighnari are your best bets here, and paralyzing this mechanical menace resets its annoying 60% elemental absorption resistance.
Understanding the Aeonblight Drake's Complex Mechanics
Here's the thing about the Aeonblight Drake—it's arguably Genshin's most mechanically demanding field boss since its Version 3.1 debut. You'll find this beast lurking in Devantaka Mountain, Sumeru, and it'll cost you 40 Original Resin per attempt.
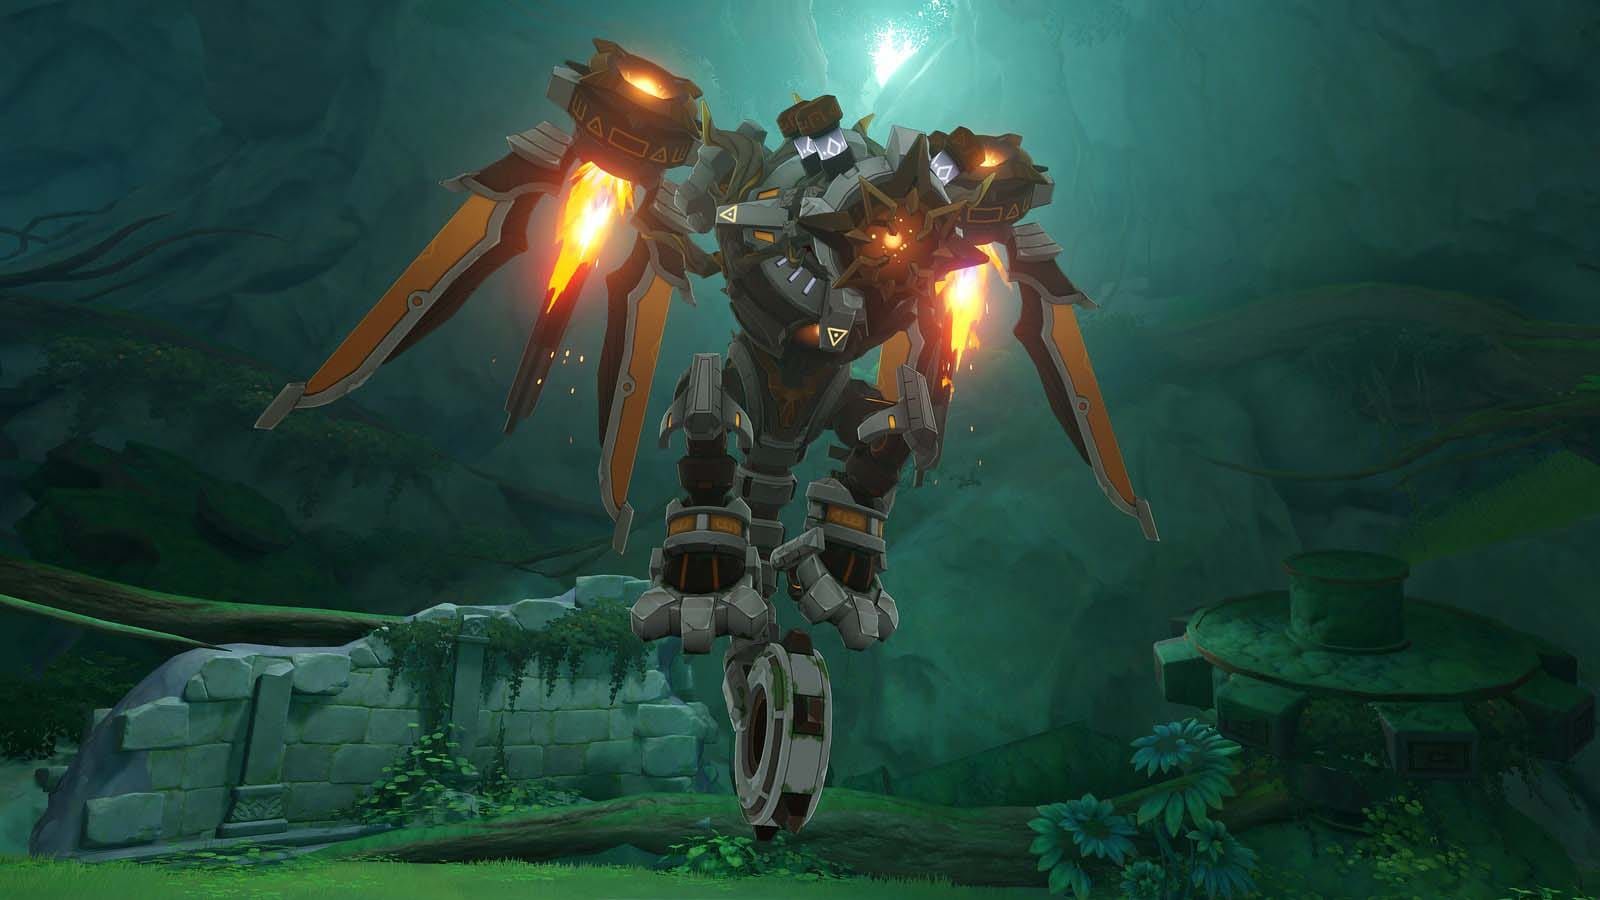
The numbers tell an interesting story. Base resistances sit at 70% Physical and 10% Elemental—already pretty chunky. But here's where it gets nasty: during those golden orb charge animations, the boss slaps on an additional 60% resistance to whatever element hit it hardest. Yeah, it's basically saying nice try to your main DPS.
BitTopup offers convenient Genshin Impact gift top up for friend services with competitive pricing and instant delivery for optimal team building resources.
What makes this fight particularly engaging (read: frustrating until you get the hang of it) is how the elemental absorption mechanic forces you to think strategically. Those colored canisters during charge-up animations? They're your warning system. Learn to read them, or prepare for your damage to get severely gimped.
Weak Point Targeting—Your Key to Victory
The weak point system is where this fight either clicks or completely falls apart for players. When grounded, you're aiming for that glowing head/eye area. Airborne? Both wings need your attention.
Landing charged bow shots on these spots triggers an 8-10 second paralysis window—and this is crucial—it resets all elemental resistances back to base values. For aerial phases, you absolutely must hit both wing weak points. Miss one? No paralysis for you.
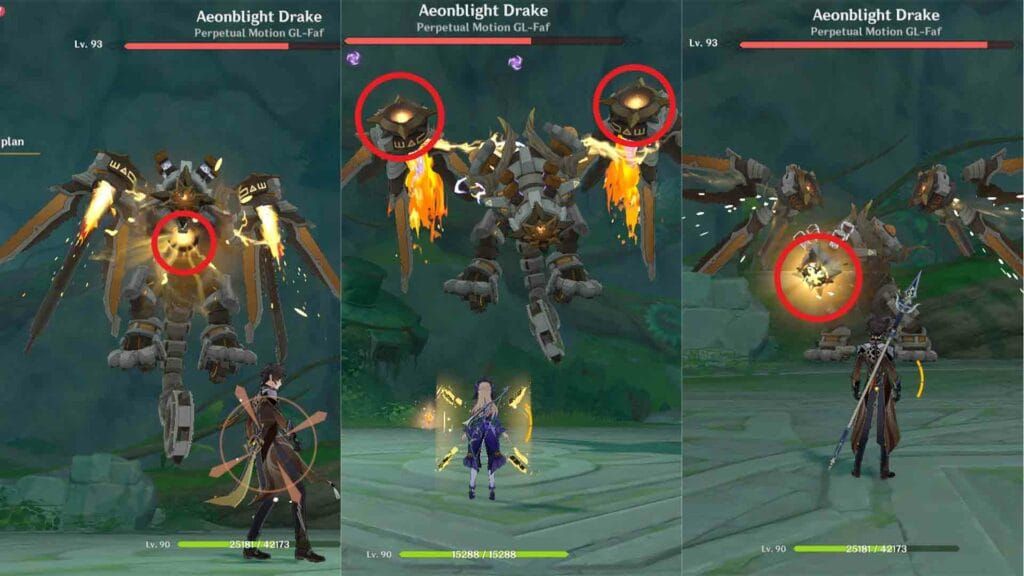
Positioning matters more than you might think. Medium range gives you the sweet spot between accuracy and safety. Too close and you're eating AoE damage; too far and your shots might miss those critical moments when weak points appear.
Here's an editor's note from experience: catalyst users theoretically can target weak points, but the precision just isn't there for consistent results. Bow users aren't just recommended—they're practically mandatory.
Breaking Down the Boss Phases
Ground Phase Dynamics
The ground phase feels almost manageable once you understand the patterns. Forward charges (I call them Robo Rush attacks), tail sweeps, and body slams all come with generous telegraphing.
There's actually a positioning exploit here that many players miss: standing right beneath the tail base negates most attacks except the tail sweep itself. This lets melee characters maintain consistent damage uptime—pretty valuable considering how mobile this fight can get.
Aerial Phase Challenges
The aerial phase is where things get spicy. Tracking missile barrages force constant movement, and you're essentially on a timer to bring this thing down. Phase transitions happen at 75% and 40% health, so you can prepare for them.
Wing targeting becomes your primary job here. Both weak points must be hit for the forced landing and subsequent paralysis state.
Ranged Team Compositions That Actually Work
Premium Setup: Yoimiya, Yelan, Yun Jin, Zhongli
This is probably the smoothest experience you'll get. Yoimiya's targeting precision is unmatched for weak points, while Yelan handles off-field Hydro application and burst damage windows. Yun Jin's Normal Attack buffs synergize perfectly with Yoimiya's kit, and Zhongli? Well, he prevents those annoying interruptions that can ruin your DPS rotations.
Tighnari Quicken Variant: Tighnari, Raiden Shogun, Kujou Sara, Zhongli
Tighnari's charged shots excel at precision targeting while triggering Quicken reactions for exceptional single-target damage. The Electro supports provide energy and damage amplification that really shines in those paralysis windows.
BitTopup's Genesis Crystals e-voucher code system provides secure, efficient resource acquisition for character development and weapon refinements.
Making Melee Teams Work (Yes, It's Possible)
Hu Tao Vaporize: Hu Tao, Xingqiu, Yelan, Thoma
Look, this isn't optimal—let's be honest about that. But it can work if you maximize damage during vulnerability windows and exploit that tail positioning trick during ground phases. You'll rely heavily on your sub-DPS during aerial phases, but Hu Tao's burst damage in paralysis windows can be substantial.
Hybrid approaches often prove most effective. Tartaglia, for instance, can switch between melee and ranged stances as phases demand. Flexibility wins fights.
Character Recommendations Based on Performance Data
Top-Tier DPS Options
Yoimiya leads the pack with exceptional single-target damage and weak point precision that feels almost unfair. Ganyu and Tighnari provide similar effectiveness through different approaches—Ganyu's charged shots and Tighnari's Dendro reaction potential both excel here.
Support Characters That Matter
Zhongli's shields maintain DPS uptime when everything's exploding around you. Diona provides that rare combination of defensive utility plus bow targeting capability. Fischl offers consistent off-field DPS with weak point capabilities when needed.
Material Drops and Character Investment
The Aeonblight Drake drops Perpetual Caliber—essential for Nilou, Layla, and Wanderer ascension. You'll need 46 total per character: 2 for 40-50, 4 for 50-60, 8 for 60-70, 12 for 70-80, and 20 for 80-90.

Additional drops include the usual gemstones, Mora, and artifacts from Gladiator's Finale and Wanderer's Troupe sets. Not the most exciting loot table, but necessary for progression.
Advanced Techniques for Optimization
Absorption Counter-Strategies
You've got two main options when that 60% elemental resistance kicks in: trigger paralysis to reset it, or switch to a different elemental DPS. The paralysis method provides extended damage windows while completely removing those defensive bonuses.
DPS Window Optimization
Those 8-10 second paralysis windows are your bread and butter. Prepare burst rotations specifically for these moments. Combining the tail exploit positioning with precise weak point timing creates surprisingly efficient clear times.
Frequently Asked Questions
What exactly are the weak points and how do I target them effectively? Glowing areas on the head during ground phases, both wings during aerial phases. Bow users with charged shots provide the precision needed for consistent targeting, triggering paralysis and resetting those nasty resistances.
How much better are ranged characters compared to melee? Significantly better for aerial phases and weak point mechanics. Melee can work using positioning exploits, but ranged provides consistent performance across all phases.
Which characters should I prioritize building for this fight? Yoimiya, Ganyu, and Tighnari excel as primary DPS options. For supports: Zhongli for shields, Yelan for off-field damage, Diona for bow utility plus healing.
How does the elemental absorption mechanic actually work? The boss absorbs whatever element dealt the highest damage, gaining 60% resistance during those golden orb animations. Counter this by hitting weak points for paralysis or switching your elemental DPS entirely.
What materials does this boss drop and how many do I need? Perpetual Caliber for Nilou, Layla, and Wanderer ascension. You'll need 46 total per character, plus the usual gemstones and artifact sets.
Can melee teams actually clear this efficiently? Limited effectiveness but definitely possible. Use the tail positioning exploit, ensure you have a bow user for aerial phases, and time your damage windows precisely during paralysis states.