

Banyue dominates ZZZ 2.4 as an S-Rank Fire Rupture specialist converting Fire DMG to Sheer DMG, bypassing defenses entirely. Target 45,000+ HP, 70% CRIT Rate, 4,500+ Sheer Force using Wrathful Vajra and Yunkui Tales 4-piece. Optimal teams with Dialyn, Lucia, and Lighter exploit Thrall Salvation's stun phases for consistent Rupture damage.
Understanding Banyue's Rupture Role
Banyue's Core Passive grants 0.1 Sheer Force per 1 Max HP, making her exceptional against high-resistance bosses like Thrall Salvation where Contract stacks increase Anomaly RES by 15% per stack (max 3). Sheer DMG ignores these modifiers completely.
Her Wrathful Fires system caps at 120 points, triggering Visage of Wrath mode when maxed. This grants 4 Mountain's Might stacks, enabling enhanced EX Specials that consume 1 stack while restoring 10 Adrenaline. Proper resource management creates self-sustaining damage loops.
For competitive advantages, Zenless Zone Zero polychrome buy banyue 2.4 anomaly cheap through BitTopup provides secure transactions for W-Engines and materials.
Base Stats and Mechanics
Level 60 stats: 8,497 HP, 859 ATK, 445 DEF, 95 Impact, 5% CRIT Rate, 78.8% CRIT DMG, 90 Anomaly Mastery. At 45,000-50,000 HP endgame, she generates 4,500-5,000 Sheer Force before equipment bonuses.
Wrathful Fires Recovery:
Perfect Blocks: 6 points (1s window)
Perfect Dodges: 4 points (1s window)
Defensive Assists: 4 points
Dodge Counter: 4 points
Adrenaline: 0.5 per point spent
Break Through buff in Deadly Assault grants Rupture agents +15% Sheer DMG and ignores 15% All-DMG RES, doubling down on her core strength.
Why She Excels vs Thrall Salvation
Thrall's Contract stacks (+45% Anomaly RES at max) don't affect Sheer DMG. Self-Sacrifice mechanic grants +10% Stun DMG Multiplier per stack (max 3), and when stunned, boss takes +50% CRIT DMG. Banyue's Impact (95 base, 300+ with builds) contributes to stuns while her CRIT build capitalizes on vulnerability.
Mindscape 1 reduces Fire RES by 10% for 30s, grants +10% Sheer DMG, and extends stun by 2s—triple benefit for exceptional clears.
Best W-Engines
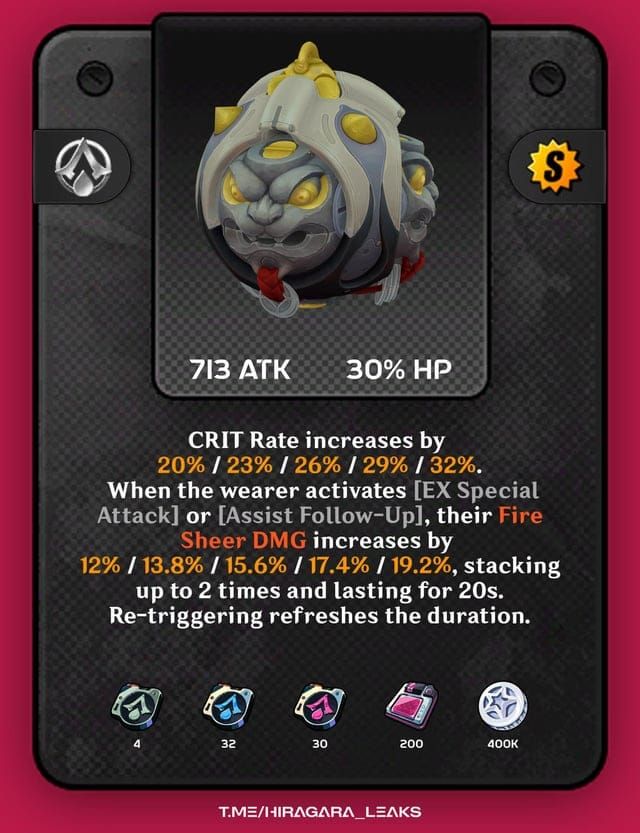
S-Tier: Wrathful Vajra

Base ATK 713, +30% HP, +20% CRIT Rate. Passive increases EX Special, Assist Follow-Up, and Fire/Sheer DMG by 12% per stack (max 2, 20s duration) = 24% multiplicative damage.
At 45,000 HP, weapon adds 13,500 HP (58,500 total) = 5,850 Sheer Force. The 20% CRIT Rate lets you hit 70% threshold with only 45% from Drive Discs. Dual-stack uptime exceeds 85% during proper rotations.
A-Tier Alternatives
Grill O'Wisp: +15% Fire DMG baseline, +15% CRIT Rate for 5s when HP decreases. Performs 15% below Wrathful Vajra but costs zero Polychromes.
Puzzle Sphere: +16% CRIT DMG for 12s after EX Specials, +20% DMG when targets below 50% HP. Excels in Thrall execution phases.
Six Shooter/Radiowave Journey/Cinder-Cobalt/Precious Fossilized Core: Situational/placeholder options.
Damage Breakpoints
45,000 HP = 5,850 Sheer Force. 50,000 HP = 6,500 Sheer Force (11% damage increase). CRIT Rate 70% is efficiency ceiling—beyond this, stack CRIT DMG.
At 70% CRIT Rate, increasing CRIT DMG from 150% to 180% boosts average damage by 12.6%. Pushing to 200% adds another 9.3%.
Optimal Drive Disc Sets
Yunkui Tales 4-Piece
2-piece: +10% HP. 4-piece: +4% CRIT Rate per stack (max 3, 15s duration) from EX Special/Chain Attack/Ultimate = +12% CRIT Rate. At 3 stacks: +10% Sheer DMG.
Maintain 3 stacks through EX Specials during Visage of Wrath. Experienced players achieve 90%+ uptime. Testing shows 4-piece outperforms mixed sets by 18-22%.
Main Stat Priority
Disc 6: HP% (mandatory). At +30% HP on 45,000 base = 13,500 additional HP = 1,350 Sheer Force.
Disc 5: Fire DMG% (15-20% multiplicative increase) > HP% (8-12% through conversion).
Disc 4: CRIT DMG if CRIT Rate >65% total. Otherwise CRIT Rate to reach 70% threshold.
Substat Priority
CRIT Rate > CRIT DMG > HP% > ATK% > Impact > Anomaly Mastery
Each CRIT Rate roll (2.5-3.5%) increases consistency. CRIT DMG rolls (5-7%) amplify peaks. HP% rolls (4-6%) feed Sheer Force + survivability.
6% ATK% = 3-4% damage. 6% HP% on 45,000 build = 2,700 HP = 270 Sheer Force (equivalent damage + survivability).
Complete Stat Targets
Endgame benchmarks: 45,000-50,000 HP, 70% CRIT Rate, 180%+ CRIT DMG, 4,500+ Sheer Force, 300+ Impact.
With Wrathful Vajra (+20%) and Yunkui Tales (+12% at 3 stacks), Banyue reaches 37% CRIT Rate before Disc 4/substats. Need 33% more = 10-12 quality CRIT Rate substat rolls.
CRIT Efficiency
70% CRIT Rate + 150% CRIT DMG = 1.75× average multiplier. Increasing CRIT Rate to 80% (same CRIT DMG) = 1.80× (+2.9%). Maintaining 70% CRIT Rate while raising CRIT DMG to 180% = 1.91× (+9.1%).
Once at 70% CRIT Rate, every roll should target CRIT DMG or HP%.
Team Compositions
F2P: Banyue + Dialyn + Lucia
Dialyn provides stun (170+ Impact), creating windows for Banyue's CRIT damage vs Thrall's +50% CRIT DMG taken. Lucia offers buffs/healing. Zero limited S-Ranks needed beyond Banyue.
Rotation: Dialyn stun setup → Banyue Visage of Wrath burst → Lucia buffs. The 60 Adrenaline recovery (every 180s) syncs with Dialyn's stun cycles.
Mid-Investment
Banyue + Lighter + Orphie Magus: Lighter amplifies Fire DMG, provides stun. Orphie adds defense/energy. 15-20% better than pure F2P.
Banyue + Pulchra + Pan Yinhu: Rupture synergy with overlapping damage-over-time effects.
For faster team building, top up ZZZ thrall salvation teams monocoins fast through BitTopup ensures secure transactions with excellent service.
Endgame Optimized
Banyue + Lighter + Astra Yao: 25-30% higher damage than F2P. Lighter's Fire DMG stacks multiplicatively with Sheer conversion. Astra Yao provides premium buffs.
Banyue + Ju Fufu + Astra Yao: Buff stacking for extreme burst windows.
Bangboo: Birkblick (Fire DMG), Booressure (Impact), Cryboo (defense).
Thrall Salvation Strategy
Phase 1: Opening Burst
Establish Rupture before 2+ Contract stacks. Build Wrathful Fires to 120 via Earth Shaker (AAAE/AAAAAE), trigger Visage of Wrath.
Eliminate Sobeks first in Deadly Assault Stage 2 (2,000 Performance Points). Cleave during Basic chains while building Wrathful Fires.
When stunned, Thrall takes +50% CRIT DMG. Unleash Mountain Tremor-Wrath (AAAE + EEA) or Lion's Roar-Wrath (EEEE + AAE).
Phase 2: Maintaining Uptime
Contract stacks max (+45% Anomaly RES), but Sheer DMG ignores it. Maintain Visage of Wrath via Perfect Blocks (6 Wrathful Fires) and Perfect Dodges (4 Wrathful Fires).
Immovable Mountain parries (Dodge without direction during attacks) generate Daze + 4 Wrathful Fires. Master timing for 80%+ Visage uptime.
EX Specials in Visage consume 1 Mountain's Might, restore 10 Adrenaline. This creates positive feedback via Adrenaline-to-Wrathful Fires conversion (0.5 per point).
Phase 3: Execution
Thrall below 50% HP activates Puzzle Sphere's +20% DMG. Self-Sacrifice maxed = +30% Stun DMG Multiplier. Coordinate final stuns with team buffs.
Break Through (+15% Sheer DMG, ignores 15% All-DMG RES) stacks multiplicatively. Time Ultimate with Break Through + stun for 20-30% HP deletion.
M1 extends stun by 2s, reduces Fire RES 10%, grants +10% Sheer DMG. Coordinate Phase 3 stuns for full rotation execution.
Skill Rotation
Wrathful Fires Generation
Earth Shaker (AAAE/AAAAAE): Primary combo outside Visage. 4-hit efficient, 6-hit higher generation but longer commitment.
Mountain Tremor (AE/AAE): Faster generation under time pressure. 2-hit minimal commitment, 3-hit balanced.
One's Path (EA/EEA): Defensive combo with invulnerability frames. Use during dangerous Thrall attacks.
Visage of Wrath Combos
Mountain Tremor-Wrath (AAAE + EEA): Primary damage. Basic chain builds Mountain's Might, EEA consumes for Sheer DMG. Each stack consumed = 10 Adrenaline.
Lion's Roar-Wrath (EEEE + AAE): EX Special emphasis for high Adrenaline reserves.
Ultimate Timing
Optimal windows:
Stun phases (+50% CRIT DMG taken)
Break Through activation
Team buff stacking
Emergency invulnerability
Avoid:
Immediate use without coordination
Phase transitions
Outside Visage of Wrath
Properly timed Ultimate (stun + Break Through + buffs) deals 3-4× uncoordinated damage.
Resource Investment
Week-by-Week
Week 1: Max Core Skill (Basic Rupture Seal ×4, Advanced ×32, Arbiter ×30, 800k Denny). Max W-Engine. Equip correct main stat Discs.
Week 2-3: Raise Basic Attack (Burn Chip ×5, Advanced ×15, Specialized ×50, Hamster Pass ×1, 500k Denny). Max Special Attack. Farm Yunkui Tales.
Week 4-5: Complete Yunkui 4-piece. Max Discs 4/5/6 (prioritize Disc 6). Farm 70% CRIT Rate substats.
Week 6+: Refine substats. Evaluate M1 investment. Optimize team.
Investment Breakpoints
Minimum Viable: 40,000 HP, 60% CRIT Rate, 150% CRIT DMG, 4,000 Sheer Force. Enables clears, 20-30% slower.
Optimization Threshold: 45,000 HP, 70% CRIT Rate, 180% CRIT DMG, 4,500 Sheer Force. Efficiency ceiling—redirect resources after this.
Whale Territory: 50,000 HP, 75% CRIT Rate, 200% CRIT DMG, 5,000 Sheer Force. 8-12% gain for 3-5× investment.
Common Mistakes
HP Without CRIT
50,000 HP with 40% CRIT Rate/120% CRIT DMG < 45,000 HP with 70% CRIT Rate/180% CRIT DMG.
Fix: Hit 45,000 HP minimum, prioritize CRIT Rate to 70%, then CRIT DMG to 180%+, then HP beyond 50,000.
Rotation Errors
Spamming Basics without EX Specials = 25-35% damage loss. Exiting Visage early wastes multipliers.
Fix: Track resources visually. Integrate EX Specials every 3-4 Basics during Visage. Use Perfect Blocks/Dodges to extend duration.
Mistiming Ultimates = 40-50% less damage.
Fix: Hold for stun + buff windows. Accept 15-20s delays for optimal timing.
Team Composition
Triple DPS without stun/support = 30-40% less actual damage.
Fix: Maintain 1 DPS, 1 Stun, 1 Support baseline.
No energy generation = rotation collapse.
Fix: Include Lucia/Astra Yao/Orphie for Adrenaline support.
Advanced Tips
Animation Canceling
Dodge after final Basic Attack damage frame cancels recovery, saving 0.3-0.5s per cycle. Over 90s = 5-8 extra combos = 15-20% more Wrathful Fires.
EX Special canceling follows same principle. Practice timing before boss attempts.
Positioning
Thrall hitbox extends beyond visual model. Attack from max Basic range to avoid cleaves.
Corner positioning limits Thrall movement, creating predictable patterns. Reduces incoming damage 20-30%.
Sobek cleaving during Earth Shaker eliminates all within 15-20s, securing 2,000 Performance Points.
Damage Calculation
(Base Sheer Force × Skill%) × (1 + CRIT DMG%) × (1 + Sheer DMG%) × (1 + Fire DMG%)
Example: 4,500 × 300% × 2.8 × 1.34 × 1.35 = 68,229 per CRIT.
Balanced distribution outperforms single-stat stacking. Once CRIT Rate hits 70%, additional CRIT Rate = 0.7× value vs CRIT DMG investment.
FAQ
Best W-Engine? Wrathful Vajra: +30% HP, +20% CRIT Rate, +24% Fire/Sheer DMG. F2P: Grill O'Wisp or Puzzle Sphere.
HP Target? 45,000-50,000 HP. 45k = 4,500 Sheer Force. 50k = 5,000 (11% increase). Beyond 50k, prioritize CRIT DMG.
F2P Team? Banyue + Dialyn + Lucia. Zero limited S-Ranks needed beyond Banyue.
Drive Disc Main Stats? Disc 6: HP%. Disc 5: Fire DMG% > HP%. Disc 4: CRIT DMG if >65% total CRIT Rate, else CRIT Rate.
Maintain Visage Uptime? Perfect Blocks (6 Wrathful Fires), Perfect Dodges (4), Immovable Mountain parries (4). Prioritize EX Specials (consume 1 Mountain's Might, restore 10 Adrenaline = 5 Wrathful Fires).
M1 Worth It? -10% Fire RES, +10% Sheer DMG, +2s stun = 12-15% damage increase. But complete base build (W-Engine, Yunkui 4-piece, substats) first for better value.