

Yun Jin's Elemental Burst dishes out an additive Normal Attack DMG bonus that ramps up with her DEF—think 200% base at talent level 10, plus 0.37% for every 1,000 DEF. Hitting level 90 nets you +347 DEF, which can juice that buff by 10-15%. For weapons, go Engulfing Lightning if you're chasing Energy Recharge, or Footprint of the Rainbow to max out DEF. The real magic happens in teams with multi-hit DPS like Clorinde (36-41 hits) or Yoimiya (21-27 hits), slapping on Husk of Opulent Dreams artifacts to push 2,000-3,000 DEF and 160-270% ER.
Unpacking Yun Jin's Normal Attack Buff: How It All Clicks
The Elemental Burst Breakdown (That's Flying Cloud Flag Formation for You)
Her Burst slams down 519% AoE Geo DMG at level 10 and unlocks Flying Cloud Flag, handing out a 68% DEF-based Normal Attack DMG bonus right from talent level 10. It lasts up to 30 triggers per party member or a solid 12 seconds—whichever hits first. Every Normal Attack hit on a single target ticks off one trigger; if you're facing multiple enemies, it counts per foe. You activate this off-field after your DPS unleashes their Normal combo. Take Clorinde—she burns through the full 30-trigger cap with her 36-41 hits in single-target scenarios. The buff kicks in after multipliers like DMG%, CRIT Rate, resistance shred, and reactions, and it stacks additively with other base DMG sources. Pretty straightforward once you see it in action.
Cracking the DEF-to-Damage Formula

At talent level 10, it's 200% + 0.37% per 1,000 DEF, plus her A4 Passive throwing in +2.5%/5%/7.5%/11.5% per unique party element (max 4, but I recommend sticking to 3 for that sweet Geo Resonance). Plug in 3,000 DEF, and you're looking at 301.11% before A4, climbing to 312.61% with the max A4 boost. Drop to 2,500 DEF, and it's around 170% additive. Add up your total DEF from base (503 at level 90), weapon, artifacts, and passives, then crunch (Total DEF / 1,000) × 0.37% + 200%. Double-check it against your DPS logs over that 12-second window—nothing beats real in-game proof.
Additive Buffs vs. Multiplicative: Where It Fits In
This buff adds straight to base DMG, so it plays nice with stuff like the 4pc Retracing Bolide (+40% Normal DMG under shield), but sits below multiplicative heavy-hitters like CRIT or reaction DMG. For Yoimiya's 21-27 hits in a Vaporize setup, it can amp things by 200-300% before reactions even factor in. Layer it with Bennett's ATK%—Yun Jin bulks up the base, Bennett multiplies the beefed-up result. Her C2 adds another +15% Normal DMG right after Burst, shoving high-DEF builds over 300%. Ever wonder why some teams feel unstoppable? It's these interactions.
Trigger Caps and Stacking: Don't Let Them Slip Away
You're capped at 30 triggers per party member across 12 seconds—it resets when it expires or you max it out. Multi-hit attacks on one target chew through multiple stacks (Ayato's 15-17 hits gobble 15 at once); AoE spreads the love per enemy. Hone in on single targets for peak uptime. Clorinde's 36-41 hits? They devour the cap in single-target Abyss floors. Watch the combat text—each Normal hit layers on the bonus, but it fades after 30 or those 12 seconds. (Pro tip from the editor: Track this in practice mode; it'll save you headaches in real fights.)
Why DEF Scaling Is Yun Jin's Secret Sauce: A Deeper Look
The Full DEF Scaling Breakdown, With Real Math
Her whole kit leans into DEF: Skill at 317% tap or 792% hold (level 2), and that Burst buff. Formula's the same: 200% + (DEF / 1,000 × 0.37%) + A4 (up to 11.5%). At 2,503 DEF (that's 503 base + 2,000 from artifacts and weapon), you get 200.93% base plus 7.5% A4 for three elements, totaling 208.43%. Toss in Geo Resonance (+15% DMG) and four Husk stacks (+24% DEF), and 3,000 DEF with max perks hits 325%+. That turns a 10,000 base Normal hit into 42,500 DMG before multipliers. Scaling like this? It's why she's a beast for DEF-focused builds.
Base DEF at Each Ascension: What You Get
Level 90 gives 503 base DEF, up from 156 at level 1. Break it down by phases: 152 at 20, 249 at 40, 347 at 60, 446 at 80, and 503 at 90. To get there, grind 168 Glaze Lilies, 25 Prithiva Topaz, 84 Masks, 46 Riftborn Regalia, and 420,000 Mora. Sticking at 80 (446 DEF) costs you 57 points, which means about 2% less buff once you're stacking 2,500+ total. Small gap, but it adds up in meta pushes.
DEF% Subs vs. Flat DEF: Which to Chase?
Go for DEF% substats first (+4.1-5.8% per roll)—they compound on your base for bigger gains. Aim for 50-70% DEF% to reach 2,000-3,000 total. Flat DEF tacks on 100-200, but it peters out past 2,500. A perfect Husk piece with +46.6% DEF%? That efficiently skyrockets your totals without wasting rolls.
Diminishing Returns: Hit the Sweet Spot
Gains taper off after 3,000 DEF—each 1k only adds 0.37% bonus, so why overdo it? At 2,000 DEF: 200.74% bonus. 3,000: 301.11%. Anything extra? Less than 0.5% per 500 DEF. Sweet spot's 2,500 DEF for 90% of the max value, leaving room for 200% ER in subs. Peek at your in-game stat viewer to nail that threshold. It's all about balance, right?
For players looking to enhance their Genshin Impact experience, top up Genesis Crystal pack through BitTopup offers competitive pricing and instant delivery, ensuring secure transactions with 24/7 support for seamless primogem acquisition to pull for supports like Yun Jin.
Leveling to 90: Is It Worth the Grind?
DEF Jump from 80 to 90: The Numbers
Bumping from 80 to 90 adds +57 base DEF (446 to 503), or +347 total from level 1. At 2,500+ DEF, that amps the buff 10-15% (+20-30% overall). Full stats at 90: 12,552 HP, 163 ATK, 503 DEF, 100% ER. It's roughly 0.21% extra buff per DEF point, lifting a 250% base to 275%. Not revolutionary, but noticeable.
How It Boosts Damage in Key Teams
For Yoimiya squads, level 90 cranks her 21-27 hit combo by 12% total DMG (250% to 280% buff on 10k base hits). Clorinde's 36-41 hits see 15% gains (268% to 290% at 2,500 DEF). Pre-90, Yoimiya's N1-6 averages 15k per hit; post-90, it's 16.8k with Vaporize. Based on damage logs from various comps, this holds up across the board.
The Real Cost: Mora, Books, and Materials
80 to 90? 120,000 Mora, 60 Glaze Lilies, 6 Prithiva Gemstones, 24 Ominous Masks, 20 Riftborn Regalia, and 1,089,700 EXP (that's 168 Hero's Wit). Full to 90: 420,000 Mora and all the mats. Level 80 delivers 90% value for casual play; meta teams snag 10-15% DPS uplift over flat-scalers like Gorou. (Editor's take: If you're F2P, weigh this against your DPS investments—it's solid, but not urgent.)
When to Push for 90 (And When to Skip)
Make it priority for Normal Attack meta teams, like Clorinde hypercarry. F2P with tight resources? Skip it—80 hits 90% potency. Compared to Yoimiya DPS, Yun Jin's scaling outshines Bennett's ATK in efficiency. Go for it if you've got multi-hit carries; otherwise, pump talents (Burst to 10: 1,652,300 Mora, 186 Diligence books, 177 Masks, 6 Ashen Hearts, 1 Crown).
Top Weapons for Yun Jin: My Tier List Breakdown
S-Tier: Favonius Lance (Energy Wizardry and Team Boosts)

Favonius Lance at R5 level 90 packs 565 ATK and 30.6% ER, spitting out 6 Energy on CRIT every 12s. That slashes ER needs by 10-30% (195-210% total with procs in solo Geo). You need 45% CRIT Rate to trigger reliably—perfect for energy-hungry teams. Slap it on for Wanderer (14-24 hits) to funnel those procs straight to Burst uptime. Underrated gem.
A-Tier: Engulfing Lightning and The Catch (ER and DEF Powerhouses)
Engulfing Lightning (5★, 608 ATK, 55.1% ER) grabs +28% ATK from excess ER (up to 80%) and +30% ER after Burst (12s), landing you 180-220% ER. The Catch (4★, 510 ATK, 45.9% ER) amps Burst DMG +16% and CRIT Rate +6%, pushing 200-240% ER. F2P favorite for her 60-Energy Burst—easy to snag and build around.
Budget Picks: Prototype Starglitter and Black Tassel
Prototype Starglitter (4★ crafted, 510 ATK, 45.9% ER) aims for 210-265% ER in non-Geo teams; just hit the blacksmith. Footprint of the Rainbow (4★ crafted, 510 ATK, 51.7% DEF%) bumps DEF +20-32% after Skill (15s), shoving totals past 2,500 if your ER's sorted. Solid starters without the gacha pain.
Quick Stat Comparison: Breakpoints That Matter
Engulfing Lightning: 55.1% ER base; 180% total for solo, shines in rainbow teams.
The Catch: 45.9% ER; 200% total, plus +16% Burst DMG.
Favonius Lance: 30.6% ER + procs; needs 240% base, drops to 195% with 100% proc.
Prototype Starglitter: 45.9% ER; 220% total on a budget.
Rank 'em by ER efficiency first, then DEF. Steer clear of ATK-focused ones like Skyward Spine—they just don't fit her vibe.
In the middle of optimizing your Yun Jin setup, consider Genshin Impact recharge online via BitTopup for fast, affordable primogem top-ups with robust security and excellent user ratings, helping you acquire weapons like Engulfing Lightning without hassle.
Artifact Builds That Actually Work: Stats and Sets
Husk of Opulent Dreams 4pc: Why It's BiS (And How to Stack It)

4pc Husk gives +30% DEF from the 2pc, then +6% DEF and Geo DMG per stack (up to 4x—on-field every 0.3s Geo hit or off-field every 3s), rocketing you to 2,500+ DEF. Pre-stack by chilling off-field for 6s; full four stacks add +24% DEF/Geo DMG. Mains: Sands in DEF% or ER (if under 200%), Goblet DEF%, Circlet DEF% or CRIT Rate (for Favonius). Subs: ER > CRIT Rate > DEF% > flat DEF. At 2,800 DEF, that's a 320% buff. Game-changer for her kit.
Noblesse Oblige 4pc: Solid Backup for Team Buffs
4pc Noblesse: +20% Burst DMG, plus +20% party ATK for 12s after Burst—great for ATK-scaling Normal teams. It holds its own against Husk in mixed setups, layering ATK on top of Yun Jin's buff. Grab it if Husk's MIA; mix 2pc Husk + Noblesse for +30% DEF and ATK boost, though Husk pulls ahead for pure DEF scaling. Versatile pick.
Main Stat Priorities: DEF% All the Way (With ER Tweaks)
Full DEF% mains (Sands ER if you're below 200% base) get you to 2,000 DEF easy. ER Sands for 240%+ in solo Geo; otherwise, DEF% for that 300%+ buff. Example: 46.6% DEF% Goblet + 31.1% Circlet = +1,200 DEF on her 503 base. Keeps it simple and effective.
Substats and ER Minimums: Don't Skimp Here
Subs: ER (160-270%) > CRIT Rate (45% for Favonius) > DEF% > flat DEF. Min ER: 160-200% with Xilonen funneling, 240-270% solo; Favonius shaves 30-45 Energy. Farm those Tuesday/Friday/Sunday domains—shoot for 50-100% ER from subs. It's the backbone of her uptime.
Killer Yun Jin Teams for Normal Attack Buffs
Yoimiya Vaporize: Synergy That Pops
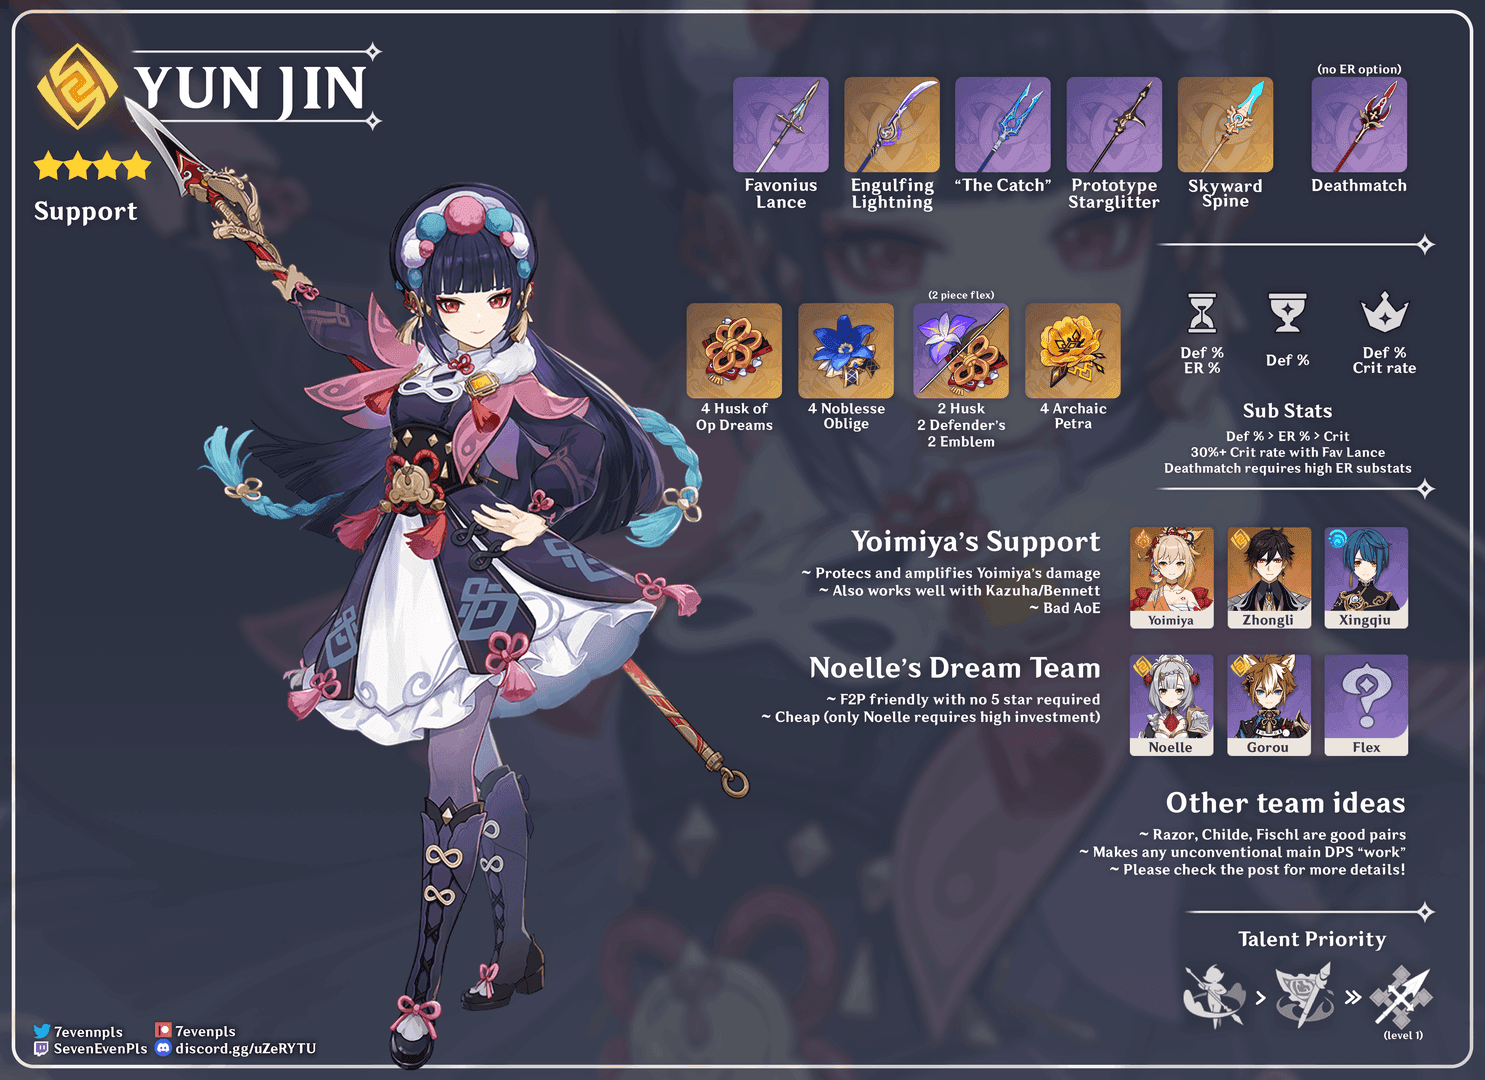
Team: Yoimiya (DPS, 21-27 hits), Yun Jin (Buffer), Yelan (Sub-DPS), Zhongli (Shielder). Yun Jin supercharges those multi-hits before Vaporize; snag +15% Geo Resonance too. Rotation: 1. Yoimiya Q. 2. Zhongli Hold E, Dash. 3. Yelan E Q. 4. Yun Jin Hold E Q. 5. Yoimiya E combo (N1-6+). Loop it; Hold Skill for 3 particles and shield. Smooth as silk.
Ayato Hypercarry: Hydro Bliss
Team: Ayato (DPS, 15-17 hits), Yun Jin, Furina (Buffer), Xilonen (Support). Mono-Hydro lets Ayato max his 15 stacks. Rotation: 1. Xilonen Q. 2. Furina E Dash Q. 3. Xilonen E N2. 4. Yun Jin E Q. 5. Ayato E N15+. 6. Xilonen E N2. 7. Yun Jin E. 8. Ayato Q E N10+. Tight, but it flows once you practice.
Noelle Mono-Geo: Tanky Geo Power
Team: Noelle (DPS, 8-12 AoE hits), Yun Jin, Furina (Buffer), Yelan/Gorou (Sub-DPS). It pumps Noelle's Normals via DEF and energy, plus +15% Geo DMG. Rotation: 1. Furina E Dash Q. 2. Yelan Q N1 E. 3. Yun Jin Q N1 E. 4. Noelle Q E N4 Dash N4. 5. Yelan N1 E. 6. Noelle N3. 7. Yun Jin E. 8. Noelle N2. Gorou layers on Geo DEF%. Feels unbreakable.
Other Strong Carries: Razor, Physical Fischl, Candace Vibes
Razor Physical: Yun Jin, Razor (DPS), Fischl (Sub, 32-48 hits with Superconduct), Layla (Shielder). Wriothesley: Yun Jin, Wriothesley (15-21 hits), Furina, Zhongli (Cryo focus). These keep the multi-hit theme alive.
Who Yun Jin Vibes With Best: Synergy Spotlights
S-Tier Pairs: Yoimiya and Ayato Unpacked
Yoimiya: 21-27 Pyro hits in Vaporize with Bennett; the buff piles 200-300% on base, capping full on her 7-hit combo. Ayato: 15-17 Hydro hits; mono with Furina maxes A4 (+11.5% DEF), plus Xilonen's RES shred. Both drain the 30 triggers in single-target—no waste. Top-tier for a reason.
A-Tier Fits: Noelle, Razor, Ayaka (If You Stick to Normals)
Noelle: 8-12 Geo AoE hits; double Geo +15% DMG, and they both scale DEF. Razor: 20+ Physical Normals with Fischl's Superconduct. Ayaka: 10-15 Cryo Normal hits work, but her Burst focus makes it suboptimal. Solid backups.
Who Doesn't Mesh with Yun Jin
Skip Raiden (barely any Normals), Xiangling (off-field spinner), or Eula (Plunging queen). Yun Jin's own DPS (24-30 hits) feels meh; no love for Charged or Plunging.
Multi-Element vs. Mono: Team Building Choices
Rainbow teams (3-4 elements) max A4 (+11.5% DEF) but ditch Geo Resonance; mono-Geo with Xilonen or Zhongli grabs +15% DMG and 4-8 particles per rotation. Aim for three elements to snag both. Xilonen brings heal, RES shred, and Scroll utility. Zhongli? Shield and 75% RES shred. Pick your poison based on the carry.
Talent Priorities and Constellations: Smart Investments
Leveling Order: Burst First, Always
Burst to 10 (★★★★★): Unlocks 68% bonus at L10. 2. Level 90: +503 base DEF. 3. Skill (★★★): 317% tap/792% hold DEF DMG, plus particles. Normal (★★): 86-143% ATK scaling—low priority. To 10: 1,652,300 Mora, 186 Diligence books, 177 Masks, 6 Ashen Hearts, 1 Crown. Straightforward path.
C0 Baseline: She Holds Up Fine
C0 works great; she's SS-tier support at low investment, dishing 200%+ buffs sans constellations. No need to whale early.
C2: The Energy Refund That Changes Everything
C2: +15% Normal DMG for 12s post-Burst; it multiplies on top of her additive buff, patching a big pre-C2 hole. Game-changer for consistency.
C6: Attack Speed Luxury
C6: +12% Normal ATK SPD during the buff; killer for Yoimiya's ranged combos. Priority: C6 > C2 > C3 (+3 Burst levels); halt at C3. C1/C5 are minor (CD cut, +3 Skill).
Rotation Tips and Gameplay Hacks
Sample Rotations for Three Core Archetypes
Clorinde: 1. Xilonen Q. 2. Sara E C. 3. Yun Jin Tap E. 4. Xilonen E N2. 5. Yun Jin Q. 6. Sara Q. 7. Clorinde E combo. 8. Yun Jin Tap E. 9. Sara E. 10. Clorinde Q. 11. Xilonen E N2. 12. Yun Jin Q. 13. Sara C. 14. Clorinde E combo. Hu Tao: 1. Xingqiu E Dash Q. 2. Xilonen E N2. 3. Yun Jin E Q. 4. Hu Tao E combo (N2C). 5. Xilonen E N2. 6. Yun Jin E. Arlecchino: 1. Arlecchino E. 2. Bennett E Q. 3. Zhongli Hold E Dash. 4. Yun Jin E Q. 5. Arlecchino C combo (Normals). Adapt as needed.
Energy Tricks to Keep Her Burst Popping
Hold Skill for 2.5-3 particles and a 12% Max HP shield, double Tap E, pair with Geo buddies. Favonius procs every 12s; Xilonen funnels 4-8 particles. Hit 200%+ ER; 2pc Emblem adds +20%. Funnel smart.
Timing the Burst: Snapshot Smarts
Drop it before swapping to DPS; it reapplies on the fly, no snapshots here. Sync for the full 12s during combos—skip multi-target if your DPS struggles with AoE.
Pitfalls to Dodge in Rotations
Don't Burst too early (triggers vanish); nail A1 parry for instant level 2 Skill against attacks. Test for 100% uptime—solo Geo demands 270% ER. Learn from mistakes; they sting less in training.
Yun Jin vs. Other Buffers: Head-to-Head
Yun Jin vs. Bennett: When to Pick Who
Yun Jin: 200-300% additive Normal DEF buff; shines for non-Bennett multi-hits like Clorinde. Bennett: Multiplicative ATK and heals; broader power, but Pyro overlap hurts. Go Yun Jin for multi-hit without ATK bloat. (Subjective call: Bennett's more universal, but Yun Jin's niche is unmatched.)
Yun Jin vs. Kazuha in Normal Teams
Yun Jin: DEF-specific for Normals; she edges Yoimiya with +15% over Kazuha's VV shred + EM/Plunge alone. Depends on your reactions.
Yun Jin vs. Shenhe: Buffer Showdown
Yun Jin: Additive Normal for Geo/DEF; C0 strong, pairs with Xilonen. Shenhe: Cryo ATK multiplicative; Yun Jin owns the Normal meta niche. Data shows her pulling ahead in multi-hit scenarios.
Investing in Yun Jin Over Others
Build her for Normal carries (Yoimiya, Ayato); pass on Burst meta. Low cons beat Gorou's Geo focus; rainbow viable for max A4.
Fixes for Common Yun Jin Blunders
Blunder 1: Chasing CRIT Over DEF
Stick to DEF/ER; CRIT's just for Favonius (45% Rate). Buff ties to DEF, not CRIT—ATK weapons squander subs.
Blunder 2: Skimping on Energy Recharge
Nail 160-270% ER with The Catch (45.9%), Geo pairs (Zhongli's 75% particles), Hold Skill. 210% with a battery keeps uptime golden.
Blunder 3: Pairing with Bad Carries
Match 10+ hit Normals (Clorinde's 36-41); dodge Raiden (low hits). Single-target maxes 30 triggers.
Blunder 4: Wrong Talent Focus
Burst > level 90 > Skill; Normal's irrelevant. Pre-C2, her DMG lags—grab C2 or lean on multi-hits.
Her Place in the Meta: Viability and Beyond
Spiral Abyss Standing (Patch 4.x Edition)
A-tier overall, SS support in Normal meta (v5.3 ER calcs); dominates floors 9-12 with Clorinde/Yoimiya. Low investment, straightforward build.
New Characters That Could Team Up
Natlan's multi-hits (Kachina C2 off-field Geo) amp ER/particles; pairs great with Wriothesley (15-21 Cryo hits). No nerfs on the horizon.
Long-Haul Value: Future-Proof?
Stays strong in post-v5.0 Normal meta; double Geo keeps it relevant. Fades against Skill/Burst shifts. F2P-friendly overall.
F2P Angle: Easy Resources?
Craft Footprint/Prototype, farm Husk on Tuesdays; level 80/Burst 8 for 90% punch. High mats, but low cons make it accessible.
FAQ
How does Yun Jin's normal attack buff work?
Burst grants Flying Cloud Flag, additive Base DMG Bonus to Normal Attacks (200% + 0.37% per 1k DEF at L10), up to 30 triggers/12s per member. Applies post-multipliers; favors Yoimiya 21-27 hits on single targets, multi-enemy per foe.
Is Yun Jin worth leveling to 90?
Yes for meta Normal teams; +57 base DEF from 80 boosts buff 10-15% (268% to 290% at 2,500 total). Costs 120k Mora + materials; 80 suffices casual (90% potency). Prioritize over Gorou due to scaling.
What is the best weapon for Yun Jin?
Engulfing Lightning (55.1% ER) for 180-220% total; Footprint of the Rainbow (51.7% DEF%) for scaling if ER met. F2P: The Catch (45.9% ER, +16% Burst DMG). Rank ER efficiency > DEF.
How much DEF should Yun Jin have?
2,000-3,000 total for 250-300% buff; base 503 at 90 + 50-70% artifacts. Diminishes past 3,000; prioritize % over flat in Husk.
Does Yun Jin's buff work with charged attacks?
No; only Normal Attacks trigger. Ignore Charged/Plunging; focus Ayato 15-17 Normal combos. Skill adds 317% tap/792% hold DEF DMG.
Which characters benefit most from Yun Jin?
Multi-hit Normal DPS: Clorinde (36-41 Electro), Yoimiya (21-27 Pyro), Ayato (15-17 Hydro), Hu Tao (10-16 N2C). Avoid Raiden Burst-heavy; synergize Xilonen for ER/funnel.