

Yoimiya Overvape teams blend Vaporize (that sweet 1.5x multiplier) with Overload reactions to crank out massive single-target DPS. Fischl's Oz drops Electro every 0.5s, while Xingqiu's Rain Swords layer on Hydro. For builds, slap Crimson Witch 4pc on Yoimiya for +15% Pyro DMG and up to +40% reaction boosts; Golden Troupe 4pc on Fischl amps off-field Skill DMG by +25%; and Emblem 4pc on Xingqiu pushes Burst DMG +25% via ER gains. Rotations lock in 10s Pyro infusion, triggering Vaporize on those N3/N5 hits. Aim for 120%+ ER on Yoimiya and 180%+ on Xingqiu to steamroll Abyss floors. (72 words)
Introduction to Yoimiya Overvape in Genshin Impact
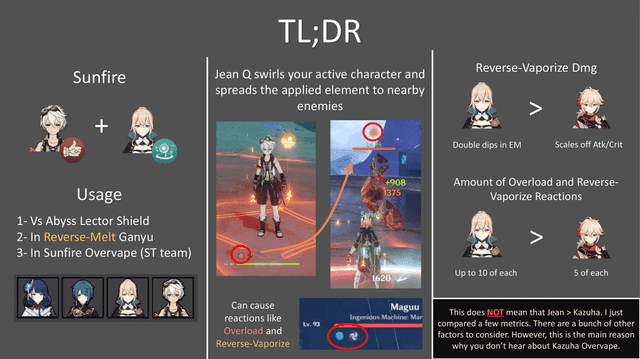
What is Overvape and Why Pair with Fischl/Xingqiu?
Ever wonder why Overvape feels like Yoimiya's secret weapon? It fuses Overload (Pyro slamming into Electro) and Vaporize (Pyro meeting Hydro), delivering 1.5x multipliers on Vaporize strikes plus that satisfying AoE knockback from Overload. Yoimiya's Niwabi Fire-Dance infuses her Normal Attacks with Pyro for a full 10 seconds, setting up these dual reactions like clockwork.
Fischl summons Oz to pepper Electro every 0.5s, sparking Overloads left and right. Xingqiu, meanwhile, tags enemies with Hydro through his Rain Swords, wetting the field so Yoimiya's N3 and N5 hits (with their 2.5s ICD) can Vaporize reliably. And get this—her full 7-hit Normal string dishes out 137.9% DMG per L1 Blazing Arrow, juiced up by 25-40% DPS from Crimson Witch 4pc.
To pull it off, gear Yoimiya with Thundering Pulse for +20% ATK and stackable Normal DMG bonuses. Summon Oz and Rain Swords right before her infusion kicks in—that's your chain reaction starter pack.
Team Overview and Roles
Picture this core squad: Yoimiya as your main DPS, Fischl handling Electro sub-DPS, Xingqiu on Hydro duty, and Zhongli flexing in for shields. On a budget? Swap Zhongli for Beidou to double down on Electro and snag some damage reduction.
Yoimiya thrives on her 10s infusion window (18s CD overall), spamming Normals. Fischl keeps Oz humming for 10s (25s Skill CD, 15s Burst CD). Xingqiu pumps out 3-4 Rain Swords over 15s, dishing Hydro and 20% interruption resistance.
Breaking down roles:
Yoimiya: Her 60 Energy Burst needs 120%+ ER to fire off Aurous Blaze every 2s through team hits.
Fischl: Pump 110-150% ER for non-stop Oz; her C6 stretches it +2s and slaps 30% ATK Electro onto Yoimiya's normals.
Xingqiu: 80 Energy Burst, 180%+ ER (especially with Sacrificial Sword for double Skills); C2 bumps Burst to 18s and shreds 15% Hydro RES.
Level those talents to 9/9/9—prioritize Yoimiya's Normal Attack first, which costs 1,625,500 Mora to hit L10. Ascend her to 90 for +19.2% CRIT Rate, and run some domain tests to nail the reactions.
For the full scoop on Yoimiya's kit, dive into our Genshin Impact Yoimiya Complete Build Guide. Trust me, it's a game-changer.
Core Mechanics of Overvape Reactions
Vaporize and Overload Synergies
Vaporize amps Yoimiya's Pyro damage by 1.5x against Hydro-soaked foes, zeroing in on those N3/N5 hits (each Rain Sword chipping 54.3% Hydro DMG). Then Overload kicks in with AoE knockback whenever Pyro meets Electro, and Oz is firing 88.8% ATK DMG every 0.5s to keep it rolling.
The real magic? Layer Hydro first for Vaporize on your big swings, follow with Electro for Overload, and rack up 15-40% bonuses from Crimson Witch 4pc (hit 3 stacks through her Skill). In a tight 10s rotation, Yoimiya squeezes in 7 normals, netting 3-4 Vaporizes (thanks to ICD) and 5+ Overloads for a solid 30% DPS spike.
Start with Xingqiu's Skill or Burst for 15s of Hydro coverage, drop Oz, trigger Niwabi, and hang back to dodge the knockback—positioning is key here.
Elemental Gauge and Application Rates
Xingqiu stacks Hydro gauge to 1.5-2 units per Rain Sword hit, ensuring Vaporize sticks every time. Oz dumps 1 Electro unit every 0.5s, meshing perfectly with Yoimiya's 2.9s attack speed for Overloads on a 2.5s ICD. Her Pyro infusion plays nice with the gauge, locking in that 1.5x Vaporize multiplier.
Break it down: Oz lasts 10s (+2s at C6), Rain Swords hold for 15s with 2 instances per hit. If Hydro dips below 1 unit, quick-swap to Xingqiu. Fischl's Hold Skill lets you nudge Oz into better position—small tweaks like that keep the reactions flowing.
Optimal Artifact Builds for Yoimiya
Recommended Sets: Crimson Witch and Alternatives

Crimson Witch 4pc stands out—2pc gives +15% Pyro DMG, while 4pc cranks Overload by +40% and Vaporize by +15% (Skills boost the 2pc effect by 50%, capping at 3 stacks; it snapshots +10% party ATK plus 1% per stack from something like Summer Night's Dawn, if you're mixing pieces).
Shimenawa's 4pc is a solid alt, boosting Normal DMG +50% for 10s after a Skill (but it guzzles 15 ER). Or go hybrid with 2pc from each for +18% ATK and +15% Pyro.
Pair it with Bennett's EM share, and Crimson edges out 20% higher reaction damage over Shimenawa's Normal-heavy focus. (Editor's take: I've farmed Crimson Witch endlessly in Pyro Regisvine—stick to 4pc if Vaporize makes up over 50% of your hits; otherwise, hybrid it up for flexibility.)
Farm those pieces in the Pyro Regisvine domain. After dialing in your artifacts, level up your adventure with quick Genesis Crystals instant delivery from BitTopup—they've got competitive prices, credits in minutes, full game compliance, global server support, 24/7 help, and killer user ratings for hassle-free top-ups.
For teams skipping the Overload twist, check our Yoimiya Vaporize Teams Without Overload.
Stat Priorities: Crit, ATK, and EM
Chase CRIT DMG/Rate first (aim 60%+ Rate, 120%+ DMG for that 1:2 sweet spot), then ATK% to 2000+ total, EM at 150-200 for reaction pop, and ER over 120%. Mains: Sands in ATK% or EM, Goblet Pyro DMG, Circlet CRIT Rate or DMG. Subs prioritize CRIT > ATK% > EM > ER.
Hit 2000 ATK with 60/120 CRIT and 150 EM, and your Vaporize strikes double the base output. Roll for at least 30% CRIT Rate on subs (building from her 24.2% base); swap to EM Sands if Bennett's sharing 200+ EM.
Fischl Build and Integration
Artifact Goals for Oz Uptime
Golden Troupe 4pc shines here: 2pc +20% Skill DMG, 4pc +25% off-field Skill DMG (and another +25% if she's off-field over 2s). Go for Sands ATK% or EM, Goblet Electro DMG, Circlet CRIT Rate/DMG. Subs: CRIT > ATK% > EM, with ER at 110-130% in double Electro setups or 130-150% solo.
At 2000+ ATK and 60/120 CRIT, Oz's 88.8% ATK DMG keeps Overload humming through Yoimiya's 7-hit barrage. Ascend Fischl to 90 for +24% ATK; pump Skill to 10 (4,957,500 Mora) for that full 10s uptime; and sync her Burst to reset on an active Oz.
Weapon and Talent Priorities
Polar Star takes the cake as BiS 5-star: 608 Base ATK, 33.1% CRIT Rate, +12% Skill/Burst DMG that stacks to +48% ATK—activate it before Oz drops. F2P folks, R5 Slingshot gives +36% Normal DMG at range. Talent order: Skill > Burst > Normal (C6 adds +2s Oz and 30% ATK Electro on Yoimiya's normals).
In Machine Gun mode, Oz launches projectiles off Yoimiya's normals—pure synergy. Steps: 1. Slap on Polar Star and summon Oz before Yoimiya's Skill. 2. Burst (60 Energy) to reset Skill CD for 100% uptime. 3. C1 throws in off-field joint attacks.
Curious about Fischl's deeper support tricks? Our Fischl Advanced Support Builds has you covered.
Xingqiu Support Optimization
Sacrificial Sword vs. Favonius
Sacrificial Sword lets you double up on 21s CD Skills, fueling an 80 Energy Burst and keeping 15s Rain Swords alive. Favonius? It spits particles on CRITs. Target 180%+ ER (or 150% with Sacrificial), 1800+ ATK, and CRIT at 60-70%/120-150%.
Those double Skills spawn 6 Rain Swords (54.3% DMG per hit) for steady Vaporize. Level Burst to 10 in Wed/Fri/Sun domains; ascend to 90 (420,000 Mora, 46 Cleansing Hearts) for +24% ATK; C6 adds +3 Energy per hit and beefs the third Rain DMG.
Keep the momentum with top up Genshin Impact now on BitTopup—affordable rates, delivery under 5 minutes, secure payments, all-region coverage, solid support, and a 4.9/5 satisfaction score.
Buffs and Hydro Application Tips
Rain Swords bring 20% DMG reduction and 6% HP healing on shatter; C2 shreds 15% Hydro RES for 4s. Her passive tosses in +20% Hydro DMG Bonus, and 2 instances per hit lock in Wet status across infusions.
Pro tips: 1. Burst over Skill for max 15s uptime. 2. Swap back after Yoimiya's normals to refresh. 3. Sync Rain with N3/N5 for 1.5x Vaporize. 4. C6 nets +3 Energy per pop.
Sample Rotations and Combos
Quick Swap Rotation Example
Here's a snappy combo: 1. Xingqiu Skill (3 Rain Swords, 15s Hydro). 2. His Burst. 3. Fischl Skill (10s Oz). 4. Yoimiya Skill (10s infusion). 5. Her 7 Normals (Vaporize on N3/N5, Overload everywhere else). 6. Yoimiya Burst (Aurous Blaze). 7. Cycle back to refresh supports.
This 20s loop hits 100% Oz and Rain uptime, with 4 Vaporizes at 1.5x. Tweak for 8s Skill gaps using off-field Bursts—keeps it smooth.
Full Burst Rotation for Abyss
Go longer: 1. Zhongli Skill for the shield. 2. Xingqiu Skill/Burst (Hydro lock-in). 3. Fischl Skill/Burst (Electro, C4 for reset). 4. Yoimiya Skill + Normals (stay ranged against knockback). 5. Her Burst. 6. Team hits trigger Aurous Blaze every 2s. Loop with particle funneling.
Nails 30s uptime in Abyss; C4 Yoimiya shaves 1.2s off Skill CD per explosion. Practice in the training grounds—toss in Kazuha for enemy grouping if needed.
Energy Management and Sustain
Battery Roles and Recharge Goals
Yoimiya wants 120%+ ER (60 Energy Burst) with team funneling. Fischl's 110-150% ER leverages her 4th passive as a battery. Xingqiu hits 180%+ for double casts. Double Electro resonance adds +20% recharge overall.
Alternate Fischl's Burst (15s CD) and Skill (25s CD) to hold Oz steady. Steps: 1. Favonius on Xingqiu for CRIT particles. 2. Bennett ensures 100% uptime. 3. Stack ER subs if Bursts lag over 5s.
Healing and Shielding Add-ons
Xingqiu heals 6% Max HP on Rain shatters. Zhongli shreds RES and boosts interruption resistance. Perks: Shields eat knockback; Rain's 20% DMG reduction stacks nicely; Zhongli's Burst amps shield strength +20%.
Flex them in for single-target bosses—keep Yoimiya at max range during her 7-hit string.
Comparisons and Alternatives
Overvape vs. Other Yoimiya Comps

Based on the data, Overvape edges pure Vaporize by adding Overload's AoE (40% artifact bonus), though knockback can be a pain—Vaporize keeps 1.5x on all hits without Electro clutter. Against Melt, Overvape suits Hydro/Electro vibes (1.5x), while Melt pulls 2x reverse on Cryo but applies slower.
Fischl over Beidou? She's stationary gold for single-target; Beidou's AoE counters shine with interrupt RES. EM Sands vs. ATK? EM spikes reactions +20% with Bennett; ATK fuels base scaling.
Run Overvape for boss Machine Gun fun (pair with Yelan/Zhongli); switch to Melt for frozen crowds.
When to Use This Team
This setup rules Abyss single-target floors—F2P C0 works fine. Pros: C2 Yoimiya's off-field Pyro nets +25% DPS. Cons: AoE's weak, and interruptions can trip you up.
Test it against straight Vaporize; sub Beidou if knockback wrecks over 20% of your rotations.
Common Mistakes and Troubleshooting
Avoiding Downtime in Rotations
Big pitfall: Botched timing leads to spotty reactions (Pyro ICD is the culprit). Counter it by reapplying Hydro/Electro between infusions—focus Vaporize on N3/N5.
Knockback shattering strings? Fixes: 1. Zhongli or Thoma shields. 2. Back off to range. 3. Kazuha groups 'em. 4. Chevreuse tones down knockback. Shields let you complete 100% of those 7-hits.
Testing Your Build in Game
Oz uptime tanking? Push 130%+ ER and alternate CDs. Steps: 1. Burst while Oz is live. 2. Lean on Double Electro resonance. 3. C4 for HP regen.
Dealing with 8s Skill downtime? Swap supports early; use Burst explosions for C4 CD cuts. Eye the combat log for full 100% procs.
Advanced Tips and Community Insights
Damage Calculations
Take a Lv90 Yoimiya at 2000 ATK/60/120 CRIT/150 EM: N3 Vaporize clocks ~50k DMG (1.5x). Fischl C6 adds +30% Electro per hit; full rotation DPS jumps 20-30% over baseline. Swap to EM Sands for Bennett's 200+ EM share.
Drop Oz right before N1 for instant Overload; C6 Fischl turbocharges those normals.
Spiral Abyss Case Studies
Budget crew (Yoimiya/Fischl/Beidou/Xingqiu) clears floor 12 at 9 stars with shields. Advanced with Yelan sub? 36 stars through ER tweaks.
C2 on Yoimiya/Xingqiu? 25% uplift, even without max investment.
Ready to crush Spiral Abyss? Fire up this Yoimiya Overvape build and drop your clear times in the comments. For more Genshin gold, subscribe to our newsletter.
FAQ
How do you rotate Yoimiya with Fischl and Xingqiu in Genshin Impact?
Kick off with Xingqiu's Skill/Burst (15s Hydro, 3-4 Rain Swords). Fischl Skill for 10s Oz Electro. Yoimiya Niwabi (10s infusion) + 7 Normals (1.5x Vaporize on N3/N5, Overload at 2.5s ICD). Her Burst (Aurous Blaze), then refresh supports. 20s cycle locks 100% uptime; Zhongli shields dodge interruptions.
What artifacts are best for Yoimiya Overvape builds?
Crimson Witch 4pc: +15% Pyro (2pc), +15% Vaporize/+40% Overload (4pc, 3 Skill stacks for 50% 2pc boost). Alts: Shimenawa's 4pc (+50% Normal post-Skill, 10s); 2pc mix (+18% ATK +15% Pyro). Mains: ATK%/EM Sands, Pyro Goblet, CRIT Circlet. Delivers 20% higher reactions alongside Fischl/Xingqiu.
Is Overvape the strongest team for Yoimiya?
It's a beast for single-target with 1.5x Vaporize + Overload (15-40% artifacts), beating pure Vaporize by +25% in reactions—though Melt's 2x AoE edges it out. F2P C0 shines; perfect for Abyss bosses with Hydro/Electro gauge; +30% boost if knockback's tamed.
What weapons maximize Yoimiya's DPS in Overvape?
Thundering Pulse (BiS): 608 ATK, 66.2% CRIT DMG, +20% ATK stacking to +40% Normal (low ER/Skill needs). F2P: R5 Rust (+40% Normal, ATK scales); R5 Slingshot (+36% range). Pumps 7-hits 15-20%; equip pre-Niwabi for full 10s.
How does Fischl synergize with Yoimiya?
Oz zaps Electro every 0.5s (88.8% ATK DMG, 10s) for Overload on Pyro normals; C6 +2s uptime, +30% ATK Electro per hit (projectiles in strings). Her 4th passive batteries ER; 100% Skill/Burst uptime. Golden Troupe 4pc (+25% off-field Skill); 110-150% ER; pre-infusion summon for 20-30% DPS lift.
Common mistakes in Genshin Overvape rotations?
Overload knockback snapping 7-hits: Zhongli shields or range positioning fixes it. ICD messing triggers: Hydro via Rain Swords for N3/N5 Vaporize, Electro elsewhere. Sustain dips: 180% ER on Xingqiu for double Skills. Track 100% Oz/Rain; skip mid-infusion swaps.
👉 Genesis Crystals instant delivery 👈
✅ Official direct recharge, 100% secure
✅ No waiting – top-up arrives in 7 seconds
✅ Big discounts, low prices to save more
✅ 7×24-hour customer service, ready to assist anytime