

Quick Answer: R5 Rust performs at ~103% baseline efficiency and outperforms several R1 5-star weapons, while R1 Thundering Pulse leads at ~111% with a 10-15% damage advantage. Use EM Sands in Vaporize teams with Bennett/Yun Jin buffers; ATK% Sands for Mono Pyro teams. R5 Slingshot emerges as the top F2P choice, potentially outperforming R5 Rust in hyper-buffed scenarios.
Here's something that might surprise you: Yoimiya's weapon selection isn't as straightforward as bigger star rating equals better damage. After spending countless hours testing different combinations, I've found that weapon synergies with artifacts, team compositions, and elemental reactions create some genuinely unexpected optimization scenarios.
Let me walk you through what actually works for Inazuma's premier Pyro DPS.
Yoimiya Weapon Tier List 2025 Overview
Meta Analysis and Tier Classifications
Thundering Pulse sits comfortably in SS-tier as Yoimiya's signature weapon
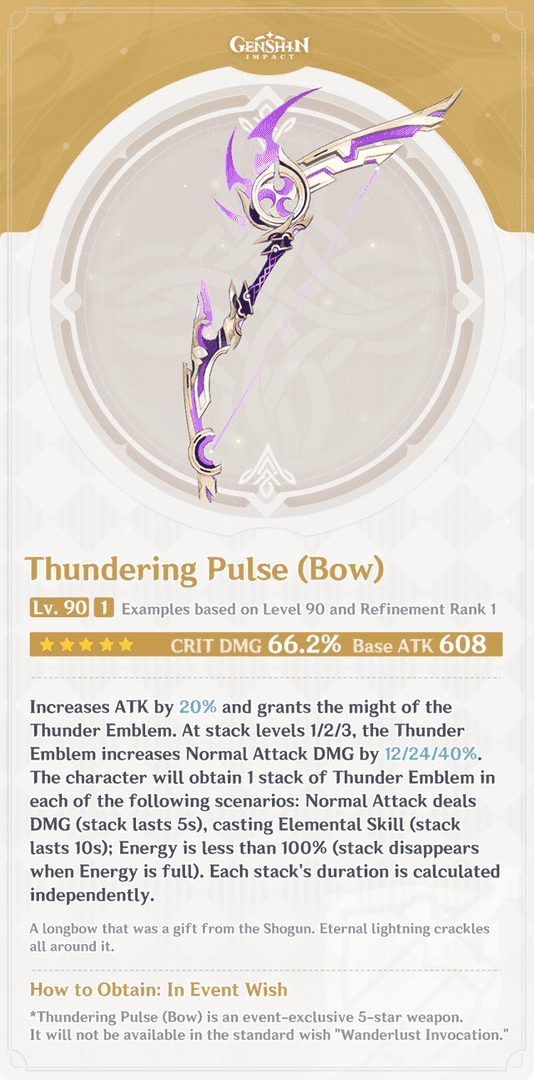
– and honestly, it shows. With 608 Base ATK and 66.2% CRIT DMG at level 90, the raw stats alone make artifact building a breeze. But here's where it gets interesting: the passive grants up to 40% Normal Attack DMG bonus through Thunder Emblems. You'll maintain stacks through Normal Attacks (5s duration), Elemental Skill casting (10s), and staying below 100% Energy.
That last part? Pure genius when paired with Shimenawa's.
S-tier weapons include R1 Aqua Simulacra (~105% baseline performance) and R5 Rust (~103% baseline). Now, Aqua Simulacra might seem like an odd choice – it's technically a HP-scaling bow – but those numbers don't lie. 542 Base ATK with 88.2% CRIT DMG, plus 20% DMG increase when enemies are nearby (8-meter range). R5 Rust delivers 510 Base ATK with 41.3% ATK% and that beautiful 80% Normal Attack DMG bonus.
A-tier options get more interesting. R1 Polar Star, R5 Slingshot, and various Rust refinements all cluster here. Polar Star's a bit of a disappointment, honestly – 608 Base ATK and 33.1% CRIT Rate look great on paper, but Yoimiya typically maintains only 2 stacks (20% ATK increase) rather than the full 4-stack potential. The weapon wants you to weave in Charged Attacks and Bursts, but that's just not how she plays optimally.
For players seeking cost-effective weapon banner pulls, BitTopup offers a cheap Genesis Crystals bundle with excellent value, competitive pricing and fast delivery times.
Investment Priority Framework
Here's my take after analyzing dozens of account progressions: Thundering Pulse > C6 > C2 for overall account improvement.
Pulling for Yoimiya's signature weapon provides greater team DPS increases than early constellations – something that surprised me initially. The 10-15% damage advantage of R1 Thundering Pulse over R5 Rust justifies primogem investment for dedicated users. However (and this is crucial), investing in support characters like Yelan, Furina, or Bennett often yields superior team-wide improvements.
R5 Rust Deep Dive: The F2P Champion
Damage Analysis and Calculations
Let's talk about why R5 Rust punches so far above its weight class.
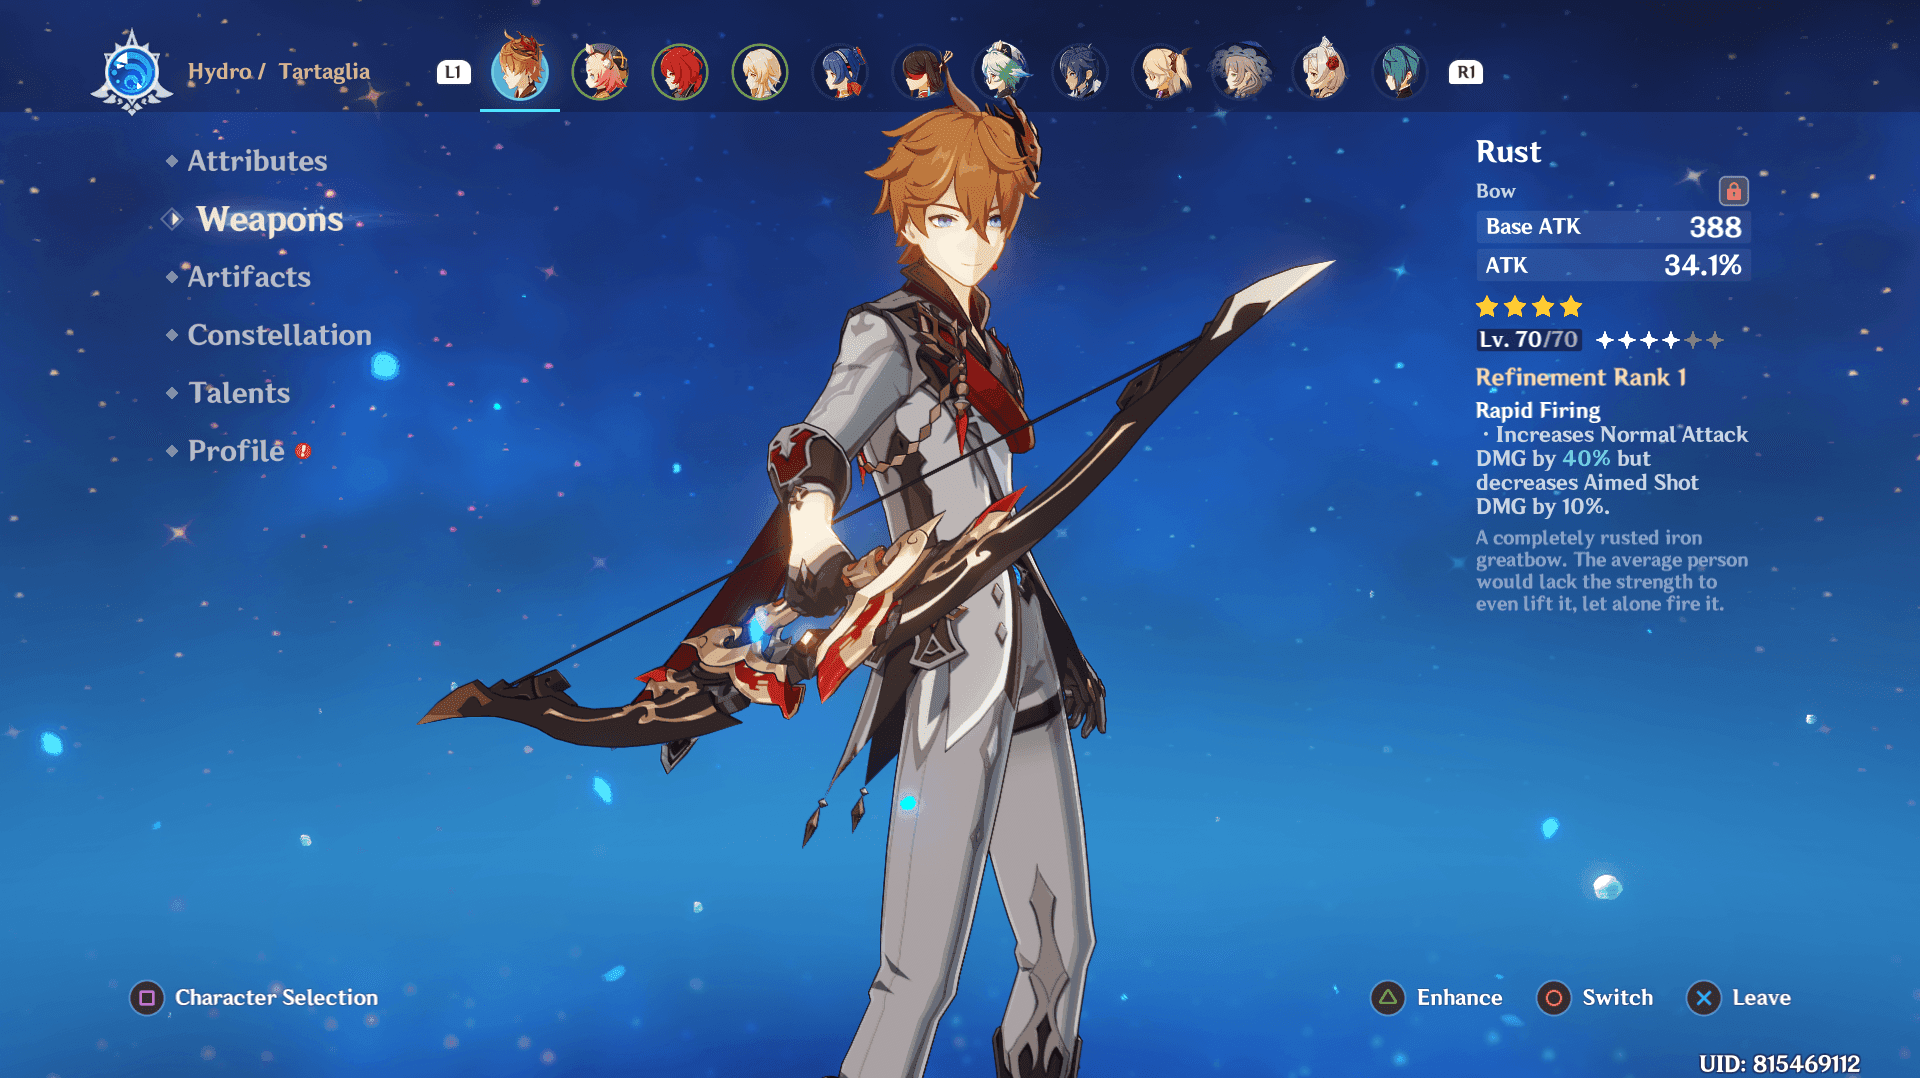
That 80% Normal Attack DMG bonus isn't just a number – it's a separate multiplier that stacks beautifully with everything else. Combined with 510 Base ATK and 41.3% ATK%, you're looking at performance that consistently outperforms R1 Skyward Harp and R1 Amos' Bow.
The magic happens when you add external ATK buffs from Bennett or flat damage increases from Yun Jin. Since the 80% DMG bonus operates independently, it scales incredibly well with these supports.
Optimal Artifact Synergies
4pc Shimenawa's Reminiscence and R5 Rust? Chef's kiss.

You're looking at a combined 130% Normal Attack damage increase (80% weapon + 50% artifact). The Energy consumption actually helps rather than hurts, since Yoimiya's Elemental Burst contributes only 4-8% of total damage anyway. CRIT ratio optimization becomes your main focus – target 80-90% CRIT Rate and 160-180% CRIT DMG, leveraging Yoimiya's 24.2% CRIT Rate ascension stat.
Team Composition Requirements
R5 Rust absolutely shines in Vaporize teams with Xingqiu or Yelan providing Hydro application. The weapon's consistent damage ensures reliable Vaporize triggers on Yoimiya's highest-damage hits (N3 and N5).
Overload compositions with Chevreuse unlock Rust's full potential by eliminating those annoying Vaporize sequence concerns. Bennett's inclusion transforms performance dramatically – those massive flat ATK buffs make EM Sands superior to ATK% Sands in Bennett-supported Vaporize teams.
5★ Weapon Breakdown: Premium Options
Thundering Pulse Performance
Thundering Pulse isn't just Yoimiya's best weapon – it's designed specifically for her playstyle.
The 608 Base ATK matches Polar Star while providing superior 66.2% CRIT DMG. The Thunder Emblem system grants 12%/24%/40% Normal Attack DMG bonuses at 1/2/3 stacks. Stack generation occurs through Normal Attack hits (5s), Elemental Skill activation (10s), and maintaining sub-100% Energy.
Here's the brilliant part: Thundering Pulse and Shimenawa's Reminiscence work together like they were made for each other. The artifact set's 15 Energy consumption maintains the weapon's third stack requirement, ensuring consistent 40% damage amplification.
Aqua Simulacra Viability
This one's a sleeper hit. Aqua Simulacra performs as Yoimiya's second-best 5-star option despite its unconventional design for her kit.
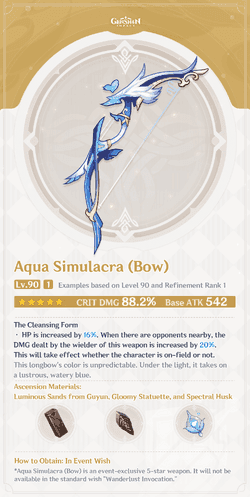
542 Base ATK with exceptional 88.2% CRIT DMG creates an interesting stat distribution. The passive grants 16% HP increase (useless for Yoimiya) and 20% DMG bonus when opponents remain nearby (8-meter range). While Yoimiya's attack animations push her backward, skilled positioning maintains the damage bonus consistently. That low Base ATK? Becomes negligible when you consider the massive CRIT DMG contribution.
For reliable access to premium weapons through cost-effective means, BitTopup serves as a trusted Genshin top up site with comprehensive security measures and competitive exchange rates for Genesis Crystal purchases.
Polar Star Considerations
Polar Star functions primarily as an expensive stat stick – and that's not necessarily bad.
You get excellent 608 Base ATK and 33.1% CRIT Rate while completely underutilizing the passive mechanics. Practical gameplay limits Yoimiya to 2 stacks (20% ATK increase) since incorporating Charged Attacks and Elemental Burst usage results in DPS losses. Despite passive limitations, Polar Star remains competitive through raw statistical superiority, performing similarly to R5 Rust while making artifact building significantly easier.
EM Sands Rules: When and Why
Vaporize Team Requirements
This is where things get mathematically interesting.
EM Sands becomes superior to ATK% Sands in specific scenarios involving consistent elemental reactions and external ATK buffing. Primary conditions require Vaporize teams including Bennett or Yun Jin, where their flat ATK/damage buffs create diminishing returns on additional ATK% sources.
Overvape teams with high Electro application (C6 Fischl) benefit from EM Sands due to multiple simultaneous reactions. The calculation threshold shows EM Sands superiority when Yoimiya receives 700+ flat ATK from Bennett's buff while maintaining consistent Vaporize triggers.
EM Threshold Calculations
Optimal EM values range from 100-200 for Vaporize-focused builds. That's achievable through EM Sands (187 EM at +20) plus moderate substat rolls. Team composition significantly impacts these calculations – Bennett + Yun Jin combinations make EM Sands valuable even with moderate EM substats.
Weapon choice influences EM thresholds too. High Base ATK weapons like Thundering Pulse require less EM investment compared to low Base ATK options like Slingshot.
ATK vs EM Trade-offs
Mono Pyro teams consistently favor ATK% Sands due to minimal reaction dependency. Makes sense, right?
Mixed reaction teams require careful analysis of reaction uptime and external buff availability. Teams with inconsistent Hydro application or lacking strong ATK buffers typically perform better with ATK% Sands. Artifact quality considerations affect the decision – high-quality ATK% Sands with excellent CRIT substats may outperform mediocre EM Sands even in reaction teams.
Alternative 4★ Weapons Analysis
Hamayumi Performance
Hamayumi has a fundamental design flaw for Yoimiya builds.
454 Base ATK and 55.1% ATK% at level 90 look decent, with passive granting 16% Normal Attack DMG bonus, doubling to 32% at 100% Energy. The critical flaw emerges with 4pc Shimenawa's compatibility – Hamayumi requires full Energy for maximum effectiveness, while Shimenawa consumes 15 Energy for its damage bonus.
It's like they're fighting each other. Without Shimenawa's, Hamayumi becomes decent with 4pc Crimson Witch allowing Elemental Burst usage, though R5 Rust consistently outperforms.
Prototype Crescent Viability
Prototype Crescent offers 510 Base ATK and 41.3% ATK%, matching Rust's base statistics while requiring headshot activation for 36% ATK and 10% Movement SPD bonus.
Practical application proves challenging since Yoimiya's rapid-fire attacks make consistent weak point targeting difficult. Against enemies with large weak points, R5 Prototype Crescent can approach R5 Rust's performance, but reliability makes Rust superior.
Windblume Ode Considerations
If you managed to snag this during its event period, you've got a hidden gem.
510 Base ATK with 165 Elemental Mastery at level 90. The passive grants 16% ATK bonus for 6 seconds after Elemental Skill usage – perfect synergy for Yoimiya's gameplay. The weapon excels in reaction-heavy teams where EM provides significant value. Limited availability restricts access, making it a niche option for those who obtained it during its event period.
Weapon-Artifact Synergy Optimization
Shimenawa Set Interactions
4pc Shimenawa's provides 50% Normal Attack DMG bonus through 15 Energy consumption – and this is where weapon choice really matters.
Thundering Pulse synergy represents the pinnacle of weapon-artifact interaction. Energy drain maintains the weapon's third stack requirement while both effects combine for 90% total damage amplification. It's beautiful when everything clicks together like this.
Rust compatibility remains excellent despite lacking special interactions, creating 130% combined damage bonus (80% weapon + 50% artifact).
Crimson Witch Combinations
4pc Crimson Witch provides 15% Pyro DMG Bonus with stacking effects reaching 22.5% after Elemental Skill usage.
Vaporize team optimization benefits from 15% Vaporize damage bonus and Pyro DMG scaling. Weapons with high Base ATK like Thundering Pulse maximize effectiveness through improved reaction base damage. Overvape applications show strong performance, particularly with EM Sands for enhanced reaction scaling.
Team Composition Impact on Weapon Choice
Vaporize Team Weapons
Vaporize teams prioritize weapons maximizing reaction damage while maintaining consistent trigger timing.
High Base ATK weapons like Thundering Pulse and Aqua Simulacra excel by providing strong reaction base damage, especially with EM Sands optimization. R5 Rust performance depends heavily on external ATK buffing – with Bennett support, Rust's ATK% substat experiences diminishing returns.
Slingshot viability peaks in hyper-buffed teams with both Bennett and Yun Jin, compensating for low Base ATK. It's wild how much external buffing can change weapon rankings.
Overload Team Optimization
Overload teams with Chevreuse eliminate Vaporize sequence concerns, allowing focus on raw damage output.
Consistent damage weapons like Rust and Thundering Pulse perform excellently without requiring precise reaction timing. Chevreuse synergy provides Pyro RES Shred and ATK% buffs, enhancing all weapon choices while requiring pure Pyro/Electro compositions. C6 Fischl combinations create Overvape scenarios, dramatically increasing team performance.
Investment Cost Analysis
Primogem Efficiency
Let's talk real numbers here. Weapon banner investment requires careful cost-benefit analysis considering 75/90 pity and 37.5% rate-up chance.
Thundering Pulse acquisition typically costs 150-240 pulls (24,000-38,400 primogems) with average luck. R5 Rust alternatives provide 85-90% of Thundering Pulse's performance at dramatically lower costs.
Opportunity cost considerations include foregone character acquisitions – pulling Thundering Pulse prevents 1-2 limited character acquisitions. That's the real question: is 10-15% more damage worth missing out on Furina or Yelan?
Resource Requirements
Weapon enhancement materials demand substantial resin investment. 5-star weapons require 907 Mystic Enhancement Ore and 605,000 Mora for level 90, while 4-star weapons need 605 ore and 403,000 Mora.
Refinement considerations heavily favor 4-star weapons due to acquisition accessibility. R5 Rust provides substantial performance gains over R1, while 5-star refinements offer minimal improvements at extreme costs.
Common Mistakes and Optimization Tips
Weapon Selection Errors
Overvaluing 5-star rarity leads players to use suboptimal weapons simply due to star rating. I've seen too many people using R1 Skyward Harp or Amos' Bow when R5 Rust would perform better.
Ignoring refinement scaling creates missed opportunities – many players use R1 Rust when R4-R5 refinements provide substantial damage increases. Misunderstanding conditional passives results in poor choices like Hamayumi's Energy requirement conflicting with optimal artifact choices.
Refinement Priorities
4-star weapon refinement should prioritize Rust above other options due to exceptional scaling and universal applicability.
Each refinement provides 10% Normal Attack DMG bonus, creating substantial cumulative improvements. 5-star weapon refinement offers minimal returns – R1 to R5 Thundering Pulse provides ~15% damage increase at costs equivalent to multiple limited characters.
Resource allocation strategy should focus on achieving R5 4-star weapons before considering 5-star alternatives. Trust me on this one.
FAQ
Is R5 Rust better than 5-star weapons for Yoimiya? R5 Rust outperforms several R1 5-star weapons including Skyward Harp and Amos' Bow, achieving ~103% baseline performance. However, top-tier 5-star weapons like Thundering Pulse and Aqua Simulacra still provide 10-15% damage advantages.
When should I use EM Sands on Yoimiya? Use EM Sands in Vaporize teams with Bennett or Yun Jin as ATK buffers, and in Overvape teams with high Electro application like C6 Fischl. Use ATK% Sands in Mono Pyro teams or compositions without strong ATK buffers.
What's the best F2P weapon for Yoimiya? R5 Slingshot is the premier F2P choice, providing 31.2% CRIT Rate and 60% DMG bonus. In teams with both Bennett and Yun Jin buffs, R5 Slingshot can outperform R5 Rust due to superior stat distribution.
Is Thundering Pulse worth pulling for Yoimiya? Thundering Pulse provides 10-15% damage increase over R5 Rust and significantly easier artifact building. For dedicated Yoimiya users, this represents good value, but investing in support characters often provides greater team-wide improvements.
How does weapon choice affect Yoimiya's team compositions? High Base ATK weapons like Thundering Pulse excel in reaction teams by providing strong base damage for Vaporize scaling. Low Base ATK weapons like Slingshot require external ATK buffs to remain competitive.
Should I refine 4-star weapons or save for 5-star weapons? Prioritize R5 Rust before considering 5-star alternatives, as each refinement provides 10% Normal Attack DMG bonus. Only pursue 5-star weapons after achieving R5 on preferred 4-star options, and never refine 5-star weapons due to extreme costs.