

Quick Take: In 2025, Wanderer's ER sweet spot sits between 100-130% for every-other burst rotations at C0—perfect for solid DPS without dumping tons of resources into it. Push to 160-170% if you're at C2 and running supports like C6 Faruzan. Stick with Desert Pavilion Chronicle 4pc for that 100% ER efficiency in hypercarry mode, especially as the meta's new Anemo tricks shave off about 10% from those requirements.
Getting a Grip on Wanderer's Energy Flow (2025 Edition)
Why His 60-Energy Burst Feels Like a Hurdle
Wanderer's Q guzzles 60 Energy and sits on a 15-second cooldown. You can scrape together about 13.5 Energy from five particles in a 20-second rotation if you're at 120% ER—particles from his kit handle the rest in every-other setups. Start with his base 100% ER from level 90 ascension, then layer on 61.3% from a Favonius Codex. Here's a tip from the field: Watch that energy bar in fights. If it's dipping below 90% uptime, bump up ER subs by 20-30% on artifacts. Simple as that.
Breaking Down His Skill's Particle Magic: The Kuugo (E) Dive
In Windfavored mode, every Normal or Charged Attack hit spits out one particle, capped at five per activation with a 2-second ICD. Those Kuugoryoku Points drain at 10 per second while you're hovering—keeps things tense. Fast-forward to 2025, and the Electro A1 passive throws in +0.8 Energy per hit on a 0.2-second CD, juicing Taser teams by 10-15%. How to pull it off: Pop E, chain three N3 attacks for three particles in six seconds. Team it with Fischl, and you're looking at 15-20 Energy per cycle. Wrap up the state with a dash on those A4 procs—feels smooth once you get the rhythm.
On-Field vs. Off-Field: How Particles Actually Feed Him Energy
When you're on-field, you snag 100% of those particles, plus a 12.5% bonus for just being active. Off-field? It's only 80% of that. Triple Anemo teams? They slash your needs by 20-30% thanks to resonance sharing the love. To optimize, time your on-field entry right after buffs—grab about 15 Energy from Bennett's trio of particles and Faruzan's duo. Aim for 140% ER in quickswaps, and run a quick 20-second cycle sim in-game to check.
ER's Real Role in Unlocking Wanderer's Peak Damage
Hit 100% ER, and you're golden for 90%+ burst frequency in every-other rotations, triggering that +40% NA/CA DMG from Desert Pavilion Chronicle 4pc. At C2, crank it to 160% to tap into +200% Burst DMG after burning 50+ Kuugoryoku—nets you 14-17% more DPS overall. The 2025 Natlan tweaks ease ER demands by 10% through Pyro resonances. Build smart: Chase CRIT first (70-80% Rate, 160%+ DMG) and 2000 ATK, then slot ER subs to top out at 130% for C0. Test it against Abyss trash mobs; you'll see the difference.
Every Burst or Every-Other? The Big Rotation Debate
So, What's This 'Every Burst' Thing All About?
Every burst means firing off Q every single cycle, which demands 160-170% ER at C2 to foot that 60-Energy bill. It maxes out C2's +200% DMG bonus once you've spent 50+ Kuugoryoku, piling on 32-34% total DPS when you factor in C3/C4 upgrades. Picture this: Buffs into E, a quick CA, then NA/CA chains leading to Q—pair it with C6 Faruzan, and you're up 69-75% in output. Nail the timing: Drop Burst right as Skill wraps. At 160% ER, 20-second cycles flow easy. Toss in 20-30% extra ER if you're eyeing Shimenawa's 4pc to counter its 15-Energy penalty.
And 'Every-Other Burst'? The Smarter Skip?
Every-other lets you skip Q on alternate turns, settling for 100-130% ER at C0 while still hitting 153.72% NA/Skill DPS per smack. It's 5-10% shy of every burst's peak, but you get 90% uptime without the hassle. Example setup: Buffs, Q if it's up, E into CA and NA/CA chains—keeps you at ~132% performance with ATK Sands. Pro tip: Alternate bursts every 40 seconds; Desert Pavilion 4pc amps NA/CA by +40% on those CA hits. For multi-target Abyss chaos, lock in 100% ER and call it a day.
How Rotation Lengths and Cooldowns Line Up
Most rotations clock in at ~20 seconds, syncing Burst CD with Skill recast for every-other at just 100% ER. C6 Faruzan cuts needs by 20-30% with her particle spam, making every feasible at 130% ER. The 2025 meta nudges those thresholds down 10%, so C0 every lands comfy at 140%. Break it down: 1. Kick off with Faruzan Q for RES shred. 2. E to enter state. 3. NA/CA for particle farming. 4. Q to close the loop. Test for 90% uptime over 20-second runs—adjust as needed.
Weighing DPS: Burst Frequency Against Build Effort
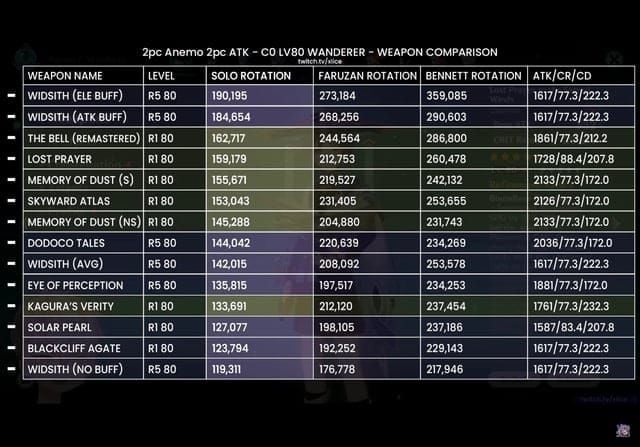
Pushing every burst at 160% ER costs you 3-5% on NA DPS but delivers 15% overall uplift via C2, hitting 129% in hypercarry spots. Every-other at 100% ER? It edges out 5-10% higher sustained DPS, no ER Sands required—great for 84% F2P efficiency. Low ATK buffs? Memory of Dust ramps it to 119-126% equivalent. My take as an editor who's farmed way too many artifacts: Go every if you're C2+ (that C1/C2 combo adds 25-27% DPS); stick to every-other for C0. Crunch the numbers—at 100% ER with Tulaytullah's, every-other clocks 130% DPS, barely edging every's 129% at 160% ER.
For players looking to enhance their Genshin Impact experience, consider Genshin Impact crystal purchase through BitTopup, offering competitive prices, instant delivery, secure transactions, broad support range, excellent after-sales service, and high user experience ratings to acquire resources for Wanderer builds quickly.
Your Go-To Wanderer ER Table: Every Burst Edition
Solo Wanderer: No Backup, All Pressure
Flying solo? Every burst demands 150-200% ER at C0 with zero supports. C2 eases it to 160-170%. Stack it like this: Base 100% plus ER Sands (51.8%) and subs (30%) for 181.8% total. Gear up with Favonius for that 61.3% ER and reliable CRIT procs (100% uptime at R5). Solo test: If Q lags over 10 seconds, slap on 20% more ER subs.
Teaming with Faruzan (C0 to C6 Breakdowns)
Even at C0, Faruzan pushes you to 160% ER for every via her particles and RES shred. C6? It plummets to 130% with +40% CRIT DMG and those 4 Kuugoryoku restores below 40 (5x on 0.2s CD), cutting needs 20-30%. Key breakpoints: 170% without her, 130% in C6 hypercarry. Run C6 Faruzan Q into E CA for shred and particles—at 130%, you're generating 15-20 Energy per cycle. Sub ER every four artifact levels if uptime slips under 90%.
Double Anemo Battery Squads: Shared Gains
Double Anemo drops every to 110-120% ER, particles flowing 20-30% easier across the team. Sample rotation: Faruzan Q, Jean EQ, then Wanderer E into [NA/CA] Q. Jean's C4 throws in RES shred and SPD boosts, netting ~18 particles per cycle. Steps: Venti's EQ for grouping and extra particles; hit 110% ER with base + Ballad weapon (61.3%) + 20% subs. Abyss test for 90%+ uptime—it's worth it.
Hypercarry Crew: ER in the Spotlight
For hypercarry, C2 every needs 110-120% ER, fueled by Bennett's three particles and Pyro resonance (+25% ATK). It hits 132% performance at 100% ER with ATK Sands, though 160% guarantees zero downtime. Sequence: Buffs > E > CA > NA/CA > Q (keep Kuugoryoku low). Tune to 120%: Favonius on a Jean flex slot. Verify with 20-second cycles aiming for 90% burst frequency.
Weapon Tweaks for ER Balance
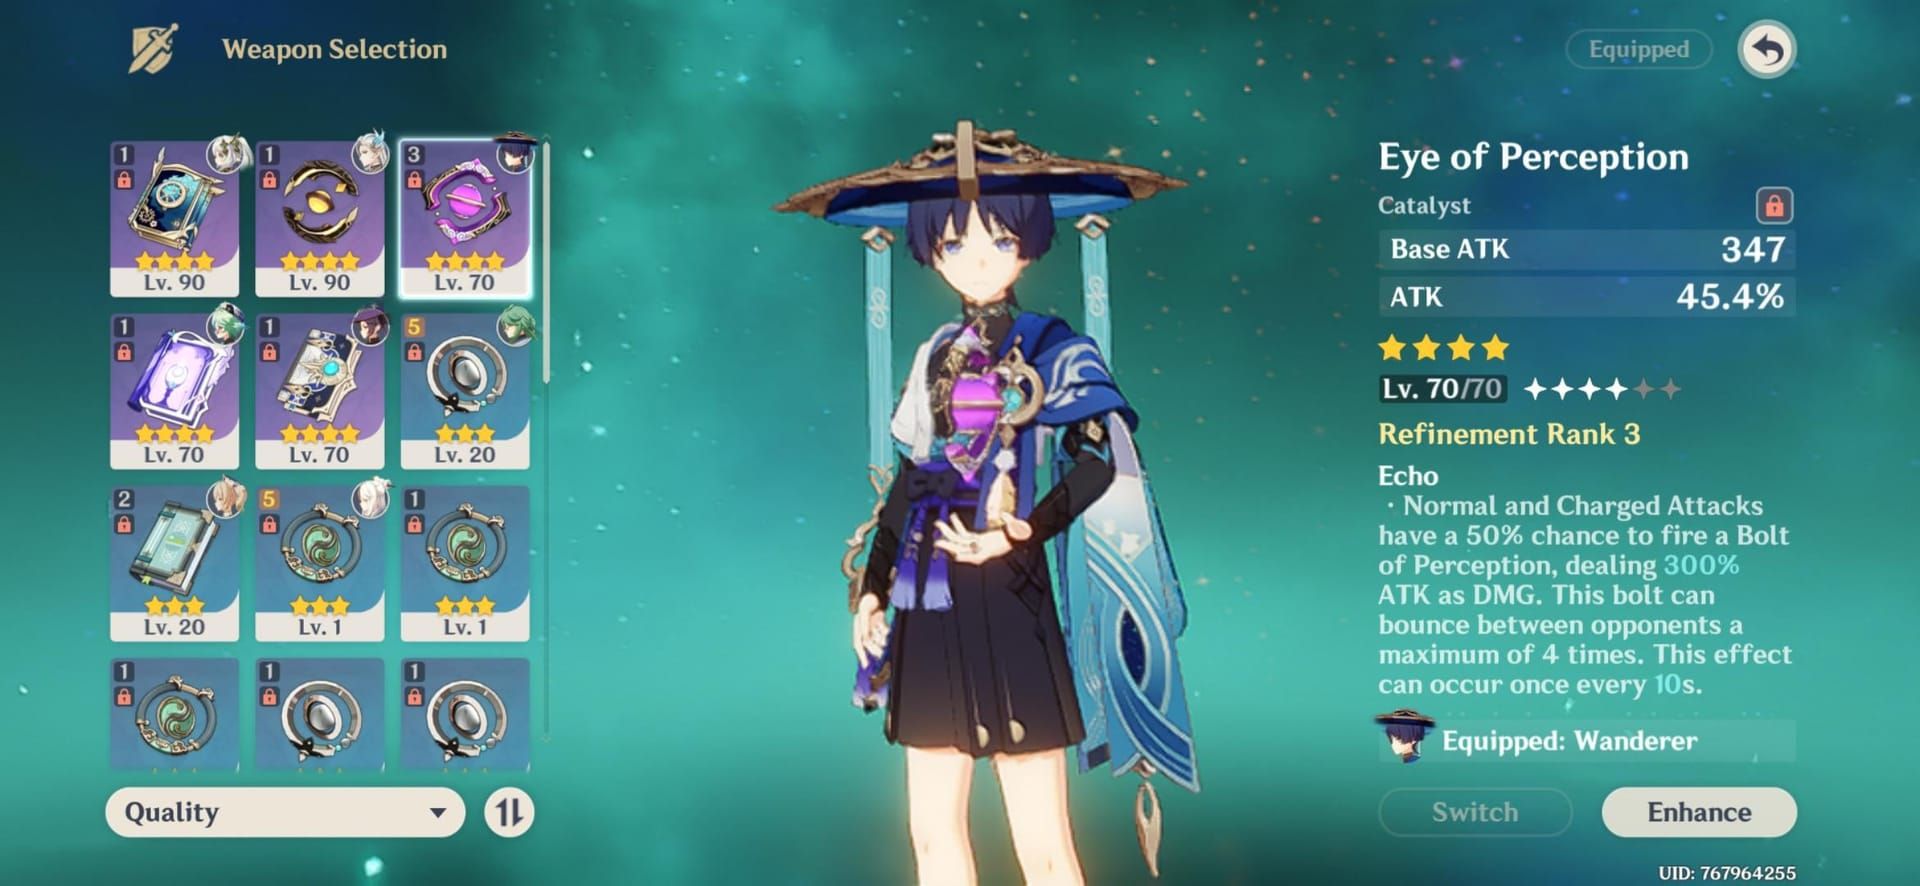
Tulaytullah's (0% ER) craves team funneling to reach 160% for every; Favonius Codex's 61.3% makes every-other doable at 130%. Skyward Atlas fits 150% hypercarry vibes. Adjustments: Low-ER Lost Prayer? Pair with C6 Faruzan for 140%. R5 Ballad adds 61.3% ER. Always prioritize CRIT weapons if base ER is 100%.
Your Go-To Wanderer ER Table: Every-Other Burst Edition
The Lighter Load: ER Needs Dialed Back
Every-other thrives at 100-130% ER for C0, with DPC 4pc hitting 100% for BiS 100% performance. Shimenawa's at 130% restricts to every third but still pulls 94% output. 2025's Natlan artifacts trim it to 90-120%. Straight facts: 100% base covers 1 particle per hit; 120% with Desert Pavilion unlocks +40% NA/CA.
Team Setups That Shine in Every-Other
Standard Anemo DPS? 120% ER with Faruzan/Jean: Faruzan E CA Q > Bennett EQ > Wanderer CA E [NA/CA] Q (every-other). Taser twist: 130% with Fischl/Xingqiu for Electro-Charged Swirls (+0.8 Energy per hit). Execute: 1. VV shred first. 2. E into state. 3. Spam N3. 4. Q on alternates; target 110% in Pyro resonance squads.
ER Sweet Spots for Smooth Sailing
Shoot for 160% at C0 to lock 90% uptime in every-other; drop to 100% with DPC for endless N2C spam. Furina teams? 130% via Marechaussee Hunter's +36% CRIT Rate stacks. Build it: ATK Sands at 100% ER base; swap to ER Sands on delays. Test run: 13.5 Energy from particles at 120% keeps it comfy—no sweat.
When Every-Other Steals the Show
It's prime for F2P or multi-target Abyss at C0, dodging that 200% ER trap. C1 alone boosts +6-11%, even better with 4pc DPC for SPD/DMG amps. Pre-C2, it's the default since Burst base is meh. In 2025 Pyro teams, every-other at 120% nails Vaporize; skip every unless you've got C2 or C6 Faruzan for that 14-17% edge.
In the midst of optimizing your Wanderer setup, topping up resources efficiently can make a big difference—try Genesis Crystal top up via BitTopup for fast, affordable Genesis Crystals with guaranteed safety, broad support, excellent customer support, competitive prices, and high user ratings, ensuring seamless progression in Genshin Impact.
For more on team synergies, check our Best Wanderer Teams 2025 guide.
Building Wanderer? Here's How to Read the ER Table Like a Pro
Step 1: Map Out Your Squad
Hypercarry with Faruzan/Bennett? 110-120% for every-other. Triple Anemo? 100-120%. Take Sunfire (Faruzan/Jean C4/Bennett) at 120% for Pyro Swirls. Action item: Tally particles (Bennett 3, Faruzan 2); under 15 per cycle? Bolt on an Anemo battery.
Step 2: Pick Your Rotation Path
C0? Every-other at 100% ER for that balanced feel. C2? Every at 160%. DPS math: Every-other hits 132% with Tulaytullah's; every's 129% but stacks +32% total. Quick call: F2P life? Every-other. Got C6 Faruzan? Every at 130%—game changer.
Step 3: Pull ER Numbers from the Table
Formula: Total ER = Base 100% + Weapon (0-61%) + Sands (0-51.8%) + Subs (20-30%) + Team (10-30%). C0 every-other DPC: 100%. C2 every: 160% sans Faruzan, 130% with C6. Crunch it in-game stats; standard aim 120%, factoring 2025's -10% meta dip.
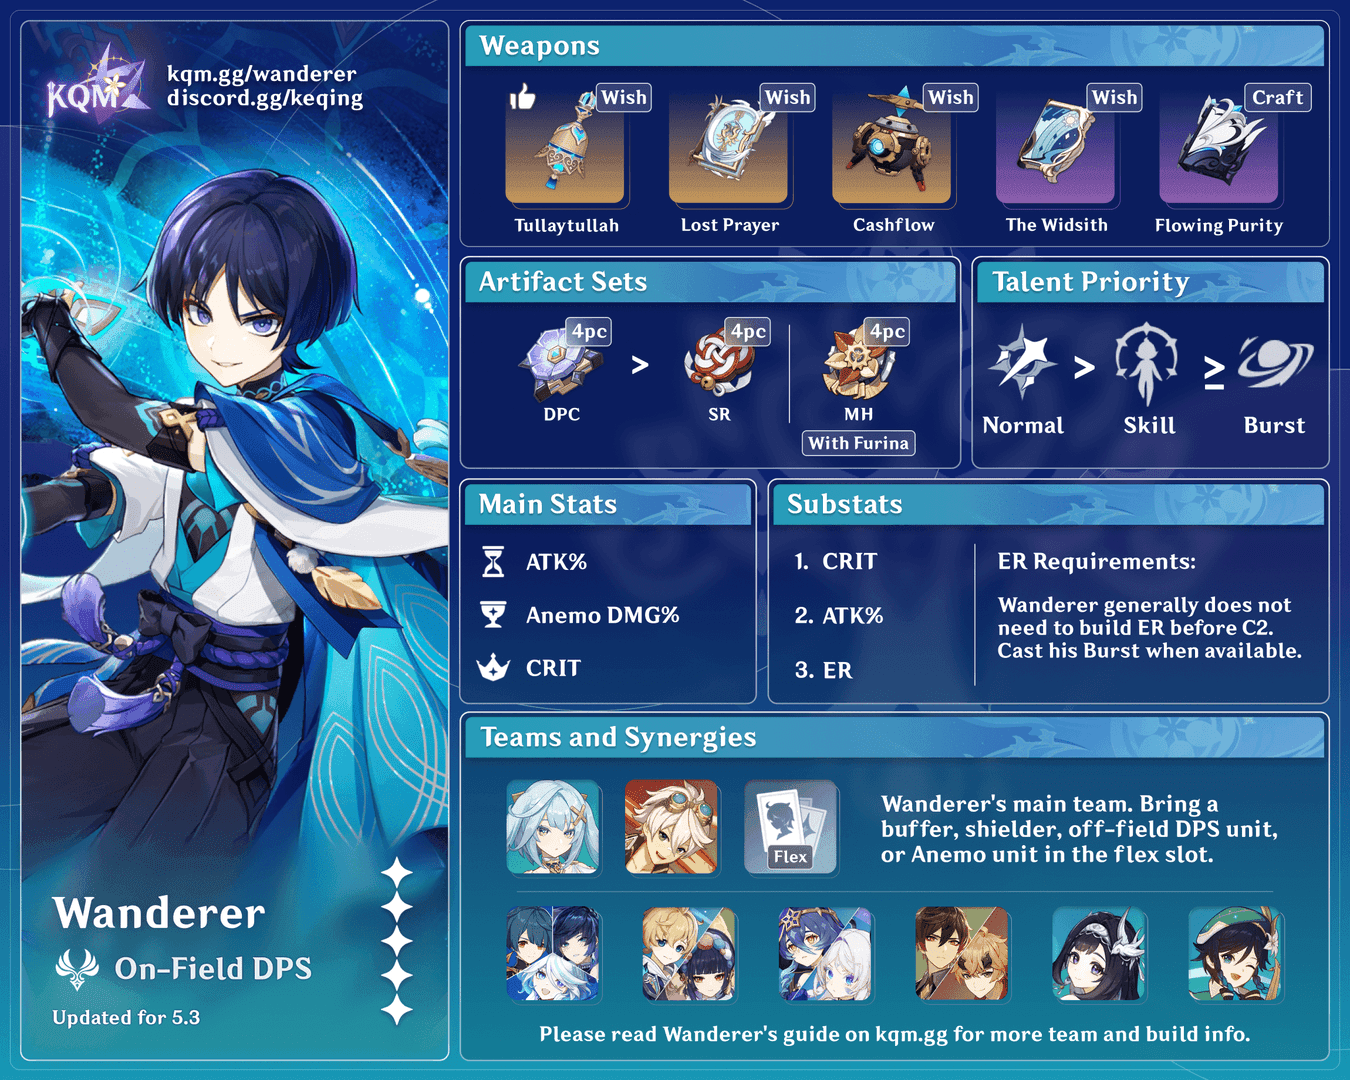
Step 4: Artifact Hunt and Substat Tweaks
Mains: ATK% Sands (top pick), Anemo DMG% Goblet, CRIT Circlet (1:2 ratio). Subs: CRIT > ATK% > ER (cap 130%). DPC 4pc is BiS at 100% ER. Farm plan: 20-30% ER subs if short; steer clear of Shimenawa's post-C2.
Step 5: Real-Fight Testing and Tweaks
Run a 20s sim: Buffs > E > NA/CA > Q (every-other). Eyeball uptime; under 90%? ER sub or Favonius fix. Refine in Abyss: Add CC like Venti for AoE; leverage A4 procs for free dashes. It's all about iteration.
Explore our Wanderer Energy Calculator Tool for precise simulations.
ER Sands or ATK Sands: Which One for Wanderer?
Go ER Sands When...
Slap on ER Sands (51.8%) for every rotations at 160% ER—trades 3-5% DPS for rock-solid consistency. Must-have in no-funnel teams or Shimenawa's (130-140%). Case in point: ER Sands at 160% unlocks every burst, netting +15% total with C2 versus ATK Sands' delays.
ATK Sands Route: Lean on Subs for ER
ATK% Sands wins for 100% ER every-other, pumping 5-10% higher DPS to 132% performance. Subs handle 20-30% ER, focusing CRIT/ATK first. Do this: ATK Sands + 20% ER subs; in Bennett crews, push CRIT ER builds to 120% total.
What the DPS Crunches Say: ER vs. ATK Head-to-Head
ATK Sands at 100% ER: 132% hypercarry output. ER Sands at 160%: 129%, but every burst adds 14-17% from C2. Low buffs? ATK Sands with Memory of Dust: 119-126%. Verdict from the data: Every-other ATK beats ER by 5-10%; every demands ER for that 69-75% C6 boost. Dive deeper in our Wanderer Artifact Guide.
How Substat Rolls Sway Your Pick
Prime ER subs (every four levels) cap every-other at 130%; bad rolls? ER Sands it is. Target: 70-80% CRIT Rate, 200% DMG at 120% ER. Pro move: CRIT subs first; log DPS over 20s cycles to gauge roll quality.
Team Breakdowns: ER Needs and Real-World Cases
Wanderer/Faruzan/Bennett/Zhongli: Shielded Hypercarry ER
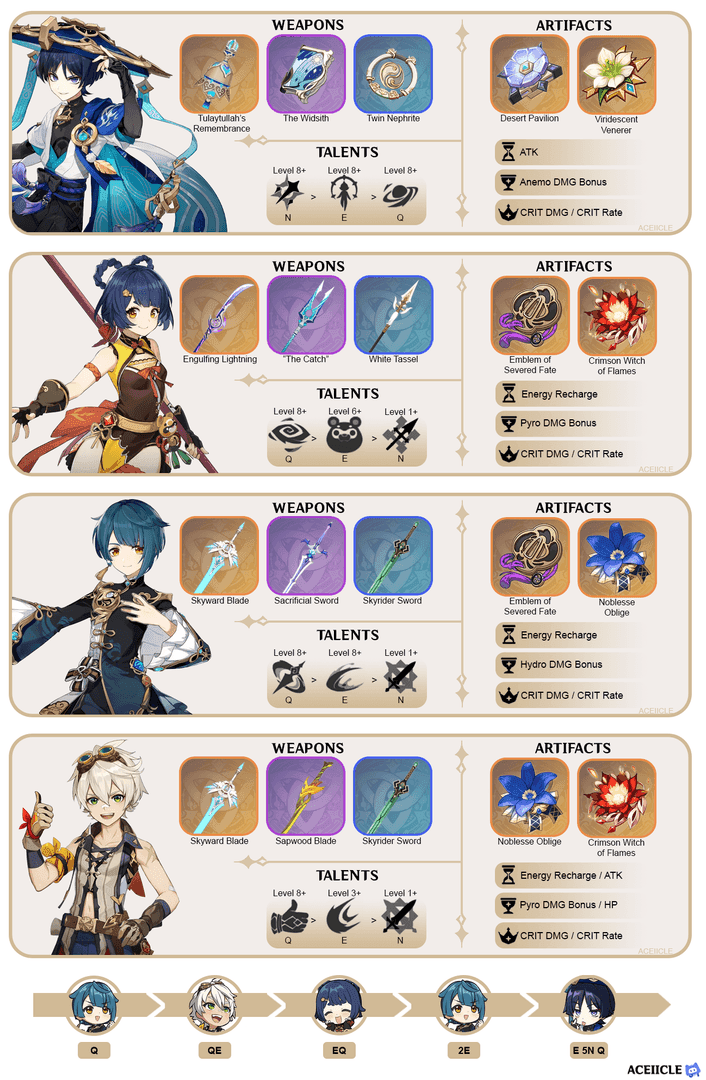
120% ER for every-other here—Zhongli's shield nets ~18 particles per cycle. Rotation: Faruzan EQ > Bennett EQ > Zhongli Q > Wanderer CA E [NA/CA] Q. Steps: 1. Shield up for safety. 2. Buff ATK/Pyro. 3. E > N3 chains. 4. Alternate Q; no knockback eases ER by 10%.
F2P Wanderer: Keep ER Lean
F2P hits 110% ER for 81-84% every-other performance with Blackcliff Agate (2pc ATK/Anemo). Squad: Sucrose/Xiangling/Bennett; Xiangling E drops 4 particles. Build: Subs for 110% ER; Bennett EQ > Sucrose EQ > Xiangling E > Wanderer E [NA/CA] Q. Single-target beast.
Quickswap vs. Hypercarry: ER Gaps Explained
Quickswap craves 130-150% ER versus hypercarry's 110-120%—off-field grabs only 80%. Taser example: Xingqiu EQ > Beidou EQ > Fischl E > Wanderer E 4N3C > Q every-other. Tweak: More ER for quickswaps; hypercarry thrives on on-field gen. Check Wanderer Rotation Guide for flows.
Abyss Tweaks Floor by Floor
Single-target? 100% ER every-other with DPC. AoE? 140% with CC like Venti for particle scoops. Floor 12: +10% ER against knockback mobs. Test per floor; Electro A1 in heavy Abyss Electro shaves 10-15% needs.
Pro Tips: Mastering Wanderer's Energy Game
Funneling Energy Like a Boss
Funnel with Favonius on supports (Jean's C2+ for particles); pre-funnel pre-Q for 15+ per cycle. Triple Anemo shares 20-30% gen. Trick: Faruzan Q > Venti EQ > Bennett EQ > Wanderer; 110% ER target.
Pre-Burst Particle Setup
Off-field gen from Bennett (3) and Faruzan (2) before swap; Wanderer takes 80% off-field. Double Hydro? Yelan/Xingqiu add 5 each, hitting 120-130% ER. Steps: 1. Supports E/Q. 2. Swap in. 3. E for max gen; A1 Hydro extends +20 Kuugoryoku.
Timing Rotations for Energy Peaks
Q at Skill's end for C2's +200% DMG max; hold CA pre-depletion for last particles. A4 Descent (16% chance, +12% per miss) gives free dashes, zero point cost. Drill it: 1s ICD; overworld practice sustains states longer.
Constellations' Energy Edge: C1 and Beyond
C1 boosts +6-11% DPS, every-other at 100% ER viable. C2: 160% for every (+14-17%). C6: -20-30% ER with extra DMG/sustain. Prioritize C6 Faruzan; C1 helps F2P every-other big time.
For deeper synergy, visit Wanderer Faruzan Synergy Guide.
ER Pitfalls and How to Dodge Them
Trap #1: Forgetting Team Particle Help
Don't overstack to 200% ER at C0—Bennett/Faruzan particles make it pointless; cap every-other at 130%. Fix: Tally team gen (15+ per cycle); Favonius on flex if skimpy.
Trap #2: Botched Rotation Timing
Mid-Skill Burst wastes C2 buffs; end it for peak efficiency. Altitude drops eat points, cutting gen short. Cure: Dash out on A4; practice procs (watch visuals) for 16-100% odds.
Trap #3: Sleeping on Weapon Passives
Tulaytullah's (0% ER) starves without funnel; Favonius needs CRIT hits for 60/1 procs. Adjust: R5 Favonius for 100% uptime at 130% total; ER-team pair.
Mid-Build Energy Fixes
Verify gen (state hits only). 2. CC for collection. 3. ER sub if <90% uptime. 4. Electro A1 with Fischl (-10-15% needs). Skip CA spam sans DPC; shields (Zhongli) for multi-target uninterrupted farming.
2025 Shifts: What's New in Wanderer's Energy World
Tweaks to the Energy Rules
Version 6.0 holds the 60-Energy cost steady, but fresh Anemo artifacts sprinkle minor particles, trimming ER 10%. Wanderer's on Chronicled Wish. Result: C0 every now viable at 140% versus pre-2025's 160%.
Fresh Faces Messing with ER
Natlan's Mavuika amps Pyro buffs, favoring ATK Sands; Citlali's Cryo A1 +20% CRIT helps sideways. C6 Faruzan still rules (-20-30% ER). Pyro/Hydro teams ease via resonances; triple Anemo cuts 10-15%.
Artifact Updates and ER Ripples
New sets boost DPC at 100% ER for every-other; Shimenawa's okay at 130% but skip post-C2. Marechaussee Hunter at 130% for Furina HP. Meta now: Anemo DMG% Goblets over ER Sands.
Building Wanderer for the Long Haul
Grab C6 Faruzan in Sep 2025 for ER relief; balance 100-130% ER with CRIT/ATK. Check quarterly for Anemo drops. Editor's hunch—with Natlan, Pyro teams at 120% ER crush Vaporize.
Link to our Complete Wanderer Build Guide 2025 for full optimization. Ready to enhance? Optimize your Wanderer's energy recharge now using our interactive ER calculator tool – find your perfect build in seconds!
FAQ
How much ER does Wanderer need for every burst rotation?
Target 160-170% ER at C2 without Faruzan, dropping to 130% with C6 Faruzan via particles and Kuugoryoku restore. In hypercarry teams like Faruzan/Bennett, 110-120% suffices with 15-20 Energy/cycle, ensuring 90% uptime in 20-second rotations. Adjust via Favonius weapons adding 61.3% ER.
What is the difference between every burst and every-other burst for Wanderer?
Every burst maximizes C2's +200% DMG at 160% ER, adding 32-34% DPS but risks starvation without supports. Every-other at 100-130% ER relies on NA/Skill for sustained output, safer for C0 F2P with 5-10% less DPS but 90% uptime. Rotations: Every uses E > NA/CA > Q every cycle; every-other alternates Q, favoring multi-target Abyss.
Does Wanderer need ER sands or ATK sands?
ATK Sands preferred for every-other at 100% ER, yielding 5-10% higher DPS (132% performance) with subs covering 20-30% ER. ER Sands essential for every rotation at 160%, trading 3-5% for +15% total gain via consistent bursts. In Bennett teams, ATK Sands prioritizes CRIT ER builds at 120% total.
How does Faruzan affect Wanderer's ER requirements?
Faruzan C0 needs 160% ER for every via particles/RES shred; C6 reduces by 20-30% to 130% via +40% CRIT DMG and 4-point Kuugoryoku restores (5x/0.2s CD). Rotation starts with Faruzan Q > E CA, generating 2-3 extra particles for 15-20 Energy/cycle.
What is Wanderer's burst energy cost?
Burst costs 60 Energy with 15s CD, generating no particles but amplified by 100% base ER. In Windfavored state, pairs with 1 particle/hit (2s ICD) for refill. 2025 Electro A1 adds +0.8 Energy/hit, easing to 130% ER in Taser teams for every-other.
Is every-other burst rotation worth it for Wanderer?
Yes, at C0 with 100-130% ER, providing 132% performance via DPC 4pc +40% NA/CA DMG—ideal for F2P and Abyss multi-target. Avoids energy issues, adding +6-11% from C1; 2025 meta lowers needs 10% for balanced DPS over every's 14-17% C2 gain.