

Sparkle's auto-battle AI wastes CRIT DMG buffs on wrong targets due to HSR's slot priority system. This guide reveals the team positioning fix, explains AI logic, and provides speed tuning for S-rank auto-battle in Memory of Chaos, Pure Fiction, and farming.
Understanding HSR Auto-Battle AI Logic
HSR's auto-battle uses predetermined algorithms evaluating targets by team slot position, character path, and battle conditions. Unlike manual play, AI follows rigid decision trees ignoring team synergy.
How Auto-Battle Makes Targeting Decisions
AI prioritizes through three layers. First: Skill vs Basic Attack based on SP availability and role. Supports like Sparkle get high Skill priority, but AI doesn't distinguish buffing DPS vs sustain. Second: evaluates targets using slot position—leftmost slots get preference. Third: applies path modifiers where Harmony supports favor offensive paths (Destruction, Hunt, Erudition), but this can't override slot priority.
Version 1.3 improved Skill/Ultimate timing, but slot-based targeting remains unchanged. Sparkle's 50% action advance Skill needs precise targeting for max DPS.
Team Slot Position Priority
Slots function as hidden priority queue. Sparkle's AI scans slot 1→4, selecting first eligible non-Sparkle character. Sustain in slot 1 = Sparkle buffs wrong target, wasting 24% CRIT DMG (plus 45% of her CRIT DMG) on minimal damage.
Problem intensifies because Sparkle's A4 Trace extends CRIT DMG buff until target's next action. Advancing slow sustain wastes buff for multiple cycles while DPS operates unbuffed. For Honkai Star Rail Oneiric Shard buy, BitTopup provides secure transactions for Light Cones complementing optimal configurations.
Turn Order and Action Value Basics
Action Value (AV) = 10,000 ÷ SPD. Sparkle's Skill reduces target AV by 50%, inserting them earlier. Auto-battle doesn't predict future turn order—evaluates current state only.
Sparkle needs 160+ SPD for two turns/cycle, ensuring buff uptime and SP recovery via Ultimate. 167+ SPD achieves three turns/cycle but creates complications where Sparkle acts before previous buff expires.
Support AI Behavior Patterns
Harmony characters trigger specialized routines distributing buffs team-wide. AI recognizes Sparkle's Skill as buff ability, attempts rotation, but conflicts with hypercarry comps needing one DPS receiving all support. AI uses Ultimates at max energy, wasting Sparkle's 4 SP recovery Ultimate.
Auto-battle spams support Skills before previous casts expire. With Sparkle's Talent providing 7 max SP (base 5 + 2) and Ultimate recovering 4 SP, timing separates efficiency from failure.
Why Sparkle Uses Skills Incorrectly
Sparkle's 50% action advance, CRIT DMG scaling, and Quantum A6 Trace require intelligent targeting AI can't provide.
Core Problem: AI Limitations
Auto-battle can't evaluate roles beyond path. Sparkle's AI knows she's Harmony support, should use Skill frequently, but can't distinguish advancing Seele vs Aventurine. Algorithm treats all non-Sparkle allies equally, defaulting to slot position.
Critical when considering Sparkle's Talent: boosts ally DMG 6%/SP consumed, stacking 3× for 18% lasting two turns. Advancing sustain who uses Basic Attacks accumulates stacks on wrong character. DPS operates without CRIT DMG buff + Talent bonus = 40-60% damage loss vs manual.
Skill Mechanics and Buff Distribution
Sparkle's Skill: 12% base CRIT DMG + 27% of her CRIT DMG at level 1, scaling to 24% + 45% at max. With proper investment (CRIT DMG Body, Sacerdos 4pc providing 18% CRIT DMG/stack, Broken Keel 2pc adding 10% at 30%+ Effect RES), Sparkle reaches 200-250% CRIT DMG = 90-112% CRIT DMG buff for target.
A4 Trace extends buff until target's next action, synergizing with fast DPS. Auto-battle ignores this, sometimes advancing slow characters holding buff while faster DPS take unbuffed actions.
Common Wrong-Target Scenarios
Three recurring issues:
Sustains in early slots receive consistent buffs
Dual DPS: AI alternates buffs instead of focusing hypercarry
Multiple Quantum allies: AI prioritizes Quantum sustains over Quantum DPS
Try Not to Laugh Challenge (2025/10/15-11/03) showed these issues. Players reported failures until team order fixes enabled S-ranks with Sparkle-Tribbie-Archer-Dan Heng and Qingque-Sparkle-Tribbie-Dan Heng.
Quantum Ally Priority Effects
Sparkle's A6 Trace adds ATK% scaling per Quantum ally. AI doesn't weight Quantum DPS higher than Quantum sustains, treating Fu Xuan identically to Seele.
Problematic in optimized Quantum teams (Sparkle, Seele, Silver Wolf, Quantum sustain). Slot priority means sustain receives buffs for Seele, while debuffs/buffs fail synchronizing with Seele's burst windows.
Team Order Solution: Optimal Positioning
Strategic slot arrangement manipulates AI's priority system for consistent correct targeting.
Step-by-Step Arrangement
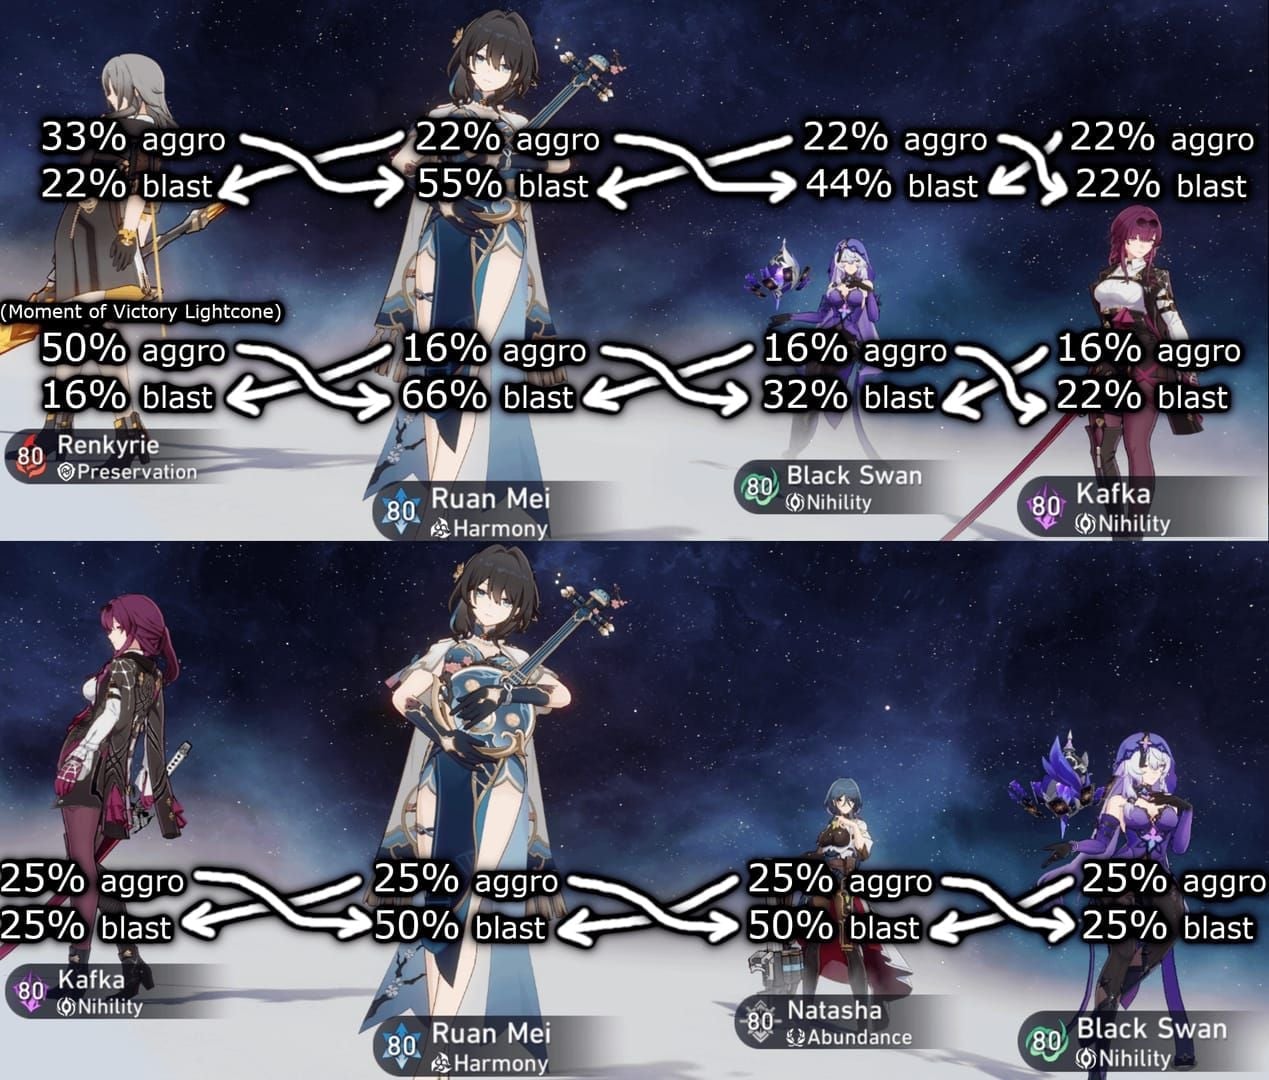
Slot 1: Secondary support/sub-DPS. Occasionally receives buffs but isn't primary damage. Silver Wolf, Pela, Tingyun work here.
Slot 2: Sparkle. Acts early while preventing excessive slot 1 buffing.
Slot 3: Main DPS. AI naturally prioritizes slot 3 when scanning forward from Sparkle. Receives majority of advances/CRIT DMG buffs.
Slot 4: Sustain. Final position minimizes offensive buff chances.
Position Priority Examples
Imbibitor Lunae testing: Tingyun-Sparkle-Imbibitor Lunae-Huohuo achieved 85-90% correct targeting (17-18/20 Skill uses). Huohuo-Sparkle-Tingyun-Imbibitor Lunae dropped to 45-50%.
Seele teams: Pela-Sparkle-Seele-Fu Xuan enables consistent auto-battle. Seele's 115 base SPD + 50% advance creates frequent Resurgence triggers when properly buffed.
Qingque: Sparkle-Qingque-Support-Sustain balances SP-intensive playstyle (4 SP/enhanced attack) with Sparkle's 4 SP Ultimate recovery.
Main DPS Placement
Slot 3 maximizes uptime through turn mechanics. Sparkle from slot 2 evaluates targets forward (3, 4, 1). Slot 3 gets first consideration, and offensive paths receive slight AI favor = double advantage.
A4 buff extension synergizes: slot 3 DPS receives CRIT DMG buff persisting until next action. Fast DPS (140+ SPD) consume buff in 1-2 cycles, Sparkle's 160+ SPD maintains near-permanent uptime.
Support/Sustain Positioning
Slot 1 supports should provide timing-independent utility. Debuffers (Pela, Silver Wolf) work well—DEF reduction/RES shred apply to enemies, avoiding buff targeting issues.
Slot 4 sustains benefit from reduced targeting while maintaining protection. Preservation/Abundance typically have 90-105 base SPD, acting infrequently enough that AI rarely selects them. For top up HSR cheap, BitTopup offers fast delivery for characters/Light Cones needed for optimized configs.
Speed Tuning and Turn Order
SPD distribution determines whether positioning fixes succeed.
Ideal Speed Ranges
Sparkle: 160+ SPD for two actions/cycle. Level 80 base 101 demands investment via Feet (SPD), Sacerdos 2pc (+6% SPD), substats. 167+ enables three actions/cycle but creates auto-battle complications.
Main DPS: 130-145 SPD. Acts frequently enough to capitalize on buffs while slower than Sparkle, creating predictable turn orders.
SPD differential: 15-25 points. Under 15 creates variance where DPS occasionally acts first; over 25 means Sparkle takes multiple actions between DPS turns.
Action Advance Effects
50% action advance reduces target AV by half. Properly positioned slot 3 DPS receives advances consistently, increasing action frequency 30-40%. Advancing sustain wastes the mechanic—sustains contribute minimal damage regardless of frequency.
Action advance affects SP economy. More actions = more SP consumption/generation. Sparkle's Ultimate recovering 4 SP compensates for Skill cost, but only if team doesn't waste SP on incorrectly advanced characters.
Buff Duration Synchronization
Sparkle's Skill buff lasts until target's next action; Talent DMG boost lasts two turns. Characters with burst windows (Seele's Resurgence, Jingliu's Transcendence) need buffs active during high-damage phases.
Two-turn Talent: characters consuming 3+ SP during those turns maximize 18% DMG boost. Imbibitor Lunae (3 SP/enhanced attack) reaches max stacks immediately; Qingque (4 SP) exceeds limit.
Speed Breakpoints to Avoid
Avoid 160 SPD Sparkle with 133-135 SPD DPS—creates 1.2:1 ratio where every fifth cycle desyncs. 180+ Sparkle with sub-130 DPS creates 1.4:1+ ratio forcing AI to distribute buffs across targets.
Sustains: keep under 110 SPD. 120+ acts often enough for AI to consider them valid targets frequently. If sustain needs higher SPD (Luocha healing), ensure DPS maintains 135+ SPD.
Skill Point Management
Sparkle's Talent (7 max SP) and Ultimate (4 SP recovery) create unique economy dynamics.
SP Economy in Auto Mode
Teams start with 3 SP, regenerate 1/Basic Attack. Sparkle's Talent adds 2 max. Auto-battle doesn't bank SP—uses Skills when current SP ≥ cost, causing premature expenditure.
Problems for SP-intensive DPS (Imbibitor Lunae 3 SP, Qingque multiple SP/turn). Manual builds to 6-7 SP before unleashing rotation. Auto-battle spends continuously, leaving 2-3 SP when DPS acts.
Sparkle's 4 SP Ultimate partially compensates, but AI uses at max energy vs timing for SP-starved moments. Ultimate at 6 SP wastes 3 potential SP (7 max - 6 + 4 = 10, capped at 7); at 2 SP fully capitalizes.
AI Skill vs Basic Decision
Simple tree: if current SP ≥ Skill cost AND role = offensive, use Skill; else Basic Attack. Doesn't account for future planning. Sparkle (support role) gets high Skill priority, almost always uses Skill when SP available vs banking for DPS.
Problematic with multiple SP consumers. Sparkle-Imbibitor Lunae-Tingyun-Sustain has two supports wanting Skills + DPS needing 3 SP/turn. AI lets supports consume freely, starving Imbibitor Lunae.
Balancing Consumption
Sparkle is SP-neutral long-term—Skill costs 1 SP, Ultimate recovers 4, generates energy every 3-4 turns = net +0.5-0.75 SP/turn. Auto-battle's immediate Ultimate usage disrupts balance.
Optimal teams: one SP-intensive DPS + two SP-neutral characters. SP-neutral includes most sustains (primarily Basic Attack), Pela (1 SP Skill not essential every turn), certain sub-DPS.
SP-Positive/Neutral/Negative Characters
SP-positive: Generate more than consume. Most Abundance/Preservation (70-80% Basic Attacks). Tingyun is neutral despite frequent Skills—Ultimate recovers ally energy, indirectly reducing SP via faster Ultimate cycling.
SP-negative: Imbibitor Lunae (3 SP), Qingque (2-4 SP), Jingliu during Transcendence (2 SP). Sparkle teams should include only one SP-negative character. Two requires perfect manual timing auto-battle can't achieve.
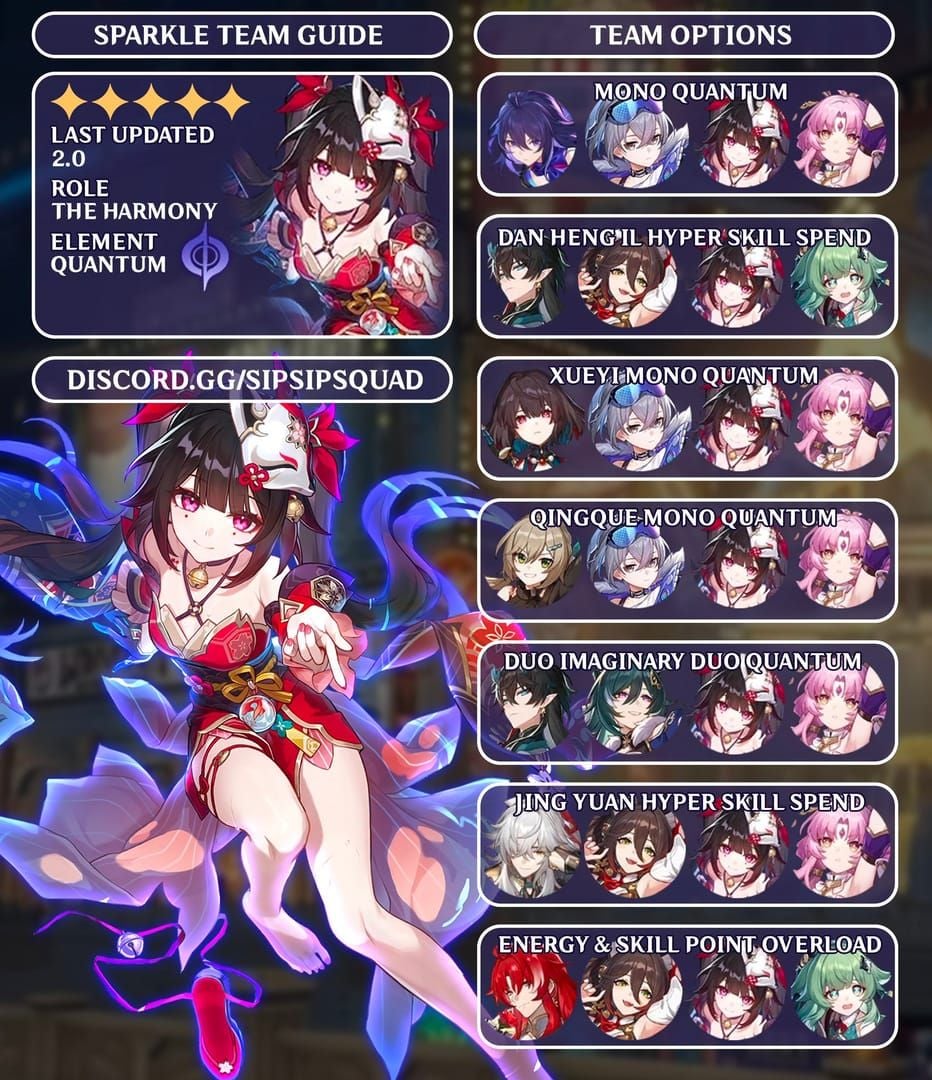
Best Team Compositions
Certain archetypes accommodate AI limitations while maximizing Sparkle's strengths.
Hypercarry Teams
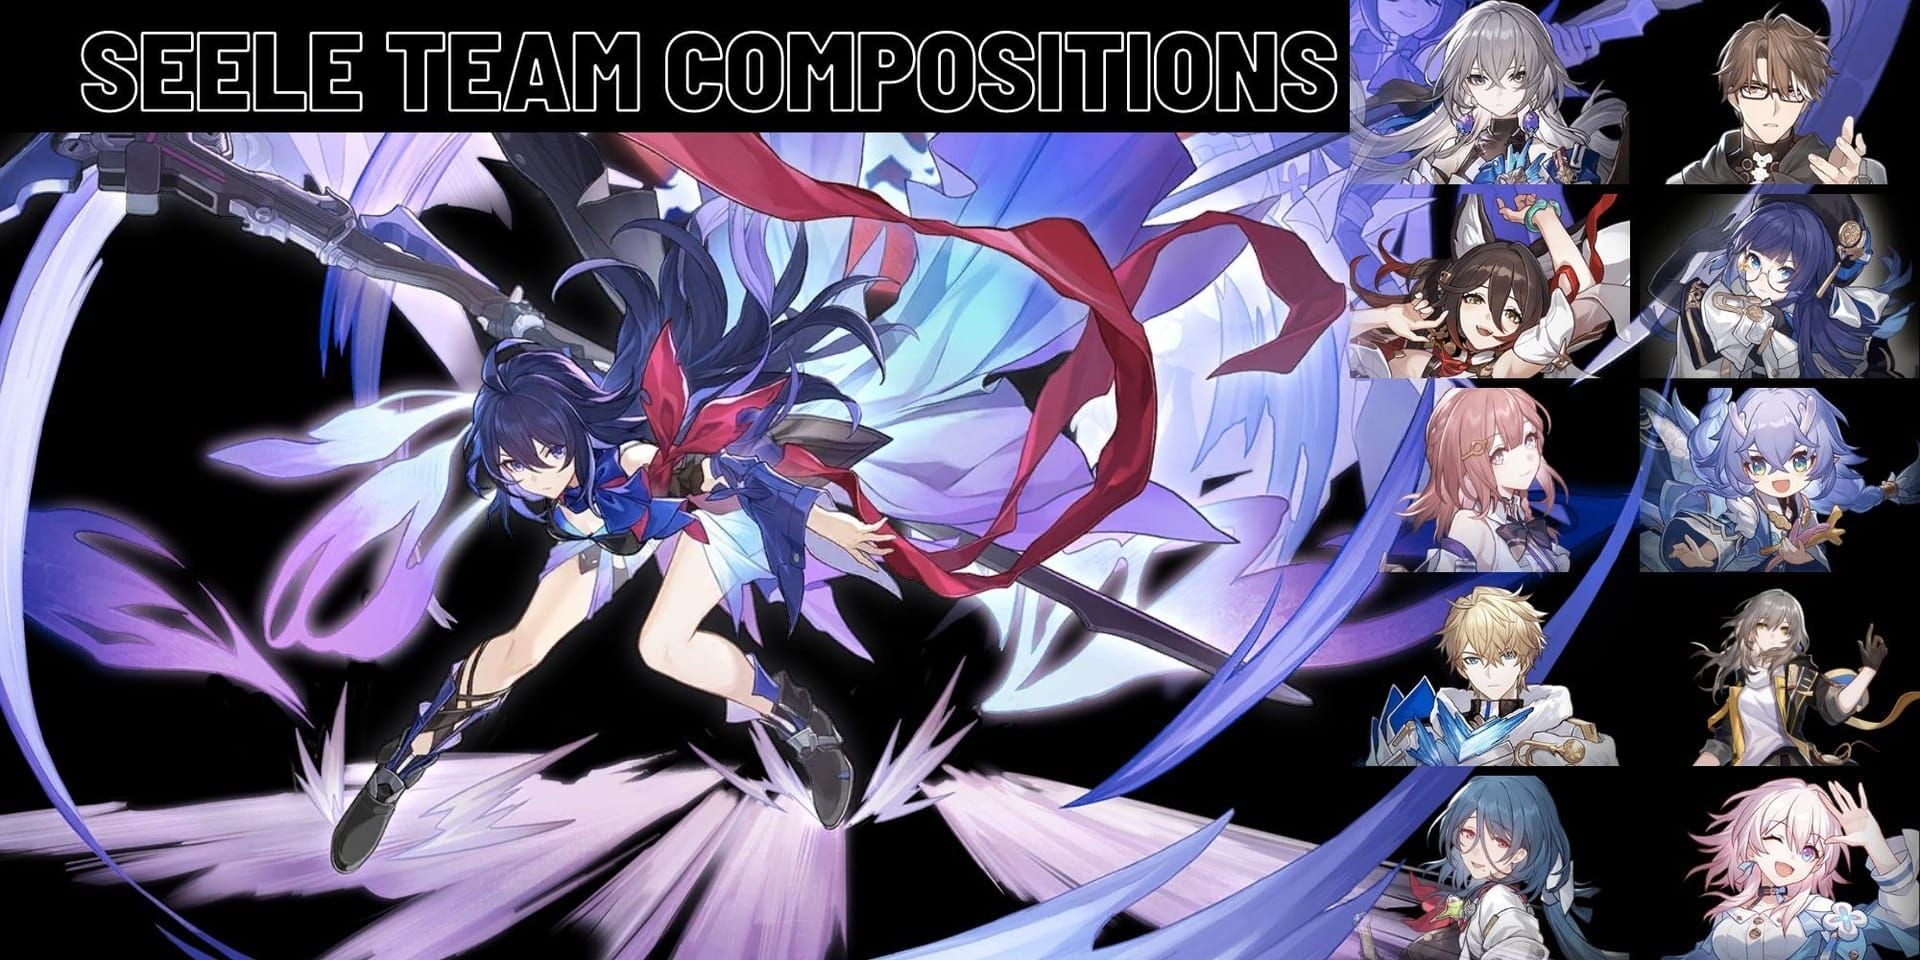
Seele: Silver Wolf - Sparkle - Seele - Fu Xuan. Seele's Hunt path + high damage = obvious buff target. Resurgence (extra turn on kill) synergizes with action advance. S-rank auto MoC 9-10 with Sparkle 165 SPD, Seele 142 SPD.
Imbibitor Lunae: Tingyun - Sparkle - Imbibitor Lunae - Huohuo. SP economy for 3 SP enhanced attacks. Tingyun's Ultimate energy + Huohuo healing/energy sustain team. CRIT DMG buff scales Imbibitor Lunae's high CRIT DMG = 200k+ damage auto-battle.
Jingliu: Pela - Sparkle - Jingliu - Luocha. Balances SP-negative Transcendence with SP-positive supports. Pela DEF reduction amplifies burst damage. Self-sufficient Transcendence buffs stack multiplicatively with Sparkle = 150k+ enhanced Skills. Requires Sparkle 160 SPD minimum for 2× buffs/Transcendence.
Quantum Synergy Teams
Qingque: Qingque - Sparkle - Tribbie - Dan Heng achieved full auto S-ratings in Try Not to Laugh Challenge. Quantum activates A6 Trace for max ATK%. Position Qingque slot 1 (unconventional) because frequent actions needed—placing first ensures advances. Works because Qingque's damage vastly exceeds others.
Quantum Dual DPS: Seele - Sparkle - Silver Wolf - Qingque. Flexible for varied content. Silver Wolf Quantum implant ensures weakness. Auto-battle alternates buffs, reducing peak damage but maintaining consistent output.
Dual DPS Configurations
Feixiao - Sparkle - Cerydra - Sampo achieved full auto S-ratings distributing buffs between Feixiao's frequent attacks and Cerydra's burst. Works because both have similar SPD (135-145).
Dual DPS underperforms vs hypercarry in pure damage. Splitting buffs = each DPS at 60-70% effectiveness. Use for elemental coverage or when enemies counter single-target.
F2P Teams
Budget: Trailblazer (Harmony) - Sparkle - Trial DPS - Gallagher. Trial characters from events have competitive stats/built-in Light Cones. Gallagher's healing + break damage = self-sufficient sustain. S-rank auto Simulated Universe 6-7, Calyx farming.
4-Star Focus: Pela - Sparkle - Qingque - Lynx. Qingque rivals 5-star DPS when supported. Sparkle as only 5-star makes this accessible.
Advanced Optimization
Memory of Chaos Strategy
Sparkle - Tribbie - Archer - Dan Heng achieved full auto S-ratings leveraging multiple action advance sources. Tribbie stacks with Sparkle; Archer/Dan Heng provide sustained damage without complex rotations.
Sparkle 167 SPD, DPS 138-142 SPD creates optimal ratios where buffs align with enemy cycles. Floor 12 enemies act frequently—turn variance causes wipes. Consistent buff uptime eliminates threats before dangerous attacks.
Pure Fiction Optimization
Multi-wave + enemy count bonuses favor AoE. Sparkle pairs with Erudition (Jade, Herta) though single-target focus makes her suboptimal vs AoE supports. Sampo - Cerydra - Sparkle - Huohuo achieved full auto S-ratings combining DoT + buffed burst.
Wave transitions reset turn order, expiring buffs between waves. Position DPS slot 3 for immediate first-wave buffs, maximizing damage when enemy counts highest. Sparkle's Technique (Unreliable Narrator) grants Misdirect 20s + recovers 3 SP on entry for first-wave burst.
Simulated Universe Auto-Farming
Blessing accumulation amplifies strengths. Prioritize Remembrance/Elation paths boosting CRIT/action frequency. AI handles blessing selection poorly—manual selection + auto-battle combat balances best.
Domain encounters with specific mechanics may need adjustments. Sparkle's universal CRIT DMG buffing works most encounters, but lacks elemental coverage/break damage. Pair with versatile DPS or maintain multiple pre-configured teams.
Calyx and Echo of War
Daily farming prioritizes speed over survival. Remove sustain, run three DPS. Pela - Sparkle - Seele - Qingque clears Calyx of Destruction in 45-60s auto-battle.
Echo of War bosses need sustained damage. Reintroduce sustain but maintain aggression—Tingyun - Sparkle - Imbibitor Lunae - Luocha clears Echo of War: Destruction's Beginning in 90-120s, 95%+ success.
Troubleshooting
When Positioning Doesn't Work
Verify SPD tuning. Identical/near-identical SPD (within 2-3 points) creates variance overriding slot priority. Adjust for clear 5+ point differentials.
Light Cones modifying action (Eagle of Twilight Dance Dance Dance advances 25% after Ultimate) disrupt expected turn orders. Increases frequency (beneficial) but creates unpredictability requiring SPD retuning.
Light Cone/Relic Impacts
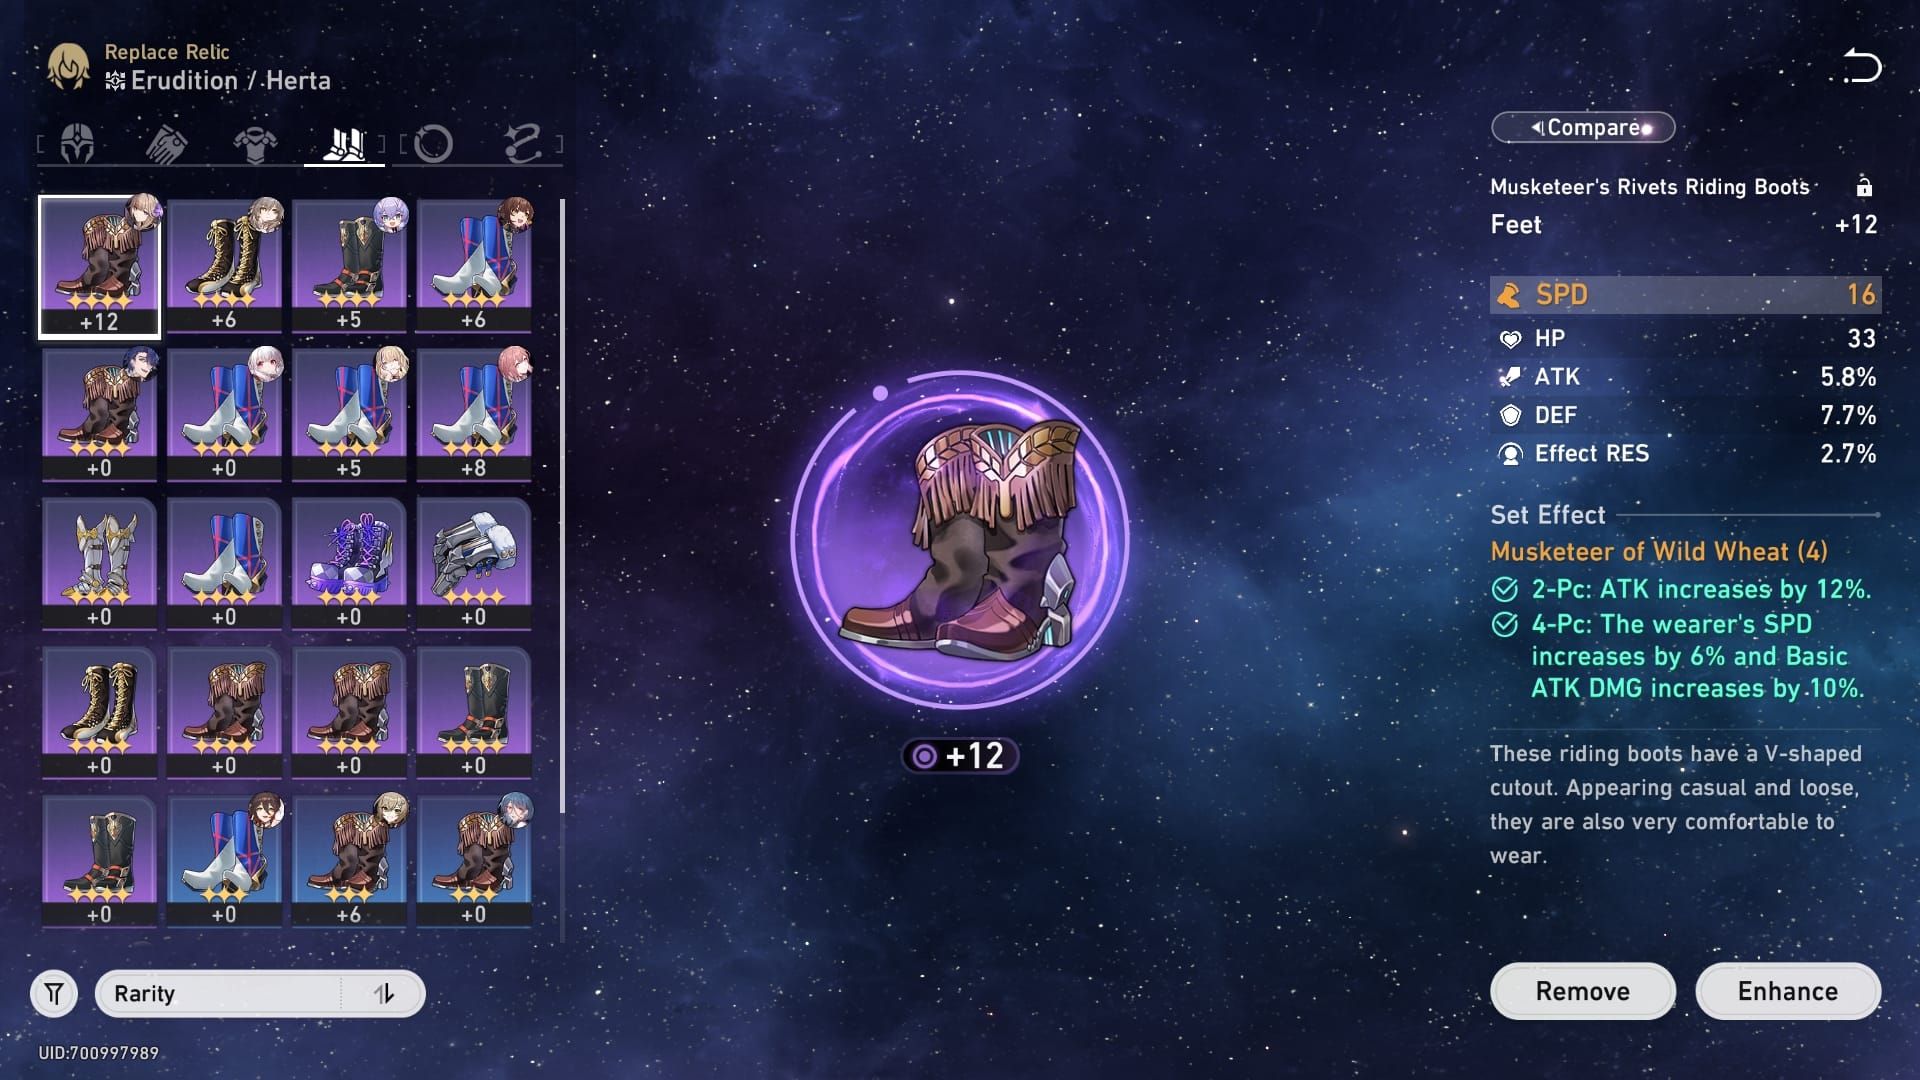
Sparkle's signature (Past Self in Mirror) provides CRIT DMG/energy but doesn't affect targeting. Budget alternatives (Memories of the Past, Planetary Rendezvous) offer similar support. Key: whether SPD substats push into problematic breakpoints—high SPD substats might push 165→172 SPD, crossing three-actions threshold.
Sacerdos 4pc (18% CRIT DMG/stack) maximizes buff transfer. Messenger 4pc (12% SPD to allies) disrupts tuned ratios. Stick with Sacerdos 4pc or mix Sacerdos 2pc + Broken Keel 2pc.
Character-Specific Quirks
Qingque's tile-cycling uses multiple Skills/turn, consuming SP faster than AI anticipates. Imbibitor Lunae's three-tier enhanced attack (1/2/3 SP) confuses AI's SP management.
Counter/follow-up mechanics (Clara, Topaz) generate actions outside standard turn order, causing unexpected buff expiration. Require conservative SPD tuning (10+ differentials vs 5+).
Alternative Supports
Bronya: Similar action advance/CRIT DMG but targets character directly ahead in team order = predictable targeting. Place DPS after Bronya for consistent buffs. Needs 160+ SPD baseline, 180+ to capitalize fully. Excels in reliability, trails buff strength.
Ruan Mei: Team-wide buffs eliminate targeting. Skill provides DMG%/Weakness Break to all; Ultimate delays enemies/extends buffs. AI uses on cooldown without selection = perfect consistency. Benefits balanced comps vs hypercarry. For specific DPS thresholds, Sparkle's focused buffing often superior despite inconsistencies.
Measuring Efficiency
Key Metrics
Clear Time: Track average across 10+ runs. Optimal Sparkle teams: Calyx 60-90s, Echo of War 90-150s, MoC 180-300s.
Consistency Rate: Successful clears vs failures. 90%+ = proper config; sub-80% = fundamental issues. Monitor which scenarios cause failures.
Buff Accuracy: Review 20-30 runs, count Sparkle Skills on main DPS vs others. Optimal: 85-90%; below 75% = positioning/speed problems.
Testing Protocol
Run 10 auto-battle attempts, record clear time/success/accuracy. Adjust one variable, run another 10. Compare to isolate improvements.
Test in Calyx first (consistent enemies/difficulty). Achieve 90%+ consistency, progress to Echo of War, then MoC lower floors.
Record all SPD values. Small changes from relic upgrades/Light Cone swaps disrupt tuned orders. Maintain spreadsheet tracking SPD/position/metrics.
Long-Term Optimization
Reevaluate as roster expands. New limited DPS might outperform current, requiring reconfiguration.
Maintain multiple pre-configured teams (MoC hypercarry, Calyx farming, event) optimized for specific use cases.
Investment Priority
Sparkle 160+ SPD: Baseline for two-actions/cycle. SPD Feet + Sacerdos 2pc first.
Main DPS CRIT DMG: Sparkle's buffs scale multiplicatively. CRIT DMG Body + weapon upgrades.
Sparkle 200+ CRIT DMG: Skill transfers 45% to allies. CRIT DMG Body, Sacerdos 4pc, substats.
Team SPD tuning: Minimal cost (swapping relics), significant consistency gains.
Light Cones: Signature provides CRIT DMG/energy but 4-star alternatives adequate. Prioritize DPS Light Cones.
FAQ
Why does Sparkle use skill on wrong character? AI prioritizes by slot position, not role. Scans slot 1→4, selects first eligible non-Sparkle. Position main DPS slot 3, Sparkle slot 2 for 85-90% correct targeting.
Best team position for Sparkle? Slot 2. Places her early while allowing AI to prioritize slot 3 (main DPS). Slot 1 cycles evenly; slots 3-4 delay actions.
How does speed affect buff timing? Sparkle needs 160+ SPD for 2×/cycle. DPS should be 130-145 SPD, creating 15-25 point differential for predictable turns where Sparkle buffs before DPS acts.
Fix targeting without changing teams? Yes, via repositioning. DPS slot 3, Sparkle slot 2, support slot 1, sustain slot 4. Works with any comp, no character changes. Combine with SPD tuning (Sparkle 160+, DPS 130-145).
Best compositions for auto-farming? Hypercarry with one SP-intensive DPS: Pela/Silver Wolf - Sparkle - Seele/Imbibitor Lunae/Qingque - Luocha/Fu Xuan. For faster Calyx, remove sustain, add second DPS (accept occasional failures for 30-40% faster clears).
How many skill points needed? Sparkle's Talent increases max to 7. Maintain 4-5 SP during combat—enough for DPS Skills while preventing waste from 4 SP Ultimate. Consistently below 3 SP = need more SP-positive characters; maintaining 6-7 constantly = DPS not using Skills enough (positioning/targeting issues).