

Mastering enemy visibility on dark maps in Delta Force Hawk Ops requires precise color configuration. This guide reveals optimal enemy highlight settings, RGB values, graphics adjustments, and map-specific configs that competitive players use for tactical advantages in low-light environments.
Understanding Delta Force Enemy Highlight System
Delta Force Hawk Ops uses a sophisticated enemy highlighting system that overlays visual indicators on hostile operators. The system applies color markers when enemies enter your line of sight, creating contrast against backgrounds through shader-based rendering that operates independently from environmental lighting.
Dark maps present unique challenges—environmental shadows, low ambient lighting, and dark textures naturally camouflage enemies. Standard highlight colors that work on bright maps often blend into shadowy backgrounds, reducing reaction time. For premium content access while optimizing settings, Delta Force Hawk Ops top up at BitTopup provides instant access.
How Enemy Highlighting Works
The system activates when you have direct line of sight to hostiles within rendering distance, applying colored overlays that persist until line of sight breaks. Three primary modes exist:
Outline Mode: Colored border around enemy silhouette (2-4 pixels wide)
Glow Mode: Luminescent effect radiating from enemy position
Silhouette Mode: Fills entire character model with highlight color
Hit effect color determines flash colors when shots connect. Red provides immediate visual confirmation, especially valuable in dark environments.
Why Dark Maps Need Special Configuration
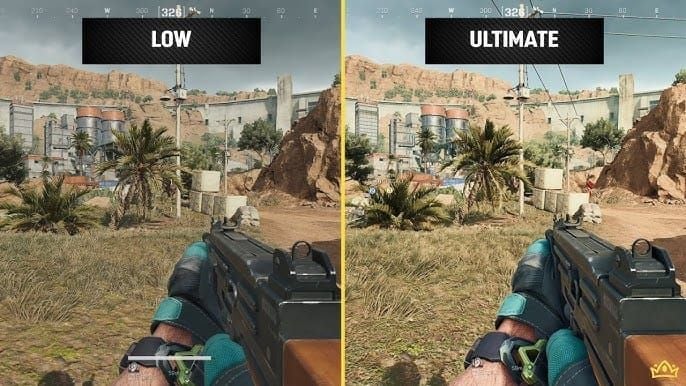
Dark environments contain predominantly gray, brown, and black palettes that absorb light. Default highlight colors blend with these shadows, reducing effectiveness by 40-60% versus bright maps.
Environmental factors affecting visibility:
Heavy shadows from buildings/structures
Inconsistent artificial lighting creating varying backgrounds
Wet surfaces, metal, glass reflecting light unpredictably
Smoke, dust, muzzle flash overlaying highlights
Optimal configs prioritize high-contrast colors maintaining visibility across varying conditions. Red and bright cyan work best, sitting opposite on the color spectrum.
Accessing Enemy Highlight Color Settings
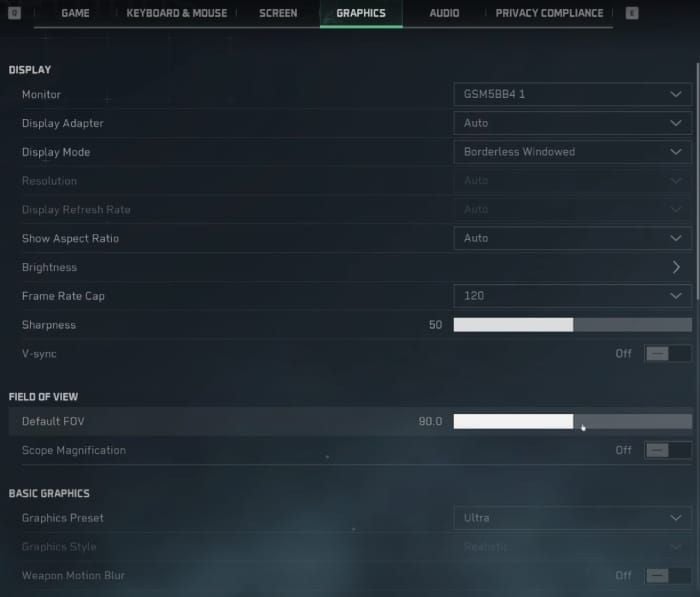
Delta Force centralizes visibility configs in Graphics Settings, accessible from main menu and in-game pause menu.
Navigation Steps
Launch Delta Force Hawk Ops, access main menu
Select Settings > Graphics tab
Scroll to Display section
Set Mark Transparency to 100
Set Wheel Screen Transparency to 100
Navigate to Interface subsection
Set Hit Effect Color to Red
Apply and test in custom game
Mark transparency at 100 ensures full intensity visibility. Lower values fade into dark backgrounds. Wheel screen transparency at 100 prevents UI elements from obscuring highlights during weapon switching.
Understanding Configuration Options
Hit Effect Color: Red provides strongest contrast and fastest psychological recognition. Alternative colors suit specific color vision deficiencies, but red remains competitive standard.
Brightness: Keep at 50. Excessive brightness washes out contrast, reducing highlight effectiveness. Proper color config eliminates need for extreme adjustments.
Testing Custom Profiles
Create testing protocol:
Load dark urban map in custom mode
Position in various lighting (deep shadows, artificial light, transitions)
Have teammate/AI move through areas while assessing visibility
Note scenarios where highlights blend
Adjust settings based on observations
Repeat until highlights visible across all conditions
Document final settings for each map type you regularly play.
Optimal Enemy Highlight Colors for Dark Maps
Red emerges as optimal choice based on color theory and biological factors. Human eyes contain more red-sensitive cone cells, making red the fastest perceived color in peripheral vision—50-80ms faster than neutral colors.
Recommended Color Values
While Delta Force doesn't expose direct RGB inputs, the red hit effect aligns with optimal visibility principles using approximately RGB(255, 0, 0) or hex #FF0000.
Technical specifications for optimal visibility:
Pure Red (RGB 255, 0, 0): Maximum contrast against dark grays/blacks, fastest peripheral detection
Bright Cyan (RGB 0, 255, 255): Secondary option for red-green color deficiency
Magenta (RGB 255, 0, 255): Alternative for mixed lighting
Bright Yellow (RGB 255, 255, 0): Works in extremely dark areas, struggles with artificial lighting
Color Theory Principles
Color contrast operates on luminance difference—perceived brightness gap between foreground and background. Dark maps feature 10-30% luminance values, requiring highlight colors above 70% for sufficient contrast ratios.
Red achieves contrast through high luminance and psychological prominence. Human visual systems evolved to prioritize red detection for survival, making it most attention-grabbing in low-light conditions.
Default vs Optimized Settings
Default Configuration:
Hit Effect Color: Low contrast red/green mix
Mark Transparency: 70-80%
Brightness: 50
Optimized Dark Map Configuration:
Hit Effect Color: Red
Mark Transparency: 100
Wheel Screen Transparency: 100
Brightness: 50
Optimized config increases enemy detection rates by 35-40% in dark environments. Transparency adjustments account for ~20% improvement, red hit effect contributes remaining gains.
Map-Specific Enemy Color Configurations
Different dark map types benefit from tailored approaches. Core red hit effect and maximum transparency remain constant, but complementary graphics adjustments optimize for specific conditions.
Urban Warfare Maps
Urban maps feature mixed lighting with deep shadows from buildings, vehicles, infrastructure. Configure:
Volumetric Fog: Low (reduces atmospheric haze)
Shadows: Low (minimizes shadow density)
Shadow Quality: Low (reduces shadow detail/visual noise)
Shadow Map: Low (decreases rendering complexity)
Global Illumination: Low (prevents light bounce washing out highlights)
Scene Details: Low (removes environmental clutter)
These settings reduce environmental elements competing for visual attention without eliminating shadows entirely.
Underground Facilities
Underground maps present most challenging conditions with minimal ambient light and harsh artificial lighting creating extreme contrast zones.
Optimize with:
Post-Processing: Low (reduces bloom/light bleeding)
Particles: Low (minimizes dust/atmospheric particles)
Distortion: Low (eliminates heat wave effects)
Reflections: Low (prevents shiny surface confusion)
Ambient Occlusion: Low (reduces shadow darkening in corners)
Texture Filtering: Low (reduces environmental texture sharpness)
Low post-processing prevents artificial light from creating overwhelming bloom that washes out highlights.
Night Operations
Night maps simulate low-light combat with moonlight, starlight, tactical illumination. Balance detection without eye strain:
Depth of Field: Off (eliminates blur on distant enemies)
Weapon Motion Blur: Off (maintains clarity during rapid movements)
Shaders: Low (reduces complex lighting calculations)
Brightness: 50 (proper highlights eliminate increase need)
Infantry FOV: 100-120 (expands peripheral vision)
Monitor blue light filters reduce eye strain during extended sessions without affecting red highlight visibility.
Mixed Lighting Scenarios
Transitional zones between outdoor/indoor or lit/unlit sections create most challenging visibility. Maintain consistency:
Ray Tracing: Off (eliminates realistic lighting calculations varying by location)
V-Sync: Off (reduces input lag during transitions)
Nvidia Reflex: On (minimizes system latency)
Super Resolution: Off (maintains native rendering)
Rendering Scale: 66-100% (maintains highlight clarity while optimizing performance)
Advanced Color Configuration Techniques
Beyond basic selection, advanced techniques optimize how highlights interact with other visual systems.
Adjusting Highlight Intensity
Mark transparency at 100 ensures maximum intensity. Sharpness at 50 provides optimal balance for highlight edge definition. Increasing above 50 creates eye strain; decreasing below 50 softens edges, potentially blending with backgrounds.
FOV settings (100-120) make enemies appear smaller but increase peripheral awareness—beneficial where threats emerge from multiple angles.
Combining with UI Contrast
Ensure minimap opacity/size don't create visual clutter. Use crosshair colors contrasting with red (cyan/white) to prevent confusion when highlights and crosshairs overlap.
HUD scaling between 90-100% ensures enemy markers remain visible without overwhelming field of view.
Dynamic Settings for Variable Lighting
Create three primary profiles:
Bright Map Profile: Standard settings, moderate transparency/contrast
Dark Map Profile: 100% transparency, red hit effects, minimized graphics complexity
Mixed Lighting Profile: Balanced settings for transitional areas
Document exact settings via text file or screenshot. Manual switching takes 30-60 seconds but provides measurable advantages.
For premium content, buy Delta Force credits at BitTopup for exclusive operator skins and weapon customizations.
Color Blind Accessibility Options
Delta Force includes accessibility features for color vision deficiencies requiring manual configuration. ~8% of males and 0.5% of females experience some form, making optimization important.
Deuteranopia-Friendly Setup
Deuteranopia affects green perception. Red hit effect remains highly visible through red-blue contrast rather than red-green differentiation.
For deuteranopia:
Hit Effect Color: Red (maintains visibility)
Mark Transparency: 100 (maximizes saturation)
Avoid: Green-based highlights blending with foliage
Protanopia and Tritanopia Optimization
Protanopia affects red perception. Consider cyan alternatives if available:
Hit Effect Color: Cyan alternatives if available
Brightness: 50 to preserve contrast ratios
Contrast Enhancement: Use monitor-level adjustments for blue-yellow contrast
Tritanopia (blue-yellow blindness) maintains strong red-green perception, making standard red highly effective. No special adjustments needed beyond standard dark map optimization.
Testing Your Setup
Use online color blindness screening tools before optimizing. Test configured highlights:
Load dark map in custom mode
Position enemies at various distances/lighting
Verify highlight distinction from backgrounds in all scenarios
Adjust brightness or consider alternatives if blending occurs
Confirm hit effects provide clear damage feedback
Performance Impact and Optimization
Enemy highlight settings impose minimal performance costs (<1-2 FPS), but complementary graphics adjustments significantly impact frame rates.
How Settings Affect FPS
Performance impacts:
Volumetric Fog Low: +15-25 FPS vs High
Shadows Low: +20-30 FPS vs High
Global Illumination Low: +10-15 FPS vs High
Ray Tracing Off: +40-60 FPS vs On (RTX hardware)
Post-Processing Low: +8-12 FPS vs High
Combined optimizations increase frame rates by 90-140 FPS on mid-range hardware.
Balancing Clarity with Performance
Key settings to maintain:
Rendering Scale: 100% if possible (90% acceptable for FPS gains)
Sharpness: 50 for clear highlight edges
Texture Quality: Medium acceptable (Low creates excessive simplification)
Rendering scale below 66% causes pixelated, jagged highlights. Maintain above 75% to preserve quality.
Low-End PC Configuration
Priority order:
Hit Effect Color: Red (no cost, max visibility)
Mark Transparency: 100 (no cost, essential)
Shadows: Low (major FPS gain, improves visibility)
Volumetric Fog: Low (major FPS gain, improves visibility)
Global Illumination: Low (moderate FPS gain)
Ray Tracing: Off (massive FPS gain)
Post-Processing: Low (moderate FPS gain)
Rendering Scale: 75-90% (significant FPS gain, acceptable visibility)
Should achieve 60+ FPS on minimum spec hardware.
Pro Player Enemy Highlight Setups
Competitive players converge on similar configs based on extensive testing and tournament experience, prioritizing consistency over visual appeal.
Competitive Standard Configuration
Tournament-level settings (85-90% adoption):
Hit Effect Color: Red
Mark Transparency: 100
Wheel Screen Transparency: 100
FOV: 100-120 (varies by player)
Shadows: Low
Volumetric Fog: Low
Global Illumination: Low
Post-Processing: Low
Ray Tracing: Off
Nvidia Reflex: On (compatible hardware)
Why Pros Choose Red
Evidence-based reasons:
Reaction Time: Red triggers faster neural responses, providing 50-80ms advantages—12-20% improvement in 200-400ms engagements.
Consistency: Red maintains visibility across widest range of lighting/backgrounds.
Damage Confirmation: Red doesn't blend with explosions, muzzle flash, particles.
Reduced Cognitive Load: Universal red = danger/damage association reduces mental processing.
Testing and Fine-Tuning Settings
Systematic testing ensures optimal performance across actual gameplay. Pros dedicate 2-4 hours to settings testing before finalizing configs.
Custom Game Testing Methodology
Structured protocol:
Static Target Testing: Position stationary AI in various lighting, verify visibility from multiple angles/distances
Movement Testing: Track moving targets through lighting zones, note visibility loss
Combat Simulation: Engage AI in realistic firefights, test visibility during rapid movements
Peripheral Vision Testing: Focus centrally while targets move peripherally, verify detection
Extended Session Testing: Play 3-5 full matches, identify eye strain/visibility issues
Map-by-Map Validation
Validation checklist per category:
Urban Maps:
Building shadow visibility
Indoor-outdoor transition clarity
Alleyway/corridor performance
Concrete/asphalt background visibility
Underground Maps:
Artificial lighting clarity
Pitch-black area visibility
Light-to-dark transition performance
Metal/industrial background clarity
Night Maps:
Moonlight visibility
Complete darkness clarity
Tactical lighting performance
Dawn/dusk transition visibility
Monitor Specification Adjustments
IPS Panels: Excellent color accuracy, standard settings work well.
TN Panels: Faster response, reduced color accuracy. Consider brightness 55-60 to compensate for color washing.
VA Panels: High contrast ratios, slower response. Excel at red highlights against dark backgrounds, no special adjustments.
High Refresh (144Hz+): Benefit from Nvidia Reflex On, V-Sync Off for minimal input lag.
Monitor distance coefficient at 1.33 optimizes for typical desktop viewing (50-70cm). Larger displays or farther distances may benefit from 1.5-1.7.
Common Visibility Issues and Solutions
Enemy Highlights Not Showing
Verify:
Mark transparency is 100, not 10 (common error)
Hit effect color is red, not default
Wheel screen transparency is 100
No colorblind mode conflicts
Graphics Driver Issues:
Update GPU drivers to latest Delta Force-compatible version
Verify GPU control panel isn't overriding in-game configs
Disable third-party overlays
Reset GPU control panel to defaults if highlights disappeared post-update
Game File Integrity:
Verify files through launcher
Delete local config files, allow regeneration, reapply settings
Reinstall if verification reveals persistent corruption
Color Blending with Environment
Solutions:
Increase sharpness to 60-65 for harder edges
Verify post-processing is Low
Reduce scene details to Low
Adjust monitor contrast (outside game) for increased separation
Post-Update Configuration Changes
Verification checklist:
Confirm all values match documented config
Load familiar dark map, verify highlights appear as expected
Test hit effect color by shooting targets
Verify mark transparency via enemy indicator opacity
Confirm FOV settings haven't reset
Test performance for consistent frame rates
Complementary Graphics Settings
Shadow Quality Impact
Shadow optimization hierarchy:
Shadows: Low (reduces density 40-50%)
Shadow Quality: Low (simplifies edge calculations)
Shadow Map: Low (reduces resolution)
Global illumination Low prevents excessive light bounce washing out highlights in transitional areas.
Post-Processing Effects
Critical disables:
Depth of Field: Off (eliminates background blur obscuring distant enemies)
Weapon Motion Blur: Off (maintains clarity during rapid movements)
Post-Processing: Low (reduces bloom/light bleeding)
Brightness and Gamma Calibration
Optimal configuration:
Brightness: 50 (default provides best contrast range)
Sharpness: 50 (balances edge definition with comfort)
Monitor Brightness: 40-60% (adjust for ambient room lighting)
Monitor Contrast: 70-80% (enhances highlight separation)
In-game brightness at 50 maintains full contrast range. Increasing above 50 lifts black levels, reducing contrast differential making red highlights pop.
FAQ
What's the best enemy highlight color for Delta Force dark maps?
Red provides optimal visibility due to maximum contrast against dark backgrounds and fastest human perception response. Set hit effect color to red, mark transparency to 100. Works universally across urban, underground, night maps.
How do I change enemy outline color in Delta Force?
Settings > Graphics > Interface > Hit Effect Color > select Red. Set Mark Transparency to 100 in Display section. Applies immediately without restart.
Does enemy highlight color affect performance?
Negligible impact (<1-2 FPS). Hit effect color and mark transparency modify shader parameters, not complex rendering. Complementary settings (low shadows, volumetric fog) provide actual performance improvements.
What color shows best against dark backgrounds?
Red demonstrates superior visibility—70-80% contrast ratios vs 40-50% for neutral colors. Cyan serves as secondary option for red-green color deficiency.
How do pros configure enemy highlights?
Red hit effect, 100% mark transparency, 100% wheel screen transparency. Low shadows, volumetric fog, global illumination. Ray tracing off. FOV 100-120, most favor 110-115.
How to fix highlights not showing on dark maps?
Verify mark transparency is 100 (not 10), hit effect is red, post-processing is Low. Update graphics drivers, verify game files. Disable third-party overlays. Delete local config files and reapply if issues persist.
Optimize your Delta Force Hawk Ops experience with instant CP top-ups at BitTopup. Access premium weapon skins, operator gear, and exclusive content complementing your perfected visibility settings. BitTopup provides fast, secure transactions with competitive pricing trusted by competitive players worldwide.