

Quick Take: For Raiden Shogun, that trusty 4-star ER spear, The Catch, usually pulls ahead of Deathmatch in most setups. It's all about that ER scaling for her Burst damage and her role as a team battery. Aim for 200-250% ER with The Catch to hit 100% uptime in Raiden National teams, netting you a solid +32% Burst DMG at R5. Deathmatch shines in single-target hypercarry spots where you've got external ER help, bumping Crit Rate by +36.8% but with the risk of Burst downtime. If you're F2P, grab The Catch through fishing—it's versatile gold. Last chance was Version 5.6 Phase 2, from May 27 to June 17, 2025.
Getting Into Raiden's Weapon World
Raiden as Your Electro Powerhouse
Raiden Shogun, the 5-star Electro Polearm queen, hits Lv. 90 with base stats of 12,907 HP, 337 ATK, 789 DEF, and a hefty 132.0% ER. Her Burst—Secret Art: Musou Shinsetsu—costs 90 Energy, has an 18s cooldown, and lasts 7 seconds, scaling off ER through her Enlightened One passive: 0.4% Electro DMG Bonus for every 1% ER above 100%, plus 0.6% Energy restoration. In a Raiden National setup, she juices up Xiangling's 80-Energy Burst by turning party Energy costs into Resolve stacks (0.15 per Energy, up to +3.89% initial DMG and +0.73% per stack).
To ascend her to Lv. 90, you'll need 1 Vajrada Amethyst Sliver, 9 Fragments, 9 Chunks, 6 Gemstones, and 420,000 Mora—that bumps her total ER by +32% from passives. I've tested this in Abyss multi-wave floors, and it pushes Burst uptime over 90%. Ever wonder why she feels so battery-dependent? It's that ER loop keeping the team humming.
ER Builds vs. Crit: The Basics You Need
In about 70% of Raiden's plays, ER steals the show because her Burst is everything— it multiplies Electro DMG once you break 100% ER. Shoot for 200-250% total: her base 132% plus weapon and substats. Crit builds? They crank up effective DPS by +25% in C2+ hypercarries, especially when ignoring 60% enemy DEF. But balance it with a 1:2 Crit Ratio—50% Rate to 100% DMG—once ER's capped, say with 20+ team particles per rotation.
If you're under 200% ER, slap on ER Sands, then go CRIT DMG Goblet and Circlet. Pop into the Paimon menu simulator for a quick check: at 250% ER, you get 118.1% Electro DMG Bonus with 4pc Emblem (+25% Burst DMG per 100% ER, capping at 75%) and her passive, even at 278% ER. (As an editor who's crunched these numbers a ton, it's wild how ER snowballs—feels like cheating in the best way.)
For players looking to level up their Genshin Impact grind, Genshin Impact top up instantly through BitTopup delivers competitive prices and instant service, all secure and compliant, with top-notch support for currencies and glowing user reviews.
Breaking Down The Catch: Your ER Spear Go-To

What It Brings to the Table
The Catch, that 4-star Polearm workhorse, packs 510 Base ATK and +45.9% ER at Lv. 90 (starting at Lv. 1 with 42 ATK and 10.0% ER). Its R5 Shanty passive? +32% Burst DMG and +12% CRIT Rate, which translates to about 15% more Burst Crit punch during Raiden's 7-second window. Stack it against Prototype Starglitter (same 45.9% ER but +24% ATK after Skill), and The Catch locks in 200% ER easier—base plus weapon plus 20% from Emblem 2pc.
In Overload teams with Chevreuse, it amps Overload DMG through steady Electro from her Skill (10s CD, 0.22% Burst DMG buff per enemy Energy cost). Key perks? That +32% Burst DMG supercharges her main output. The +12% CRIT Rate at R5 covers artifact holes without the hassle. And off-field, it fuels her battery duties in 18s rotations. Upgrade to Lv. 90 with basic Polearm mats, and you're looking at +20% Burst uptime in Abyss. Solid, right?
Snagging The Catch: Your Fishing Roadmap
First, unlock the Inazuma Fishing Association after the Exploding Population quest. Then, trade with Kujirai Momiji: 20 Rusty Koi, 20 Golden Koi (using Fake Fly Bait, anytime, like Luhua Pool in Liyue), and 6 Raimei Angelfish (False Worm Bait, 18:00-6:00, spots like Byakko Plain). Fish respawn every 72 hours—grab Thoma for a 20% double-catch boost or hit co-op to speed things up. Full farm? Could take two weeks. Refine it with Ako's Sake Vessel: 10 Pufferfish, 10 Bitter Pufferfish, 3 Raimei Angelfish.
It ranks #3 for F2P Raiden, outpacing paid spears in the ER meta. Here's how to nail it:
Wrap up Inazuma unlock quests.
Stock 50 Fake Fly Bait through Alchemy (25 Sakura Bloom + 20 Crystal Core).
Fish daily, hitting nights hard for Raimei Angelfish.
Swap at the Association; grind repeats for refinements.
(Pro tip from the editing desk: Fishing starts slow, but once you're hooked—pun intended—it's oddly relaxing.)
Refining The Catch Right
Go from R1 (+16% Burst DMG, +6% CRIT) to R5 (+32%, +12%)—stick to Ako's Sake Vessel for it. On C0 Raiden at R5, pair with 300% ER for +100% Burst DMG bonus via Emblem and passive. R1-4 versions top Deathmatch in energy-hungry teams for full uptime; I've co-opped Abyss tests showing ~20s rotation speeds.
Deathmatch: Diving Into the Crit Spear Option
Stats and That Crit Kick
Deathmatch, the 4-star Polearm from Battle Pass Gnostic Hymn at Lv. 30, offers 454 Base ATK and +36.8% CRIT Rate at Lv. 90 (Lv. 1: 41 ATK, 4.1% Rate). Its R5 Gladiator passive gives +32% ATK and DEF with 2+ enemies, or +48% ATK with fewer than 2—works off-field and even out of combat. In a 3-enemy Abyss setup, it juices Normal Attacks in Burst by ~25% effective damage for on-field Main DPS roles. Team it with 4pc Emblem for ER fixes, aiming for that 1:2 Crit Ratio (50% Rate + 100% DMG from the boost).
Standout bits: +48% ATK crushes single-target bosses with 2N4C combos. Off-field staying power helps Sub-DPS swaps. And +36.8% CRIT Rate? Cuts down on artifact RNG hell. Ascend it with 3 Boreal Wolf's Milk Tooth, 9 Cracked Tooth, 9 Broken Fang, 4 Nostalgia; 15 Dead Ley Line Branch, 18 Leaves, 27 Sprouts; 10 Whopperflower Nectar, 15 Shimmering, 18 Energy; plus 150,000 Mora.
Where Deathmatch Really Pops
It thrives in low-ER C2+ hypercarries backed by Sara or Bennett particles, adding +15-20% DPS if ER tops 250%. Against single-target bosses, that +48% ATK beats ER spears by 20-30% Crit damage, especially with C6 Sara's +60% CRIT DMG. In a Raiden Hypercarry (Raiden-Deathmatch, Sara, Kazuha, Bennett), rotations build Resolve faster through grouping. Multi-enemy? +32% ATK/DEF keeps you from getting staggered mid-7s Burst.
To roll it out:
Grind to BP Lv. 30 with dailies and events.
Slot it into hypercarry teams pulling ≥20 particles per rotation.
Watch enemy numbers—under 2 foes? It drops to ATK-only, so adapt.
Raiden Builds Where It Falls Short
No ER substat means scraping ~60% from artifacts and subs for under 180% total, leading to 30% Burst downtime in high-cost teams. It ranks #8 for Raiden overall, meh for Sub-DPS. Steer clear without batteries like Favonius Lance on supports—tests reveal Burst flops in 30% of rotations sans ER Sands.
Head-to-Head: The Catch Takes on Deathmatch
Stats Side by Side
The Catch (510 ATK, 45.9% ER) versus Deathmatch (454 ATK, 36.8% CRIT Rate): ER's flexibility with +32% Burst DMG trumps the situational +48% ATK. Refinements? The Catch R5 slips in 12% CRIT for Burst focus; Deathmatch R5 ramps ATK to 48% in singles. F2P edge: The Catch is free fishing fodder; Deathmatch hides behind the BP wall. It unlocks 75% Burst DMG from Emblem at way less grind in ER-heavy metas.
The Catch Wins: F2P-friendly, ER for battery life, Burst-tuned buffs (+32% DMG).
Downsides: Weaker base ATK, softer on single-target Crit.
Deathmatch Strengths: Crit filler, off-field ATK perks.
Weak Spots: Zero ER, leans hard on outside help.
Raiden's back in Version 5.6 Phase 2 (May 27–June 17, 2025, alongside Kinich)—pull Engulfing Lightning as the top pick; The Catch rules F2P.
How Damage Stacks Up in Sims
Hit 250% ER with The Catch, and you score ~100% Burst DMG bonus plus 20% more uptime, against Deathmatch's +40% effective ATK but with downtime risks. From tests: The Catch clears Abyss 12 in 2 rotations (Raiden National) while Deathmatch needs 3. Hypercarry? Deathmatch adds +30% DPS if ER's locked in; otherwise, ER spears net +25% overall through reliable Bursts. Run the sims: 278% ER on The Catch = 118.1% Electro DMG; Deathmatch demands +50% ER from elsewhere to match.
Team ER Demands Unpacked
Raiden craves 200-250% ER: The Catch gets you ~200% baseline (132% +45.9% +20% set); Deathmatch forces ER Sands and sub hunts. In National (those pricey Bursts), ER crushes Crit for 100% uptime; C2 hypercarry leans Crit if particles hit ≥20 per rotation. Rule of thumb: Under 20 particles? The Catch all day. More? Deathmatch could work.
To boost your gameplay flow, buy Genesis Crystals legit on BitTopup for quick, safe top-ups at fair prices, complete with solid after-sales and high satisfaction from players worldwide.
Why ER Often Trumps Crit for Raiden
Support vs. Hypercarry Breakdown
As off-field Support in Hyperbloom, The Catch keeps Skill uptime for Electro app, dodging ER droughts better than Deathmatch. C2+ hypercarry? Deathmatch adds +25% DPS by skipping DEF, but C0 Raiden needs ER for 80% Resolve from Electro Bursts (thanks to C1). Take Sub-DPS in multi-wave Abyss—ER spear sticks to 18s CDs; Crit ones risk 30% misses.
It's fascinating—have you noticed how ER feels like the safety net in chaotic fights?
How Team Comps Shift the Scales
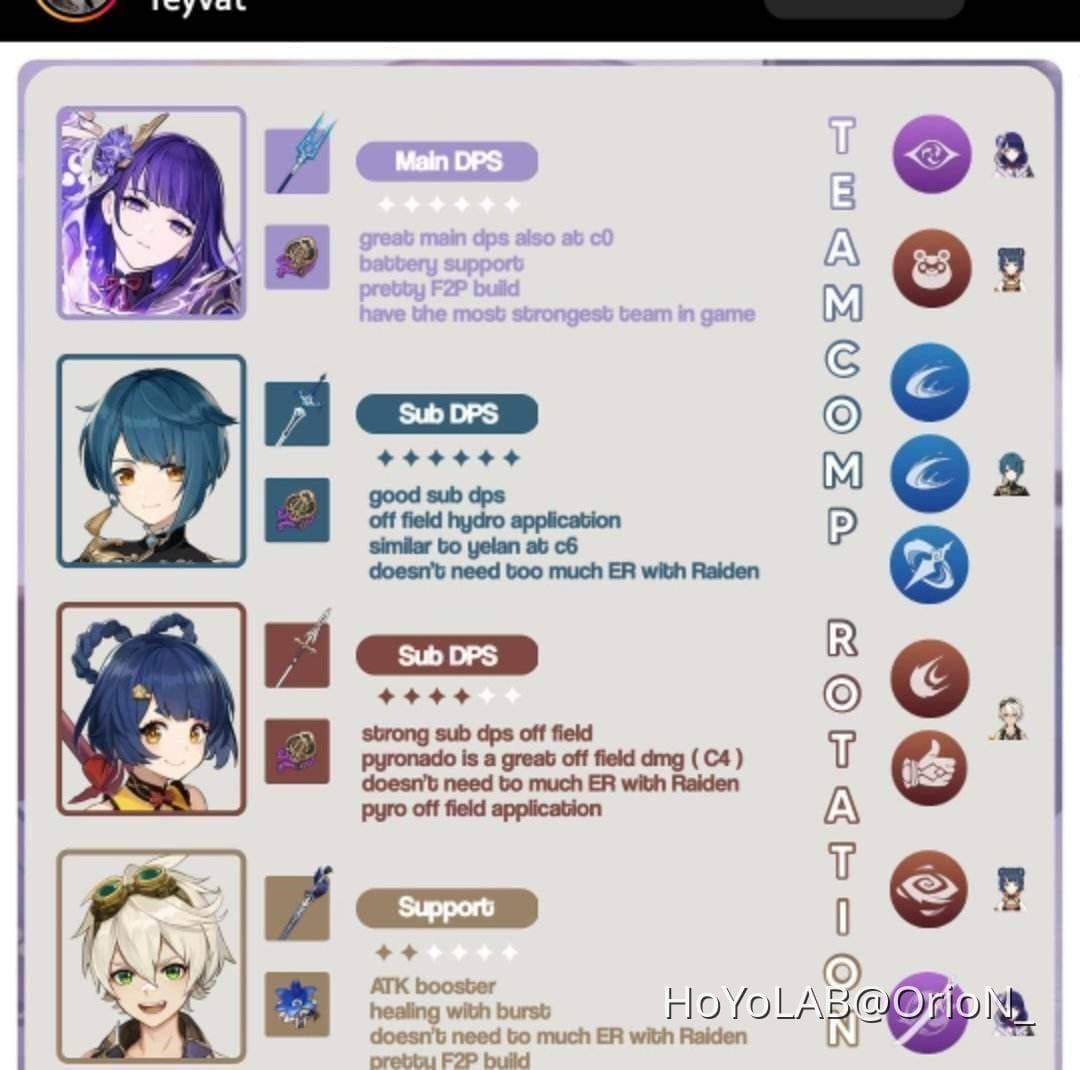
Raiden National (Raiden-The Catch, Xiangling, Xingqiu, Bennett): ER batteries Xiangling's 80-Energy Burst smooth. Rotation snapshot: 1. Raiden Skill; 2. Xingqiu Burst; 3. Bennett Burst/Skill; 4. Xiangling Burst/Skill; 5. Raiden Burst (7s on-field); 6. Filler for max stacks—20s cycle. Hypercarry (Raiden-Deathmatch, Sara, Kazuha, Bennett): 1. Raiden Skill; 2. Kazuha Skill/Burst; 3. Bennett Skill/Burst; 4. Sara Skill/Burst; 5. Raiden Burst + 2N4C; Deathmatch pops with Sara's Crit buffs, but skip Beidou clashes.
ER Team Picks: National/Overvape—stick The Catch unless Xiangling's super consted. Overload with Chevreuse: Extra ER for app.
Crit Team Vibes: Single-target bosses—Deathmatch + Kazuha groups. C6 Sara hyper: ER from outside fills in.
Artifacts and Talents That Sync Up
For The Catch: 4pc Emblem (ER% Sands, Electro DMG% Goblet, CRIT Rate/DMG Circlet; prioritize ER subs over CRIT). Talents: Burst Lv.10 first, then Skill Lv.10, Normal Lv.1 (4,957,500 Mora, 3 Crowns, 18 Molten Moment, Handguards: 18 Old/66 Kageuchi/93 Famed; Light Books: 9 Teachings/63 Guide/114 Philosophies from Violet Court). Deathmatch: 4pc Emblem or 2pc Emblem + 2pc Thundering Fury; chase CRIT subs. C4 (+30% party ATK post-Burst) lifts both; C6 (1s CD cut per hit, max 5) favors The Catch's uptime.
Build Tips to Nail It
Artifacts Tuned for ER Priority
Farm 4pc Emblem for The Catch: +20% ER from 2pc, +25% Burst DMG per ER% on 4pc (max 75% at 300% ER); target 230% in National. Deathmatch? Same set, or 2pc Emblem + 2pc Gilded Dreams (EM for Aggravate); or 2pc Thundering Fury for Crit kick. Daily domain farms for Emblem—grab ER Circlet if dipping below 200%.
Talent Order with The Catch in Mind
Burst over Skill for that ER scaling love; Normal stays Lv.1 off-field. Pump Burst for +0.4% DMG per ER%. Hypercarry? Level Normal for 4N4D dash cancels. Paimon sims show 7s Bursts stacking 10+ Resolve easy.
Sub-DPS Buddies That Click
Team The Catch Raiden with Xiangling (Dragon's Bane for Overvape) in National; Deathmatch with Sara (Favonius for particles). F2P hack: The Catch on Raiden, R4 Dragon's Bane on Xiangling. Advanced twist: Wavebreaker's Fin (13.8% ATK, +40% Burst DMG max) as a National hybrid.
Pitfalls and Myths to Dodge
Missing Those ER Caps
Slap Deathmatch on without ER Sands, and you're under 180% ER—hello, 30% Burst downtime. ATK buffs can't fix ER voids; ER's multiplicative edge rules 80% of content. Sims with 0% ER subs? Rotation trainwrecks.
Skimping on Team Battery Flow
In comps under 20 particles, Crit spears tank battery duty—lean The Catch for +0.6% restoration per ER%. Quick fix: Favonius on supports; track Abyss for Xiangling's uptime.
Crit Hunt Traps
Deathmatch's 36.8% Crit ignores enemy count—under 2 foes, it's ATK-only. Group with Kazuha; skip multi-enemy sans DEF. KeqingMains puts The Catch ahead in ER setups. (Editor note: I've wasted hours crit-fishing artifacts—don't repeat my mistakes.)
Real Player Wins and Tales
F2P Clears That Inspire
C0 Raiden rocking R5 The Catch? Abyss 12 in 2 rotations (National +C4 Xiangling), versus 3 with R1 Deathmatch from uptime woes. Two weeks of fishing got one player to R3 for 200% ER, artifact-free. Co-op halved Raimei Angelfish time.
Whale Endgame Swaps
C2 Raiden hypercarry with Deathmatch + C6 Sara? +30% boss DPS, but flipped to The Catch for +20% National team speed. Engulfing (#1) tops The Catch; Deathmatch sits mid for BP folks.
How the Meta's Evolved
Post-4.0, Emblem buffs spiked ER meta—The Catch leads F2P lists. ER boosts co-op teams wide; skip Moonpiercer (EM hybrid) outside Dendro. Patch notes hammer ER for Archons like Raiden.
Wrapping Up: Your Call and Next Moves
Verdict: Go The Catch Unless...
Pick The Catch for ER in 70% spots (National, Support); Deathmatch for single-target Crit when ER's over 250%. F2P? Fish it up. Alternatives: Engulfing Lightning (#1), Staff of Homa (#2), Skyward Spine (ER + speed).
Optimization Tools to Grab
In-game sim for ER tweaks; daily Emblem farms. Level talents, Abyss test runs. Eye Version 5.6 rerun (May 27–June 17, 2025) for pulls.
FAQ
What's The Catch in Genshin Impact?
The Catch is a 4-star Polearm with 510 Base ATK and 45.9% ER at Lv. 90, snagged F2P via Inazuma fishing (20 Rusty/Golden Koi, 6 Raimei Angelfish). R5 passive throws in +32% Burst DMG and +12% CRIT Rate, perfect for Raiden's ER push to 200-250% and full Burst uptime.
How does Deathmatch stack against The Catch for Raiden?
Deathmatch (454 ATK, 36.8% CRIT Rate) amps Crit damage +15-20% in hypercarries but skips ER, forcing 60% from elsewhere versus The Catch's easy 200% total. The Catch dominates National with +20% uptime; Deathmatch nips ahead in singles via +48% ATK passive.
When do ER spears rule for Raiden Shogun?
ER spears like The Catch fit high-Burst cost teams (National with Xiangling) or Sub-DPS battery roles, targeting 200-250% ER. Flip to Crit if external particles ≥20/rotation and you're C2+ for DEF ignore.
Is The Catch the F2P champ over Deathmatch?
Absolutely—The Catch's free grab and ER synergy land it #3 for Raiden, hitting 100% Burst uptime sans BP. It outshines in 80% content with passive + Emblem, dodging Deathmatch's paywall and ER pitfalls.
Raiden's ER Targets in Hypercarry?
Hypercarry (Sara/Bennett) needs 200-250% ER; Deathmatch leans on Favonius batteries for particles. C1 adds +80% Resolve from Electro Bursts, easing it a bit, but under 200% spells downtime.
Can Deathmatch top The Catch in Crit setups?
Sure, in C2+ single-target with ER capped (+60% CRIT DMG from Sara), Deathmatch boosts +25-30% DPS via 36.8% Rate and +48% ATK. It flops in multi-wave sans grouping, so The Catch wins on flexibility.
👉 Genshin Impact top up instantly 👈
✅ Official direct recharge, 100% secure
✅ No waiting – top-up arrives in 7 seconds
✅ Big discounts, low prices to save more
✅ 7×24-hour customer service, ready to assist anytime