

Metro Royale 4.1 introduces enhanced Fame farming through strategic early-game routes. This guide covers optimal spawn selection, loadout value under 600k Metro Cash, and three proven strategies yielding 2-3 million profits in 10-12 minutes with 70%+ survival rates.
Understanding Metro Royale 4.1: What Actually Changed (And Why It Matters)
Let's be honest – Metro Royale 4.1 Chapter 29 isn't just another incremental update. It completely rewrites early-game strategy, and if you're still playing like it's the previous version, you're leaving serious money on the table.
The Fame system overhaul hits different now. Seven Honor tiers from Adventurer to Legend actually mean something beyond bragging rights. You're earning rewards through player defeats, successful extractions, and those Honor items from supply crates that everyone used to ignore. Here's what caught my attention: weekly missions requiring just 60 minutes cumulative survival provide consistent Honor Medal rewards that don't eat up precious backpack space. That's... actually brilliant design.

Snow Crates randomly spawning in frozen areas? Game changer. Combined with Ghost Crates, we're seeing value-per-minute ratios that make those first 10-12 minutes absolutely critical. Miss this window, and you're basically playing catch-up the entire match.
The Lock Box system deserves special mention here. Secure storage for valuables like gold bars and rare materials means items won't drop when you inevitably get third-partied. This enables calculated plays in high-risk areas that were previously suicide missions.
New Features Worth Your Attention
Command Post improvements include increased daily gifting limits – finally! – and continued post-max favorability returns. The 1v1 custom settings let you practice specific scenarios without burning through your main account's resources.
Weekend Market events offering 20-30% enhanced sell prices Friday through Sunday create strategic timing opportunities. I've been holding major sales for weekends, and the difference is substantial.
Regional competition through real-time leaderboard tracking across four categories (Earnings, Enemies Eliminated, Fame/Honor points, Zombie elimination) adds a competitive edge that keeps things interesting beyond personal progression.
Strategic Spawn Point Selection: Location, Location, Location
Here's where most players mess up immediately. Spawn selection isn't just about avoiding early fights – it's about positioning for the entire early-game circuit.
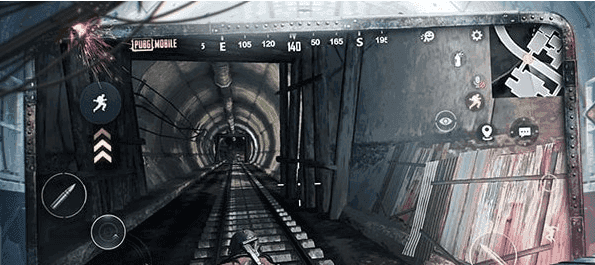
Low-encounter areas like Garnet Maison, Dock House, and the Tin Lake/Lana region provide ideal starting positions. Why? Immediate Black Market access, predictable low-risk Roaming Thieves, and multiple rotation options based on those randomly generated Underground Railway lines.
The Underground Railway spawns 2 of 4 possible lines per match. You can only see them near entrance points, so scout immediately after spawning. Lines connecting School, Power Plant, Garnet Maison, and Mason Station offer the highest strategic value due to access to multiple high-tier loot zones.
High-Value Spawn Locations That Actually Work
Garnet Maison serves as the perfect starting point for what I call the Misty Port Industrial Sweep route. This 1700x900m area provides low encounter rates while offering Bounty Missions that mark boss locations. Dock House offers similar advantages with additional Black Market access for immediate gear assessment.
Tin Lake and Lana regions excel for Cash Farming Circuit approaches. Consistent Roaming Thief spawns provide early gold bars and refined components with minimal combat risk. Weather conditions significantly impact spawn viability – fog provides enhanced stealth, while rain muffles audio cues that could give away your position.
Optimal Early-Game Route Planning: Three Strategies That Work
After extensive testing (and plenty of expensive failures), three primary strategies dominate Metro Royale 4.1 early-game optimization:
Route 1: Misty Port Industrial Sweep targets that massive 1700x900m industrial zone with systematic coverage. Spawn at Garnet Maison or Dock House, secure early loot, utilize subway tunnels and zip lines for Maintenance Room access, then push Radiation Zone or conduct final Black Market sales before extraction.
Route 2: Cash Farming Circuit emphasizes gold bars and refined components over bulky gear. Target Roaming Thieves at Tin Lake/Lana for low-risk accumulation, followed by systematic 3-4 high-tier crate circuit. Perfect for solo players under strict time constraints.
Route 3: Underground Railway Optimization leverages transportation advantages for rapid zone transitions while maintaining stealth positioning.
Conservative Route Strategies (My Personal Favorite)
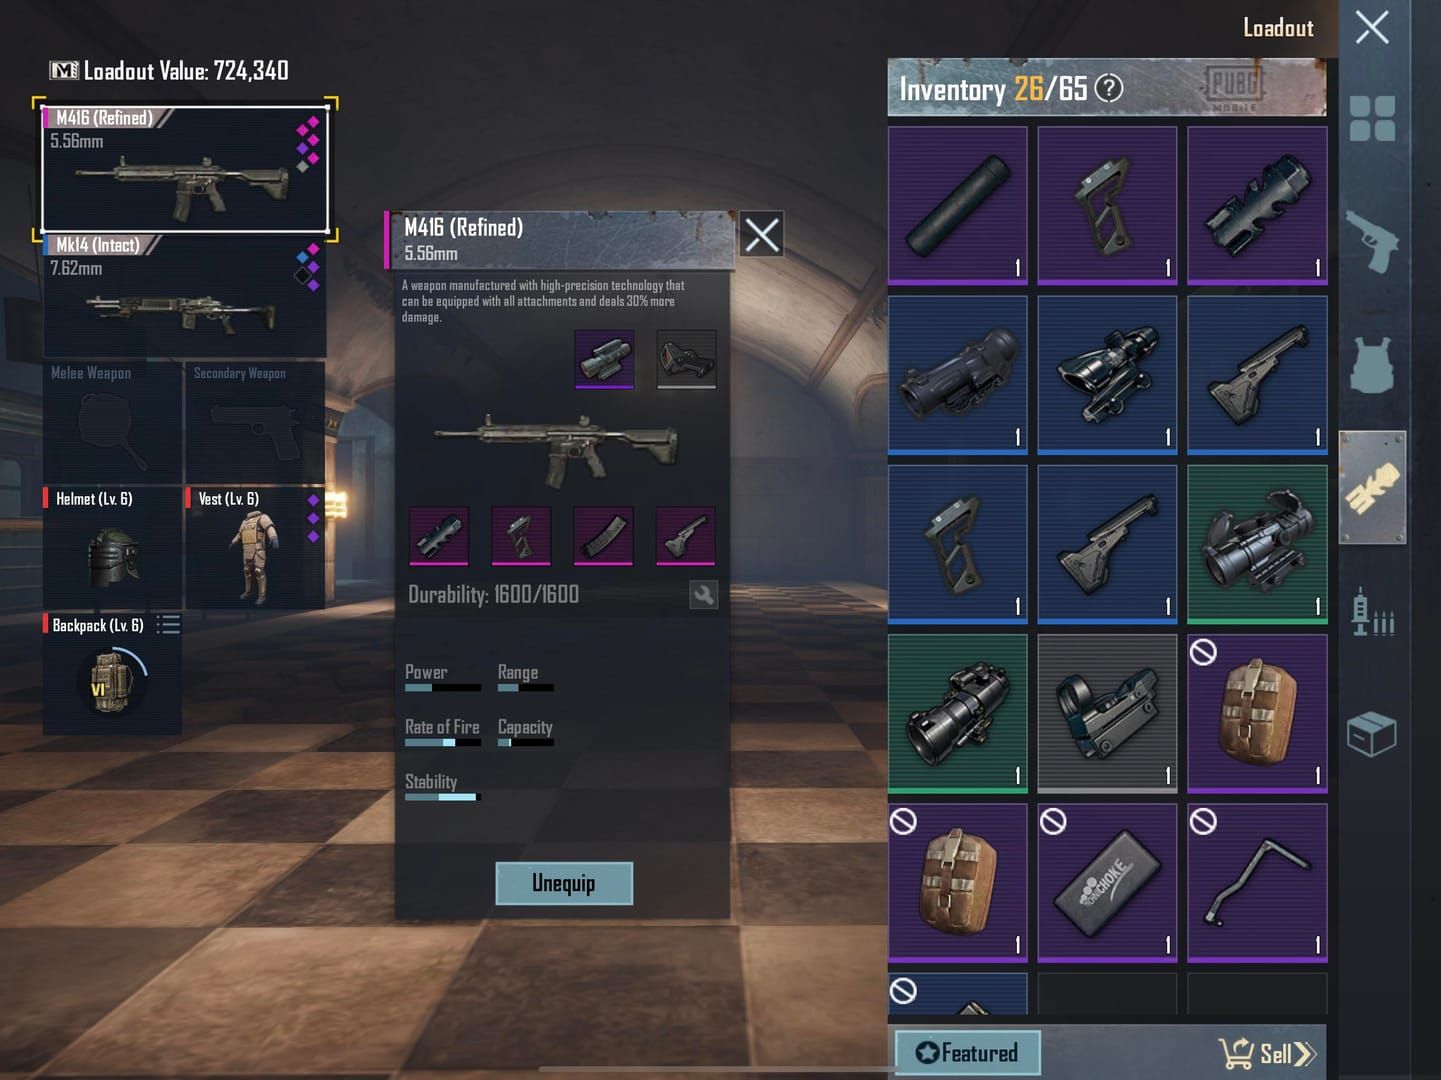
The Cash Farming Circuit represents the most conservative approach, maintaining loadout values under 600k Metro Cash for favorable matchmaking. Here's the optimal configuration I've been running: Level 7 refined armor, Level 6 helmet, AUG or M416 primary weapon, Level 2-3 tactical backpack, 3-4 smoke grenades, 1-2 flashbangs.
This setup consistently yields 2-3 million Metro Cash per 10-12 minute run targeting 3-4 high-tier crates. The key? Extract at the 10-12 minute mark to avoid that brutal 300% increase in player encounter rates.
Deploy Evacuation Flare Guns for helicopter extraction when carrying loads exceeding 2 million Metro Cash value. Trust me on this one.
Aggressive Fame Farming Routes (High Risk, High Reward)
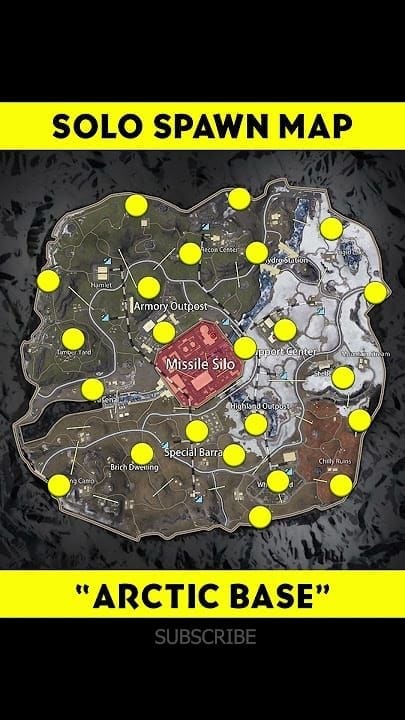
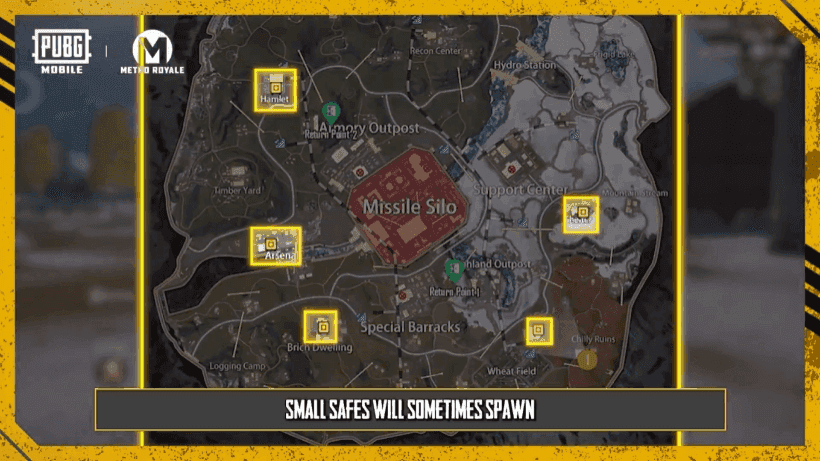
Fame farming hotspots include Underground Railway Maintenance Rooms and boss areas like Arctic Base (Missile Silo, Armory Outpost). Eliminating Juggernauts and bosses yields substantial Honor points alongside valuable loot.
Juggernaut encounters require specific tactics: target drones first, then use flanking maneuvers while avoiding LMG fire to access Gold Bars and Epic gear. Arctic Base encounters feature Hunter units and Dr. X at the radiation core, dropping Genetic Codes for Incubation Chamber loops.
Advanced players achieve 5-8 million Metro Cash profits through skilled execution. For consistent success in these challenging scenarios, players can recharge PUBG UC bundle through BitTopup's reliable platform, offering competitive pricing, fast processing times, and excellent customer support for maintaining competitive loadouts.
Fame Farming Techniques and Hotspots: Where the Real Money Is
Fame accumulation operates through multiple vectors rewarding both PvE and PvP engagement. The system emphasizes consistent participation over sporadic performance – which honestly makes more sense than the old feast-or-famine approach.
The Contaminated Zone in the northeast foggy corner offers specialized Fame farming through Radiation Caches containing epic loot. Equip Rad Shields providing 3 minutes protection against mutants' armor-tearing attacks. Shotguns prove most effective here, while Nuclear Batteries trade for 500 coins each.
School and Power Plant boss encounters (Fire Joy/Fire Roy) integrate perfectly with Ghost Crate farming for comprehensive Fame accumulation. Underground Railway Maintenance Rooms provide premium Fame farming due to Juggernaut guards and Epic gear rewards.
Efficient Farming Patterns
Systematic circuit planning maximizes Fame accumulation within that critical 10-12 minute window. Prioritize early-game boss encounters when competition remains minimal, then transition to extraction-focused strategies as player convergence increases.
The 7-tier Honor system requires consistent point accumulation rather than sporadic activities. Supply crate Honor Medal farming provides consistent progression without direct combat – perfect for players who prefer strategic gameplay over constant fighting.
Loadout Value Assessment: The 600k Rule
Here's something most guides won't tell you: loadout optimization centers on maintaining total gear value under 600,000 Metro Cash for favorable matchmaking brackets. This prevents placement into lobbies with million-credit opponents while enabling high-value zone access.
Level 7 refined armor and Level 6 helmet provide essential protection while remaining cost-effective. Primary weapon selection should prioritize stability and mobility – AUG and M416 represent optimal choices.
3-4 smoke grenades enable emergency retreats. 1-2 flashbangs provide enemy disorientation. Evacuation Flare Gun serves as premium extraction insurance, summoning helicopter transport in 3 minutes.
Weapon Tier List and Values (The Truth About Ammunition)
Here's what surprised me: ammunition quality significantly outweighs weapon tier in damage calculation. Low-tier weapons with premium ammunition consistently outperform high-tier weapons using basic rounds.
Refined AUG configurations with premium ammunition demonstrate superior performance compared to exquisite weapons using standard rounds. Allocate approximately 200 rounds of high-quality ammunition for sustained engagements.
Equipment ROI Analysis
Budget loadout analysis reveals optimal configurations achieving 625% ROI on 2.5 million Metro Cash extractions versus premium setups achieving 400% ROI on 3.2 million extractions. When adjusted for 70% survival rates, budget configurations maintain 280% net returns.
The Lock Box system eliminates insurance requirements for stored items, enabling risk-free accumulation of valuable materials. Value-per-slot assessment drives optimal loot prioritization: gold bars provide maximum density, followed by rare materials and Fabled items.
Risk Management: Staying Alive When It Matters
Early-game risk management requires systematic threat assessment and contingency planning. Primary risks include rat encounters (stealth players ambushing from corners and extraction points), Juggernaut confrontations, and player convergence beyond the 12-minute threshold.
Rat countermeasures demand immediate engagement upon suspicion. Use audio cues for footsteps and breathing patterns – they're more reliable than visual confirmation in most situations.
Extraction timing becomes critical as encounter rates increase 300% after 12 minutes. Deploy Evacuation Flare Guns for helicopter transport when carrying loads exceeding 2 million Metro Cash.
PvP Engagement Decision Framework
Engagement decisions follow systematic evaluation: threat level, current loot value, remaining extraction time, available escape routes. Players carrying high-value loads should prioritize avoidance over confrontation.
Ladder climbing vulnerability requires immediate jump button response when detecting threats, then reposition using smoke coverage or Adrenaline Syringe speed boosts.
Escape Route Planning
Vehicle-based escape requires multiple contingency layers. Primary escape via motorcycles or cars, secondary protocols deploy smoke grenades during vehicle destruction, tertiary options leverage Underground Railway for stealth repositioning.
Route planning must incorporate multiple extraction points and alternative pathways preventing predictable movement patterns. Audio awareness provides primary threat detection through Ghost Crate sounds, Juggernaut footsteps, and player movement patterns.
Advanced Early Game Tactics: Next-Level Strategies
Advanced tactics leverage deep mechanical knowledge for maximum efficiency within the early-game window. Contaminated Zone exploitation requires Rad Shields and shotgun weapons for optimal damage against mutant attacks.
Password-locked door mechanics at Armory Outpost and Support Center require systematic letter collection for vault access – worth the effort for the rewards inside.
Solo vs Squad Strategy Differences
Solo play emphasizes value-per-slot optimization and rapid extraction timing. Focus on gold bars and refined components over bulky gear, maintaining strict 10-12 minute extraction deadlines.
Squad coordination enables higher-risk objectives like Juggernaut encounters and boss fights through role division: looters focus on acquisition, security monitors threats, support manages vehicles and medical supplies.
Information Gathering Techniques
Pre-match intelligence involves assessing Underground Railway configurations to determine optimal route selection. Scout entrance points immediately after spawning to identify which 2 of 4 possible lines are active.
Market timing intelligence enables optimization during weekend events offering 20-30% enhanced prices. Early-game positioning must facilitate smooth mid-game transition without compromising extraction flexibility.
Common Early Game Mistakes (And How to Avoid Them)
The most prevalent error? Exceeding that 600k Metro Cash loadout threshold, triggering higher-difficulty matchmaking with million-credit opponents. Always verify total equipment values including ammunition and utilities before deployment.
Over-staying beyond the 10-12 minute window increases encounter rates 300%. Maintain strict time discipline to prevent costly errors.
Overaggression Pitfalls
Aggressive engagement without risk assessment frequently results in unnecessary losses. Players carrying high-value loads should prioritize avoidance using smoke screens and alternative routing.
Juggernaut encounters require coordinated approaches, drone elimination priority, and sufficient ammunition reserves. Avoid Maintenance Room challenges without Level 7 armor and premium weapons.
Loot Prioritization Errors
Bulky, low-value item accumulation compromises extraction efficiency. Maintain strict value-per-slot assessment prioritizing gold bars, rare materials, and Fabled items over gear upgrades.
Ammunition prioritization errors impact combat effectiveness – high-tier weapons with low-tier ammunition perform worse than low-tier weapons with premium rounds. Underground Railway line identification failures compromise route optimization.
Tools and Resources for Route Optimization
Professional players utilize comprehensive tracking systems documenting match dates, loadout costs, extracted values, net profits, and survival rates. ROI calculators target 300%+ margins: (Extracted Value - Loadout Cost - Insurance) / Investment × 100.
Risk-adjusted calculations incorporating survival rates: (ROI × Survival Rate) - (Loss Rate × 100%) determine true profitability.
Map Analysis Tools
Underground Railway mapping tools document 4 possible line configurations and strategic implications. Include entrance locations, Maintenance Room positions, connection points between major zones.
Boss encounter documentation should include positioning strategies, equipment requirements, reward expectations for School (Fire Joy), Power Plant (Fire Roy), and Arctic Base encounters.
Performance Tracking Methods
Systematic tracking requires consistent data collection: survival rate (target 70%+), average profit per run, time efficiency (profit per minute), Fame tier advancement progress.
Video replay analysis provides insight into decision-making patterns and tactical execution. Comparative analysis between Conservative Cash Farming, Aggressive Fame Farming, and Hybrid Underground routes determines optimal focus areas.
For players seeking to enhance their Metro Royale experience with premium outfits and equipment, buy PUBG UC for outfits through BitTopup's secure platform, which offers competitive pricing, instant delivery, and excellent customer support to maximize your gaming progression.
FAQ
What's the optimal loadout value for Metro Royale 4.1 early game? Keep total gear under 600,000 Metro Cash: Level 7 refined armor, Level 6 helmet, AUG/M416, Level 2-3 backpack, 3-4 smoke grenades, 1-2 flashbangs for 2-3 million profit runs.
How long should early-game routes take? Extract after 10-12 minutes to avoid that brutal 300% encounter rate increase. Target 3-4 high-tier crates and boss encounters, using Evacuation Flare Guns for loads exceeding 2 million Metro Cash.
Which Underground Railway lines provide best strategic value? Lines connecting School, Power Plant, Garnet Maison, Mason Station offer optimal high-tier loot zone access. Scout entrance points after spawning to identify which 2 of 4 lines are active.
What's the most efficient Fame farming strategy? Target Maintenance Rooms and boss areas like Arctic Base within the first 8-10 minutes when competition remains minimal. Eliminate Juggernauts and bosses for Honor points while completing weekly survival missions.
How do you counter rats in early game? Engage suspicious players immediately using audio cues for footsteps and breathing. Deploy smoke grenades at extraction points, use Evacuation Flare Guns for helicopter extraction with high-value loads.
What items should you prioritize in Lock Box? Store gold bars, rare materials, Fabled items as they won't drop on death. Prioritize value-per-slot items, avoid bulky gear focusing on materials enabling crafting and trading opportunities.