

Hoshimi Miyabi, the S-Rank Frost Anomaly Agent from Section 6's Void Hunter division, arrives in Version 1.4 with unique scaling that challenges conventional drive disc wisdom. While Section 6 discs seem thematically fitting, leaked data reveals critical mismatches with her kit. This guide covers her confirmed material requirements—over 4 million Denny, 350 Freeze Chips, 60 Higher Dimensional Data—plus optimal drive disc builds prioritizing her 80% CRIT Rate requirement and 115 Anomaly Mastery threshold. Learn why Branch and Blade Song 4-piece outperforms Section 6 sets, how to farm materials efficiently, and avoid resource-wasting mistakes before her banner launches.
Understanding Miyabi's Kit and Scaling Mechanics
Miyabi functions as a Frost Anomaly Agent with hybrid damage scaling. Her kit combines Anomaly Proficiency-based Freeze application with CRIT-dependent burst damage during Freeze Shatter windows, creating unique stat requirements.
For efficient resource prep, Zenless Zone Zero Top Up through BitTopup ensures sufficient Polychromes to secure Miyabi and her signature W-Engine.
Skill Set Overview and Damage Types
At Level 60, Miyabi reaches 855 base ATK, 116 Anomaly Mastery, 148 Anomaly Proficiency—stats signaling dual-scaling. Her rotation applies Freeze stacks through Anomaly buildup, then detonates with CRIT-scaled Shatter damage. This two-phase model benefits from both Anomaly Proficiency (faster Freeze) and CRIT Rate/CRIT DMG (maximizing Shatter explosions).
Core Skills D-F demand 9 Sycophant's Refinements and 60 Higher Dimensional Data: Thunderous Dragon—materials exclusively from weekly Sacrifice-Bringer boss and Thracian Expert Challenge. These time-gated resources make pre-farming essential.
Primary Stat Scaling from Leaked Data
The 80% CRIT Rate requirement is non-negotiable. Core Skill F grants Freeze Shatter CRIT Rate +12% for 15 seconds when Anomaly Mastery ≥115, but only if you've built substantial baseline CRIT Rate. Below 80%, Shatter damage becomes inconsistent.
Signature W-Engine Hailstorm Shrine provides CRIT DMG +50% and Ice DMG +20% at max stacks (2 stacks, 15 seconds). F2P alternative Fusion Compiler offers ATK +12% and Anomaly Proficiency +25 per stack (max 3 stacks, 8 seconds) but lacks CRIT synergy.
Role Classification
Miyabi occupies primary DPS with Anomaly as her damage vehicle, not support. Total skill investment requires 25 Basic, 75 Advanced, 250 Specialized Freeze Chips, totaling 2,905,000 Denny. Add 800,000 Denny promotions and 405,000 Core Skills—4+ million total confirms main DPS resource intensity.
Section 6 Drive Disc Set: Complete Breakdown
Section 6 discs carry thematic appeal but lack confirmed set bonuses in extracted data—a critical problem for verifying mechanical optimization.
Set Bonus Effects and Activation Conditions
Without concrete Section 6 data, comparison shifts to confirmed alternatives. Branch and Blade Song 4-piece provides CRIT DMG +16% (2-piece) and when Anomaly Mastery ≥115, CRIT DMG +30% plus Freeze Shatter CRIT Rate +12% for 15 seconds (4-piece). These bonuses directly align with Miyabi's 115 Anomaly Mastery threshold and 80% CRIT Rate requirement.
Statistical Performance
Drive disc farming occurs through Routine Cleanup (unlocked Inter-Knot Level 30). Music Store's Advanced Tuning (Level 40) guarantees S-Rank drops.
Woodpecker Electro 2-piece offers CRIT Rate +8%, 4-piece grants Basic Attack, Dodge Counter, EX Special, Assist Follow-Up CRIT DMG +9% for 6 seconds. For Miyabi's EX Special-focused rotation, this 6-second window aligns with burst phases but shorter duration vs Branch and Blade Song's 15 seconds reduces consistency.
Why Section 6 Seems Appealing Initially
Thematic faction connection creates appeal. However, drive disc substats matter more than set bonuses when stat quality differs significantly. Well-rolled off-set pieces with CRIT Rate, CRIT DMG, ATK%, Anomaly Proficiency outperform on-set pieces with flat HP, DEF, low-value substats.
The Critical Problem: Why Section 6 May Be a Trap
Resource investment in drive discs represents weeks of stamina. Committing to wrong sets delays optimization by 2-4 weeks of Routine Cleanup runs.
Skill Scaling Mismatch
Miyabi's damage formula weights CRIT-based Shatter explosions heavily. Core Skill progression costs 60 Higher Dimensional Data and 9 Sycophant's Refinements, unlocking CRIT-scaling multipliers. Without confirmed Section 6 bonuses supporting CRIT Rate, CRIT DMG, or Freeze Shatter damage, the set can't compete with Branch and Blade Song's explicit +30% CRIT DMG and +12% Freeze Shatter CRIT Rate.
The 115 Anomaly Mastery threshold appears repeatedly in her kit. At Level 60, she reaches 116 base—just exceeding requirement without disc contributions. Branch and Blade Song's conditional bonuses activate naturally without awkward stat trade-offs.
Opportunity Cost vs Alternatives
Branch and Blade Song 4-piece addresses stat requirements without playstyle adjustments. 2-piece CRIT DMG +16% provides unconditional value, 4-piece activates automatically at 115+ Anomaly Mastery. Polar Metal offers 2-piece Ice DMG +10% and 4-piece Basic/Dash Attack DMG +20% plus Freeze Shatter DMG +20% for 12 seconds—competitive for Basic Attack chains.
Real Damage Calculations
Assume 100,000 base Freeze Shatter damage:
Branch and Blade Song 4pc: +46% total CRIT DMG (16% + 30%). With 80% CRIT Rate and 200% CRIT DMG (including bonuses), average multiplier = 0.8 × 3.0 + 0.2 × 1.0 = 2.6×. +12% Freeze Shatter CRIT Rate pushes effective CRIT Rate to 92%.
Polar Metal 4pc: +10% Ice DMG + 20% Freeze Shatter DMG = 30% additive increase. Multiplies with CRIT but doesn't increase CRIT Rate, resulting in lower average damage below 100% CRIT Rate.
Woodpecker Electro 4pc: +8% CRIT Rate helps reach 80% threshold, +9% CRIT DMG on key abilities for 6 seconds. Shorter duration and lower CRIT DMG vs Branch and Blade Song reduces sustained damage.
Branch and Blade Song emerges superior for CRIT-Shatter playstyle.
Team Composition Dependencies
Drive disc effectiveness varies with teams. If Miyabi pairs with CRIT Rate buffs, 80% threshold becomes easier, potentially allowing Polar Metal's higher Ice/Shatter DMG bonuses to outperform. Teams lacking CRIT support make Branch and Blade Song's +12% Freeze Shatter CRIT Rate essential.
Section 6 sets (assuming generic bonuses like ATK%/HP%) underperform in all contexts—they don't amplify Miyabi's unique Freeze-Shatter loop.
Alternative Drive Disc Sets: Superior Options
To maximize farming efficiency, Buy ZZZ Monochromes at BitTopup for fast top-ups enabling stamina refreshes during critical farming windows.
Top Recommended Set #1
Branch and Blade Song 4-piece is mathematically optimal. 2-piece CRIT DMG +16% provides unconditional value, 4-piece bonuses—Anomaly Mastery ≥115 grants CRIT DMG +30% and Freeze Shatter CRIT Rate +12% for 15 seconds—activate automatically when built correctly.
15-second duration covers multiple Freeze-Shatter cycles. Miyabi applies Freeze (2-4 seconds), detonates Shatter (instant), reapplies. This 5-7 second cycle fits within 15-second buff window.
Farming priority: Routine Cleanup at highest Inter-Knot level. Use Advanced Tuning (Level 40) for guaranteed S-Rank drops.
Top Recommended Set #2
Polar Metal 4-piece serves Basic/Dash Attack-focused rotations. 2-piece Ice DMG +10% amplifies all Frost damage, 4-piece Basic/Dash Attack DMG +20% plus Freeze Shatter DMG +20% for 12 seconds rewards aggressive play.
12-second duration requires tighter timing vs Branch and Blade Song's 15 seconds. However, +20% Freeze Shatter DMG directly multiplies Shatter damage, potentially outperforming in teams with external CRIT Rate buffs pushing Miyabi above 90% (where additional CRIT Rate has diminishing returns).
Polar Metal excels in sustained combat like Shiyu Defense. Ice DMG bonus applies universally, more forgiving for learning rotations.
Situational Sets
Woodpecker Electro 2-piece provides CRIT Rate +8%, valuable for reaching 80% threshold. Pairing Woodpecker 2pc + Branch and Blade Song 2pc creates hybrid: CRIT Rate +8% and CRIT DMG +16%, sacrificing 4-piece bonuses for balanced CRIT stats.
This 2+2 strategy works when inventory lacks complete 4-piece with acceptable substats. A 2+2 with excellent substats (CRIT Rate, CRIT DMG, ATK%, Anomaly Proficiency on every piece) outperforms 4-piece with poor substats.
Mixed Set Strategies
Calculate effective stats before committing to 4-piece. If current 2+2 reaches 80% CRIT Rate and 200%+ CRIT DMG while potential 4-piece drops to 70% CRIT Rate, the 2+2 performs better despite losing 4-piece bonus.
Drive Disc Stat Priority Guide
Main Stat Priorities by Position
Slot 1-3 (HP/ATK/DEF): Fixed main stats, focus on substats. Target CRIT Rate, CRIT DMG, ATK%, Anomaly Proficiency.
Slot 4: CRIT Rate% mandatory. Provides largest CRIT Rate contribution (up to 30%+ max rolls), irreplaceable for 80% threshold. Never use ATK% or other main stats.
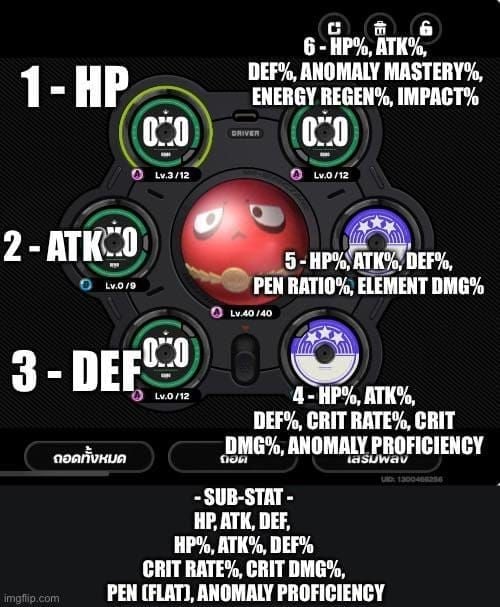
Slot 5: Ice DMG% provides highest damage increase. PEN Ratio% secondary when Ice DMG% has terrible substats. ATK% fallback.
Slot 6: ATK% scales both Anomaly Proficiency (faster Freeze) and Shatter damage.
Substat Tier List
S-Tier (always valuable):
CRIT Rate: Target 80% total
CRIT DMG: Target 200%+ total
ATK%: Aim 30-40% from substats
A-Tier (situationally valuable):
Anomaly Proficiency: Accelerates Freeze when CRIT stats sufficient
PEN: Increases damage vs high-DEF enemies
F-Tier (avoid):
HP%, Flat HP, DEF%, Flat DEF: No scaling in kit
CRIT Rate to CRIT DMG Ratio
Optimal ratio: 1:2 after reaching minimum CRIT Rate.
Reach 80% CRIT Rate first (non-negotiable)
After 80%, invest CRIT DMG at 1:2 ratio
Target: 80-85% CRIT Rate, 200-220% CRIT DMG
Branch and Blade Song's +12% Freeze Shatter CRIT Rate pushes effective to 92-97% during Shatter windows, making additional CRIT Rate beyond 80% less valuable. Once at 80%, prioritize CRIT DMG over CRIT Rate.
Hailstorm Shrine provides CRIT DMG +50% at max stacks, significantly reducing CRIT DMG requirement from disc substats.
Anomaly Proficiency vs Raw Damage
Anomaly Proficiency accelerates Freeze application but means nothing if Shatter damage is weak.
Priority order:
Reach 80% CRIT Rate (enables consistent Shatter)
Reach 200% CRIT DMG (maximizes Shatter per hit)
Invest Anomaly Proficiency (increases Shatter frequency)
At Level 60, Miyabi has 148 base Anomaly Proficiency. Additional from substats and Fusion Compiler (+75 max) can push to 220-250, accelerating Freeze. However, this only pays off after securing CRIT stats.
Comprehensive Pre-farming Checklist
Drive Disc Farming Routes
Routine Cleanup drops discs at Inter-Knot 30+ with improved rates at 40, 50, 60. Prioritize highest level you can clear efficiently.
Advanced Tuning (Inter-Knot 40) guarantees S-Rank discs, eliminating A/B-Rank waste.
Stamina efficiency: Each run costs 40 stamina, drops 2-3 discs. Complete 6-piece set with acceptable main stats requires ~15-20 runs (600-800 stamina). Optimized substats (3-4 desirable per piece) requires 40-60 runs (1,600-2,400 stamina), equivalent to 10-15 days natural regeneration.
Start disc farming at least 2 weeks before banner for substat optimization time.
Skill Material Requirements
Total Freeze Chips:
25 Basic
75 Advanced
250 Specialized
Source: Combat Simulation VR Device (unlocked after Chapter 1). Rotates daily—check schedule for Freeze Chip days.
Hamster Cage Pass: 5 total for maxing skills (Level 11-12 requires 1 per skill). From events and New Eridu City Fund. Time-gated, can't farm directly.
Certification Seals:
4 Basic Anomaly
32 Advanced Anomaly
30 Controller
Farmed from Combat Simulation. Prioritize Specialized Freeze Chips first (longest farm), then Controller Seals.
W-Engine Options
Hailstorm Shrine: Requires 4 Basic, 32 Reinforced, 30 Specialized Anomaly Components, 200 W-Engine Energy Modules, 400,000 Denny for max level. Farm from W-Engine stages daily.
If pulling Hailstorm Shrine, pre-farm materials now. If using Fusion Compiler, verify sufficient copies for refinement.
Denny and Upgrade Materials
Total Denny:
Promotion: 800,000
Skills: 2,905,000
Core Skills: 405,000
W-Engine: 400,000
Grand Total: 4,510,000+
Senior Investigator Logs: 300 required for ascension.
Farm Denny from Golden City Bank and weekly Notorious Hunt. Prioritize during double-reward events before 1.4.
Team Composition Impact on Drive Disc Selection
Synergy-Based Adjustments
CRIT Support Teams: If supports provide CRIT Rate buffs, reduce disc CRIT Rate to 70-75%, allowing more substats for CRIT DMG and ATK%. Shifts optimal sets toward Polar Metal 4pc.
Anomaly Support Teams: Teams with Anomaly Proficiency buffs reduce need for Anomaly Proficiency substats. Allows full CRIT investment, making Branch and Blade Song even more dominant.
Mono-Frost Teams: Pairing with other Frost characters may provide Ice DMG% buffs. Polar Metal's +10% Ice DMG and +20% Freeze Shatter DMG gain value from multiplicative stacking.
F2P Team Compositions
F2P teams lack specialized CRIT/Anomaly buffs, placing full stat responsibility on discs and W-Engines.
For F2P:
Mandatory: Branch and Blade Song 4pc or Woodpecker 2pc + Branch and Blade Song 2pc for 80% CRIT Rate
W-Engine: Fusion Compiler at highest refinement
Substats: CRIT Rate > CRIT DMG > ATK%, minimal Anomaly Proficiency
F2P builds can't afford suboptimal choices. Every substat must contribute to CRIT thresholds.
Premium Team Options
Premium teams with Hailstorm Shrine and CRIT supports optimize for max damage:
Discs: Branch and Blade Song 4pc with CRIT DMG and ATK% focus
Target: 85% CRIT Rate, 230%+ CRIT DMG, 40%+ ATK%
Anomaly Proficiency: Invest remaining substats for faster rotations
Premium builds achieve 15-20% higher damage than F2P through optimized distributions and synergies.
Common Pre-farming Mistakes
Over-investing in Section 6 Before Confirmation
Most common mistake: farming Section 6 based on thematic appeal without verifying bonuses align with kit. Without confirmed bonuses supporting CRIT Rate, CRIT DMG, or Freeze Shatter damage, risks wasting 1-2 weeks farming.
Wait for official kit confirmation before committing. Until then, Branch and Blade Song and Polar Metal remain safest investments.
Ignoring Substat Quality for Set Completion
4-piece with poor substats underperforms 2+2 with excellent substats. Calculate effective stats:
4pc Branch and Blade Song mediocre substats: 75% CRIT Rate, 180% CRIT DMG
2pc Branch and Blade Song + 2pc Woodpecker excellent substats: 82% CRIT Rate, 210% CRIT DMG
The 2+2 deals significantly more damage despite losing 4pc bonuses.
Neglecting W-Engine and Support Prep
Discs represent only one-third of power budget. W-Engine and support investment contribute equally. Pre-farm W-Engine materials even if uncertain about pulling Hailstorm Shrine.
Resource Misallocation Final Weeks
Final 1-2 weeks should focus on time-gated materials: weekly boss drops (Sycophant's Refinement), Expert Challenge (Higher Dimensional Data), event items (Hamster Cage Pass).
Players spending final week on discs miss weekly boss attempts, delaying Core Skills by 1-2 weeks post-release.
Timeline and Resource Management
Week-by-Week Schedule
Week 1 (3 weeks before):
Complete weekly boss for Sycophant's Refinement (need 9 total, drops 2-3/week)
Complete Thracian Expert Challenge for Higher Dimensional Data (need 60)
Begin Combat Simulation for Specialized Freeze Chips (need 250)
Participate in events offering Hamster Cage Pass
Week 2 (2 weeks before):
Continue weekly boss and Expert Challenge
Finish Specialized Freeze Chips, begin Advanced
Start disc farming for main stat pieces (Slot 4 CRIT Rate%, Slot 5 Ice DMG%, Slot 6 ATK%)
Farm Denny if below 4 million
Week 3 (1 week before):
Final weekly boss and Expert Challenge
Complete all Freeze Chip and Certification Seal farming
Focus exclusively on disc substat optimization
Pre-farm W-Engine materials if pulling Hailstorm Shrine
Stockpile 300 Senior Investigator Logs
Release Day:
Pull Miyabi and Hailstorm Shrine
Immediately level to 60, max skills, unlock Core Skills
Equip pre-farmed discs
Test in Shiyu Defense, adjust based on performance
Stamina Allocation Priorities
Daily regeneration (240 stamina/day) limits farming. Allocate by urgency:
Priority 1 (time-gated):
Weekly boss (3/week, 60 stamina each)
Expert Challenge (daily, 40 stamina)
Event stages with Hamster Cage Pass
Priority 2 (high quantity):
Combat Simulation for Specialized Freeze Chips (250 needed)
Combat Simulation for Controller Seals (30 needed)
Priority 3 (flexible):
Disc farming (ongoing optimization)
Denny farming (can complete post-release)
W-Engine materials (only if pulling signature)
If choosing between discs and skill materials, prioritize skills. Level 60 Miyabi with maxed skills and mediocre discs outperforms Level 40 with perfect discs.
Emergency Farming with BitTopup
For late starters or material shortages, stamina refresh becomes necessary. BitTopup offers secure, fast ZZZ top-ups providing Polychromes for refreshes.
First daily refresh costs 50 Polychromes for 60 stamina (1.5 Combat Simulation or 1 weekly boss). If 2-3 Sycophant's Refinements short before release and weekly reset won't occur in time, spending 100-150 Polychromes for refreshes provides better value than waiting another week.
BitTopup's competitive pricing and instant delivery make it optimal for emergency needs, with secure transactions ensuring account safety.
Version 1.4 Meta Predictions
Expected Endgame Performance
Shiyu Defense rewards high burst damage and efficient Anomaly application—both Miyabi's specialties. Her Freeze-Shatter rotation provides:
Crowd Control: Freeze immobilizes enemies, reducing incoming damage
Burst Windows: Shatter detonations deal concentrated damage during Freeze
Anomaly Uptime: 148 base Anomaly Proficiency ensures consistent Freeze vs high-resistance enemies
Compared to other S-Rank DPS, Miyabi's dual-scaling provides flexibility. Sustained damage stages favor Anomaly Proficiency. Burst stages favor CRIT-scaled Shatters. This versatility makes her viable across multiple Shiyu rotations.
Long-term Investment Value
Miyabi's resource cost (4+ million Denny, 9 weekly boss drops, 60 Expert materials) matches other S-Rank main DPS, indicating similar power budget. Kit reliance on CRIT stats and Anomaly Proficiency—universally valuable stats—suggests strong future-proofing.
New disc sets in future versions will likely include CRIT-focused options potentially outperforming Branch and Blade Song. However, fundamental stat priorities (80% CRIT Rate, 200%+ CRIT DMG, Ice DMG%, Anomaly Proficiency) remain constant, meaning pre-farmed pieces retain value.
Investment recommendation: Miyabi represents safe long-term investment for Frost main DPS. Kit reliance on established mechanics (CRIT, Anomaly) vs unique gimmicks reduces risk of future meta shifts invalidating builds.
Future-proofing Your Build
Build future-proofing focuses on flexible stat distributions:
Maintain 80% CRIT Rate baseline: Threshold remains valuable regardless of future mechanics
Invest in high-quality substats over set bonuses: Perfect substats retain value when new sets release
Prioritize signature W-Engine if possible: Hailstorm Shrine's CRIT DMG +50% and Ice DMG +20% provide irreplaceable value unlikely to be powercrept significantly
Avoid over-specialization in niche builds (100% Anomaly Proficiency, 0% CRIT). Balanced CRIT-Anomaly distributions perform consistently across all content, providing better long-term value.
FAQ
What are the best drive discs for Miyabi?
Branch and Blade Song 4pc is optimal: CRIT DMG +16% (2pc) and when Anomaly Mastery ≥115, CRIT DMG +30% plus Freeze Shatter CRIT Rate +12% for 15s (4pc). Polar Metal 4pc alternative: Ice DMG +10% (2pc) and Basic/Dash Attack DMG +20% plus Freeze Shatter DMG +20% for 12s (4pc). Main stats: Slot 4 CRIT Rate%, Slot 5 Ice DMG%, Slot 6 ATK%.
How much does it cost to fully build Miyabi?
Over 4 million Denny: 800,000 promotions, 2,905,000 skills, 405,000 Core Skills, 400,000 W-Engine. Materials: 300 Senior Investigator Logs, 350 total Freeze Chips (25 Basic, 75 Advanced, 250 Specialized), 66 Anomaly Certification Seals, 9 Sycophant's Refinements (weekly boss), 60 Higher Dimensional Data (Expert Challenges).
When is Miyabi releasing?
Version 1.4 confirmed. Specific dates depend on regional servers—check official announcements. Pre-farm at least 2-3 weeks before expected 1.4 launch to secure time-gated materials.
What stats should I prioritize?
Reach 80% CRIT Rate first (non-negotiable), then 200%+ CRIT DMG, followed by ATK% and Anomaly Proficiency. Main stats: Slot 4 CRIT Rate%, Slot 5 Ice DMG%, Slot 6 ATK%. Substats: CRIT Rate > CRIT DMG > ATK% > Anomaly Proficiency > PEN. Kit requires 115+ Anomaly Mastery for Branch and Blade Song 4pc bonus, achievable with base 116 at Level 60.
Is Section 6 drive disc set good for Miyabi?
Without confirmed Section 6 bonuses supporting CRIT Rate, CRIT DMG, or Freeze Shatter damage, Section 6 can't compete with Branch and Blade Song's explicit +30% CRIT DMG and +12% Freeze Shatter CRIT Rate at Anomaly Mastery ≥115. Avoid investing stamina in Section 6 until official data confirms compatibility.
Which W-Engine is best?
Hailstorm Shrine (signature): CRIT DMG +50% and Ice DMG +20% at max stacks (2 stacks, 15s), offering irreplaceable CRIT synergy. Fusion Compiler (F2P): ATK +12% and Anomaly Proficiency +25 per stack (max 3 stacks, 8s), supporting faster Freeze but lacking CRIT bonuses. Hailstorm Shrine significantly outperforms for CRIT-focused builds, Fusion Compiler suits Anomaly-focused with external CRIT support.