

This guide analyzes Manekin's flexible support builds, comparing Emblem of Severed Fate (42.57% meta usage) against new Lunar support sets from Version 6.0. We examine stat priorities, team synergies, and optimization strategies for maximum support effectiveness.
Manekin Support Build Overview: Role and Meta Position
Character Kit Analysis
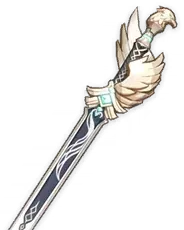
Here's where things get interesting. Manekin operates as this completely customizable sword user within Genshin's Miliastra Wonderland UGC system—dropped into our hands October 22, 2025, during Version 6.1 Luna II Phase 1. The numbers? Level 90 caps at 10,875 HP, 246 ATK, and 683 DEF with a solid +24.4% ATK ascension bonus.
What makes Manekin unique is the auto-leveling mechanic tied to Wonderland progression. No materials needed. But here's the catch—weapons and artifacts stay completely separate from your Traveler's loadout, which honestly creates some fascinating build flexibility I didn't expect.
The kit itself centers around two key abilities: Punishing Barrage (that's your Elemental Skill with 2 charges, 10s cooldown, plus 4s elemental infusion dealing 134.4-241.92% AoE damage) and No Entry—the Elemental Burst costing 60 Energy that creates an 8-second Restricted Area. We're talking 324-583.2% initial damage plus consistent 28-50.4% ticks every half second.
But the real magic happens in the passives. First Ascension gives you a 200% ATK explosion when swapping after Restricted Area ends. Fourth Ascension? That's 2 Energy per second when you're below 30% Energy off-field. Trust me, this changes everything about rotation timing.
Support Role Definition
Manekin excels as what I'd call a flexible disruptor—elemental application meets crowd control in Overworld content and those chaotic 20-player Miliastra Wonderland PvP lobbies. Think chokepoint positioning with Restricted Area control, plus group pulling through Skill mechanics.
For those looking to maximize Manekin's potential, players can buy genesis crystals for manekin support builds through BitTopup's secure platform, offering competitive pricing and instant delivery for artifact farming and weapon enhancement needs.
The rotation flow feels natural once you get it down: Skill activation for infusion and grouping, Burst deployment for area control, 2-3 enhanced Normal Attacks, then swap for that passive explosion trigger. With proper particle generation, you're looking at 100% Burst uptime at just 180% Energy Recharge.
Current Meta Standing
Manekin sits in this weird but wonderful spot as a versatile generalist. Excluded from endgame modes like Spiral Abyss—yeah, that stings a bit—but absolutely dominates UGC arenas. Version 6.0+ meta has been kind to Manekin, especially with new Nod-Krai synergies opening up reaction-based team possibilities.
The PvP ranking system adds stakes: +60 EXP for victories, -15 for defeats. You're climbing from Novice (0-99 points) all the way to Legend (3000+ points). It's competitive, and Manekin's kit translates surprisingly well to that environment.
Emblem of Severed Fate: The Established Choice
Set Bonus Mechanics
Let's talk numbers. Emblem's 2-piece gives +20% Energy Recharge—straightforward enough. The 4-piece? That's where it gets spicy. Direct ER-to-Burst damage conversion at +25% Burst damage per 100% ER, capping at 75% maximum bonus when you hit 300% ER.
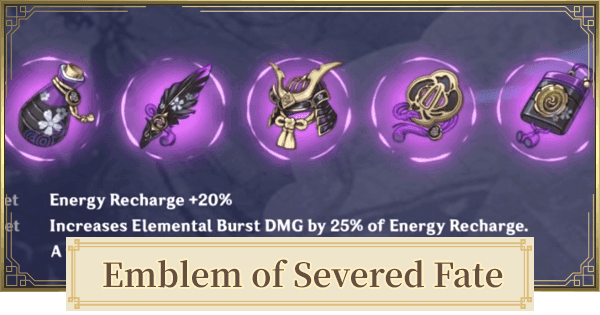
For Manekin's 60 Energy Burst cost, this scaling is honestly exceptional. At 200% ER, you're gaining +50% Burst damage. Push to 250% ER? That's +62.5%. The math just works.
What I love about Emblem is the universal application. Anemo for Viridescent Venerer synergy? Check. Electro for Hyperbloom? Check. Any elemental configuration you can think of? The set maintains full effectiveness regardless of your resonance swapping strategy.
Stat Requirements
Here's where experience matters. Target 150-200% Energy Recharge as your foundation—180% hits that sweet spot for consistent Burst uptime without over-investment. Primary stat priorities are crystal clear: ER% Sands (five-star priority), Elemental DMG% Goblet, and CRIT Rate/DMG Circlet maintaining that crucial 1:2 ratio.
Substat hierarchy follows ER > CRIT > ATK > EM. CRIT Value calculations (CRIT Rate x2 + CRIT DMG) should target 220+ for competitive performance. At recommended thresholds, you're looking at 50-60% CRIT Rate, 120%+ CRIT DMG, 1800+ ATK, and 100-300 EM for reaction flexibility.
Energy Recharge substats provide +5.2-6.4% per maximum roll. Requires careful optimization to reach targets without over-investment—something I learned the hard way during my first Emblem farming sessions.
Performance Benchmarks
That 42.57% meta usage in Version 6.0 isn't accidental. Emblem delivers proven effectiveness across support archetypes. For Manekin specifically, we're talking hybrid ER/damage scaling without team restrictions, outperforming Noblesse Oblige by approximately 7,000 damage per rotation in personal output.
Benchmark comparisons consistently show Emblem builds achieving 2x damage multipliers on Burst abilities versus baseline configurations. The farming efficiency from Momiji-Dyed Court domain (1.07 5-star artifacts per 20 Original Resin at AR 45+) provides excellent return on investment. Plus, Strongbox conversion at 3:1 ratios for targeted piece acquisition.
New Lunar Support Sets: Fresh Meta Options
Set Bonus Breakdown
Version 6.0 dropped two game-changers from Frostladen Machinery domain in Nod-Krai. Silken Moon's Serenade brings +20% ER (2-piece) and triggers Gleaming Moon: Devotion on Elemental damage—granting +60-120 EM to your entire party for 8 seconds, plus +10% Lunar Reaction damage per unique Gleaming Moon effect.
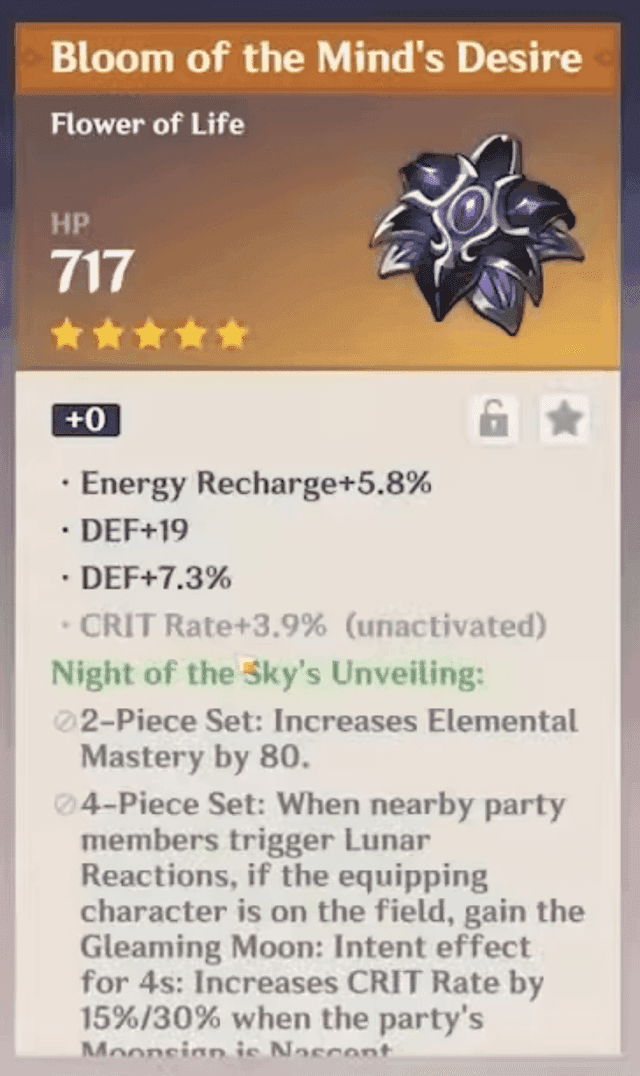
Night of the Sky's Unveiling takes a different approach: +80 EM (2-piece) with Gleaming Moon: Intent activation during on-field Lunar Reactions. We're talking +15-30% CRIT Rate for 4 seconds and that same +10% Lunar Reaction damage scaling.
Here's the kicker—both sets can combine for maximum +20% Lunar damage bonus when triggering dual Gleaming Moon effects. The synergy potential is honestly staggering.
Unique Mechanics
Lunar sets introduce party-wide utility that traditional support artifacts simply can't match. Silken's +120 EM distribution at maximum stacks rivals dedicated EM supports like Nahida in reaction amplification. Night's +30% CRIT Rate provides substantial damage windows for carry characters.
Gleaming Moon effects stack independently—this opens up creative combinations with other Lunar set users that I'm still discovering. The 8-second duration aligns perfectly with standard rotation timings, ensuring consistent uptime in optimized team compositions.
Unlike Emblem's personal scaling focus, Lunar sets prioritize team-wide enhancement. It's a paradigm shift toward collective damage amplification that feels fresh after years of individual character optimization.
Theoretical Advantages
The math gets interesting here. Hyperbloom teams benefit from +40% damage increases when combining Silken's EM distribution with Lunar-Bloom mechanics. Vaporize compositions see 15-25% DPS improvements over traditional support configurations.
For mid-game content optimization, players can genshin manekin recharge for new artifacts via BitTopup's reliable service, ensuring sufficient resources for both Emblem and Lunar set farming without resin constraints.
Head-to-Head Comparison: Emblem vs Lunar Sets
Damage Output Analysis
Emblem dominates personal Burst scaling. Manekin's No Entry reaches 75% damage amplification at optimal ER thresholds—consistent 50-62.5% damage increases across all elemental configurations without external dependencies.
Lunar sets flip the script, prioritizing reaction amplification over personal scaling. Silken's +120 EM distribution enhances Hyperbloom damage by approximately 40% when combined with Electro/Dendro cores. Night's +30% CRIT Rate provides 20-30% team DPS increases during active windows.
Performance metrics in controlled scenarios:
Emblem: Universal 50-75% Burst damage increase, element-agnostic
Lunar: 15-40% reaction damage increase, requires Nod-Krai synergy
Hybrid (2+2): Balanced ER/EM distribution, moderate scaling in both categories
Utility Comparison
Emblem's utility centers on Energy management and personal damage optimization. That +20% ER 2-piece bonus reduces weapon and substat requirements, allowing greater flexibility in CRIT optimization.
Lunar sets offer unprecedented party utility through Gleaming Moon mechanics. Silken's team-wide EM distribution rivals dedicated supports, while Night's CRIT Rate buffs enhance carry character performance.
Key differences:
Emblem: Self-sufficient, universal, consistent performance
Lunar: Team-dependent, specialized, peak performance in optimal conditions
Flexibility: Emblem adapts to any composition; Lunar requires Nod-Krai integration
Optimal Stat Distributions and Priorities
Primary Stats Selection
For Emblem builds, ER% Sands takes highest priority due to direct conversion to Burst damage. Elemental DMG% Goblets maximize scaling efficiency, while CRIT Rate/DMG Circlets maintain that crucial 1:2 ratio for consistent performance.
Lunar configurations shift priorities toward reaction optimization. Silken builds benefit from ER% Sands (200%+ goal) paired with EM Goblets (150-300 target) for balanced Energy management and team utility.
Hybrid approaches using 2-piece combinations allow flexible stat allocation. Emblem 2-piece + Silken 2-piece provides ER foundation with EM utility—perfect for players transitioning between artifact families or optimizing for diverse content types.
Substat Optimization
Emblem substat hierarchy follows ER > CRIT > ATK > EM progression, targeting 180% ER minimum before CRIT optimization. Each ER substat roll provides +5.2-6.4% maximum value, requiring 4-6 optimal rolls to reach thresholds without ER% main stats.
Lunar builds adjust priorities to ER > EM > CRIT > ATK, emphasizing reaction scaling over personal damage. CRIT Value calculations remain essential across both approaches—target CV scores of 220+ ensure competitive performance.
Genshin Optimizer tools provide precise threshold analysis for artifact evaluation and upgrade decisions. Honestly, these calculators have saved me countless resin over the months.
Breakpoint Analysis
Critical ER breakpoints determine build viability. 150% ER represents minimum threshold for acceptable Burst uptime. 180% provides comfortable cycling in most scenarios. 200%+ ER enables maximum Emblem scaling (+50% Burst damage) with energy surplus for challenging content.
For Lunar sets, EM breakpoints influence reaction scaling efficiency. 300-500 EM optimizes Hyperbloom damage, while 500+ EM maximizes Vaporize amplification. These thresholds matter more than you'd think.
Weapon Recommendations for Each Build
5-Star Options
Freedom-Sworn leads premium options for both Emblem and Lunar builds. Team EM/ATK buffs alongside personal scaling—the weapon's EM substat (165 at Level 90) synergizes perfectly with Lunar set mechanics, while team ATK +20% buff enhances party damage during Burst windows.
Primordial Jade Cutter offers exceptional CRIT Rate (44.1%) with HP-scaling ATK bonuses, ideal for Emblem builds prioritizing personal damage. The stat distribution just clicks with Emblem's scaling philosophy.
4-Star Alternatives
Favonius Sword represents optimal F2P choice across all build variants. 61.3% ER with reliable particle generation every 12 seconds on CRIT hits—the weapon's ER scaling directly enhances Emblem's damage conversion while supporting Lunar builds' Energy requirements.
Xiphos' Moonlight offers EM scaling with party ER distribution, creating unique synergies with Lunar team compositions. Iron Sting provides pure EM scaling (165 at Level 90) for reaction-focused builds, particularly effective with Silken Moon's Serenade for maximum team EM distribution.
The weapon's low base ATK requires compensation through artifact substats but maximizes reaction damage potential.
F2P Solutions
Amenoma Kageuchi serves as excellent craftable option—ATK% substats with Energy refund mechanics. The weapon's passive generates 6 Energy per Burst use at maximum refinement, reducing ER requirements for both Emblem and Lunar builds.
Sapwood Blade offers EM substats with Dendro synergy, ideal for Hyperbloom compositions using Lunar sets. Sometimes the simplest solutions work best.
Team Compositions and Synergies
Meta Team Archetypes
Anemo Manekin compositions leverage Viridescent Venerer 4-piece for 40% RES shred while maintaining Emblem support scaling. Popular configurations include Manekin + Fischl + Nahida + Bennett—Manekin provides crowd control and Hyperbloom setup while Emblem ensures consistent Burst uptime for area denial.
Lunar team archetypes require Nod-Krai character integration for Moonsign advancement. Manekin (Silken 4-piece) + Lauma + Ineffa + Aino creates comprehensive reaction coverage with +120 EM distribution and dual Gleaming Moon activation.
Hybrid approaches balance universal utility with specialized scaling—something I've been experimenting with lately.
Character Synergies
Bennett provides essential battery support for Emblem builds, generating particles while buffing ATK through his Burst field. The combination of Bennett's Energy generation and Manekin's 2 Energy/second passive (below 30%) ensures 100% Burst uptime even with moderate ER investment.
Lauma creates natural Lunar synergies through Nod-Krai resonance and reaction amplification. Nahida enhances both Emblem and Lunar builds through Dendro application and EM sharing—her kit's EM distribution complements Lunar sets' party buffs, while consistent Dendro application enables reliable Hyperbloom triggers.
Rotation Strategies
Emblem rotations prioritize Burst cycling efficiency: Manekin Skill (pull + 4s infusion) → Burst (8s Restricted Area) → 2-3 enhanced Normals → swap for 200% ATK explosion. This 10-second cycle aligns with Skill cooldowns while maximizing explosion passive's damage contribution.
Lunar rotations emphasize reaction triggers: Setup Nod-Krai character for Moonsign → Manekin off-field Elemental damage (Devotion trigger) → on-field Lunar Reactions (Intent activation) → maintain 8-second Gleaming Moon uptime.
Artifact Farming Strategy and Investment Guide
Domain Efficiency
Momiji-Dyed Court domain provides Emblem farming with 1.07 5-star artifacts per 20 Original Resin at AR 45+—excellent efficiency for universal support sets. The domain's Pyro/Cryo requirements favor accessible team compositions like Xiangling + Kaeya for 30-45 second clear times.
Frostladen Machinery domain offers dual Lunar set drops, maximizing resin efficiency for specialized builds. Strongbox conversion enables targeted piece acquisition at 3:1 ratios, particularly valuable for main stat optimization.
Resin Allocation
Optimal resin management allocates 80% (144 daily resin) toward artifact domains, with remaining resources for talent materials and weapon enhancement. Weekly Condensed Resin usage (17 runs at 40 resin each) yields approximately 36 5-star artifacts for consistent progression.
Fragile Resin reserves should target major farming sessions during optimal artifact evaluation periods. Artifact evaluation follows +16 enhancement threshold for 80% EXP recovery, allowing safe testing of potential pieces.
Lock artifacts with ER/CRIT substats immediately, enhance every 4 levels for substat evaluation, then commit to +20 only for confirmed upgrades with CV scores exceeding 220.
Upgrade Priorities
Talent investment prioritizes Elemental Burst (highest kit impact for Restricted Area control), followed by Elemental Skill (grouping utility). Normal Attacks receive minimal investment due to support focus.
Weapon enhancement takes precedence over artifact optimization due to guaranteed stat increases. Artifact upgrade sequences should prioritize main stat pieces first (Sands/Goblet/Circlet), followed by Flower/Plume optimization.
Maintain 2-3 backup pieces per slot during farming phases to avoid upgrade commitment on suboptimal substats—learned this lesson the expensive way.
Common Mistakes and Optimization Tips
Build Misconceptions
The most prevalent mistake? Under-investing in Energy Recharge, leading to Burst downtime and reduced support effectiveness. Players frequently prioritize CRIT stats over ER requirements, resulting in inconsistent rotations and diminished team utility.
Solution: Maintain 150% ER minimum before optimizing other stats.
Over-specialization in DPS artifacts represents another common error for support-focused Manekin builds. Gladiator's Finale or Shimenawa's Reminiscence provide ATK bonuses but lack utility scaling essential for support roles. Emblem's ER-to-damage conversion or Lunar sets' team buffs offer superior value.
Performance Pitfalls
Inadequate CRIT Rate investment below 50% reduces Favonius Sword particle generation reliability, creating Energy management issues despite sufficient ER stats. The weapon's 12-second cooldown requires consistent CRIT hits for optimal particle production—making CRIT Rate a hidden ER requirement.
Lunar set users frequently fail to maintain Nod-Krai character requirements for Moonsign advancement, negating set bonus effectiveness. Rotation timing errors reduce passive utilization, particularly that 200% ATK explosion on swap after Restricted Area ends.
Advanced Techniques
Animation canceling techniques optimize rotation efficiency by reducing skill deployment time. Manekin's Skill animation can be canceled into Burst activation, while Burst deployment allows immediate swapping for faster passive trigger timing.
Positioning optimization maximizes crowd control effectiveness in both PvP and PvE scenarios. Substat threshold management enables flexible build adaptation without complete artifact replacement—maintaining 180% ER allows temporary Goblet swapping between Elemental DMG% and EM based on team composition requirements.
Future-Proofing Your Manekin Build
Meta Evolution Predictions
Version 6.1+ updates introduce component-sharing systems for Manekin customization, potentially affecting stat scaling or passive mechanics. Luna III (December 2025) may alter Lunar set interactions, while Luna IV (January 2026) could introduce monetization elements affecting build accessibility.
Imaginarium Theater's October 2025 lunar mode expansion requires 32 character rosters, potentially increasing Manekin's endgame relevance despite current Spiral Abyss exclusion. Additional Moonsign advancement options could make Lunar builds more accessible without sacrificing optimization potential.
Flexible Build Strategies
Hybrid artifact combinations (2-piece Emblem + 2-piece Silken) provide adaptation pathways between meta shifts without complete build replacement. This approach maintains ER foundation while adding EM utility—suitable for transitional periods or diverse content requirements.
Weapon flexibility enables build adaptation through equipment swapping rather than artifact replacement. Maintaining both Favonius Sword (ER focus) and Iron Sting (EM focus) allows rapid optimization for different team compositions or content types.
Long-term Investment
Emblem of Severed Fate represents safest long-term investment due to universal application across current and future support characters. The set's ER-to-damage conversion remains relevant regardless of meta shifts, while farming efficiency ensures accessible optimization.
Lunar set investment requires careful consideration of Nod-Krai character availability and team composition preferences. Resource allocation should balance immediate optimization with future flexibility—maintaining artifact reserves for both families to enable rapid adaptation to meta changes.
FAQ
Q: What's the best artifact set for Manekin support build? Emblem of Severed Fate provides universal effectiveness with +75% max Burst damage from ER scaling, while new Lunar sets offer +20% reaction damage with team buffs but require Nod-Krai synergy. Choose Emblem for flexibility or Lunar for specialized Version 6.0+ teams.
Q: How much Energy Recharge does Manekin need for optimal performance? Target 150-200% ER minimum, with 180% as optimal threshold for consistent Burst uptime. Emblem builds benefit from higher ER (200%+ for +50% Burst damage), while Lunar builds can operate at 150% with proper team battery support.
Q: Are the new Lunar support sets better than Emblem of Severed Fate? Lunar sets excel in reaction-heavy teams with +120 EM distribution and +30% CRIT Rate buffs, outperforming Emblem by 15-25% in optimal conditions. However, Emblem remains superior for universal application and solo performance without team restrictions.
Q: Which weapon works best for Manekin flexible support builds? Favonius Sword provides optimal F2P performance with 61.3% ER and particle generation. Premium options include Freedom-Sworn for team buffs or Primordial Jade Cutter for personal scaling. Choose based on team composition and investment priorities.
Q: What team compositions work best with Manekin support? Emblem builds excel with Anemo Manekin + VV shred teams (Manekin/Fischl/Nahida/Bennett). Lunar builds require Nod-Krai characters (Manekin/Lauma/Ineffa/Aino) for Moonsign advancement and optimal set bonus activation.
Q: How do I optimize artifact substats for support builds? Prioritize ER > CRIT > ATK > EM for Emblem builds, targeting 180% ER before CRIT optimization. Lunar builds adjust to ER > EM > CRIT > ATK, maintaining 1:2 CRIT ratio while reaching 300-500 EM for reaction scaling.