

Quick Answer: Layla's your go-to Cryo shielder with a sweet ~130% Energy Recharge target, HP% main stats on Tenacity artifacts, and either Favonius Sword or that surprisingly good Fleuve Cendre Ferryman. Her Day-1 build? It's all about shield strength over flashy damage numbers – perfect for F2P players who want results without breaking the bank.
Layla Character Overview: Role and Strengths
Kit Analysis
Here's what you're working with: Layla's a 4-star Cryo Sword user packing 11,092 HP, 217 ATK, and 655 DEF at Level 90, plus a solid 24.0% HP ascension bonus. Not exactly DPS territory, but that's not the point.
Her Elemental Skill creates this Curtain of Slumber shield – fancy name, practical effect. While it's up, she generates Night Stars every 1.5 seconds. Collect 4 of these bad boys and they transform into homing Shooting Stars that actually deal respectable Cryo damage. The skill runs for 12 seconds with a 12-second cooldown, which means near-permanent uptime if you're paying attention.
The Elemental Burst? It deploys a celestial sphere that fires Starlight Slugs at anything unfortunate enough to be in the AoE. With just a 40 energy cost, 12-second duration, and 12-second cooldown, you've got consistent off-field Cryo application that won't drain your energy economy dry.
Her passive talent increases Shooting Star damage by 1.5% of Max HP. This is why HP investment isn't just about survivability – it actually contributes to her damage output.
Team Role Definition
Layla's got some serious strengths: that low-cost Elemental Burst, exceptionally strong shields, and near-permanent uptime on both her skill and burst effects. But here's the catch – and it's a big one – her Elemental Skill effect ends prematurely if the shield breaks. Shield integrity isn't just about comfort; it's crucial for maintaining that off-field Cryo application.
For players looking to enhance their Genshin Impact experience with reliable top-ups, Blessing of the Welkin Moon buy through BitTopup offers competitive pricing and instant delivery, ensuring you never miss out on daily Primogems while building characters like Layla.
She fills this unique niche as a Cryo shielder – stronger shields than Diona with more consistent off-field damage through her star mechanics. Think of her as the Cryo version of Thoma, but actually good. (Sorry, Thoma mains – I said what I said.)
Day-1 Build Foundations: Stats and Priorities
Primary Stats Priority
Keep it simple: HP% on Sands, Goblet, and Circlet. Maximum shield durability, immediate effectiveness, zero headaches about complex rotations or reaction timing.
HP% directly benefits shield absorption AND increases Shooting Star damage through her passive. It's efficient scaling that works from day one. Advanced players can transition to Cryo DMG goblets and CRIT circlets later, but honestly? HP% Sands should stay regardless of how fancy your build gets.
Substat priority goes: HP% > Energy Recharge > CRIT Rate > CRIT DMG. Target around 130% total Energy Recharge for consistent burst rotation – though C2 constellation changes this math significantly by restoring 1 energy when Shooting Stars connect.
Energy Recharge Requirements: Calculations and Targets
Solo vs Dual Cryo
Running solo Cryo? Stick to that 130% ER baseline. Fleuve Cendre Ferryman gives you 45.9% ER substat plus an additional 16% ER for 5 seconds after using Elemental Skill – basically solving your energy problems with one weapon choice.
Dual Cryo compositions drop your target to 110-120% ER thanks to resonance and particle sharing. The math gets friendlier when you've got a Cryo buddy.
Favonius Sword transforms Layla into a team battery, generating particles on CRIT hits. You'll need to build 20-30% CRIT Rate to trigger it consistently, but the team utility often outweighs the personal performance trade-off.
Elemental Mastery Targets by Team Type
Freeze vs Melt Teams
Freeze compositions? EM's basically worthless since Frozen enemies can't trigger additional reactions. Focus entirely on HP%, ER, and CRIT stats.
Reverse Melt teams offer some value for moderate EM investment (100-150), but HP% typically provides better overall returns due to inconsistent reaction triggering. Layla's not exactly the most reliable Melt enabler.
Pure support builds ignore EM entirely – maximize shield strength and team utility. Most effective approach for Day-1 builds when your artifact selection is... let's call it limited.
Best 4-Star Weapons for Layla
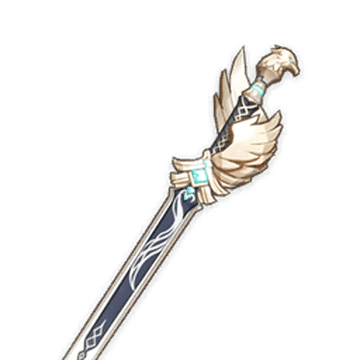
Favonius Sword Analysis
The gold standard 4-star option: 454 base ATK and 61.3% ER substat. The passive generates elemental particles on CRIT hits, benefiting your entire team's energy economy.
You'll need that 20-30% CRIT Rate investment, but turning Layla into a team battery often outweighs the personal damage loss. Especially valuable in energy-hungry teams.
Fleuve Cendre Ferryman Guide
This weapon surprised me. Exceptional F2P option from the Fontaine Fishing Association with 510 base ATK and 45.9% ER substat. The passive increases Elemental Skill CRIT Rate by 8% and ER by 16% for 5 seconds after skill use.
Higher base ATK than Favonius Sword, solid ER, and it excels in both support and sub-DPS configurations. Plus, it's free if you don't mind fishing. (Editor's note: I actually enjoy the fishing in this game – fight me.)
For comprehensive character building and resource management, Genshin Impact top up Welkin + Crystals through BitTopup provides excellent value with secure transactions and 24/7 customer support, helping players maintain consistent progress while optimizing builds like Layla's.
Alternative Options
Harbinger of Dawn (R5) deserves mention as a powerful 3-star alternative. 401 base ATK and 46.9% CRIT DMG substat, with a passive providing 28% CRIT Rate when HP exceeds 90%. Easy to maintain as a shielder.
Pairs exceptionally well with Blizzard Strayer sets – you can potentially reach 80%+ CRIT Rate in Freeze teams. Not bad for a 3-star weapon.
Artifact Sets and Main Stats Guide
Tenacity of Millelith Build
Your Day-1 configuration: 2-piece provides 20% HP increase, 4-piece grants 20% ATK and 30% Shield Strength to party members for 3 seconds when Elemental Skill hits opponents.
Shooting Stars consistently trigger the effect for near-permanent uptime. Main stats stay simple: HP% Sands, HP% Goblet, HP% Circlet.
Alternative Sets
4-piece Noblesse Oblige gives 20% ATK bonus to the team after Elemental Burst, but Tenacity generally provides superior value.
Sub-DPS builds can consider 4-piece Blizzard Strayer in Freeze teams (15% Cryo DMG + up to 40% CRIT Rate) or 4-piece Emblem of Severed Fate (20% ER + up to 75% Burst DMG bonus). But honestly? Start with Tenacity and see how it feels.
Team Compositions and Rotations
Freeze Team Rotations
Sample team: Layla, Ayaka, Mona, Venti.
Rotation: Layla Skill → Layla Burst → Mona Skill/Burst → Venti Skill/Burst → Ayaka combo.
Layla provides Cryo resonance, shield protection, and consistent elemental application for enhanced freeze uptime. Clean, effective, reliable.
Melt Team Setups
Fridge variation: Layla, Hu Tao, Yelan, Xingqiu.
This setup allows Pyro characters to trigger both Melt and Vaporize reactions while benefiting from shield protection during those vulnerable animation windows. Also adapts well to Mono Cryo and Superconduct teams supporting Physical DPS characters.
Talent Priority and Resource Investment
Leveling Order
Elemental Skill > Elemental Burst > Normal Attack.
Skill enhancement directly improves shield strength and Shooting Star damage – your bread and butter. Burst leveling increases Starlight Slug damage. Normal Attack talents? Keep 'em low. Layla rarely performs on-field rotations anyway.
Constellation Value
C1 gives 20% shield absorption increase plus secondary shields for party members. Nice, but not essential.
C2 gets the highest rating for energy restoration when Shooting Stars hit – dramatically reduces ER requirements. This is the game-changer constellation.
C6 provides 40% damage increase for stars plus 20% faster Night Star generation. Luxury territory.
C0 provides excellent F2P value without constellation investment. Don't stress about constellations unless you're already committed to the character.
Common Mistakes and Optimization Tips
Building Pitfalls
Don't prioritize ATK% over HP%. Layla's damage scaling favors HP investment through her passive talent – work with the kit, not against it.
If you're using Favonius Sword, don't neglect CRIT Rate. The weapon requires consistent CRIT hits for that team battery effect to work.
Neglecting ER requirements leads to inconsistent burst uptime. Trust me, it's frustrating.
Efficiency Improvements
Farm the Tenacity domain for multiple characters simultaneously – it also provides Pale Flame for Physical DPS characters. Efficient resin usage.
Consider the artifact strongbox for Noblesse pieces if Tenacity farming proves inefficient.
Optimize Night Star generation by using other characters' skills after deploying the shield – each generates 2 Night Stars instead of the usual 1.
Layla vs Other Cryo Supports Comparison
Versus Diona
Layla offers stronger shields and superior off-field damage. Diona provides healing and cleanse capabilities.
Choose Layla when shield strength matters more than healing. Choose Diona when you need that utility. Diona's C6 EM sharing benefits reaction teams; Layla's consistent application suits Freeze compositions better.
Versus Rosaria
Rosaria excels in sub-DPS roles with higher personal damage and CRIT Rate sharing. Layla provides superior defensive utility.
Rosaria suits aggressive compositions where you want more damage. Layla enables safer gameplay for characters with long animation commitments or low base HP. Different tools for different jobs.
Frequently Asked Questions
What Energy Recharge does Layla need for consistent burst uptime? Target 130% total ER for reliable burst rotation. C2 constellation significantly reduces this requirement due to energy restoration from Shooting Stars hitting enemies.
Which 4-star weapon is best for Layla? Favonius Sword for pure support builds (61.3% ER + team battery effect). Fleuve Cendre Ferryman as an excellent F2P alternative (45.9% ER + higher base ATK).
Should I build EM or HP on Layla? Prioritize HP% for Day-1 builds. HP scales both shield strength and Shooting Star damage through her passive. EM provides minimal value in Freeze teams and inconsistent value elsewhere.
What artifacts should I use for Layla Day-1? 4-piece Tenacity of the Millelith with HP% main stats on Sands, Goblet, and Circlet. Maximizes shield strength while providing team ATK buff through the 4-piece effect.
How do I play Layla in freeze teams? Deploy Skill for shield → Burst for off-field Cryo → swap to Hydro applicators and DPS. Her consistent application maintains Freeze status while the shield provides interruption resistance during rotations.
Is Layla worth investing in for F2P players? Absolutely. She's effective at C0, works with accessible 4-star weapons, and has straightforward HP% artifact requirements. Shield utility and low energy requirements provide immediate impact without extensive resource investment.