

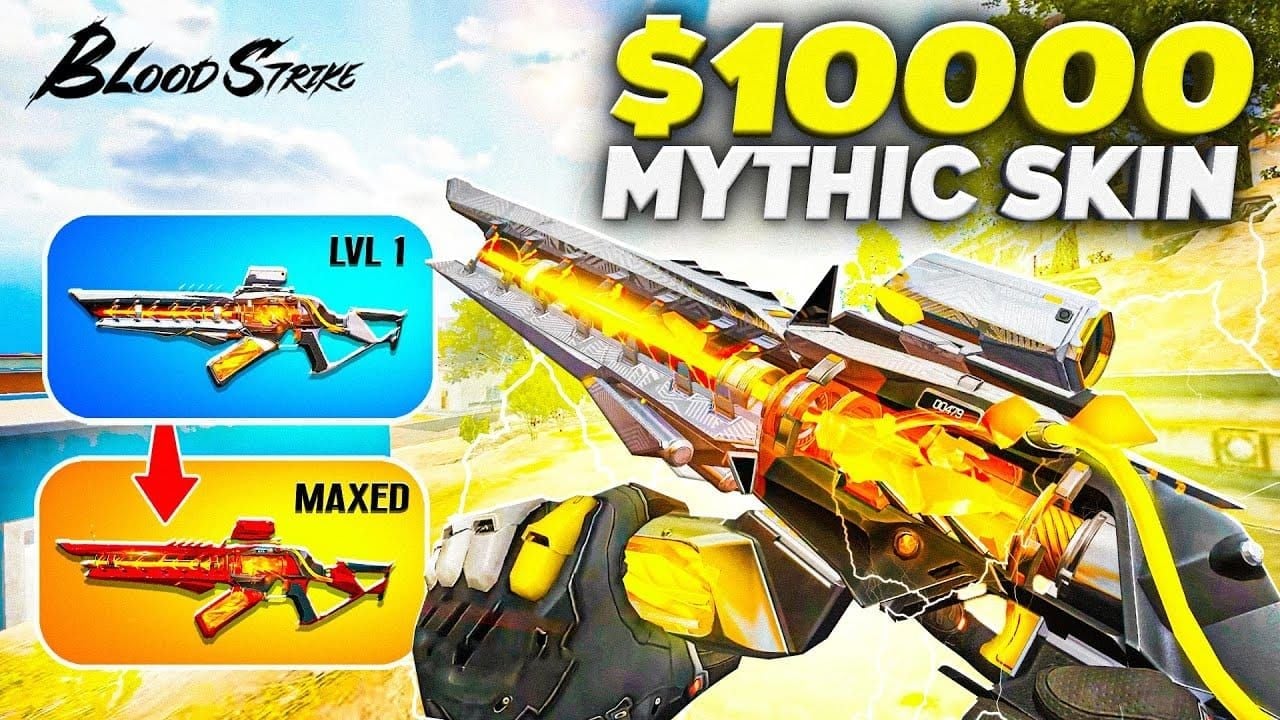
The KAG-6 dominates Blood Strike ranked with 70% pro usage. This guide delivers the exact zero-recoil loadout code, attachment breakdowns, and strategies to maximize performance with this meta-defining SMG.
The Meta-Defining Kag-6 Zero Recoil Loadout Code
The KAG-6 leads competitive Blood Strike—70% of pros use it in ranked. Unlocks at Striker Level 3 with 34 weapon levels of attachments. The zero recoil build transforms base recoil control from 46 to 51 and accuracy from 28 to 38, creating laser-accurate headshots at extended ranges (26-28 headshot damage). Accelerate progression via Blood Strike Gold recharge through BitTopup for instant battle pass access.
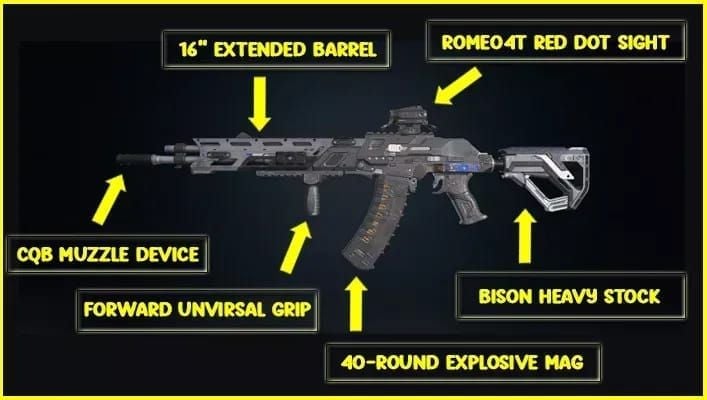
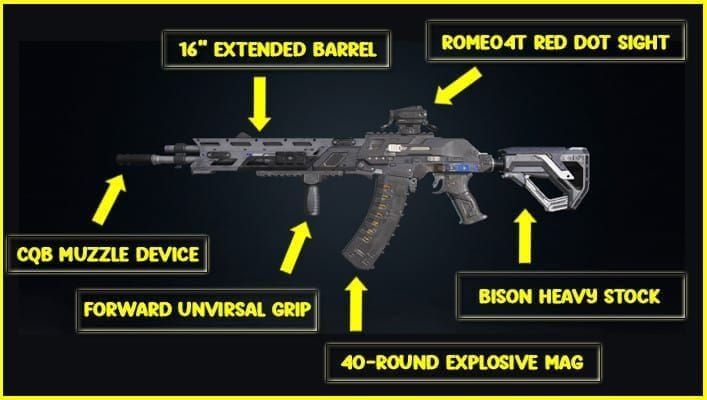
Complete Loadout Code Configuration
Muzzle: CQB Muzzle Device (Level 16) - Reduces vertical recoil, maintains ADS speed
Barrel: 16-inch Extended Barrel (Level 20) - Range 25→30, adds recoil stabilization
Grip: Forward Universal Grip (Level 6) - Eliminates horizontal drift
Optic: Romeo4T Red Dot (Level 34) - Clean sight picture, minimal obstruction
Magazine: 40-Round Explosive (Level 23) - Extended capacity for multi-kills
Mobility drops from 60 to 54 (negligible) while accuracy and control skyrocket. Precision beats movement speed in ranked.
Import and Optimize This Loadout
Access weapon customization menu, equip attachments in sequence. Priority unlock order:
Forward Universal Grip (Level 6) - immediate recoil benefits
CQB Muzzle Device (Level 16) - vertical control
40-Round Explosive (Level 23) - capacity boost
Extended Barrel (Level 20) - range extension
Romeo4T (Level 34) - final optimization
Substitute TI Hunter Reflex Optic (Level 2) until Level 34 without major performance loss.
Why This Build Dominates
Base stats: 18 damage, 63 fire rate, 25 range. Optimized: 30 range with improved accuracy outperforms competing SMGs in the 15-30m zone where most ranked fights occur. Pros favor it because it eliminates SMG weakness—inconsistent medium-range recoil. CQB Muzzle + Forward Grip creates predictable vertical-only recoil requiring simple downward compensation.
Kag-6 Weapon Overview: Why It's the Ranked SMG Choice
The KAG-6 bridges high-fire-rate SMGs and precision ARs. 63 fire rate sits between P90's 78 and slower alternatives—perfect for consistent damage without ammo waste.
Base Statistics
Damage: 18 base, 26-28 headshot
Fire Rate: 63 RPM
Range: 25 base → 30 optimized
Accuracy: 28 base → 38 optimized
Recoil Control: 46 base → 51 optimized
Mobility: 60 base → 54 optimized
Versatile stats: 4-6 shots center mass for kills, fast enough to beat ARs close-range, adequate mid-distance reach.
Competitive Strengths
70% pro usage stems from:
Predictable recoil for consistent headshots
40-round capacity supports multi-kills
Balanced mobility enables positioning adjustments
Forgiving—fire rate + capacity allows error margin
Rewards positioning and pressure over perfect accuracy, ideal for aggressive ranked play.
Optimal Engagement Ranges
Excels 10-30m. Within 10m, P90's 78 fire rate wins. Beyond 30m, damage falloff reduces effectiveness. Peak performance: 15-25m where accuracy bonuses fully manifest at max damage.
Complete Attachment Breakdown
CQB Muzzle Device (Level 16)
Reduces vertical climb without ADS penalties. Targets upward recoil during sustained fire, maintaining sight picture on heads during full-auto. Balanced approach beats flash hiders (minimal recoil help) and compensators (slower ADS).
16-inch Extended Barrel (Level 20)
Range 25→30 (20% boost), extends max damage distance. Minor recoil stabilization from added weight. Mobility reduction minimal—54 vs 60 base (10% decrease). Omit for max speed, but sacrifice meaningful range.
Forward Universal Grip (Level 6)
Eliminates horizontal drift—hardest recoil to compensate manually. Transforms pattern into predictable vertical line. Beats Stubby Vertical Grip in testing. Early Level 6 unlock delivers immediate gains.
Romeo4T Red Dot (Level 34)
Clean sight, minimal obstruction for tracking mobile targets. Red dot precision for headshots without holographic clutter. Use TI Hunter Reflex (Level 2) until Level 34. Red dots optimal for 15-25m zone.
40-Round Explosive Magazine (Level 23)
Capacity 30→40 supports team wipes without reload deaths. Explosive adds equipment/barrier damage. Maintains reasonable handling. 38s continuous fire vs 28s base (35% improvement).
Stat Comparison: Optimized vs Default
Accuracy: 28→38 (35% boost) = tighter groupings beyond 15m
Recoil Control: 46→51 (11% boost) + horizontal stabilization
Range: 25→30 (20% boost) delays damage falloff
Mobility: 60→54 (10% reduction) = acceptable trade-off
Headshot Damage: 26-28 vs base, faster armored kills
Measurable improvements: higher accuracy %, longer effective range, faster TTK.
Kag-6 vs Meta SMGs
Kag-6 vs P90

P90: 78 fire rate, 19-21 chest damage, 60% pro usage. Dominates close-quarters but aggressive recoil. Optimal build: CQB Muzzle (38), Extended Vertical Grip (24), ACRO Reflex (2), UBR Stock (20), 35-Round Mag (3). Higher level requirements.
KAG-6: More versatile across ranges, easier attachment progression, superior stability.
Decision Matrix
Choose KAG-6 when:
Engagements exceed 15m regularly
Mixed-range combat zones
Team lacks mid-range firepower
45%+ headshot accuracy
Choose P90 when:
Close-quarters dominance needed
Tight corridors, limited sightlines
Aggressive rush tactics
Raw fire rate prioritized
Both competitive—selection depends on tactics, not superiority. Pros maintain both, switching per round.
Advanced Gameplay Strategies
Ranked Positioning
Control 15-25m sightlines with cover. Avoid open long-range (AR territory) and extreme tight spaces (high fire rate SMG advantage). Pre-aim head-height along enemy paths, use controllability for sustained tracking vs burst fire.
Movement Techniques
Slide-shooting: Initiate slide→immediate ADS. Zero recoil ensures accuracy during movement.
Jump-peeking: Quick ADS + controllable recoil = safe corner checks. 40-round mag supports extended mobile combat.
Practice in customs before ranked—muscle memory essential.
Counter-Strategies
vs ARs: Force <20m engagements, leverage mobility and fire rate. Use cover aggressively.
vs Snipers: Unpredictable movement, avoid predictable spots. Flank or coordinate pushes. Smoke grenades for advancement.
vs Shotguns: Maintain 10+ meters, backpedal while firing. Zero recoil maintains accuracy during retreat. Avoid confined spaces.
Settings Optimization
Sensitivity
Pros use 400-600 eDPI. Optimal: 1200 mouse DPI × 50-70% in-game = responsive without sacrificing precision. Lower sensitivity benefits medium-range focus for headshot tracking. Test in training for comfortable 180° turns + precise adjustments.
Crosshair Placement
Maintain head-height aim along expected positions. Zero recoil rewards pre-aim—immediate headshot damage without vertical compensation. Practice becomes automatic, dramatically improving first-shot accuracy.
Performance Settings
1280x720 targeting 60+ FPS. Low graphics reduce clutter. Enable directional audio, increase footstep volume. Audio info allows positioning before visual contact.
Faster progression: buy Blood Strike Gold cheap via BitTopup—secure, instant delivery, competitive pricing.
Common Mistakes
Maximum Recoil Reduction Trap
Stacking all recoil attachments sacrifices ADS speed and mobility. Zero recoil build balances control with handling. Beyond thresholds, diminishing returns with meaningful penalties.
ADS Speed Obsession
Lightweight attachments sacrifice accuracy defining KAG-6 advantages. Medium-range focus needs accuracy over speed—sufficient ADS time at 15-25m. Evaluate positioning and pre-aim vs attachment changes.
Progression Delays
Don't wait for full optimization. Competitive with partial build—Forward Grip (6) + CQB Muzzle (16) provide majority benefits. Start ranked at Level 16, use TI Hunter (2) + Stubby Grip (3) temporarily. Accelerates leveling through ranked XP.
Alternative Builds
Aggressive Rush (Max Mobility)
Muzzle: CQB Muzzle Device
Barrel: None (eliminates penalty)
Grip: Forward Universal Grip
Optic: TI Hunter Reflex (2)
Magazine: 40-Round Explosive
Stock: Bison Heavy (if mobility bonus)
58 mobility vs 54 standard. Range reduction acceptable for close-quarters focus.
Defensive Hold (Max Range)
Matches standard zero recoil build—defensive play aligns with medium-range optimization.
Progression Guide
Fastest Path
Levels 1-6: Default config → Forward Grip at 6
Levels 7-16: Add grip → CQB Muzzle at 16
Levels 17-20: Add muzzle → Extended Barrel at 20
Levels 21-23: Add barrel → 40-Round Mag at 23
Levels 24-34: Near-complete → Romeo4T at 34
Use TI Hunter (2) until 34 = 90% effectiveness.
Resource Management
Focus exclusively on KAG-6 for concentrated XP. Battle pass provides bonuses—access premium tiers via BitTopup for accelerated progression with fast delivery and 24/7 support.
Tactical Adjustments
Without Extended Barrel: maintain closer distances. Without Romeo4T: rely more on hipfire close-range. View progression as skill development—mastering partial builds creates fundamental handling skills.
Operator Synergies
Defensive
ETHAN: 400 HP barriers (30s) create fortified 15-20m positions. Eliminate through gaps while protected.
VAL: Satellite Sam (150m radius, 6s intervals, 20s duration) provides info for pre-aim setups.
Aggressive
Mobility abilities enable rapid position changes maintaining 15-25m optimal range. Smoke/flash create advancement opportunities vs long-range threats or separation from close-quarters specialists.
Zone Rotation Strategy
Early Rotation
Rotate 30-40s before zone expiry. Secure 15-25m sightline positions before enemies arrive. Allows ability deployment, pre-aim setup, team coordination. Zero recoil accuracy peaks with proper positioning vs fighting under time pressure.
Position Selection
Evaluate:
15-25m sightlines toward enemy approaches
Cover for repositioning
Multiple angles preventing flanks
Zone center proximity for flexibility
Avoid long-range or extreme close-quarters requirements. Recognize when abandonment beats forcing unfavorable fights.
FAQ
What level needed for complete build?
Level 34 for Romeo4T, but 90% effective at Level 23 with 40-Round Mag using TI Hunter (2) substitute. Core benefits from Forward Grip (6), CQB Muzzle (16), Extended Barrel (20), Magazine (23).
Works in all ranked tiers?
Yes. 70% pro usage proves highest-level viability. Controllability benefits equally valuable for developing players improving accuracy and recoil management.
KAG-6 vs P90 for ranked?
KAG-6: superior accuracy, 30 range, 63 fire rate, 51 recoil control, versatile 15-25m. P90: 78 fire rate, 19-21 chest damage, close-quarters dominance. Both 60-70% pro usage = competitive viability. Choose based on range needs.
Effective with controller?
Zero recoil benefits controllers more—predictable vertical pattern allows simple thumbstick compensation, horizontal stability eliminates hardest aim component. Use 60-80% in-game sensitivity for precision.
Best secondary weapon?
Snipers for long-range or shotguns for extreme close-quarters cover weaknesses. P90 for all-SMG loadouts provides higher fire rate option. Avoid ARs—redundant medium-range coverage.
Update frequency after patches?
Monitor patch notes for KAG-6/attachment changes, update within 24-48h. Current build remained optimal through multiple patches due to fundamental synergies vs temporary exploits. Expect effectiveness unless devs target SMG recoil or KAG-6 directly.