

The HSR 3.8 Phase 2 Light Cone Banner runs January 7-28, 2026, featuring three 4-star light cones: Geniuses' Repose (Erudition), The Moles Welcome You (Destruction), and Post-Op Conversation (Abundance). With hard pity at 80 pulls and soft pity starting at pull 63, knowing which 4-stars deserve superimposition investment maximizes your stellar jade efficiency.
Banner Overview (January 7-28, 2026)
21-day window to secure desired light cones. Features two 5-stars—Long Road Leads Home (Nihility) and Scent Alone Stays True (Abundance)—plus three 4-stars.
Base 5-star rate: 0.8%. First featured 5-star: 75% rate, second: 18.75%, third: 6.25%. For stellar jade resources, HSR Oneiric Shards top up online through BitTopup offers competitive pricing and instant delivery.
Featured 4-Star Light Cones

Geniuses' Repose (Erudition): 24% Break Effect, excels in AoE scenarios
The Moles Welcome You (Destruction): Mischievous stacks increase ATK by 24% each. Base stats at level 80: 1058 HP, 476 ATK, 264 DEF
Post-Op Conversation (Abundance): Supports healing compositions
Each reaches S5 through duplicates or Superimposers, with significant scaling between S1 and S5.
Pity Mechanics
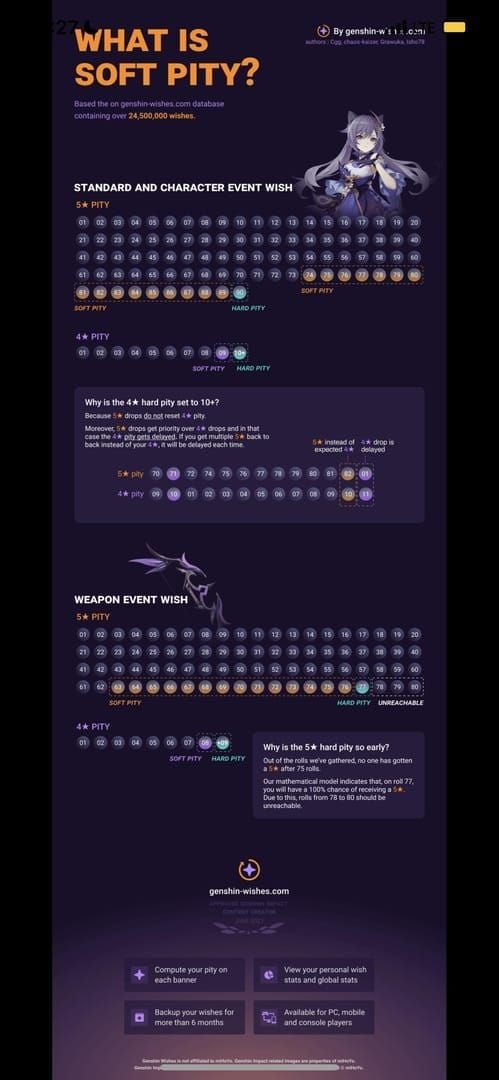
Hard pity: 80 pulls. Soft pity: pull 63 (5-7% chance), escalating to 15-25% at pulls 74-79. Average acquisition: ~63 pulls (10,080 stellar jade). Guaranteed hard pity: 12,800 stellar jade.
Phase 2 provides 25-35 free pulls. S1 to S5 for one light cone requires 320-400 pulls (51,200-64,000 stellar jade).
Understanding Superimposition
Superimposition enhances light cone passives through duplicates. Unlike character eidolons, often provides linear or exponential scaling crucial for endgame.
S1 vs S3 vs S5 Performance
Long Road Leads Home scaling:
S1: 60% Break Effect, 32% Break DMG amplification, 2.475× damage multiplier
S2: 75% Break Effect, 42% Break DMG
S5: 120% Break Effect, 72% Break DMG, 2.795× damage multiplier
12.9% damage increase S1 to S5. Recovers 1 skill point on Skill Weakness Break, generating 2-3 bonus skill points per MoC floor 12 encounter, adding 15,000-22,000 damage per Break cycle.
4-Star Critical Breakpoints
S5 is most significant. Geniuses' Repose S5 reaches ~65% of Long Road Leads Home S1 performance—exceptional value. S5 4-stars require fewer pulls than S1 5-stars, especially with 75% featured rate.
Top 4-Star Superimposition Targets
Tier S: Geniuses' Repose (Erudition)

Premier 4-star option. 24% Break Effect scales impressively. S5 reaches 65% of Long Road Leads Home S1.
Optimal users:
AoE damage dealers with Break Effect scaling
Characters with frequent Skill usage in multi-target scenarios
Weakness Break-focused teams
Universal Erudition path applicability ensures long-term value. Highest-priority 4-star for players lacking 5-star Erudition options.
Tier A: The Moles Welcome You (Destruction)
Competitive ATK scaling via Mischievous stacks (24% ATK each). Level 80 base stats: 1058 HP, 476 ATK, 264 DEF.
Excels in sustained combat where stack accumulation maximizes. MoC multi-wave encounters allow full stack optimization, substantial damage amplification over extended rotations.
Tier B: Post-Op Conversation (Abundance)
Niche healing compositions, faces competition from free alternatives. Abundance characters prioritize utility over damage, making investment lower priority.
Consider only if:
Already have optimal DPS light cones
Running healer-dependent Apocalyptic Shadow strategies
Lacking any Abundance path alternatives
Path-Specific Analysis
Erudition: AoE Damage
Geniuses' Repose dominates 4-star Erudition. Break Effect synergy aligns with current Weakness Break meta. Paired with AoE characters, passive effects activate consistently.
Pure Fiction: S5 enables competitive clear times approaching 5-star alternatives. 24% Break Effect valuable with Break Effect-scaling kits and relic sets.
Destruction: DPS Optimization
The Moles Welcome You provides straightforward ATK scaling. Mischievous stacks reward aggressive play, max stacks achievable in 2-3 rotations.
Competitive with battle pass Destruction options at S3, superior at S5. 24% ATK per stack multiplies with Harmony support buffs for multiplicative scaling.
Abundance: Healer Considerations
Post-Op Conversation fulfills basic requirements but rarely optimal investment. Free alternatives from events and Herta's Store often sufficient, reserving jade for DPS investments.
Relevant for healer-centric Apocalyptic Shadow phases or specialized MoC compositions requiring sustained healing.
Character Compatibility
Erudition Synergies
Geniuses' Repose pairs with characters featuring:
Inherent Break Effect scaling
AoE Skill damage as primary source
Frequent Skill usage patterns
24% Break Effect stacks multiplicatively with traces and relics, pushing total Break Effect into optimal ranges. MoC floor 12: faster shield depletion, increased Break window uptime.
Destruction Pairings
The Moles Welcome You excels with characters who:
Maintain consistent field time for stacks
Scale effectively with ATK%
Participate in extended rotations
Stack system rewards rapid animations and low Skill point consumption. Combined with ATK%-scaling ultimates, accumulated stacks amplify burst windows significantly.
Endgame Performance Testing
Memory of Chaos Floor 12
Long Road Leads Home S1: 2-3 bonus skill points per encounter, 15,000-22,000 damage per Break cycle. S5: ~19,000-28,000 damage per cycle.
Geniuses' Repose S5: ~65% of these values (12,000-18,000 damage per Break cycle)—competitive for rarity tier.
Pure Fiction
AoE-focused scoring favors Erudition. Geniuses' Repose S5 enables score thresholds previously requiring 5-stars.
24% Break Effect multiplicative with bonus objectives, accelerating shield depletion. Players report 8,000-12,000 point improvements upgrading S1 to S5 in Break-focused teams.
4-Star vs 5-Star Gaps
Performance gap: 25-40%, depending on content and synergy. Geniuses' Repose achieving 65% of Long Road S1 represents upper end of 4-star viability.
For budget management, S5 4-stars often provide better roster-wide value than single S1 5-stars, especially considering 320-400 pull requirement for 5-star S5.
Pull Strategy Framework
F2P Decision Tree
Lack viable light cone for primary DPS? Consider targeted pulls for featured 4-stars matching DPS path
Can reach S5 within budget? Calculate required pulls (150-250 for S5 4-star) against available resources
Banner features multiple useful 4-stars? Multi-target value improves ROI
Upcoming character banners higher priority? Character acquisition typically greater progression
For most F2P, question 4 dictates decisions. Stellar jade scarcity demands prioritizing character roster expansion, with exceptions for complete rosters lacking light cone coverage.
Need additional resources? Buy HSR Oneiric Shards instant recharge through BitTopup's secure platform with 24/7 support.
Low-Spender Optimization
With monthly Express Supply Pass:
Allocate 30-40% monthly jade to light cone banners when featured 4-stars provide multi-character value
Target S3 as optimal breakpoint, balancing performance against expenditure
Avoid chasing S5 unless within 20-30 pulls to prevent sunk cost fallacy
Prioritize universal light cones for roster flexibility
Monthly jade from Pass (~8,000-10,000) supports strategic investments without compromising character participation.
Stellar Jade Budget: 60/30/10 Framework
60% character banners: New characters = most significant progression
30% light cone banners: Targeted pulls during high-value 4-star rotations
10% emergency reserve: Flexibility for unexpected opportunities
Phase 2's 25-35 free pulls enable S3 acquisition for priority 4-stars without depleting reserves.
Common Mistakes
Myth: Always Pull for S5
Most pervasive misconception. S5 provides optimal performance, but resource investment (200-300 pulls) rarely justifies incremental gains over S3.
S3 achieves 75-85% of S5 effectiveness. S3-to-S5 investment often exceeds cost of new character. Roster diversity frequently outweighs marginal improvements.
Myth: 4-Stars Always Worse Than 5-Stars
Geniuses' Repose S5 reaching 65% of Long Road S1 contradicts this. Accounting for acquisition costs, fully superimposed 4-stars often provide superior value per jade versus single-copy 5-stars.
Critical factor: matching effects to character kits. Perfectly synergized 4-star S5 frequently outperforms mismatched 5-star S1.
Myth: Light Cone Banner Shares Pity with Character Banner
Completely independent pity systems. Light Cone Event Warp pulls don't contribute to character pity, and vice versa. Separate tracking: soft pity at pull 63 for light cones, hard pity at 80 (versus 90 for characters).
Requires separate jade budgeting for each banner type.
Alternative Sources
Battle Pass vs Banner 4-Stars
Battle pass provides guaranteed acquisition with predetermined superimposition timelines. Compare:
Acquisition certainty: Battle pass guarantees versus banner RNG
Superimposition timeline: Battle pass S5 over 5 months versus banner's immediate but resource-intensive
Path coverage: Battle pass rotates paths, potentially filling gaps efficiently
Consistent battle pass purchases often outweigh banner gambling when banner 4-stars don't align with immediate needs.
Oneiric Shard Exchange
Shards from duplicate 4-star pulls enable targeted Herta's Store acquisitions. Optimal strategy:
Complete near-finished levels (S4 to S5)
Acquire universal light cones with broad compatibility
Fill critical path gaps
Avoid exchanging for S1 niche copies. Reserve for completing high-priority levels or securing universal options.
Herta's Store and Forgotten Hall
Rotating 4-star selections purchasable with Forgotten Hall currency and shards. Deterministic acquisition bypassing banner RNG.
Monthly reset generates currency for ~1-2 purchases per version, enabling gradual superimposition without jade expenditure. Prioritize store purchases matching primary DPS characters.
Resource Management
Expected Value Calculations
Average 5-star: ~63 pulls (10,080 jade). Targeting specific 4-stars involves complexity due to shared pool.
Each 10-pull guarantees one 4-star, but featured rate means S5 typically needs 150-250 pulls (24,000-40,000 jade).
Smart Pull Limits
Set limits before engaging to prevent emotional decisions:
After securing S1: Evaluate whether additional superimposition justifies continued investment
Upon reaching 60 pulls without desired acquisitions: Approaching soft pity increases 5-star risk
When achieving S3: Diminishing returns beyond S3 rarely justify continued pulling
Recognize sunk cost fallacy. Previous pulls don't obligate continued investment; each additional pull should justify itself.
Future Banner Preparation
Banner rotations: ~every 21 days, 4-6 cycles per major version.
Maintain 12,800 jade emergency reserve for unexpected high-value banners. Combined with 60/30/10 framework, provides flexibility without compromising progression.
FAQ
Which 4-stars are featured in Phase 2?
Geniuses' Repose (Erudition), The Moles Welcome You (Destruction), Post-Op Conversation (Abundance). January 7-28, 2026.
What's the light cone pity system?
80-pull hard pity. Soft pity: pull 63 (5-7% chance), escalating to 15-25% at pulls 74-79. Base 5-star rate: 0.8%. First featured: 75%, second: 18.75%, third: 6.25%.
How much does superimposition improve 4-stars?
Geniuses' Repose S5 reaches ~65% of Long Road S1. Generally, S3 achieves 75-85% of S5 effectiveness—optimal breakpoint for resource-conscious players.
Should F2P pull on light cone banners?
Prioritize character banners for roster expansion. Pull on light cones only when lacking viable options for primary DPS and when featured 4-stars provide multi-character value. Use 60/30/10 jade allocation.
Does light cone pity share with character pity?
No. Completely independent systems. Light Cone Event Warp pulls don't contribute to character pity. Requires separate jade budgeting.
How many jades for guaranteed light cone?
Hard pity: 80 pulls (12,800 jade). Average: ~63 pulls (10,080 jade). S5 for specific 4-star: 24,000-40,000 jade across 150-250 pulls.
Ready to optimize Phase 2 pulls? Secure stellar jade through BitTopup's trusted platform—instant delivery, competitive pricing, 24/7 support for all Honkai Star Rail recharge needs!